2008 MERCEDES-BENZ CLS COUPE air condition
[x] Cancel search: air conditionPage 6 of 329
31, 2, 3 ...
7G–TRONIC . . . . . . . . . . . . . . . . . . . . . 106 A
ABS (Anti-lock Braking System)
. . . . . 57
Display message . . . . . . . . . . 221, 231
Warning lamp . . . . . . . . . . . . . . . . . 244
Acceleration
Technical data . . . . . . . . . . . . . . . . 303
Accident
Notes . . . . . . . . . . . . . . . . . . . . . . . 252
Active Service System
see ASSYST PLUS
ADAPTIVE BRAKE . . . . . . . . . . . . . . . . . 60
Adaptive brake lamps . . . . . . . . . . . . . 58
Adaptive damping system see ADS
ADS . . . . . . . . . . . . . . . . . . . . . . . . . . . 147
Airbag Activation . . . . . . . . . . . . . . . . . . . . . 43
Control unit . . . . . . . . . . . . . . . . . . . 43
Driver's . . . . . . . . . . . . . . . . . . . . . . . 46
Front . . . . . . . . . . . . . . . . . . . . . . . . 46
Front passenger . . . . . . . . . . . . . . . . 46
PASSENGER AIRBAG OFF warning
lamp . . . . . . . . . . . . . . . . . . . . . . . 242
Sidebags . . . . . . . . . . . . . . . . . . . . . 47
System . . . . . . . . . . . . . . . . . . . . . . . 45
Windowbags . . . . . . . . . . . . . . . . . . . 48 Air cleaner
Display message
. . . . . . . . . . . . . . 236
Air conditioning
2-zone Thermatic . . . . . . . . . . . . . . 153
4-zone Thermotronic . . . . . . . . . . . 155
Activating/deactivating air-recir-
culation mode . . . . . . . . . . . . . . . . 164
Activating/deactivating auxiliary
heating/ventilation . . . . . . . . . . . . 165
Air-recirculation mode with con-
venience opening/closing feature . 165
Auxiliary heating/ventilation . . . . . 166
Controlling automatically . . . . . . . . 159
Cooling with air dehumidification . . 158
Demisting the windscreen . . . . . . . 163
Malfunction indicator lamp . . . . . . 242
Misted up windows . . . . . . . . . . . . 164
Rear compartment . . . . . . . . . . . . . 158
Rear window heating . . . . . . . . . . . 164
Setting the air distribution . . . . . . . 162
Setting the airflow . . . . . . . . . . . . . 163
Setting the air vents . . . . . . . . . . . . 160
Setting the temperature . . . . . . . . . 159
Setting the temperature (rear
compartment) . . . . . . . . . . . . . . . . 160
see Climate control
Air-conditioning
Activating/deactivating . . . . . . . . . 158
Airmatic DC (Dual Control) . . . . . . . . 146
Air pump, electric . . . . . . . . . . . . . . . 217 Ambient lighting
Setting (on-board computer) . . . . . 126
Antifreeze concentration . . . . . . . . . 317
Anti-lock braking system see ABS
Anti-theft alarm system
see ATA
Anti-theft systems . . . . . . . . . . . . . . . . 61
Ashtray . . . . . . . . . . . . . . . . . . . . . . . . 181
ASSYST PLUS . . . . . . . . . . . . . . . . . . . 209
ATA (anti-theft alarm system) . . . . . . 61
Switching off the alarm . . . . . . . . . . 61
Audible warning signal . . . . . . . . . . . 251
AUTO lights Display message . . . . . . . . . . . . . . 233
Automatic car wash . . . . . . . . . . . . . 211
Automatic transmission
Changing gear yourself . . . . . . . . . 105
Display in the speedometer . . . . . . 105
Display message . . . . . . . . . . . . . . 223
Driving tips . . . . . . . . . . . . . . . . . . . 107
Emergency running mode . . . . . . . 257
Malfunction . . . . . . . . . . . . . . . . . . 257
One-touch gearshifting . . . . . . . . . 105
Program selector button . . . . . . . . 106
Releasing the parking lock man-
ually . . . . . . . . . . . . . . . . . . . . . . . . 268
Selector lever positions . . . . . . . . . 104
Shift ranges . . . . . . . . . . . . . . . . . . 106 Index
219_AKB; 2; 4, en-GB
mkalafa,
2007-11-13T09:28:36+01:00 - Seite 3
Page 11 of 329

8
Head restraint
Adjusting (front) . . . . . . . . . . . . . 76, 77
Adjusting (rear) . . . . . . . . . . . . . . . . 78
Luxury . . . . . . . . . . . . . . . . . . . . 76, 77
NECK-PRO . . . . . . . . . . . . . . . . . . . . 49
Resetting triggered head
restraints . . . . . . . . . . . . . . . . . . . . 269
Heating
see Air conditioning
High-pressure cleaners . . . . . . . . . . . 211
HOLD . . . . . . . . . . . . . . . . . . . . . . . . . . 144
Display message . . . . . . . . . . . . . . 226 I
Immobiliser
. . . . . . . . . . . . . . . . . . . . . 61
Indicator and warning lamp Brakes (red) . . . . . . . . . . . . . . . . . . 245
Coolant . . . . . . . . . . . . . . . . . . . . . 246
Distronic (red) . . . . . . . . . . . . 138, 245
Engine diagnostic . . . . . . . . . . . . . . 247
ESP ®
. . . . . . . . . . . . . . . . . . . . 59, 244
LIM . . . . . . . . . . . . . . . . . . . . . . . . . 133
PASSENGER AIRBAG OFF . . . . 51, 242
Reserve fuel . . . . . . . . . . . . . . . . . . 250
Seat belt . . . . . . . . . . . . . . . . . . . . . 249
SRS . . . . . . . . . . . . . . . . . . . . . 43, 248
Tyre pressure monitor . . . . . . . . . . 248
Indicator and warning lamps . . . . . . 244 Indicator lamp
see Indicator and warning lamp
Instrument cluster . . . . . . . . . . . . . . 109
Overview . . . . . . . . . . . . . . . . . . . . . 26
Selecting the language (on-board
computer) . . . . . . . . . . . . . . . . . . . 123
Instrument lighting . . . . . . . . . . . . . . 110
Interior lighting . . . . . . . . . . . . . . . . . . 96
Ambient (on-board computer) . . . . 126
Automatic control . . . . . . . . . . . . . . 96
Delayed switch-off (on-board
computer) . . . . . . . . . . . . . . . . . . . 126
Manual control . . . . . . . . . . . . . . . . . 96
Reading lamp . . . . . . . . . . . . . . . . . . 96
Interior motion sensor . . . . . . . . . . . . 62
ISOFIX child seat securing system . . 55 J
Jack Operation
. . . . . . . . . . . . . . . . . . . . 283
Storage location . . . . . . . . . . . . . . . 217
Jump-starting . . . . . . . . . . . . . . . . . . . 291
Jump leads . . . . . . . . . . . . . . . . . . . 291 K
Key
. . . . . . . . . . . . . . . . . . . . . . . . . . . . 66
Changing the battery . . . . . . . . . . . 270
Checking the battery . . . . . . . . . . . 270
Convenience closing . . . . . . . . . . . 101 Display message
. . . . . . . . . . . . . . 238
Factory setting . . . . . . . . . . . . . . 66, 67
Loss . . . . . . . . . . . . . . . . . . . . . . . . 261
Malfunction . . . . . . . . . . . . . . . . . . 261
Modifying the programming . . . . . . . 66
KEYLESS GO . . . . . . . . . . . . . . . . . . . . . 67
Button . . . . . . . . . . . . . . . . . . . . . . . 74
Changing the battery . . . . . . . . . . . 270
Checking the battery . . . . . . . . . . . 270
Closing the boot lid automatically . . 73
Convenience closing . . . . . . . . . . . 101
Factory settings . . . . . . . . . . . . . . . . 68
Losing the key . . . . . . . . . . . . . . . . 264
Malfunction . . . . . . . . . . . . . . . . . . 263
Modifying the programming . . . . . . . 68
Starting the engine . . . . . . . . . . . . 102
Key positions
Key . . . . . . . . . . . . . . . . . . . . . . . . . . 74
KEYLESS GO . . . . . . . . . . . . . . . . . . 74
Kickdown . . . . . . . . . . . . . . . . . . 107, 109 L
Lamps see Indicator and warning lamp
Language
Selecting (on-board computer) . . . 123
Licence plate lighting
Display message . . . . . . . . . . . . . . 235
Lighting
see Lights Index
219_AKB; 2; 4, en-GB
mkalafa,
2007-11-13T09:28:36+01:00 - Seite 8
Page 49 of 329
Occupant safety
46 tem on a suitable seat in the rear. If you
secure a forward-facing child restraint
system to the front-passenger seat, you
must move the front-passenger seat as
far back as possible.
R Make sure there are no heavy or sharp-
edged objects in pockets of clothing.
R Do
not lean forwards, e.g. over the cover
of the driver's front airbag, particularly
when the vehicle is in motion.
R Do not put your feet on the dashboard.
R Only hold the steering wheel by the rim.
This allows the airbag to inflate fully. You
could be injured if the airbag is deployed
and you are holding the inside of the
steering wheel.
R Do not lean on the doors from inside the
vehicle.
R Make sure that there are no people, ani-
mals or objects between the vehicle
occupants and the area of deployment of
the airbag.
R Do not place any objects between the
seat backrest and the door. R
Do not hang any hard objects, for exam-
ple
coat hangers, on the grab handles or
coat hooks.
R Do not attach accessories, e.g. cup hold-
ers, to the doors.
It is not possible to rule out the risk of inju-
ries caused by an airbag due to the high
speed at which the airbag is required to
deploy. G
Risk of injury
The airbag's functionality can only be guar-
anteed if the following parts are not cov-
ered and no badges or stickers are
attached to them:
R Padded steering wheel boss
R Front-passenger front airbag cover
R Outer side of front seats
R Rear door trims G
Risk of injury
When an airbag deploys, a small amount of
powder
is released. The powder may cause
short-term breathing difficulties to persons
suffering from asthma or other pulmonary
conditions. In order to prevent possible breathing dif-
ficulties you should leave the vehicle as
soon
as it is safe to do so. You can also open
the window to allow fresh air to enter the
interior. The powder does not constitute a
health hazard and does not indicate that
there is a fire in the vehicle. G
Risk of injury
The airbag parts are hot after the airbag has
been deployed. Do not touch them, other-
wise you may burn yourself.
Occupants
are not protected by the airbags
in the event of another accident. Have the
airbags checked at a qualified specialist
workshop.
Front airbags
The front airbags are designed to increase
protection for the driver's and front-
passenger head and chest. Safety
219_AKB; 2; 4, en-GB
mkalafa,
2007-11-13T09:28:36+01:00 - Seite 46
Page 68 of 329

65
Opening and closing
...........................66
Key positions ....................................... 74
Seats .................................................... 75
Steering wheel .................................... 81
Mirrors ................................................. 83
Memory functions* ............................. 86
Seat belts ............................................. 88
Lights ................................................... 91
Windscreen wipers .............................97
Side windows ...................................... 98Driving and parking ..........................
101
Transmission ..................................... 104
Instrument cluster ............................109
On-board computer ..........................111
Driving systems ................................ 132
Air conditioning ................................. 151
Sliding sunroof .................................. 169
Loading and stowing ........................172
Features ............................................. 180 Controls
219_AKB; 2; 4, en-GB
mkalafa,
2007-11-13T09:28:36+01:00 - Seite 65
Page 78 of 329
Seats
75Seats
Depending on the vehicle's equipment, seat
adjustments can be made either manually/
electrically or electrically*. G
Risk of injury
The seats can still be adjusted when there
is no key in the ignition lock. For this rea-
son, children should never be left unsuper-
vised in the vehicle. They could become
trapped by a seat adjustment movement. G
Risk of accident
Only adjust the driver's seat when the vehi-
cle is stationary. You will otherwise be dis-
tracted from the road and traffic conditions
and you could lose control of the vehicle as
a result of the seat moving. This could
cause an accident. G
Risk of injury
Make sure that nobody can become trap-
ped as you adjust the seat.
Observe the notes concerning the airbag
system.
Secure children as recommended; see the
"Children in the vehicle" section. !
When you move the seats, make sure that
there are no objects in the footwell or
behind the seats. Otherwise, you could
damage the seats and the objects.
i The head restraints in the front seats are
fitted with the NECK-PRO system
(Y page 49). For this reason, it is not pos-
sible to remove the head restraints from
the front seats.
For design reasons, the rear-compartment
head restraints cannot be removed.
Please contact a Mercedes-Benz Service
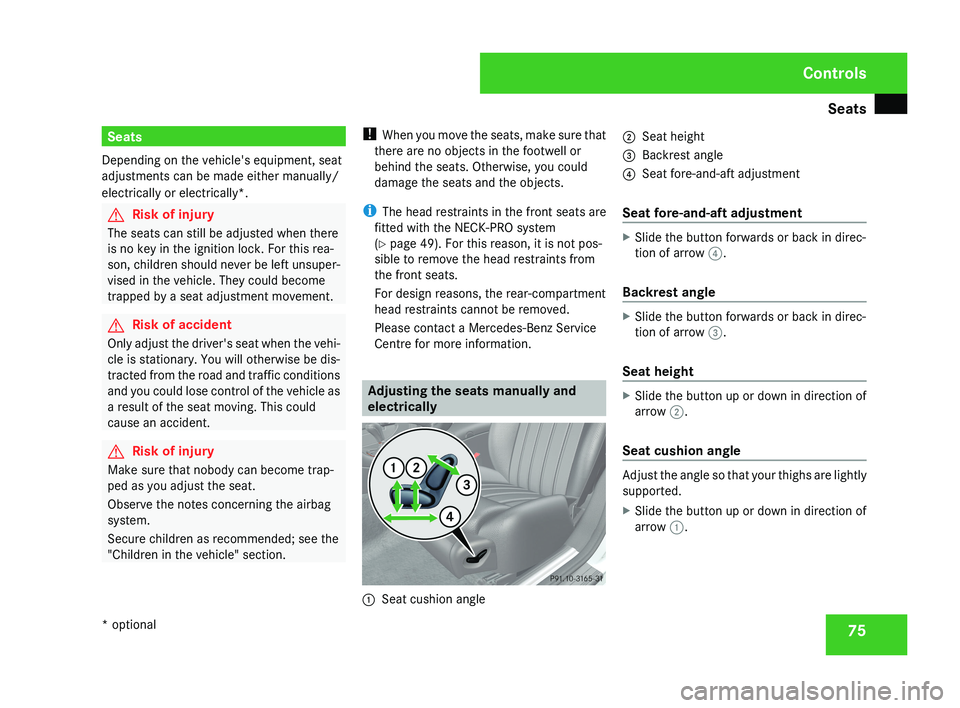
Centre for more information. Adjusting the seats manually and
electrically1
Seat cushion angle 2
Seat height
3 Backrest angle
4 Seat fore-and-aft adjustment
Seat fore-and-aft adjustment
X Slide the button forwards or back in direc-
tion of arrow 4.
Backrest angle
X Slide the button forwards or back in direc-
tion of arrow 3.
Seat height
X Slide the button up or down in direction of
arrow 2.
Seat cushion angle
Adjust the angle so that your thighs are lightly
supported.
X Slide the button up or down in direction of
arrow 1.
Controls
* optional
219_AKB; 2; 4, en-GB
mkalafa,
2007-11-13T09:28:36+01:00 - Seite 75
Page 94 of 329
Lights
91a result of the seat moving. This could
cause an accident.
G
Risk of accident
Only adjust the steering wheel when the
vehicle is stationary and do not pull away
until the steering wheel adjustment mech-
anism is locked in position. You might oth-
erwise drive without the steering wheel
adjustment mechanism being locked in
position.
As a result you could be distracted
from road and traffic conditions by an unex-
pected movement of the steering wheel
and thereby cause an accident.
However, the steerability of the vehicle is
not affected.
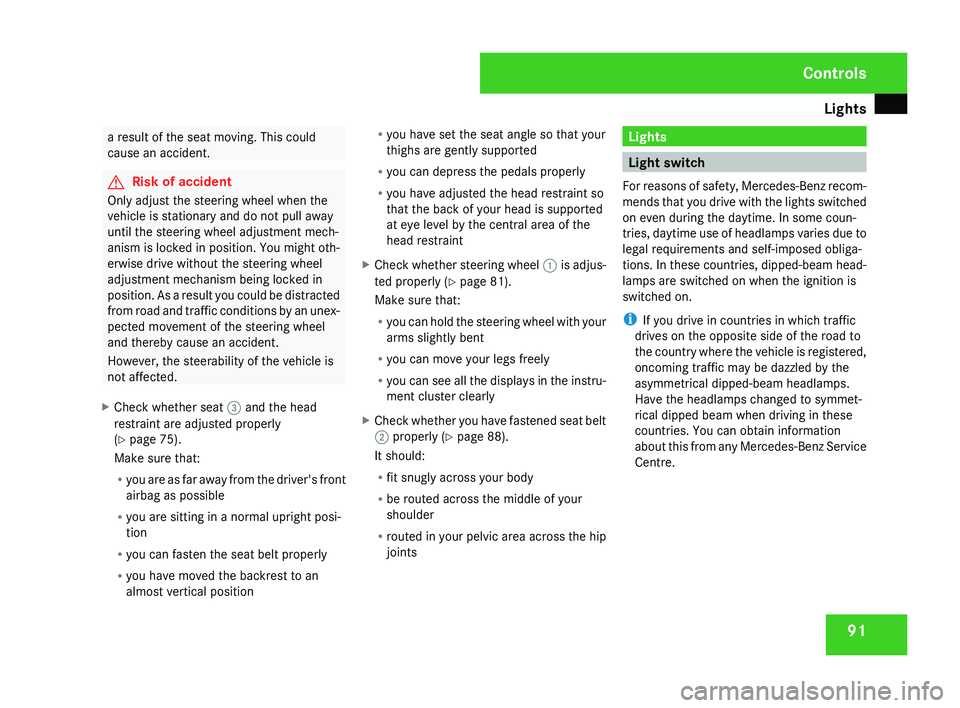
X Check whether seat 3 and the head
restraint are adjusted properly
(Y page 75).
Make sure that:
R
you
are as far away from the driver's front
airbag as possible
R you are sitting in a normal upright posi-
tion
R you can fasten the seat belt properly
R you have moved the backrest to an
almost vertical position R
you have set the seat angle so that your
thighs are gently supported
R you can depress the pedals properly
R you have adjusted the head restraint so
that the back of your head is supported
at eye level by the central area of the
head restraint
X Check whether steering wheel 1
is adjus-
ted properly (Y page 81).
Make sure that:
R you can hold the steering wheel with your
arms slightly bent
R you can move your legs freely
R you can see all the displays in the instru-
ment cluster clearly
X Check whether you have fastened seat belt
2 properly
(Y page 88).
It should:
R fit snugly across your body
R be routed across the middle of your
shoulder
R routed in your pelvic area across the hip
joints Lights
Light switch
For
reasons of safety, Mercedes-Benz recom-
mends that you drive with the lights switched
on even during the daytime. In some coun-
tries, daytime use of headlamps varies due to
legal requirements and self-imposed obliga-
tions. In these countries, dipped-beam head-
lamps are switched on when the ignition is
switched on.
i If you drive in countries in which traffic
drives on the opposite side of the road to
the country where the vehicle is registered,
oncoming traffic may be dazzled by the
asymmetrical dipped-beam headlamps.
Have the headlamps changed to symmet-
rical dipped beam when driving in these
countries. You can obtain information
about this from any Mercedes-Benz Service
Centre. Controls
219_AKB; 2; 4, en-GB
mkalafa,
2007-11-13T09:28:36+01:00 - Seite 91
Page 135 of 329
Driving systems
132
X
Press the s button to call up the most
recently dialled number in the redial mem-
ory.
X Press the j or k button to select the
desired name or number.
X Press the s button to start dialling. Driving systems
Your vehicle's driving systems are described
on the following pages:
R Cruise
control, Distronic* and Speedtronic,
which you can use to control the speed of
the vehicle
R HOLD, which makes pulling away easier,
particularly on steep uphill gradients
R Vehicle level setting and Airmatic DC*,
which can be used to adjust your vehicle's
chassis
R Parktronic*, which assists you in parking
and manoeuvring
The ABS, BAS, adaptive brake lights, ESP ®
,
EBV (electronic brake-power distribution) and
ADAPTIVE BRAKE driving safety systems are
described in the "Driving safety systems" sec-
tion (Y page 57). Cruise control
Cruise control maintains a constant road
speed
for you. It brakes automatically in order
to avoid exceeding the set speed. On long and
steep downhill gradients, especially if the
vehicle is laden, you must select shift range
1, 2 or 3 in good time. In this way you will
make use of the braking effect of the engine,
which relieves the load on the brake system
and prevents the brakes from overheating
and wearing too quickly. G
Risk of accident
Do not change down for additional engine
braking on a slippery road surface. This
could cause the drive wheels to lose their
grip and the vehicle could skid.
Use
cruise control only if road and traffic con-
ditions make it appropriate to maintain a
steady speed for a prolonged period. You can
store any road speed above 30 km/h. G
Risk of accident
Cruise control
cannot take account of road
and traffic conditions.
Always pay attention to traffic conditions
even when cruise control is activated. Controls
* optional
219_AKB; 2; 4, en-GB
mkalafa,
2007-11-13T09:28:36+01:00 - Seite 132
Page 139 of 329
Driving systems
136 R
when changing to a lane with faster mov-
ing traffic
R in complex driving situations or where
the lanes are diverted, e.g. in motorway
roadworks
Distronic cannot take account of weather
conditions. Deactivate, or do not activate,
Distronic:
R if the roads are slippery, snow-covered or
icy. The wheels could lose their grip
under braking or acceleration. The vehi-
cle could start to skid.
R if the sensors are dirty or there is poor
visibility, e.g. due to snow, rain or fog.
Distance control may be impaired.
Always pay attention to traffic conditions
even when Distronic is activated. You may
not otherwise recognise dangers in time,
could cause an accident and injure yourself
and others.
If there is no vehicle in front, Distronic oper-
ates in the same way as cruise control. Dis-
tronic functions in the 30 km/h to 180 km/
h range. G
Risk of accident
Distronic brakes your vehicle at a maximum
of 2 m/s 2
depending on its speed. This cor-
responds to approximately 20% of your
vehicle's maximum braking power. You
must also apply the brakes yourself if this
braking power is not sufficient to avoid a
collision.
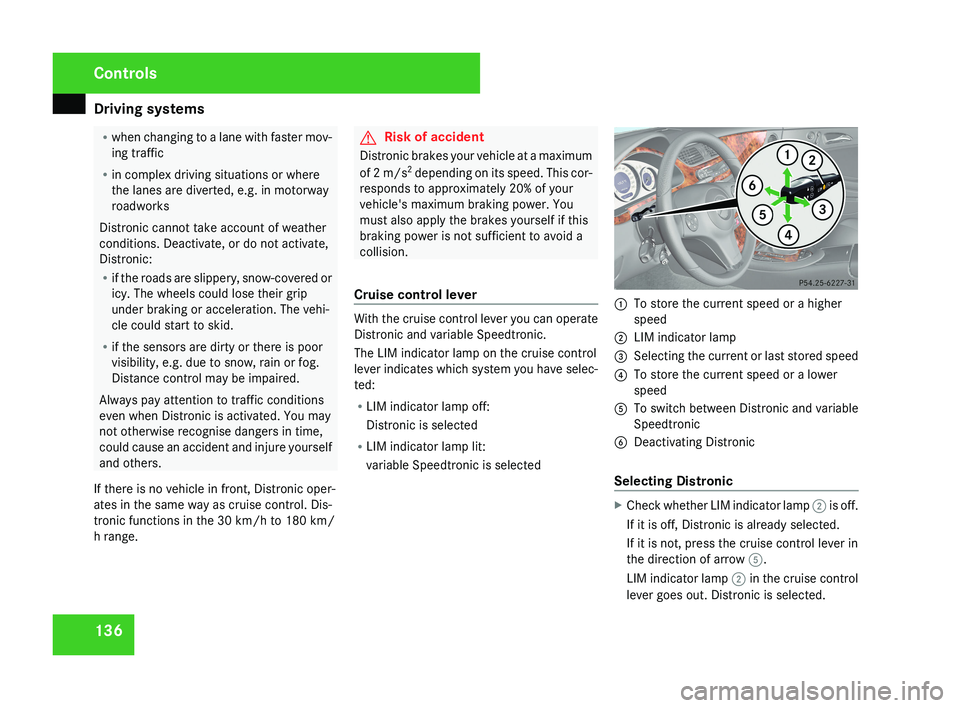
Cruise control lever With the cruise control lever you can operate
Distronic and variable Speedtronic.
The LIM indicator lamp on the cruise control
lever indicates which system you have selec-
ted:
R
LIM indicator lamp off:
Distronic is selected
R LIM indicator lamp lit:
variable Speedtronic is selected 1
To store the current speed or a higher
speed
2 LIM indicator lamp
3 Selecting the current or last stored speed
4 To store the current speed or a lower
speed
5 To switch between Distronic and variable
Speedtronic
6 Deactivating Distronic
Selecting Distronic X
Check whether LIM indicator lamp 2 is off.
If it is off, Distronic is already selected.
If it is not, press the cruise control lever in
the direction of arrow 5.
LIM indicator lamp 2 in the cruise control
lever goes out. Distronic is selected. Controls
219_AKB; 2; 4, en-GB
mkalafa,
2007-11-13T09:28:36+01:00 - Seite 136