Page 79 of 329

Seats
76
Head restraint height G
Risk of injury
Make sure that the central area of the head
restraint supports the back of your head at
about eye level. You could seriously injure
your neck if your head is not correctly sup-
ported by the head restraint in the event of
an accident. Never travel without a cor-
rectly adjusted and engaged head restraint. 1
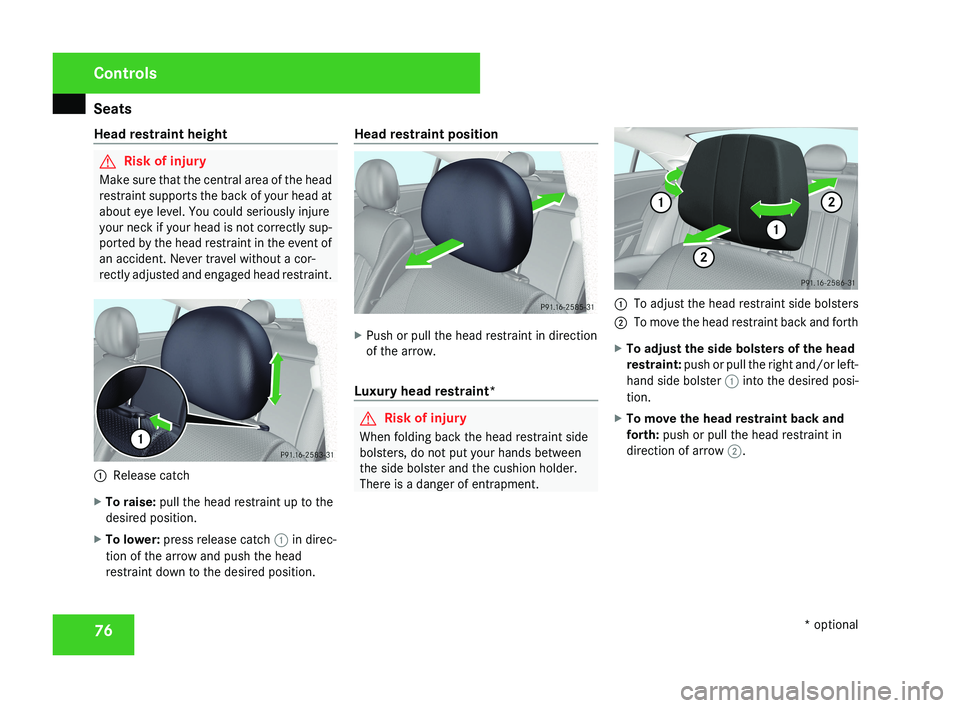
Release catch
X To raise: pull the head restraint up to the
desired position.
X To lower: press release catch 1 in direc-
tion of the arrow and push the head
restraint down to the desired position. Head restraint position
X
Push or pull the head restraint in direction
of the arrow.
Luxury head restraint* G
Risk of injury
When folding back the head restraint side
bolsters, do not put your hands between
the side bolster and the cushion holder.
There is a danger of entrapment. 1
To adjust the head restraint side bolsters
2 To move the head restraint back and forth
X To adjust the side bolsters of the head
restraint: push or pull the right and/or left-
hand side bolster 1 into the desired posi-
tion.
X To move the head restraint back and
forth: push or pull the head restraint in
direction of arrow 2. Controls
* optional
219_AKB; 2; 4, en-GB
mkalafa,
2007-11-13T09:28:36+01:00 - Seite 76
Page 80 of 329

Seats
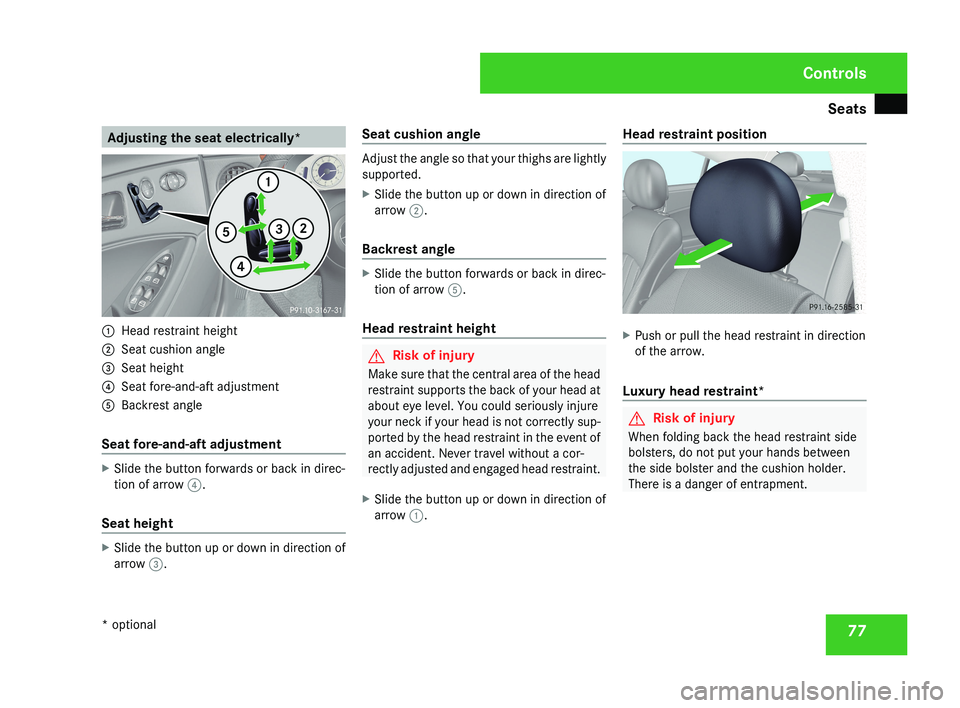
77Adjusting the seat electrically*1
Head restraint height
2 Seat cushion angle
3 Seat height
4 Seat fore-and-aft adjustment
5 Backrest angle
Seat fore-and-aft adjustment
X Slide the button forwards or back in direc-
tion of arrow 4.
Seat height
X Slide the button up or down in direction of
arrow 3. Seat cushion angle
Adjust the angle so that your thighs are lightly
supported.
X
Slide the button up or down in direction of
arrow 2.
Backrest angle
X Slide the button forwards or back in direc-
tion of arrow 5.
Head restraint height
G Risk of injury
Make sure that the central area of the head
restraint supports the back of your head at
about eye level. You could seriously injure
your neck if your head is not correctly sup-
ported by the head restraint in the event of
an accident. Never travel without a cor-
rectly adjusted and engaged head restraint.
X Slide the button up or down in direction of
arrow 1. Head restraint position
X
Push or pull the head restraint in direction
of the arrow.
Luxury head restraint*
G Risk of injury
When folding back the head restraint side
bolsters, do not put your hands between
the side bolster and the cushion holder.
There is a danger of entrapment.
Controls
* optional
219_AKB; 2; 4, en-GB
mkalafa,
2007-11-13T09:28:36+01:00 - Seite 77
Page 81 of 329
Seats
781
To adjust the head restraint side bolsters
2 To move the head restraint back and forth
X To adjust the side bolsters of the head
restraint: push or pull right-hand and/or
left-hand side bolster 1 into the desired
position.
X To move the head restraint back and
forth: push or pull the head restraint in
direction of arrow 2.
Lumbar support
The lumbar support for the driver's seat can
be adjusted to provide optimum support for
your back.
1 Adjustment lever
X Move adjustment lever 1 in the direction
of the arrow until the desired backrest con-
tour is achieved.
Rear seat head restraints
G Risk of injury
On a seat which is occupied, move the head
restraint into the upright position. This
reduces the risk of injury to the passenger
in the event of an accident.
Folding up the head restraints
X Pull the head restraint in the direction of
the arrow until it engages.
Controls
219_AKB; 2; 4, en-GB
mkalafa,
2007-11-13T09:28:36+01:00 - Seite 78
Page 82 of 329

Seats
79
Folding back the head restraints from
the front
1
Button for folding back the rear seat head
restraints
X Make sure that the key is in position 2 in
the ignition lock.
X Press button 1. Multi-contour seat*
You can set the contour of the seat to provide
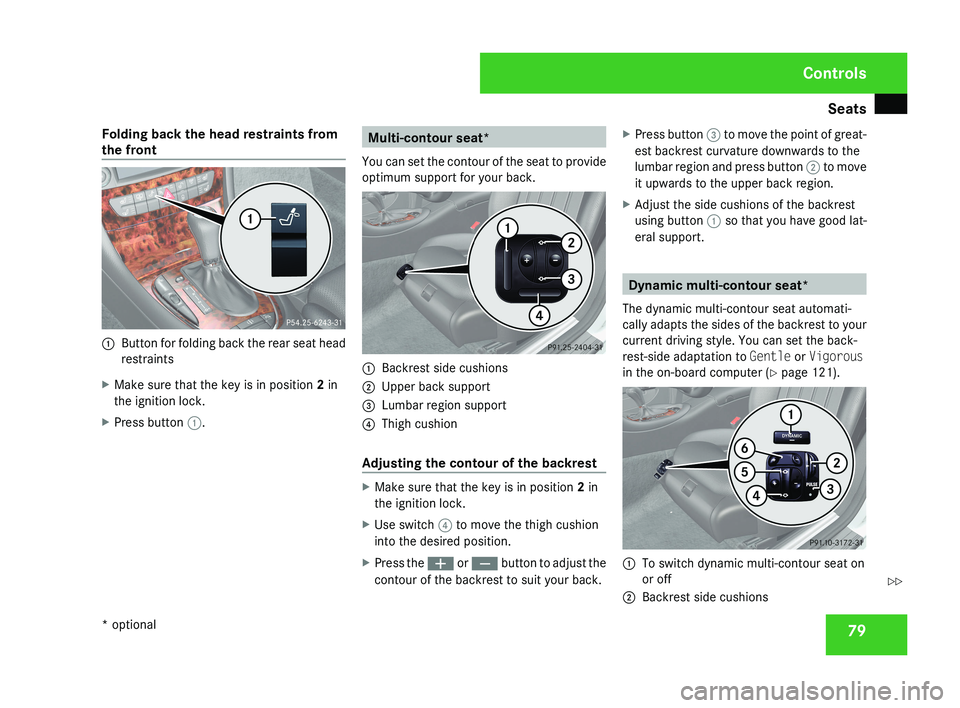
optimum support for your back. 1
Backrest side cushions
2 Upper back support
3 Lumbar region support
4 Thigh cushion
Adjusting the contour of the backrest X
Make sure that the key is in position 2 in
the ignition lock.
X Use switch 4 to move the thigh cushion
into the desired position.
X Press the æ or ç button to adjust the
contour of the backrest to suit your back. X
Press button 3 to move the point of great-
est backrest curvature downwards to the
lumbar region and press button 2 to move
it upwards to the upper back region.
X Adjust the side cushions of the backrest
using button 1 so that you have good lat-
eral support. Dynamic multi-contour seat*
The dynamic multi-contour seat automati-
cally adapts the sides of the backrest to your
current driving style. You can set the back-
rest-side adaptation to Gentle or Vigorous
in the on-board computer (Y page 121). 1
To switch dynamic multi-contour seat on
or off
2 Backrest side cushions Controls
* optional
219_AKB; 2; 4, en-GB
mkalafa,
2007-11-13T09:28:36+01:00 - Seite 79 Z