2008 MERCEDES-BENZ CLS COUPE air condition
[x] Cancel search: air conditionPage 169 of 329
Air conditioning
166
i
The auxiliary heating/ventilation is auto-
matically deactivated after about 30
minutes, or when:
R the ignition is switched on
R the battery voltage drops Auxiliary heating/ventilation*
G
Risk of poisoning
Exhaust fumes are produced when the aux-
iliary heating is in operation. Inhaling these
exhaust fumes can be poisonous. You
should therefore switch off the auxiliary
heating in confined spaces without an
extraction system, e.g. a garage. G
Risk of fire
When operating the auxiliary heating, parts
of the vehicle may become very hot, and
highly inflammable material such as fuels
could be ignited. Operating the auxiliary
heating is thus prohibited at filling stations
or when your vehicle is being refuelled. You
must therefore switch off the auxiliary heat-
ing at filling stations.
The auxiliary heating heats the air in the vehi-
cle interior to a temperature between 20 °C and 24 °C without using the heat of the run-
ning engine. The auxiliary heating is operated
using fuel directly from the vehicle's fuel tank.
For this reason, the tank content must be at
least at reserve fuel level to ensure that the
auxiliary heating functions.
The auxiliary heating/ventilation automati-
cally adjusts to changes in temperature and
weather conditions. For this reason, the aux-
iliary heating could automatically switch over
from ventilation mode to heating mode or
from heating mode to ventilation mode.
You cannot use the auxiliary ventilation to
cool the vehicle interior to a temperature
lower than the outside temperature.
Before activating
X
Set the temperature to a value between
20 † and 24 †.
The auxiliary heating/ventilation can be acti-
vated even when the air conditioning is being
controlled manually. Optimum comfort can
be attained when the system is set to auto-
matic mode. Set the desired temperature
within this range. If a higher temperature is
set, the vehicle is heated to 24 †. If a lower
temperature is set, the vehicle is heated to
20 †. Activating or deactivating the auxiliary
heating/ventilation The auxiliary heating/ventilation can be acti-
vated or deactivated via the remote control
or the button on the centre console.
The on-board computer can be used to spec-
ify up to three departure times, one of which
may be preselected (
Y page 128).
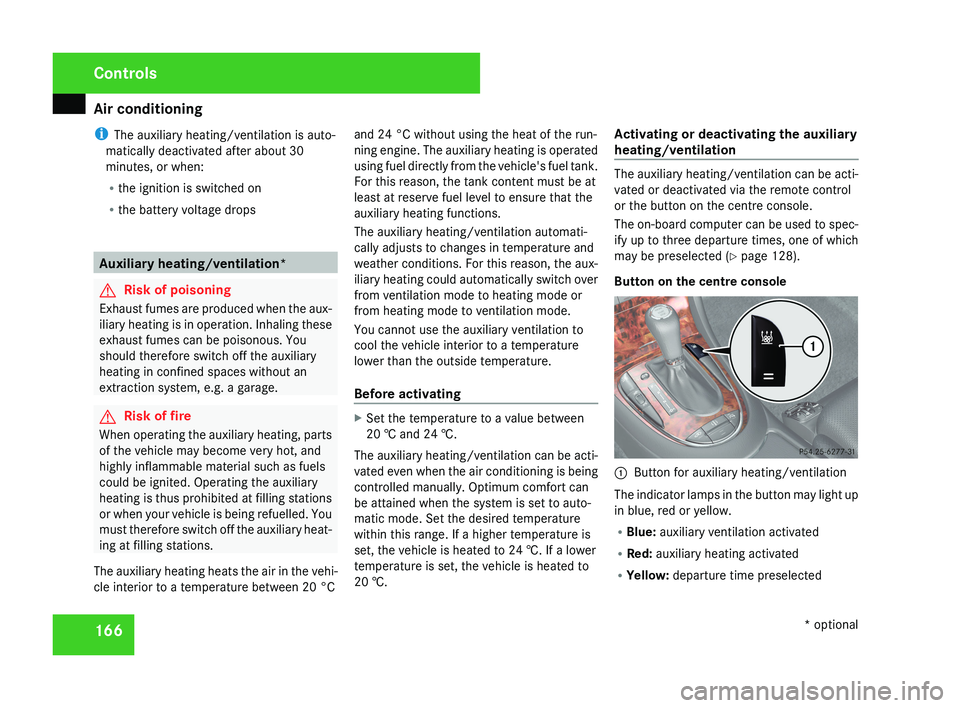
Button on the centre console 1
Button for auxiliary heating/ventilation
The indicator lamps in the button may light up
in blue, red or yellow.
R Blue: auxiliary ventilation activated
R Red: auxiliary heating activated
R Yellow: departure time preselected Controls
* optional
219_AKB; 2; 4, en-GB
mkalafa,
2007-11-13T09:28:36+01:00 - Seite 166
Page 170 of 329
Air conditioning
167
Activating the auxiliary heating/ventila-
tion
If the key is in position 1 or 2:
X
Press and hold button 1 for at least two
seconds.
The red or blue indicator lamp in the button
lights up.
If the key is removed or in position 0:
X Briefly press button 1.
The red or blue indicator lamp in the button
lights up.
Deactivating the auxiliary heating/venti-
lation
X Briefly press button 1.
The red or blue indicator lamp in the button
goes out.
Remote control
Your vehicle comes with one remote control.
You may use two additional remote controls
for your vehicle. For further information, con-
sult a qualified specialist workshop, e.g. a
Mercedes-Benz Service Centre. The remote control has a maximum range of
approximately 300 metres. This range may be
reduced by:
R
sources of radio interference
R solid objects between the remote control
and the vehicle
R the remote control being in an unfavoura-
ble position in relation to the vehicle
R transmitting from an enclosed space
i The optimum range can be achieved if you
hold the remote control vertically, pointing
upwards when you press one of the but-
tons.
i A battery symbol appears in the display
when the batteries in the remote control
are low. Replace the remote control bat-
teries (Y page 270).
i More information about the auxiliary
heating can be found in the "Practical
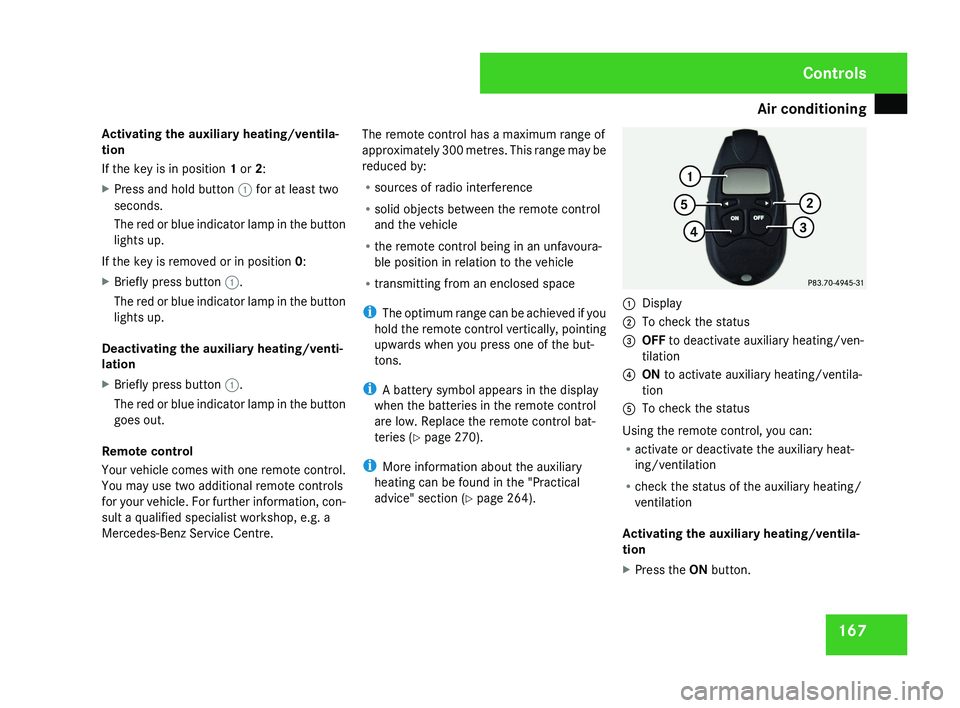
advice" section ( Y page 264).1
Display
2 To check the status
3 OFF to deactivate auxiliary heating/ven-
tilation
4 ON to activate auxiliary heating/ventila-
tion
5 To check the status
Using the remote control, you can:
R activate or deactivate the auxiliary heat-
ing/ventilation
R check the status of the auxiliary heating/
ventilation
Activating the auxiliary heating/ventila-
tion
X Press the ON button.
Controls
219_AKB; 2; 4, en-GB
mkalafa,
2007-11-13T09:28:36+01:00 - Seite 167
Page 171 of 329
Air conditioning
168
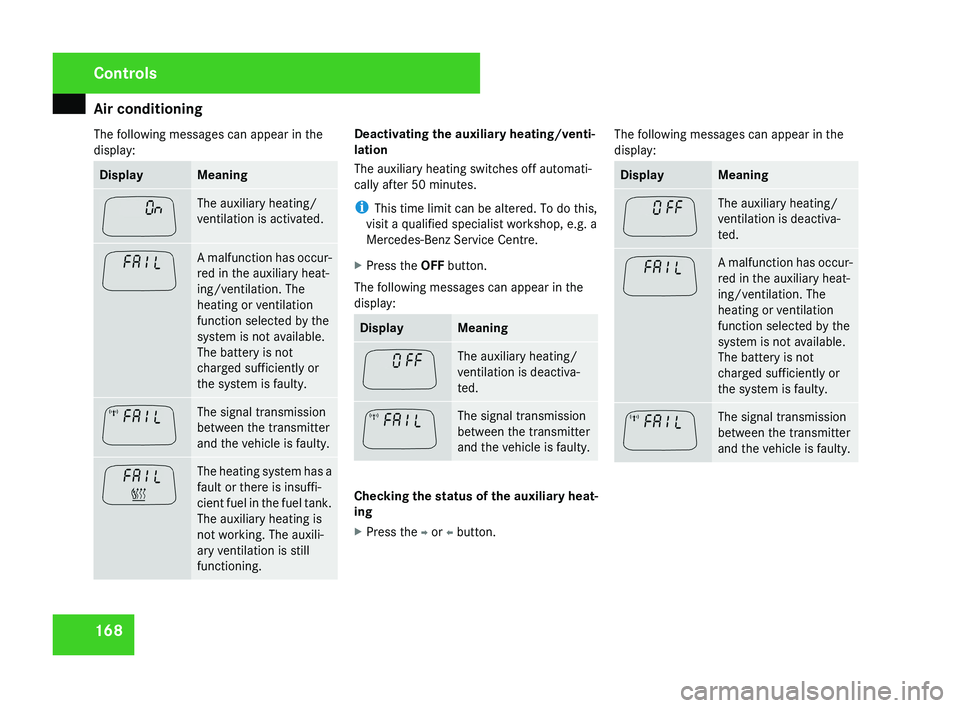
The following messages can appear in the
display: Display Meaning
The auxiliary heating/
ventilation is activated.
A malfunction has occur-
red in the auxiliary heat-
ing/ventilation. The
heating or ventilation
function selected by the
system is not available.
The battery is not
charged sufficiently or
the system is faulty.
The signal transmission
between the transmitter
and the vehicle is faulty.
The heating system has a
fault or there is insuffi-
cient fuel in the fuel tank.
The auxiliary heating is
not working. The auxili-
ary ventilation is still
functioning. Deactivating the auxiliary heating/venti-
lation
The auxiliary heating switches off automati-
cally after 50 minutes.
i
This time limit can be altered. To do this,
visit a qualified specialist workshop, e.g. a
Mercedes-Benz Service Centre.
X Press the OFF button.
The following messages can appear in the
display: Display Meaning
The auxiliary heating/
ventilation is deactiva-
ted.
The signal transmission
between the transmitter
and the vehicle is faulty.
Checking the status of the auxiliary heat-
ing
X
Press the p or o button. The following messages can appear in the
display: Display Meaning
The auxiliary heating/
ventilation is deactiva-
ted.
A malfunction has occur-
red in the auxiliary heat-
ing/ventilation. The
heating or ventilation
function selected by the
system is not available.
The battery is not
charged sufficiently or
the system is faulty.
The signal transmission
between the transmitter
and the vehicle is faulty.Controls
219_AKB; 2; 4, en-GB
mkalafa,
2007-11-13T09:28:36+01:00 - Seite 168
Page 183 of 329
Features
180 Features
Sun visors
G
Risk of accident
Keep the mirrors in the sun visors covered
while driving. You could otherwise be daz-
zled by bright lights, impairing your view of
traffic conditions. As a result you could
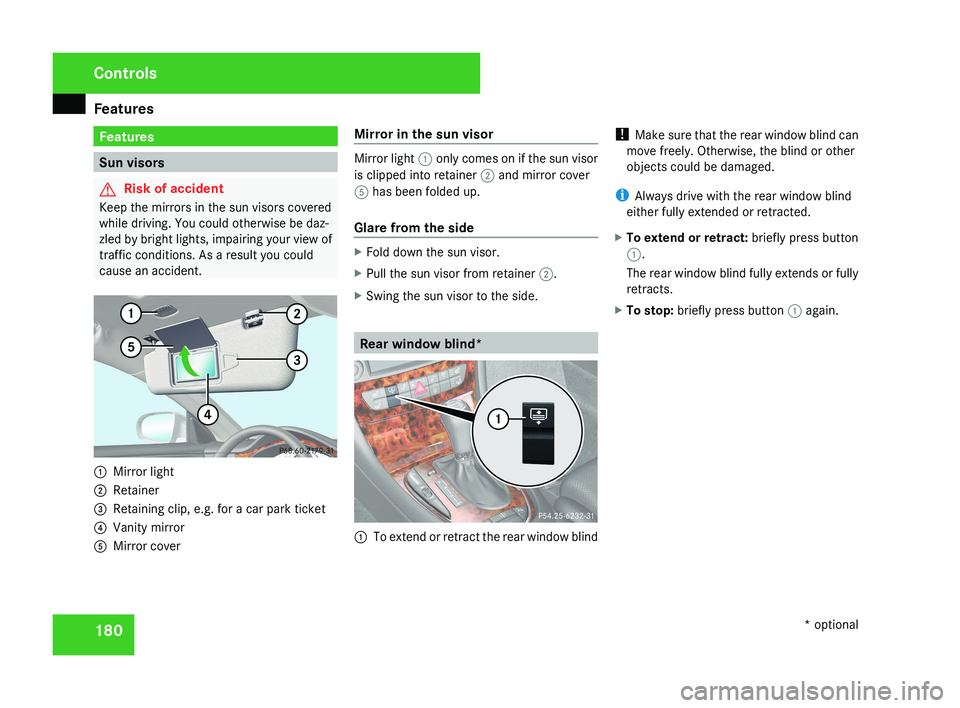
cause an accident.1 Mirror light
2 Retainer
3 Retaining clip, e.g. for a car park ticket
4 Vanity mirror
5 Mirror cover Mirror in the sun visor
Mirror light
1 only comes on if the sun visor
is clipped into retainer 2 and mirror cover
5 has been folded up.
Glare from the side
X Fold down the sun visor.
X Pull the sun visor from retainer 2.
X Swing the sun visor to the side.
Rear window blind*
1 To extend or retract the rear window blind !
Make sure that the rear window blind can
move freely. Otherwise, the blind or other
objects could be damaged.
i Always drive with the rear window blind
either fully extended or retracted.
X To extend or retract: briefly press button
1.
The rear window blind fully extends or fully
retracts.
X To stop: briefly press button 1 again.
Controls
* optional
219_AKB; 2; 4, en-GB
mkalafa,
2007-11-13T09:28:36+01:00 - Seite 180
Page 202 of 329

Tyres and wheels
199
Notes on regularly inspecting wheels
and tyres R
Regularly check the wheels and tyres of
your
vehicle for damage (e.g. cuts, punctu-
res, tears, bumps on tyres and deforma-
tion, cracks or severe corrosion on wheels),
at least every 14 days, as well as after off-
road trips or after travelling on rough roads.
Damaged wheels could cause a loss of tyre
pressure.
R Regularly check the tyre tread depth and
the condition of the tread across the whole
width of the tyre (Y page 200). If neces-
sary, turn the front wheels to full lock in
order to inspect the inner side of the tyre
surface.
R All wheels must have a valve cap to protect
the valve against dirt and moisture.
R Regularly check the pressure of all your
tyres (including the spare tyre*), particu-
larly prior to long trips, and correct the
pressure as necessary ( Y page 200).
Notes on driving R
While driving, pay attention to vibrations,
noises and unusual handling characteris- tics, e.g. pulling to one side. This may indi-
cate
that the wheels or tyres are damaged.
If you suspect that a tyre is defective,
reduce your speed and stop the vehicle as
soon as possible to check the wheels and
tyres for damage. Hidden tyre damage
could also be causing the unusual handling
characteristics. If you find no signs of dam-
age, have the wheels and tyres inspected
at a specialist workshop, for example at a
Mercedes-Benz Service Centre.
R When parking your vehicle, make sure that
the tyres do not get deformed by the kerb
or other obstacles. If it is necessary to drive
over kerbs, speed humps or similar, try to
do so slowly and at an obtuse angle. Oth-
erwise, the tyres, particularly the sidewalls,
could get damaged. Direction of rotation
Direction of rotation Tyres with a specified direction of rotation
have
additional benefits, e.g. if there is a risk
of aquaplaning. You will only gain these ben-
efits if the correct direction of rotation is
observed.
An arrow on the sidewall of the tyre indicates
its correct direction of rotation.
i You may fit a spare tyre* against the
direction of rotation. MOExtended run-flat system*
The MOExtended run-flat system allows you
to
continue driving the vehicle even when one
or more tyres lose all air pressure.
The MOExtended run-flat system may only be
used in conjunction with the tyre pressure
loss warning system or the tyre pressure
monitor* and on wheels specifically tested by
Mercedes-Benz.
i Vehicles with MOExtended run-flat sys-
tem are not equipped with the TIREFIT
kit* 25
.
25 Only for certain countries Operation
* optional
219_AKB; 2; 4, en-GB
mkalafa,
2007-11-13T09:28:36+01:00 - Seite 199 Z
Page 203 of 329

Tyres and wheels
200It is therefore recommended to additionally
equip your vehicle with the TIREFIT kit*
when fitting tyres that do not feature run-
flat properties, e.g. winter tyres.
i A TIREFIT kit*
is available from any quali-
fied specialist workshop, e.g. a Mercedes-
Benz Service Centre.
You will find notes on driving with a flat tyre
in the "Practical advice" section
(Y page 287). Tyre tread
G
Risk of accident
Bear in mind that:
R tyre grip decreases rapidly on wet roads
when
the tread depth is less than 3 mm.
You should thus replace tyres that have
insufficient tread.
R winter tyres should be replaced when the
tread depth is 4 mm or less because oth-
erwise they no longer provide adequate
grip.
R the tread on a tyre may not wear evenly.
You should thus regularly check the tread
depth and the condition of the tread across the entire width of all tyres. If nec-
essary, turn the steering wheel so that
you can see the tyre tread more easily.
You could otherwise lose control of the
vehicle and cause an accident due to the
reduced grip of the tyres on the road. Tyre pressures
G
Risk of accident
Tyre pressure that is either too high or too
low has a negative effect on the vehicle’s
active
safety, which could lead you to cause
an accident. You should therefore regularly
check the pressure of all your tyres (includ-
ing the spare tyre*), particularly prior to
long trips, and correct the pressure as nec-
essary.
To test tyre pressure, use a suitable pressure
gauge. The outer appearance of a tyre does
not permit any reliable conclusion about the
tyre pressure. On vehicles fitted with the elec-
tronic tyre pressure monitor*, the tyre pres-
sure can be checked in the on-board com-
puter.
If the vehicle is to be heavily laden or driven
at high speeds, the tyre pressure must be adapted according to the specifications given
in the fuel filler flap
(Y page 190).
Use the highest specified tyre pressure for
the spare wheel*. G
Risk of accident
Should the tyre pressure drop repeatedly:
R Check the tyre for foreign bodies.
R Check whether the wheel is losing air or
the valve is leaking.
Tyre
pressure that is too low has a negative
effect on the vehicle’s active safety, which
could lead to your causing an accident.
Tyre pressure changes by approximately
0.1 bar for every 10 °C change in ambient
temperature.
If you measure the tyre pressure in enclosed
spaces where the temperature differs from
the outside temperature, you will have to cor-
rect the measured value accordingly.
When the vehicle is driven, the tyre tempera-
ture, and with it the tyre pressure, will
increase depending on the road speed and
the load on the tyres.
Therefore, you should only correct tyre pres-
sures when the tyres are cold. Operation
* optional
219_AKB; 2; 4, en-GB
mkalafa,
2007-11-13T09:28:36+01:00 - Seite 200
Page 229 of 329
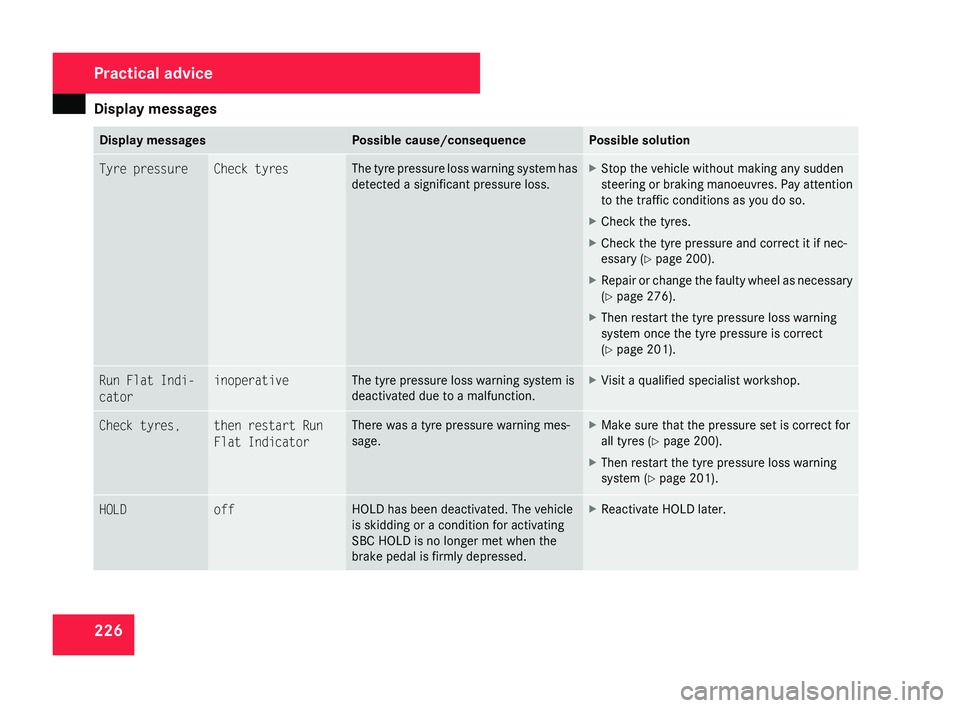
Display messages
226 Display messages Possible cause/consequence Possible solution
Tyre pressure Check tyres The tyre pressure loss warning system has
detected a significant pressure loss. X
Stop the vehicle without making any sudden
steering
or braking manoeuvres. Pay attention
to the traffic conditions as you do so.
X Check the tyres.
X Check the tyre pressure and correct it if nec-
essary ( Y page 200).
X Repair or change the faulty wheel as necessary
(Y page 276).
X Then restart the tyre pressure loss warning
system once the tyre pressure is correct
(Y page 201). Run Flat Indi-
cator inoperative The tyre pressure loss warning system is
deactivated due to a malfunction. X
Visit a qualified specialist workshop. Check tyres, then restart Run
Flat Indicator There was a tyre pressure warning mes-
sage. X
Make sure that the pressure set is correct for
all tyres
(Y page 200).
X Then restart the tyre pressure loss warning
system (Y page 201). HOLD off HOLD has been deactivated. The vehicle
is skidding or a condition for activating
SBC HOLD is no longer met when the
brake pedal is firmly depressed. X
Reactivate HOLD later. Practical advice
219_AKB; 2; 4, en-GB
mkalafa,
2007-11-13T09:28:36+01:00 - Seite 226
Page 240 of 329

Display messages
237Display messages Possible cause/consequence Possible solution
N Check engine oil
level when next
refuelling The engine oil level has dropped to a crit-
ical level. X
Check the engine oil level (Y page 195) and top
up the engine oil if necessary.
X Have the engine checked for leaks if the engine
oil needs topping up more often than usual. ± Display malfunc-
tion Consult work-
shop One or more electronic systems are
unable to deliver information to the on-
board computer. The following systems
may have failed:
R
Coolant temperature gauge
R Rev counter
R Cruise control or Speedtronic display X
Visit a qualified specialist workshop. H Tyre pressure Cau-
tion Tyre defect One or more tyres are losing air rapidly.
The affected wheel is highlighted in the
tyre pressure display of the tyre pressure
monitor*. X
Stop the vehicle without making any sudden
steering
or braking manoeuvres. Pay attention
to the traffic conditions as you do so.
X Repair or change the tyre (Y page 276). Practical advice
* optional
219_AKB; 2; 4, en-GB
mkalafa,
2007-11-13T09:28:36+01:00 - Seite 237 Z