Page 2401 of 4083

INL-18
< COMPONENT DIAGNOSIS >
INTERIOR ROOM LAMP CONTROL CIRCUIT
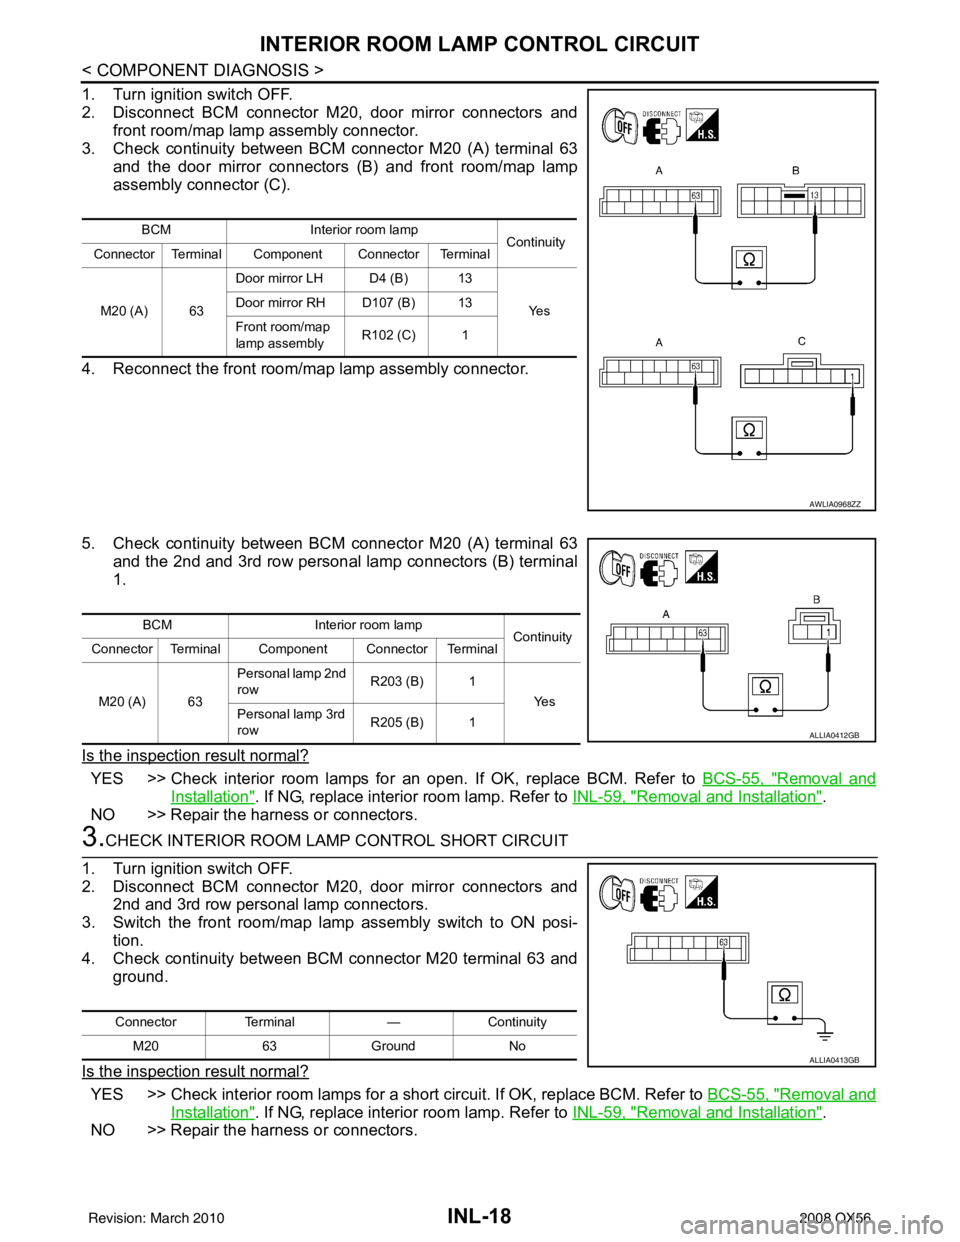
1. Turn ignition switch OFF.
2. Disconnect BCM connector M20, door mirror connectors andfront room/map lamp assembly connector.
3. Check continuity between BCM connector M20 (A) terminal 63 and the door mirror connectors (B) and front room/map lamp
assembly connector (C).
4. Reconnect the front room/map lamp assembly connector.
5. Check continuity between BCM connector M20 (A) terminal 63 and the 2nd and 3rd row personal lamp connectors (B) terminal
1.
Is the inspection result normal?
YES >> Check interior room lamps for an open. If OK, replace BCM. Refer to BCS-55, "Removal and
Installation". If NG, replace interior room lamp. Refer to INL-59, "Removal and Installation".
NO >> Repair the harness or connectors.
3.CHECK INTERIOR ROOM LAMP CONTROL SHORT CIRCUIT
1. Turn ignition switch OFF.
2. Disconnect BCM connector M20, door mirror connectors and 2nd and 3rd row personal lamp connectors.
3. Switch the front room/map lamp assembly switch to ON posi- tion.
4. Check continuity between BCM connector M20 terminal 63 and ground.
Is the inspection result normal?
YES >> Check interior room lamps for a short circuit. If OK, replace BCM. Refer to BCS-55, "Removal and
Installation". If NG, replace interior room lamp. Refer to INL-59, "Removal and Installation".
NO >> Repair the harness or connectors.
BCM Interior room lamp
Continuity
Connector Terminal Component Connector Terminal
M20 (A) 63 Door mirror LH D4 (B) 13
Ye s
Door mirror RH D107 (B) 13
Front room/map
lamp assembly R102 (C) 1
AWLIA0968ZZ
BCM
Interior room lamp
Continuity
Connector Terminal Component Connector Terminal
M20 (A) 63 Personal lamp 2nd
row
R203 (B) 1
Ye s
Personal lamp 3rd
row R205 (B) 1
ALLIA0412GB
Connector
Terminal —Continuity
M20 63Ground No
ALLIA0413GB
Revision: March 2010 2008 QX56
Page 2439 of 4083

INL-56
< SYMPTOM DIAGNOSIS >
INTERIOR LIGHTING SYSTEM SYMPTOMS
SYMPTOM DIAGNOSIS
INTERIOR LIGHTING SYSTEM SYMPTOMS
Symptom TableINFOID:0000000001601405
CAUTION:
Perform the self-diagnosis with CONSULT-III before the symptom diagnosis. Perform the trouble diag-
nosis if any DTC is detected.
Symptom Possible causeInspection item
All of the following lamps do not turn ON
• Front room/map lamp assembly
• Personal lamp 2nd and 3rd row
• Cargo room lamp
• Front and rear step lamps
• Vanity mirror lamps
• Ignition keyhole illumination
• Puddle lamps
•Foot lamps • Harness between BCM and each
interior room lamp
•BCM Battery saver output/power supply
circuit
Refer to
INL-15
.
Some or all of the following interior room lamps do not
turn ON/OFF
• Puddle lamps
• Front room/map lamp assembly
• Personal lamp 2nd row
• Personal lamp 3rd row • Harness between BCM and each
door switch
• Harness between BCM and each interior room lamp
•BCM Door switch circuit
Refer to
DLK-67
.
Interior room lamp control circuit
Refer to INL-17
.
Some or all of the following lamps do not turn ON/OFF
• Front step lamps
• Rear step lamps
•Foot lamps • Harness between BCM and step
lamps and foot lamps
•BCM Step lamp circuit
Refer to
INL-19
.
Cargo lamp does not turn ON/OFF • Harness between BCM and cargo
lamp
•BCM Cargo lamp co
ntrol circuit
Refer to INL-21
.
Ignition keyhole illumination does not turn ON/OFF • Harness between BCM and ignition
keyhole illumination
•BCM Ignition keyhole illumination control
circuit
Refer to
INL-23
.
Interior room lamp timer does not activate.
(It turns ON/ OFF when the door opens/closes.) —Check the interior room lamp setting.
Refer to
INL-11
.
Interior room lamp battery saver does not activate. —Check the interior room lamp battery
saver setting.
Refer to
INL-13
.
Revision: March 2010 2008 QX56
Page 2442 of 4083

INTERIOR ROOM LAMPINL-59
< ON-VEHICLE REPAIR >
C
DE
F
G H
I
J
K
M A
B
INL
N
O P
ON-VEHICLE REPAIR
INTERIOR ROOM LAMP
Removal and InstallationINFOID:0000000001534338
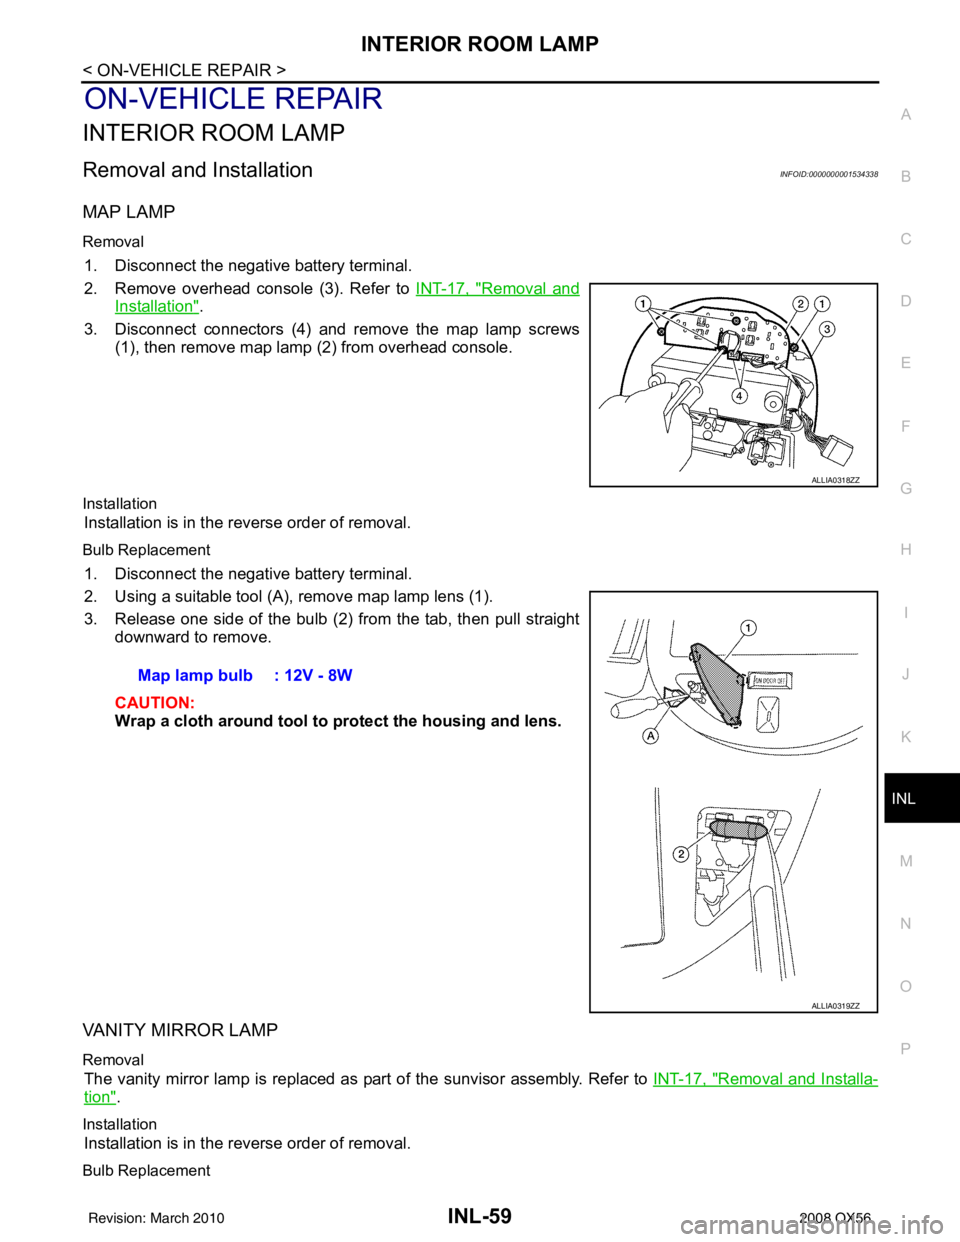
MAP LAMP
Removal
1. Disconnect the negative battery terminal.
2. Remove overhead console (3). Refer to INT-17, "
Removal and
Installation".
3. Disconnect connectors (4) and re move the map lamp screws
(1), then remove map lamp (2) from overhead console.
Installation
Installation is in the reverse order of removal.
Bulb Replacement
1. Disconnect the negative battery terminal.
2. Using a suitable tool (A), remove map lamp lens (1).
3. Release one side of the bulb (2) from the tab, then pull straight downward to remove.
CAUTION:
Wrap a cloth around tool to protect the housing and lens.
VANITY MIRROR LAMP
Removal
The vanity mirror lamp is replaced as part of the sunvisor assembly. Refer to INT-17, "Removal and Installa-
tion".
Installation
Installation is in the reverse order of removal.
Bulb Replacement
ALLIA0318ZZ
Map lamp bulb : 12V - 8W
ALLIA0319ZZ
Revision: March 2010 2008 QX56
Page 2443 of 4083
INL-60
< ON-VEHICLE REPAIR >
INTERIOR ROOM LAMP
1. Disconnect the negative battery terminal.
2. Using a suitable tool (A), release the tabs and remove the vanitymirror lamp lens (1).
3. Release one side of the bulb (2) from the tab, then pull straight out to remove.
CAUTION:
Wrap a cloth around tool to protect the housing and lens.
GLOVE BOX LAMP
Removal
1. Remove instrument lower panel RH and glove box. Refer to IP-17, "Removal and Installation".
2. Rotate glove box lamp socket and rotate counterclockwise to release from steering member.
Installation
Installation is in the reverse order of removal.
Bulb Replacement
1. Disconnect the negative battery terminal.
2. Remove instrument lower panel RH and glove box. Refer to IP-17, "
Removal and Installation".
3. Pull bulb (2) straight out from glove box lamp socket (1) to remove.
STEP LAMP
Removal
Vanity mirror lamp bulb : 12V - 1.8W
ALLIA0320ZZ
Glove box lamp bulb : 12V - 3.4W
ALLIA0321ZZ
Revision: March 2010 2008 QX56
Page 2449 of 4083
INL-66
< SERVICE DATA AND SPECIFICATIONS (SDS)
BULB SPECIFICATIONS
SERVICE DATA AND SPECIFICATIONS (SDS)
BULB SPECIFICATIONS
Interior Lamp/IlluminationINFOID:0000000001534337
*: Always check with the Parts Department for the latest parts information.Item
Wattage (W)*
Map Lamp 8
Vanity mirror lamp 1.8
Glove box lamp 3.4
Ste p lam p 3.8
Personal lamp 6
Footwell lamp 3.4
Cargo lamp 8
Console illumination lamp -
Revision: March 2010 2008 QX56
Page 2633 of 4083

MIR-1
DRIVER CONTROLS
C
DE
F
G H
I
J
K
M
SECTION MIR
A
B
MIR
N
O P
CONTENTS
MIRRORS
COMPONENT DIAGNOSIS ..........................2
DOOR MIRROR .............................................. .....2
Wiring Diagram ................................................... ......2
INSIDE MIRROR .................................................5
Wiring Diagram ................................................... ......5
PRECAUTION ...............................................8
PRECAUTIONS .............................................. .....8
Precaution for Supplemental Restraint System
(SRS) "AIR BAG" and "SEAT BELT PRE-TEN-
SIONER" ............................................................. ......
8
Precaution Necessary for Steering Wheel Rota-
tion After Battery Disconnect ............................... .....
8
Handling for Adhesive and Primer ............................9
REMOVAL AND INSTALLA TION ...............10
INSIDE MIRROR ...............................................10
Removal and Installation ..................................... ....10
DOOR MIRROR ................................................11
Door Mirror Assembly ..............................................11
Door Mirror Glass ....................................................12
Mirror Actuator .........................................................13
Revision: March 2010 2008 QX56
Page 2634 of 4083
MIR-2
< COMPONENT DIAGNOSIS >
DOOR MIRROR
COMPONENT DIAGNOSIS
DOOR MIRROR
Wiring DiagramINFOID:0000000001737087
AWLWA0021GB
Revision: March 20102008 QX56
Page 2635 of 4083
DOOR MIRRORMIR-3
< COMPONENT DIAGNOSIS >
C
DE
F
G H
I
J
K
M A
B
MIR
N
O P
AALIA0201GB
Revision: March 2010 2008 QX56