Page 3622 of 3924
STARTING SYSTEMSC-13
< SERVICE INFORMATION >
C
DE
F
G H
I
J
L
M A
B
SC
N
O P
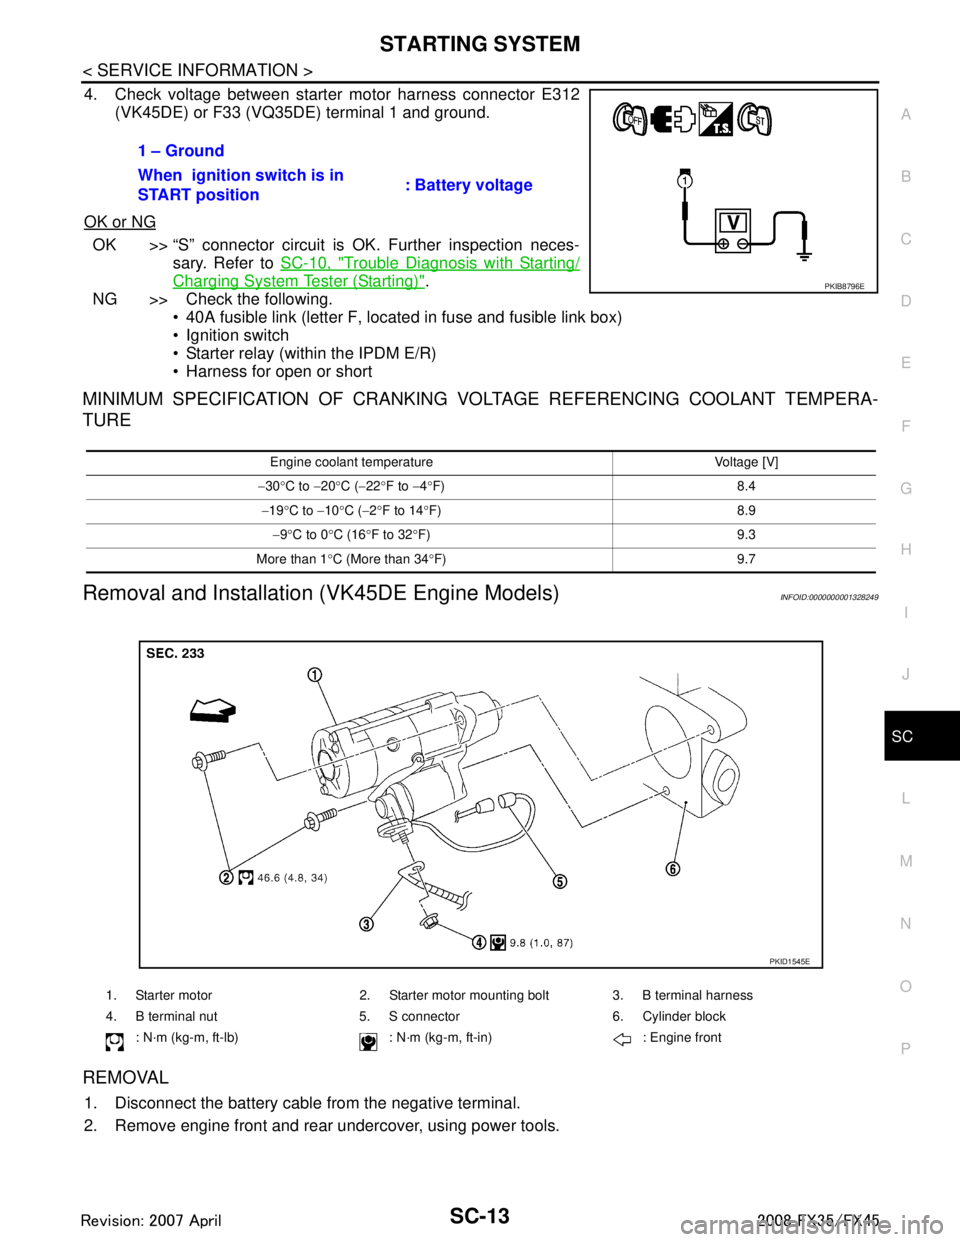
4. Check voltage between starter motor harness connector E312 (VK45DE) or F33 (VQ35DE) terminal 1 and ground.
OK or NG
OK >> “S” connector circuit is OK. Further inspection neces- sary. Refer to SC-10, "
Trouble Diagnosis with Starting/
Charging System Tester (Starting)".
NG >> Check the following.
40A fusible link (letter F, located in fuse and fusible link box)
Ignition switch
Starter relay (within the IPDM E/R)
Harness for open or short
MINIMUM SPECIFICATION OF CRANKING VO LTAGE REFERENCING COOLANT TEMPERA-
TURE
Removal and Installation (VK45DE Engine Models)INFOID:0000000001328249
REMOVAL
1. Disconnect the battery cable from the negative terminal.
2. Remove engine front and rear undercover, using power tools. 1 – Ground
When ignition switch is in
START position
: Battery voltage
PKIB8796E
Engine coolant temperature Voltage [V]
− 30 °C to −20 °C ( −22 °F to −4 °F) 8.4
− 19 °C to −10 °C ( −2 °F to 14 °F) 8.9
− 9 °C to 0 °C (16 °F to 32 °F) 9.3
More than 1 °C (More than 34 °F) 9.7
1. Starter motor 2. Starter motor mounting bolt 3. B terminal harness
4. B terminal nut 5. S connector 6. Cylinder block
: N·m (kg-m, ft-lb) : N·m (k g-m, ft-in) : Engine front
PKID1545E
3AA93ABC3ACD3AC03ACA3AC03AC63AC53A913A773A893A873A873A8E3A773A983AC73AC93AC03AC3
3A893A873A873A8F3A773A9D3AAF3A8A3A8C3A863A9D3AAF3A8B3A8C
Page 3623 of 3924
SC-14
< SERVICE INFORMATION >
STARTING SYSTEM
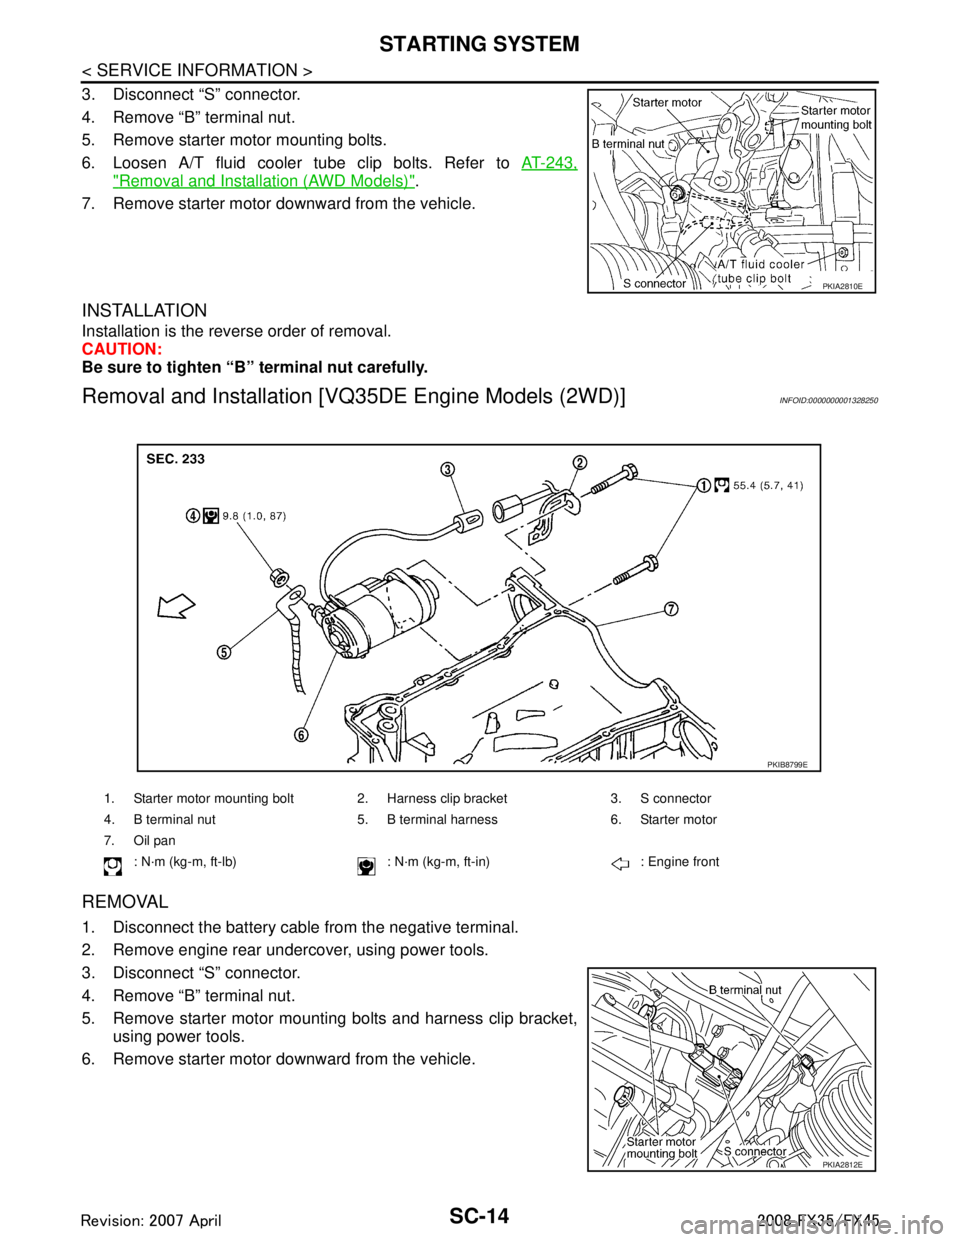
3. Disconnect “S” connector.
4. Remove “B” terminal nut.
5. Remove starter motor mounting bolts.
6. Loosen A/T fluid cooler tube clip bolts. Refer to AT-243,
"Removal and Installation (AWD Models)".
7. Remove starter motor downward from the vehicle.
INSTALLATION
Installation is the reverse order of removal.
CAUTION:
Be sure to tighten “B” terminal nut carefully.
Removal and Installation [V Q35DE Engine Models (2WD)]INFOID:0000000001328250
REMOVAL
1. Disconnect the battery cable from the negative terminal.
2. Remove engine rear undercover, using power tools.
3. Disconnect “S” connector.
4. Remove “B” terminal nut.
5. Remove starter motor mounting bolts and harness clip bracket,
using power tools.
6. Remove starter motor downward from the vehicle.
PKIA2810E
1. Starter motor mounting bolt 2. Harness clip bracket 3. S connector
4. B terminal nut 5. B termin al harness 6. Starter motor
7. Oil pan : N·m (kg-m, ft-lb) : N·m (kg-m, ft-in) : Engine front
PKIB8799E
PKIA2812E
3AA93ABC3ACD3AC03ACA3AC03AC63AC53A913A773A893A873A873A8E3A773A983AC73AC93AC03AC3
3A893A873A873A8F3A773A9D3AAF3A8A3A8C3A863A9D3AAF3A8B3A8C
Page 3624 of 3924
STARTING SYSTEMSC-15
< SERVICE INFORMATION >
C
DE
F
G H
I
J
L
M A
B
SC
N
O P
INSTALLATION
Installation is the reverse order of removal.
CAUTION:
Be sure to tighten “B” terminal nut carefully.
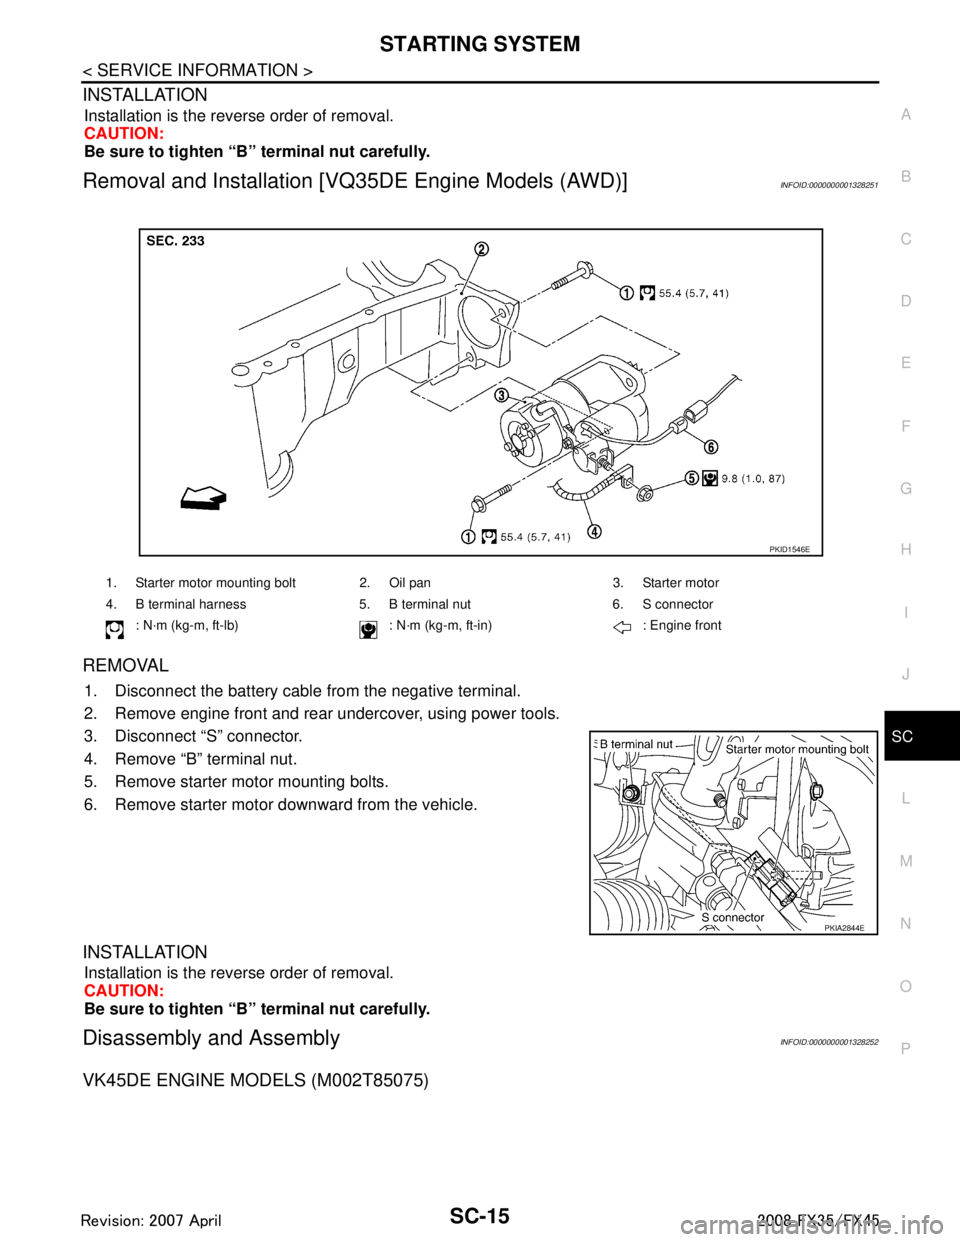
Removal and Installation [V Q35DE Engine Models (AWD)]INFOID:0000000001328251
REMOVAL
1. Disconnect the battery cabl e from the negative terminal.
2. Remove engine front and rear undercover, using power tools.
3. Disconnect “S” connector.
4. Remove “B” terminal nut.
5. Remove starter motor mounting bolts.
6. Remove starter motor downward from the vehicle.
INSTALLATION
Installation is the reverse order of removal.
CAUTION:
Be sure to tighten “B” terminal nut carefully.
Disassembly and AssemblyINFOID:0000000001328252
VK45DE ENGINE MODELS (M002T85075)
1. Starter motor mounting bolt 2. Oil pan 3. Starter motor
4. B terminal harness 5. B terminal nut 6. S connector
: N·m (kg-m, ft-lb) : N·m (k g-m, ft-in) : Engine front
PKID1546E
PKIA2844E
3AA93ABC3ACD3AC03ACA3AC03AC63AC53A913A773A893A873A873A8E3A773A983AC73AC93AC03AC3
3A893A873A873A8F3A773A9D3AAF3A8A3A8C3A863A9D3AAF3A8B3A8C
Page 3631 of 3924
SC-22
< SERVICE INFORMATION >
CHARGING SYSTEM
PRELIMINARY INSPECTION
1.CHECK BATTERY TERMINALS CONNECTION
*1 Refer to "Check “L” Terminal Circuit (Open)". *2 Refer to "Check “L” Terminal Circuit
(Short)". *3 Refer to "Check “S
” Terminal Circuit".
*4 Refer to "Check “B” Terminal Circuit". *5SC-25, "
Removal and Installation
(VK45DE Engine Mod-
els)"(VK45DE)
SC-27, "
Removal and Installation
(VQ35DE Engine Mod-
els)"(VQ35DE)
SKIB0527E
3AA93ABC3ACD3AC03ACA3AC03AC63AC53A913A773A893A873A873A8E3A773A983AC73AC93AC03AC3
3A893A873A873A8F3A773A9D3AAF3A8A3A8C3A863A9D3AAF3A8B3A8C
Page 3634 of 3924
CHARGING SYSTEMSC-25
< SERVICE INFORMATION >
C
DE
F
G H
I
J
L
M A
B
SC
N
O P
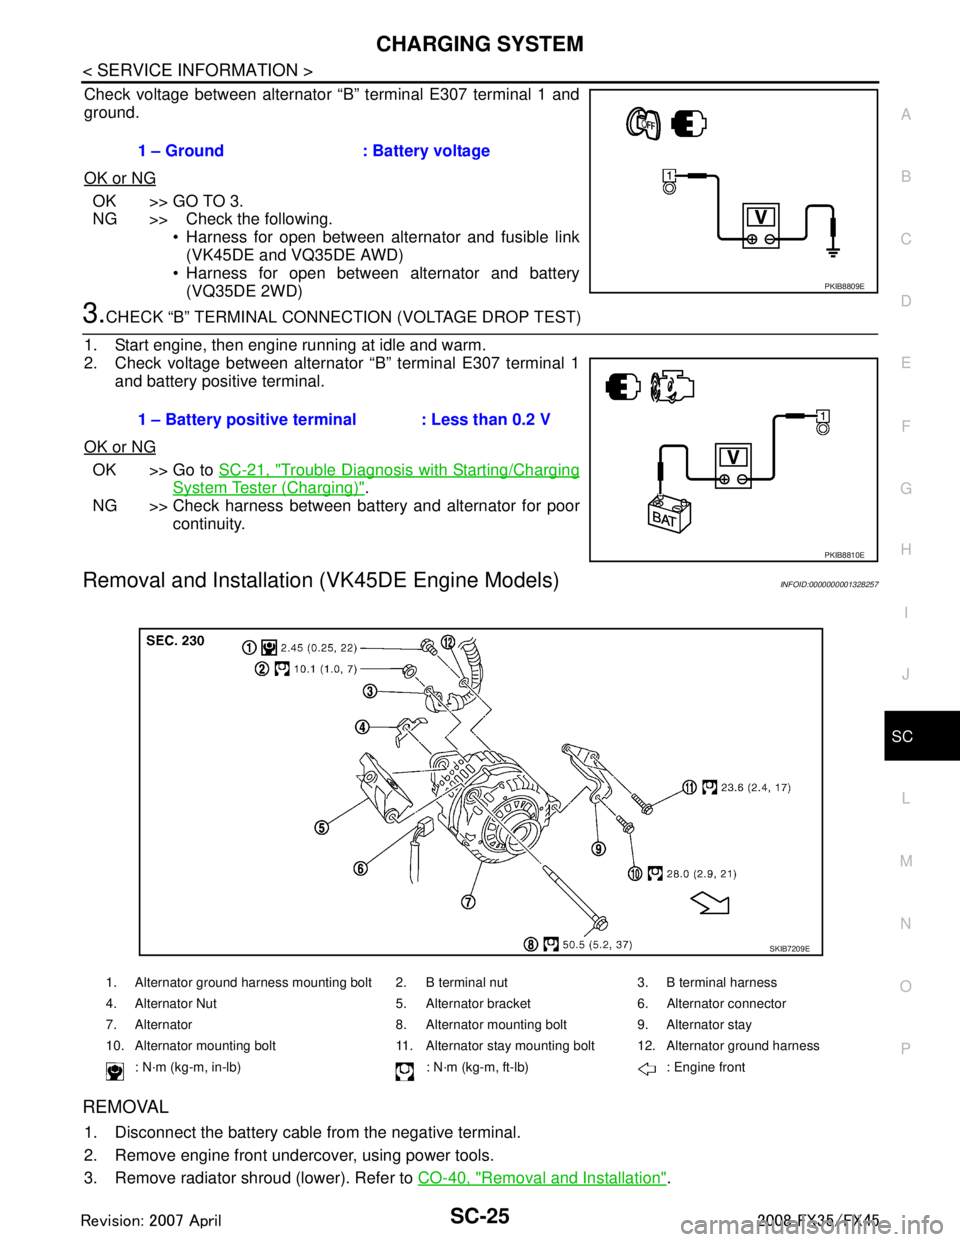
Check voltage between alternator “B” terminal E307 terminal 1 and
ground.
OK or NG
OK >> GO TO 3.
NG >> Check the following. Harness for open between alternator and fusible link
(VK45DE and VQ35DE AWD)
Harness for open between alternator and battery
(VQ35DE 2WD)
3.CHECK “B” TERMINAL CONNECT ION (VOLTAGE DROP TEST)
1. Start engine, then engine running at idle and warm.
2. Check voltage between alternator “B” terminal E307 terminal 1 and battery positive terminal.
OK or NG
OK >> Go to SC-21, "Trouble Diagnosis with Starting/Charging
System Tester (Charging)".
NG >> Check harness between battery and alternator for poor continuity.
Removal and Installation (VK45DE Engine Models)INFOID:0000000001328257
REMOVAL
1. Disconnect the battery cabl e from the negative terminal.
2. Remove engine front undercover, using power tools.
3. Remove radiator shroud (lower). Refer to CO-40, "
Removal and Installation".
1 – Ground : Battery voltage
PKIB8809E
1 – Battery positive terminal : Less than 0.2 V
PKIB8810E
1. Alternator ground harness mounting bolt 2. B terminal nut 3. B terminal harness
4. Alternator Nut 5. Alternator bracket 6. Alternator connector
7. Alternator 8. Alternator mounting bolt 9. Alternator stay
10. Alternator mounting bolt 11. Alternator stay mounting bolt 12. Alternator ground harness
: N·m (kg-m, in-lb) : N·m (kg-m, ft-lb) : Engine front
SKIB7209E
3AA93ABC3ACD3AC03ACA3AC03AC63AC53A913A773A893A873A873A8E3A773A983AC73AC93AC03AC3
3A893A873A873A8F3A773A9D3AAF3A8A3A8C3A863A9D3AAF3A8B3A8C
Page 3635 of 3924
SC-26
< SERVICE INFORMATION >
CHARGING SYSTEM
4. Remove alternator, water pump and A/C compressor belt. Refer to EM-170, "Removal and Installation".
5. Remove alternator mounting bolts, using power tools.
6. Disconnect alternator connector.
7. Remove “B” terminal nut.
8. Remove alternator ground harness mounting bolt.
9. Remove alternator assembly downward from the vehicle.
ALTERNATOR PULLEY INSPECTION
Perform the following.
Make sure that alternator pulley does not rattle.
Make sure that alternator pulley nut is tight.
INSTALLATION
Installation is the reverse order of removal. Install alternator, and check tension of belt. Refer to EM-170, "Checking Drive Belts".
CAUTION:
Be sure to tighten “B” terminal nut carefully.
PKIA2954E
PKIA2820E
Alternator pulley nut:
: 73.5 N·m (7.5 kg-m, 54 ft-lb)
3AA93ABC3ACD3AC03ACA3AC03AC63AC53A913A773A893A873A873A8E3A773A983AC73AC93AC03AC3
3A893A873A873A8F3A773A9D3AAF3A8A3A8C3A863A9D3AAF3A8B3A8C
Page 3636 of 3924
CHARGING SYSTEMSC-27
< SERVICE INFORMATION >
C
DE
F
G H
I
J
L
M A
B
SC
N
O P
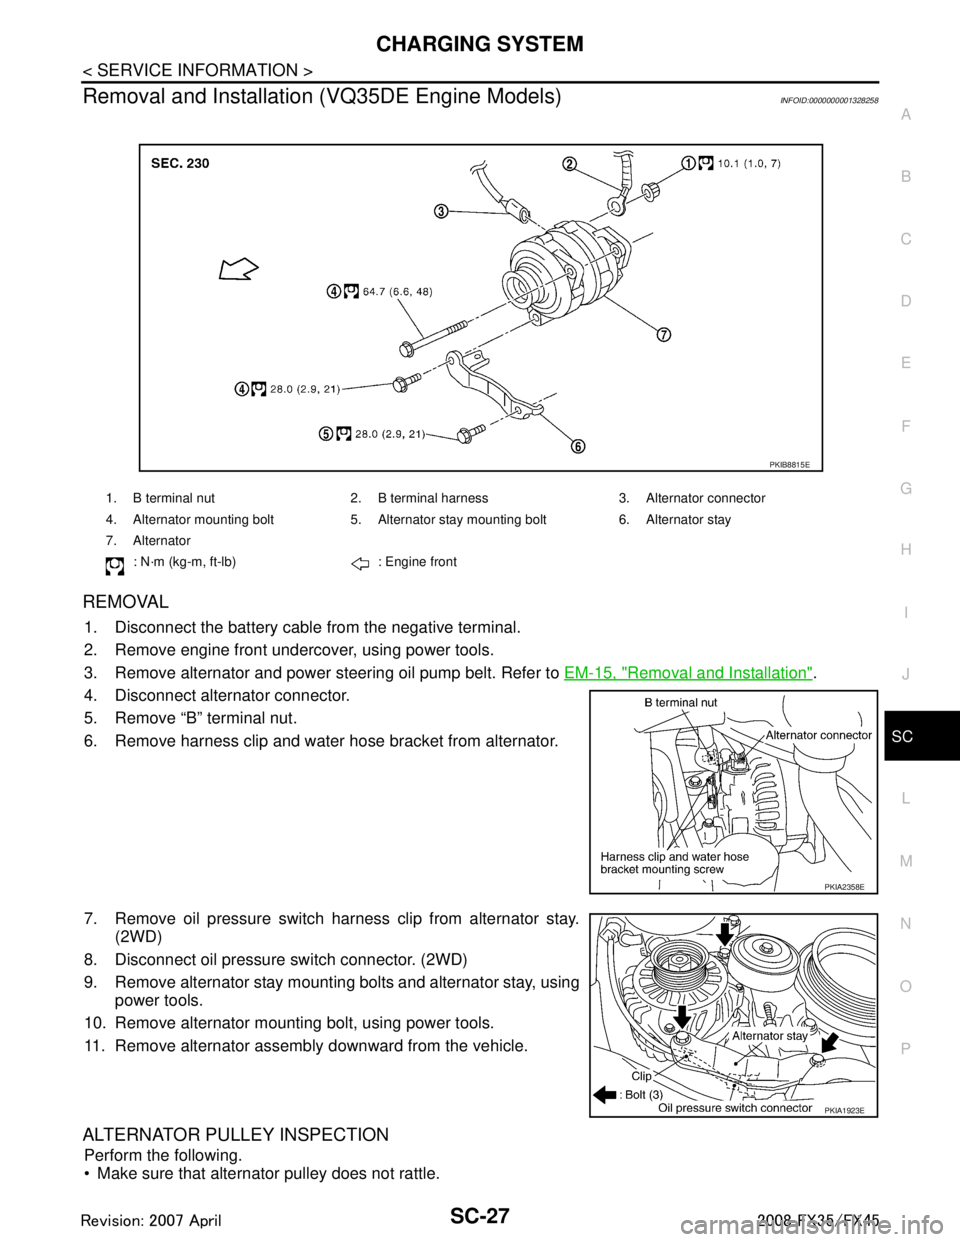
Removal and Installation (VQ35DE Engine Models)INFOID:0000000001328258
REMOVAL
1. Disconnect the battery cabl e from the negative terminal.
2. Remove engine front undercover, using power tools.
3. Remove alternator and power steering oil pump belt. Refer to EM-15, "
Removal and Installation".
4. Disconnect alternator connector.
5. Remove “B” terminal nut.
6. Remove harness clip and water hose bracket from alternator.
7. Remove oil pressure switch harness clip from alternator stay. (2WD)
8. Disconnect oil pressure switch connector. (2WD)
9. Remove alternator stay mounting bolts and alternator stay, using power tools.
10. Remove alternator mounting bolt, using power tools.
11. Remove alternator assembly downward from the vehicle.
ALTERNATOR PULLEY INSPECTION
Perform the following.
Make sure that alternator pulley does not rattle.
1. B terminal nut 2. B terminal harness 3. Alternator connector
4. Alternator mounting bolt 5. Alternator stay mounting bolt 6. Alternator stay
7. Alternator
: N·m (kg-m, ft-lb) : Engine front
PKIB8815E
PKIA2358E
PKIA1923E
3AA93ABC3ACD3AC03ACA3AC03AC63AC53A913A773A893A873A873A8E3A773A983AC73AC93AC03AC3
3A893A873A873A8F3A773A9D3AAF3A8A3A8C3A863A9D3AAF3A8B3A8C
Page 3637 of 3924
SC-28
< SERVICE INFORMATION >
CHARGING SYSTEM
Make sure that alternator pulley nut is tight.
INSTALLATION
Installation is the reverse order of removal.
Install alternator, and check tension of belt. Refer to EM-14, "Checking Drive Belts".
CAUTION:
Be sure to tighten “B” terminal nut carefully.
Disassembly and AssemblyINFOID:0000000001328259
VK45DE ENGINE MODELS (LR1110-716B)
VQ35DE ENGINE MODELS (A3TG0191)
Alternator pulley nut:
: 118 N·m (12.0 kg-m, 87 ft-lb)
1. Stator assembly 2. Slip ring 3. Rotor assembly
4. Retainer 5. Front bearing 6. Front bracket assembly
7. Pulley 8. Pulley nut 9. Fun guide
10. Double labyrinth seal 11. IC voltage regulator assembly 12. Diode assembly
13. Rear bracket assembly 14. Bush 15. B terminal nut
16. Through-bolt and nut
PKID0691E
3AA93ABC3ACD3AC03ACA3AC03AC63AC53A913A773A893A873A873A8E3A773A983AC73AC93AC03AC3
3A893A873A873A8F3A773A9D3AAF3A8A3A8C3A863A9D3AAF3A8B3A8C