2008 INFINITI FX35 differential
[x] Cancel search: differentialPage 2819 of 3924
FFD-28
< SERVICE INFORMATION >
FRONT FINAL DRIVE ASSEMBLY
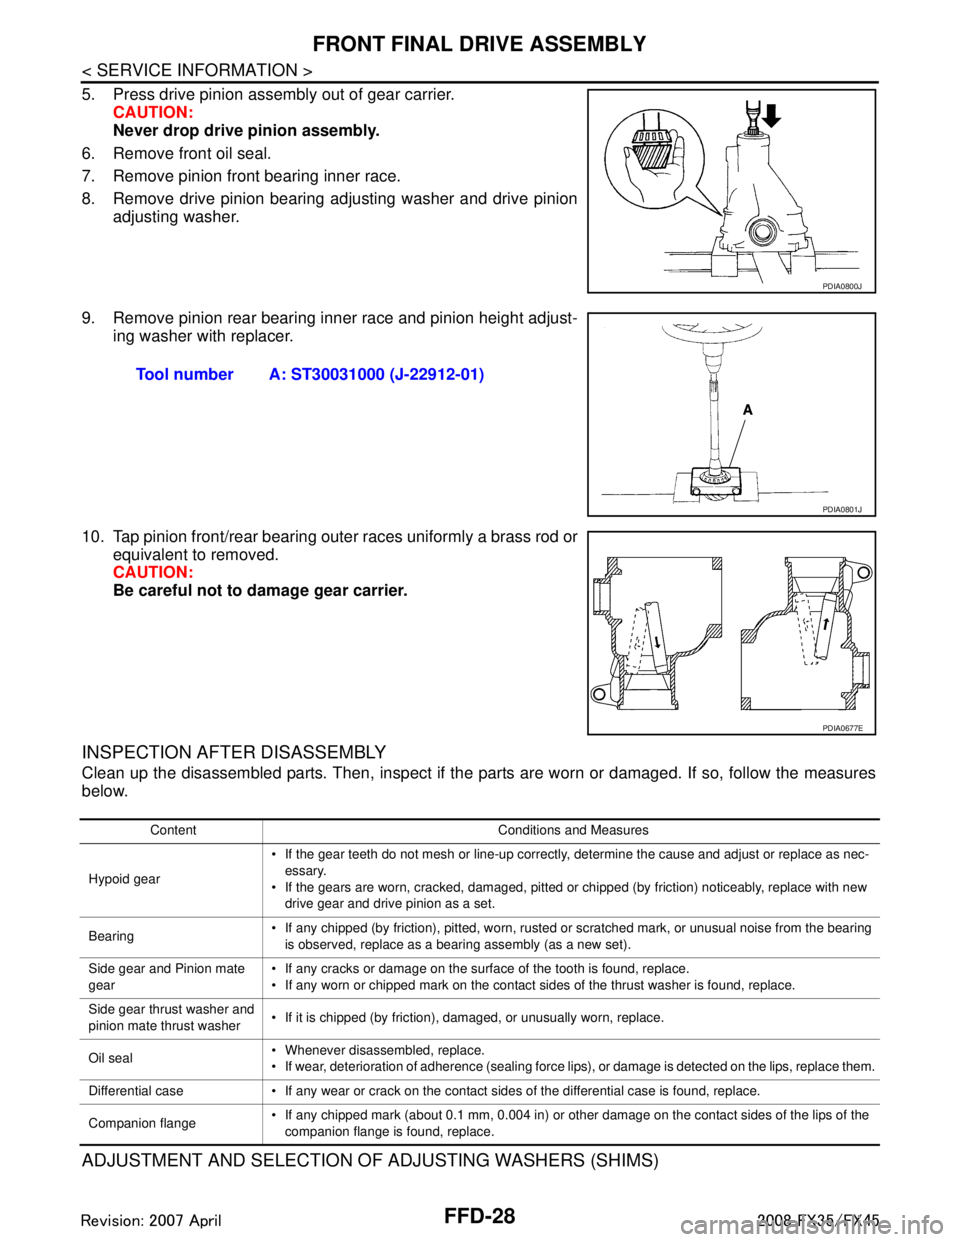
5. Press drive pinion assembly out of gear carrier.CAUTION:
Never drop drive pinion assembly.
6. Remove front oil seal.
7. Remove pinion front bearing inner race.
8. Remove drive pinion bearing adjusting washer and drive pinion adjusting washer.
9. Remove pinion rear bearing inner race and pinion height adjust- ing washer with replacer.
10. Tap pinion front/rear bearing outer races uniformly a brass rod or equivalent to removed.
CAUTION:
Be careful not to damage gear carrier.
INSPECTION AFTER DISASSEMBLY
Clean up the disassembled parts. Then, inspect if the parts are worn or damaged. If so, follow the measures
below.
ADJUSTMENT AND SELECTION OF ADJUSTING WASHERS (SHIMS)
PDIA0800J
Tool number A: ST30031000 (J-22912-01)
PDIA0801J
PDIA0677E
Content Conditions and Measures
Hypoid gear If the gear teeth do not mesh or line-up correctly, determine the cause and adjust or replace as nec-
essary.
If the gears are worn, cracked, damaged, pitted or chipped (by friction) noticeably, replace with new drive gear and drive pinion as a set.
Bearing If any chipped (by friction), pitted, worn, rusted or scratched mark, or unusual noise from the bearing
is observed, replace as a bearing assembly (as a new set).
Side gear and Pinion mate
gear If any cracks or damage on the surface of the tooth is found, replace.
If any worn or chipped mark on the contact sides of the thrust washer is found, replace.
Side gear thrust washer and
pinion mate thrust washer If it is chipped (by friction), damaged, or unusually worn, replace.
Oil seal Whenever disassembled, replace.
If wear, deterioration of adherence (sealing force lips), or damage is detected on the lips, replace them.
Differential case If any wear or crack on the contact sides of the differential case is found, replace.
Companion flange If any chipped mark (about 0.1 mm, 0.004 in) or other damage on the contact sides of the lips of the
companion flange is found, replace.
3AA93ABC3ACD3AC03ACA3AC03AC63AC53A913A773A893A873A873A8E3A773A983AC73AC93AC03AC3
3A893A873A873A8F3A773A9D3AAF3A8A3A8C3A863A9D3AAF3A8B3A8C
Page 2820 of 3924
FRONT FINAL DRIVE ASSEMBLYFFD-29
< SERVICE INFORMATION >
CEF
G H
I
J
K L
M A
B
FFD
N
O P
Differential Side Gear Clearance
Assemble the differential parts if they are disassembled. Refer to "Differential Assembly".
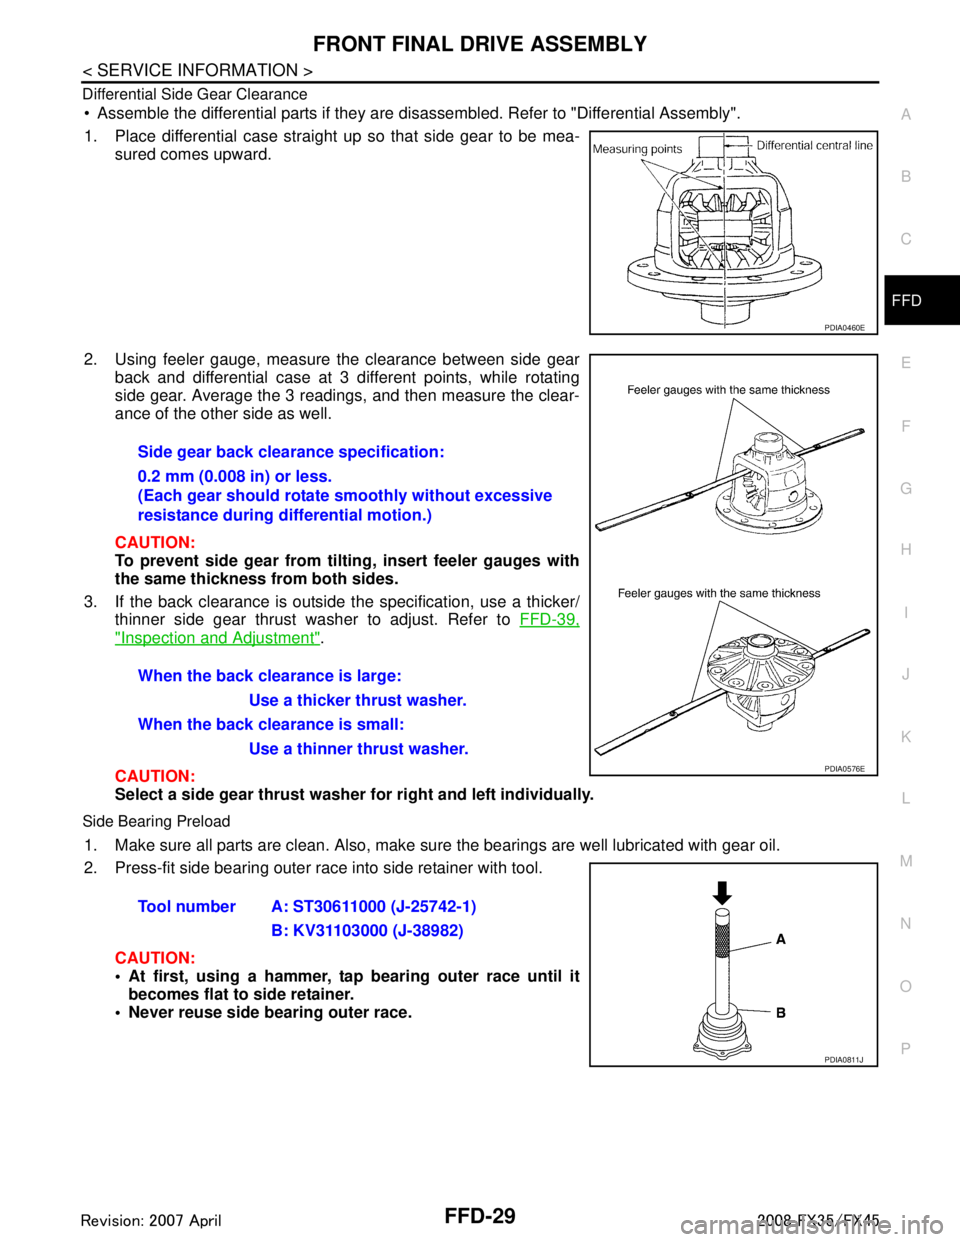
1. Place differential case straight up so that side gear to be mea-
sured comes upward.
2. Using feeler gauge, measure the clearance between side gear back and differential case at 3 different points, while rotating
side gear. Average the 3 readings, and then measure the clear-
ance of the other side as well.
CAUTION:
To prevent side gear from tilting, insert feeler gauges with
the same thickness from both sides.
3. If the back clearance is outside t he specification, use a thicker/
thinner side gear thrust washer to adjust. Refer to FFD-39,
"Inspection and Adjustment".
CAUTION:
Select a side gear thrust washer for right and left individually.
Side Bearing Preload
1. Make sure all parts are clean. Also, make sure the bearings are well lubricated with gear oil.
2. Press-fit side bearing outer race into side retainer with tool.
CAUTION:
At first, using a hammer, tap bearing outer race until itbecomes flat to side retainer.
Never reuse side bearing outer race.
PDIA0460E
Side gear back clearance specification:
0.2 mm (0.008 in) or less.
(Each gear should rotate smoothly without excessive
resistance during differential motion.)
When the back clearance is large:
Use a thicker thrust washer.
When the back clearance is small: Use a thinner thrust washer.
PDIA0576E
Tool number A: ST30611000 (J-25742-1) B: KV31103000 (J-38982)
PDIA0811J
3AA93ABC3ACD3AC03ACA3AC03AC63AC53A913A773A893A873A873A8E3A773A983AC73AC93AC03AC3
3A893A873A873A8F3A773A9D3AAF3A8A3A8C3A863A9D3AAF3A8B3A8C
Page 2821 of 3924
FFD-30
< SERVICE INFORMATION >
FRONT FINAL DRIVE ASSEMBLY
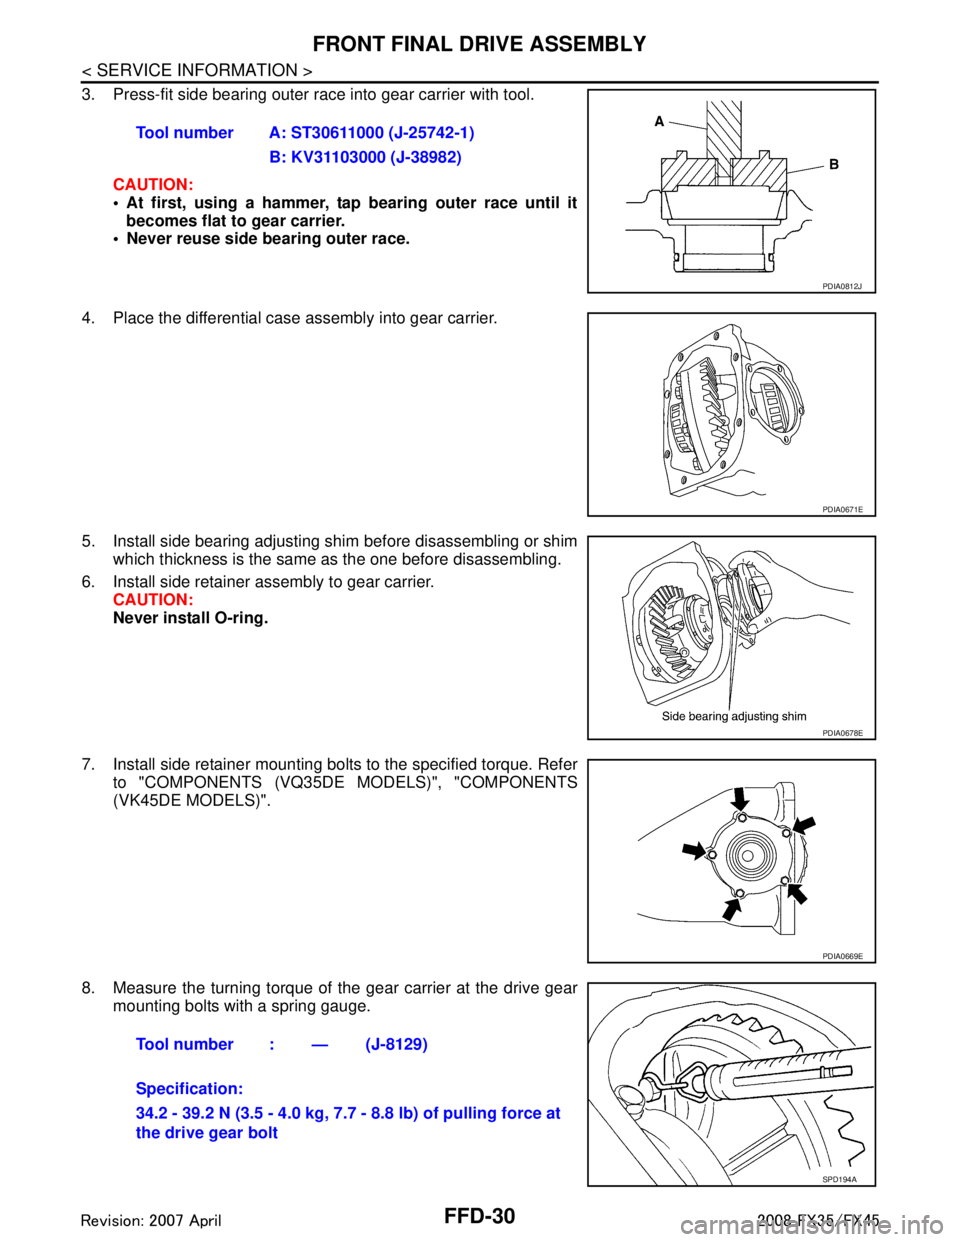
3. Press-fit side bearing outer race into gear carrier with tool.CAUTION:
At first, using a hammer, tap bearing outer race until itbecomes flat to gear carrier.
Never reuse side bearing outer race.
4. Place the differential case assembly into gear carrier.
5. Install side bearing adjusting shim before disassembling or shim which thickness is the same as the one before disassembling.
6. Install side retainer assembly to gear carrier. CAUTION:
Never install O-ring.
7. Install side retainer mounting bolts to the specified torque. Refer to "COMPONENTS (VQ35DE MODELS)", "COMPONENTS
(VK45DE MODELS)".
8. Measure the turning torque of the gear carrier at the drive gear
mounting bolts with a spring gauge. Tool number A: ST30611000 (J-25742-1)
B: KV31103000 (J-38982)
PDIA0812J
PDIA0671E
PDIA0678E
PDIA0669E
Tool number : — (J-8129)
Specification:
34.2 - 39.2 N (3.5 - 4.0 kg, 7.7 - 8.8 lb) of pulling force at
the drive gear bolt
SPD194A
3AA93ABC3ACD3AC03ACA3AC03AC63AC53A913A773A893A873A873A8E3A773A983AC73AC93AC03AC3
3A893A873A873A8F3A773A9D3AAF3A8A3A8C3A863A9D3AAF3A8B3A8C
Page 2825 of 3924
FFD-34
< SERVICE INFORMATION >
FRONT FINAL DRIVE ASSEMBLY
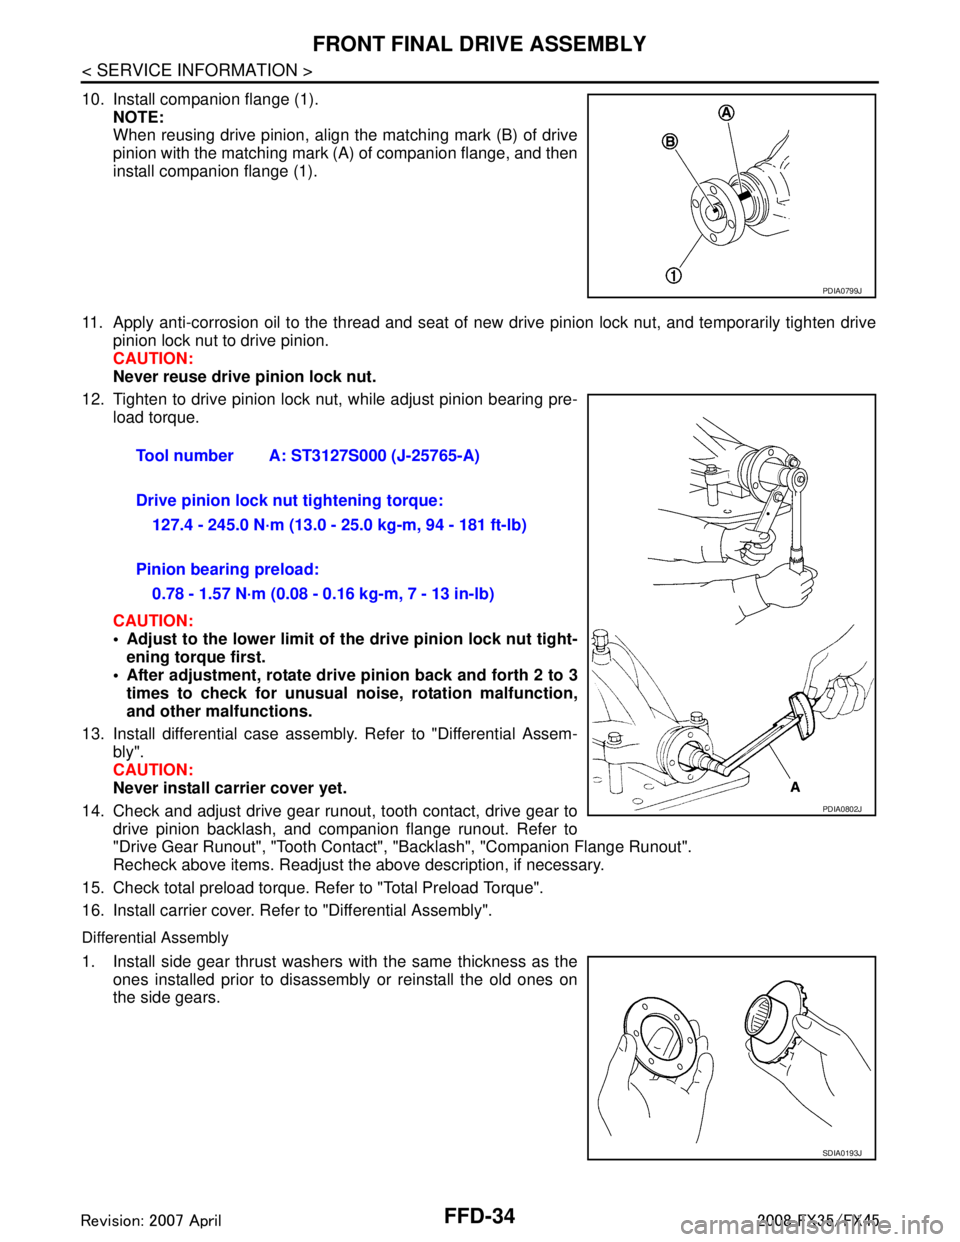
10. Install companion flange (1).NOTE:
When reusing drive pinion, align the matching mark (B) of drive
pinion with the matching mark (A) of companion flange, and then
install companion flange (1).
11. Apply anti-corrosion oil to the thread and seat of new drive pinion lock nut, and temporarily tighten drive
pinion lock nut to drive pinion.
CAUTION:
Never reuse drive pinion lock nut.
12. Tighten to drive pinion lock nut, while adjust pinion bearing pre- load torque.
CAUTION:
Adjust to the lower limit of the drive pinion lock nut tight-
ening torque first.
After adjustment, rotate dri ve pinion back and forth 2 to 3
times to check for unusual no ise, rotation malfunction,
and other malfunctions.
13. Install differential case assembly. Refer to "Differential Assem- bly".
CAUTION:
Never install carrier cover yet.
14. Check and adjust drive gear runout, tooth contact, drive gear to drive pinion backlash, and companion flange runout. Refer to
"Drive Gear Runout", "Tooth Contact" , "Backlash", "Companion Flange Runout".
Recheck above items. Readjust the above description, if necessary.
15. Check total preload torque. Refer to "Total Preload Torque".
16. Install carrier cover. Refer to "Differential Assembly".
Differential Assembly
1. Install side gear thrust washers with the same thickness as the ones installed prior to disassembly or reinstall the old ones on
the side gears.
PDIA0799J
Tool number A: ST3127S000 (J-25765-A)
Drive pinion lock nut tightening torque:
127.4 - 245.0 N·m (13.0 - 25.0 kg-m, 94 - 181 ft-lb)
Pinion bearing preload: 0.78 - 1.57 N·m (0.08 - 0.16 kg-m, 7 - 13 in-lb)
PDIA0802J
SDIA0193J
3AA93ABC3ACD3AC03ACA3AC03AC63AC53A913A773A893A873A873A8E3A773A983AC73AC93AC03AC3
3A893A873A873A8F3A773A9D3AAF3A8A3A8C3A863A9D3AAF3A8B3A8C
Page 2826 of 3924
FRONT FINAL DRIVE ASSEMBLYFFD-35
< SERVICE INFORMATION >
CEF
G H
I
J
K L
M A
B
FFD
N
O P
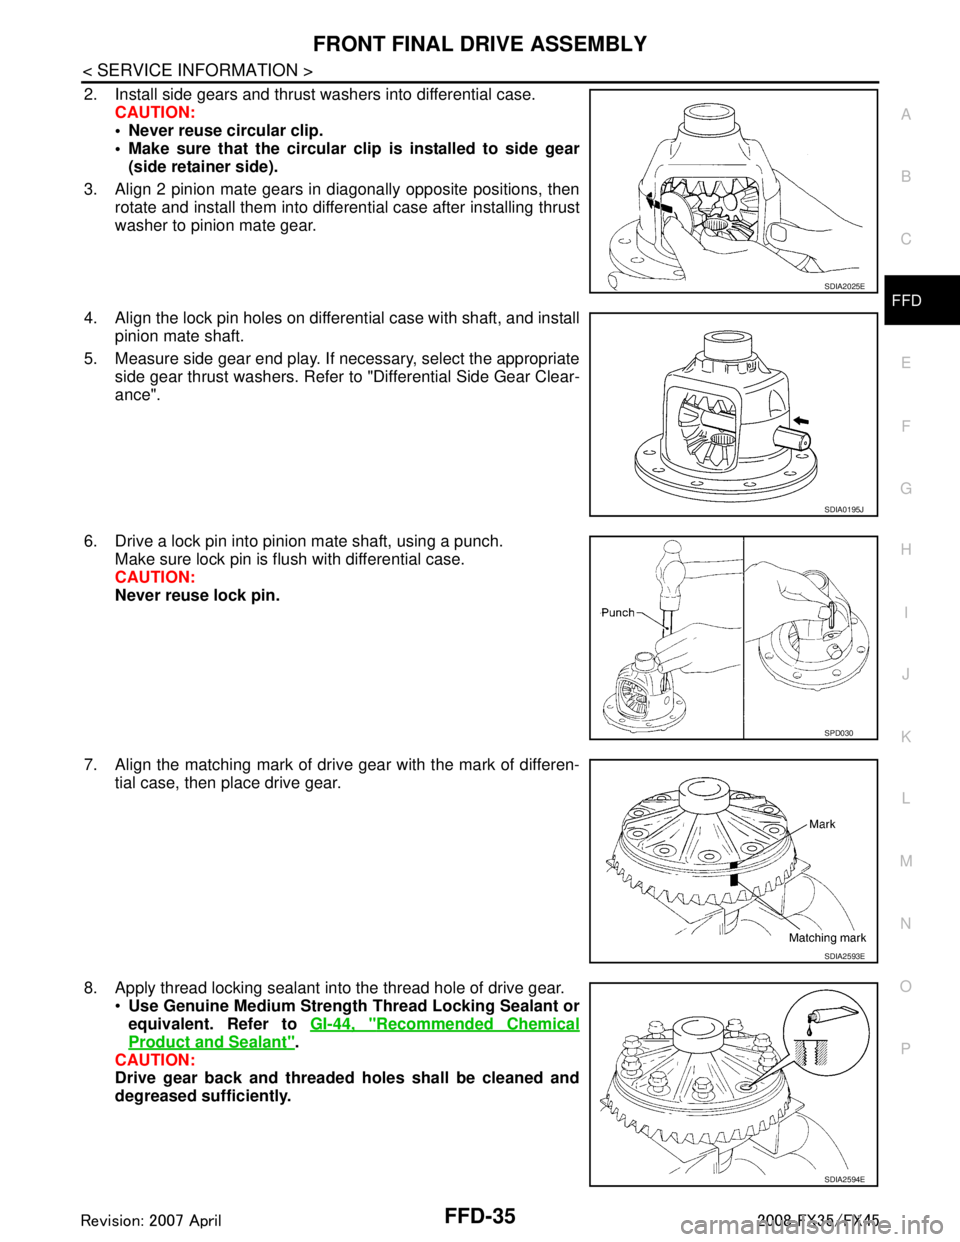
2. Install side gears and thrust washers into differential case. CAUTION:
Never reuse circular clip.
Make sure that the circular cl ip is installed to side gear
(side retainer side).
3. Align 2 pinion mate gears in diagonally opposite positions, then rotate and install them into differential case after installing thrust
washer to pinion mate gear.
4. Align the lock pin holes on differential case with shaft, and install pinion mate shaft.
5. Measure side gear end play. If necessary, select the appropriate side gear thrust washers. Refer to "Differential Side Gear Clear-
ance".
6. Drive a lock pin into pinion mate shaft, using a punch. Make sure lock pin is flush with differential case.
CAUTION:
Never reuse lock pin.
7. Align the matching mark of drive gear with the mark of differen- tial case, then place drive gear.
8. Apply thread locking sealant into the thread hole of drive gear. Use Genuine Medium Strength Thread Locking Sealant or
equivalent. Refer to GI-44, "
Recommended Chemical
Product and Sealant".
CAUTION:
Drive gear back and threaded holes shall be cleaned and
degreased sufficiently.
SDIA2025E
SDIA0195J
SPD030
SDIA2593E
SDIA2594E
3AA93ABC3ACD3AC03ACA3AC03AC63AC53A913A773A893A873A873A8E3A773A983AC73AC93AC03AC3
3A893A873A873A8F3A773A9D3AAF3A8A3A8C3A863A9D3AAF3A8B3A8C
Page 2827 of 3924
FFD-36
< SERVICE INFORMATION >
FRONT FINAL DRIVE ASSEMBLY
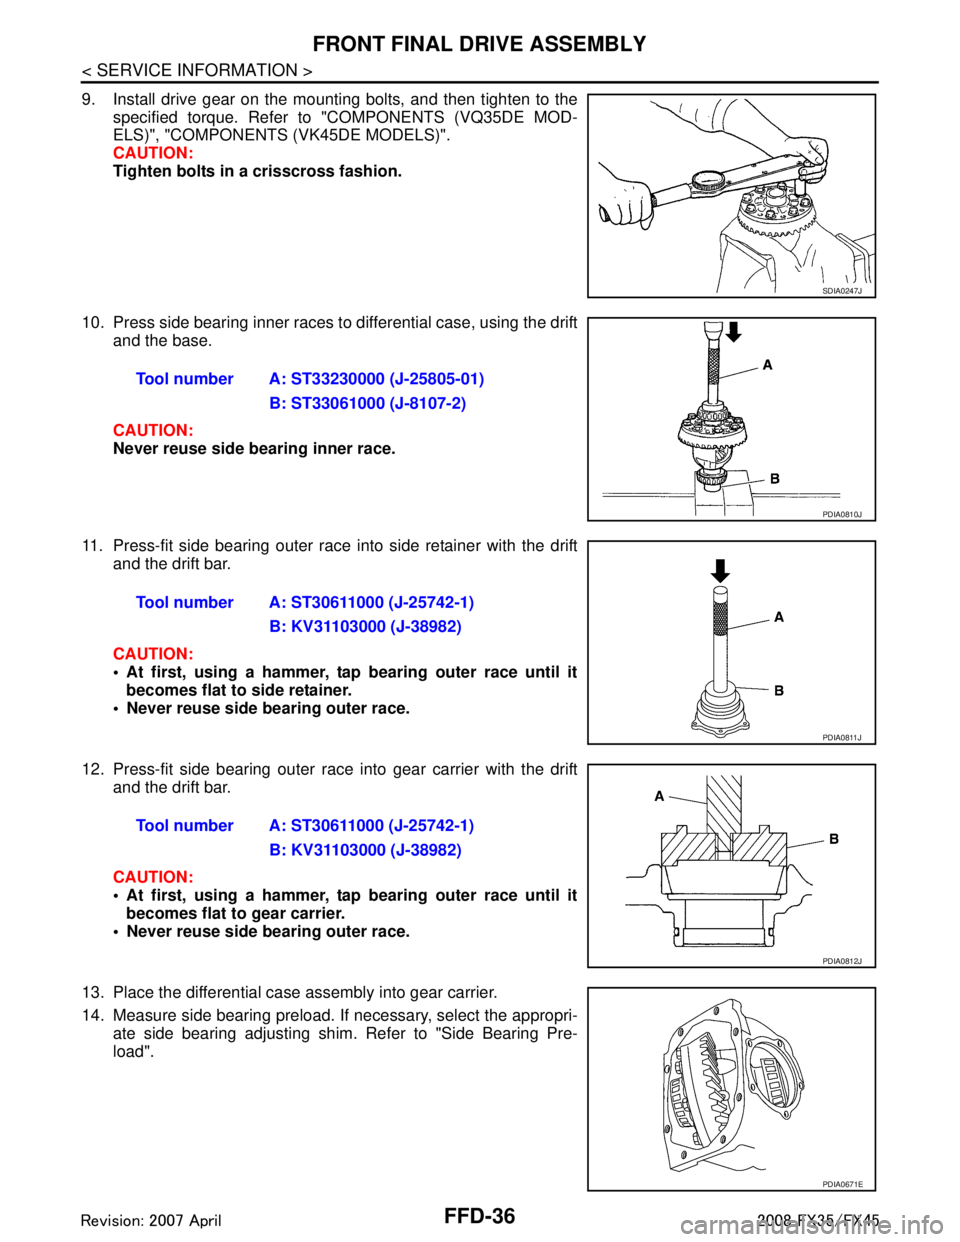
9. Install drive gear on the mounting bolts, and then tighten to thespecified torque. Refer to "COMPONENTS (VQ35DE MOD-
ELS)", "COMPONENTS (VK45DE MODELS)".
CAUTION:
Tighten bolts in a crisscross fashion.
10. Press side bearing inner races to differential case, using the drift and the base.
CAUTION:
Never reuse side bearing inner race.
11. Press-fit side bearing outer race into side retainer with the drift and the drift bar.
CAUTION:
At first, using a hammer, tap bearing outer race until itbecomes flat to side retainer.
Never reuse side bearing outer race.
12. Press-fit side bearing outer race into gear carrier with the drift and the drift bar.
CAUTION:
At first, using a hammer, tap bearing outer race until itbecomes flat to gear carrier.
Never reuse side bearing outer race.
13. Place the differential case assembly into gear carrier.
14. Measure side bearing preload. If necessary, select the appropri-
ate side bearing adjusting shim. Refer to "Side Bearing Pre-
load".
SDIA0247J
Tool number A: ST33230000 (J-25805-01)
B: ST33061000 (J-8107-2)
PDIA0810J
Tool number A: ST30611000 (J-25742-1)B: KV31103000 (J-38982)
PDIA0811J
Tool number A: ST30611000 (J-25742-1)B: KV31103000 (J-38982)
PDIA0812J
PDIA0671E
3AA93ABC3ACD3AC03ACA3AC03AC63AC53A913A773A893A873A873A8E3A773A983AC73AC93AC03AC3
3A893A873A873A8F3A773A9D3AAF3A8A3A8C3A863A9D3AAF3A8B3A8C
Page 2830 of 3924
SERVICE DATA AND SPECIFICATIONS (SDS)
FFD-39
< SERVICE INFORMATION >
C EF
G H
I
J
K L
M A
B
FFD
N
O P
SERVICE DATA AND SPECIFICATIONS (SDS)
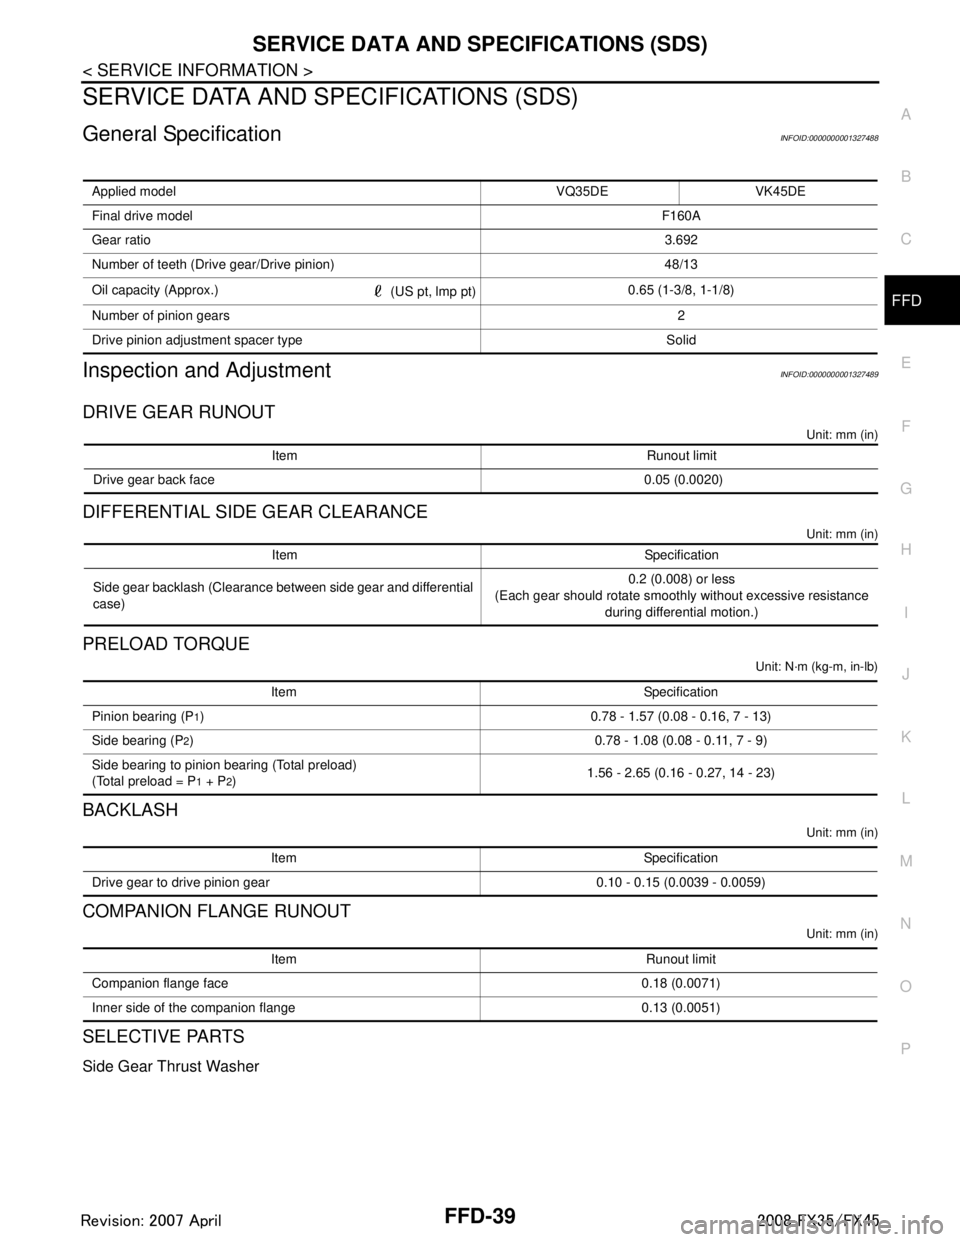
General SpecificationINFOID:0000000001327488
Inspection and AdjustmentINFOID:0000000001327489
DRIVE GEAR RUNOUT
Unit: mm (in)
DIFFERENTIAL SIDE GEAR CLEARANCE
Unit: mm (in)
PRELOAD TORQUE
Unit: N·m (kg-m, in-lb)
BACKLASH
Unit: mm (in)
COMPANION FLANGE RUNOUT
Unit: mm (in)
SELECTIVE PARTS
Side Gear Thrust Washer
Applied model VQ35DE VK45DE
Final drive model F160A
Gear ratio 3.692
Number of teeth (Drive gear/Drive pinion) 48/13
Oil capacity (Approx.) (US pt, lmp pt)0.65 (1-3/8, 1-1/8)
Number of pinion gears 2
Drive pinion adjustment spacer type Solid
Item Runout limit
Drive gear back face 0.05 (0.0020)
Item Specification
Side gear backlash (Clearance between side gear and differential
case) 0.2 (0.008) or less
(Each gear should rotate smoothly without excessive resistance during differential motion.)
Item Specification
Pinion bearing (P
1) 0.78 - 1.57 (0.08 - 0.16, 7 - 13)
Side bearing (P
2) 0.78 - 1.08 (0.08 - 0.11, 7 - 9)
Side bearing to pinion bearing (Total preload)
(Total preload = P
1 + P2) 1.56 - 2.65 (0.16 - 0.27, 14 - 23)
Item Specification
Drive gear to drive pinion gear 0.10 - 0.15 (0.0039 - 0.0059)
Item Runout limit
Companion flange face 0.18 (0.0071)
Inner side of the companion flange 0.13 (0.0051)
3AA93ABC3ACD3AC03ACA3AC03AC63AC53A913A773A893A873A873A8E3A773A983AC73AC93AC03AC3
3A893A873A873A8F3A773A9D3AAF3A8A3A8C3A863A9D3AAF3A8B3A8C
Page 2848 of 3924
FSU-4
< SERVICE INFORMATION >
NOISE, VIBRATION AND HARSHNESS (NVH) TROUBLESHOOTING
NOISE, VIBRATION AND HARSHNESS (NVH) TROUBLESHOOTING
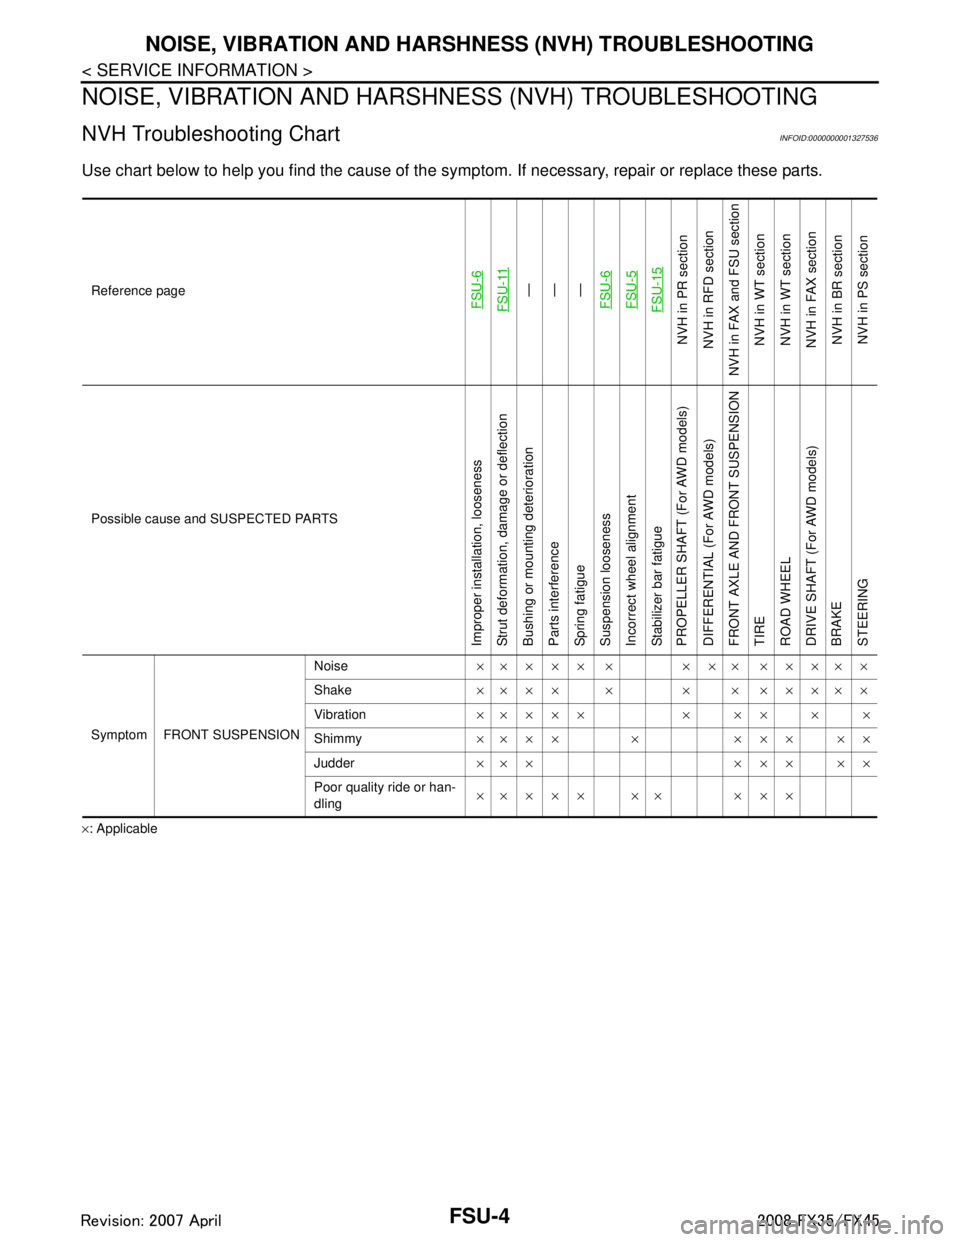
NVH Troubleshooting ChartINFOID:0000000001327536
Use chart below to help you find the cause of the symp tom. If necessary, repair or replace these parts.
×: ApplicableReference page
FSU-6FSU-11
—
—
—
FSU-6FSU-5FSU-15
NVH in PR section
NVH in RFD section
NVH in FAX and FSU section
NVH in WT section
NVH in WT section
NVH in FAX section NVH in BR sectionNVH in PS section
Possible cause and SUSPECTED PARTS
Improper installation, looseness
Strut deformation, damage or deflection
Bushing or mounting deterioration
Parts interference
Spring fatigue
Suspension looseness
Incorrect wheel alignment
Stabilizer bar fatigue
PROPELLER SHAFT (For AWD models)
DIFFERENTIAL (For AWD models)
FRONT AXLE AND FRONT SUSPENSION
TIRE
ROAD WHEEL
DRIVE SHAFT (For AWD models)
BRAKE
STEERING
Symptom FRONT SUSPENSION Noise
××××× × ××× ×××××
Shake ×××× × × × ×××××
Vibration ××××× × ×× × ×
Shimmy ×××× × ××× ××
Judder ××× ××× ××
Poor quality ride or han-
dling ×× × × × ×× × × ×
3AA93ABC3ACD3AC03ACA3AC03AC63AC53A913A773A893A873A873A8E3A773A983AC73AC93AC03AC3
3A893A873A873A8F3A773A9D3AAF3A8A3A8C3A863A9D3AAF3A8B3A8C