2008 INFINITI FX35 differential
[x] Cancel search: differentialPage 3552 of 3924
RFD-10
< SERVICE INFORMATION >
FRONT OIL SEAL
FRONT OIL SEAL
Removal and InstallationINFOID:0000000001327497
CAUTION:
Verify identification stamp of replacement frequency put in the lower part of gear carrier to determine
replacement for collapsible spacer when replacing front oil seal. Refer to "IDENTIFICATION STAMP OF
REPLACEMENT FREQUENCY OF FRONT OIL SEAL". If necessary collapsible spacer replacement,
remove final drive assembly and disassemble it to re place front oil seal and collapsible spacer. Refer
to RFD-16, "
Removal and Installation" and RFD-17, "Disassembly and Assembly".
NOTE:
The reuse of collapsible spacer is pr ohibited in principle. However, it is reusable on a one-time basis
only in cases when replacing front oil seal.
IDENTIFICATION STAMP OF REPLACEMENT FREQUENCY OF FRONT OIL SEAL
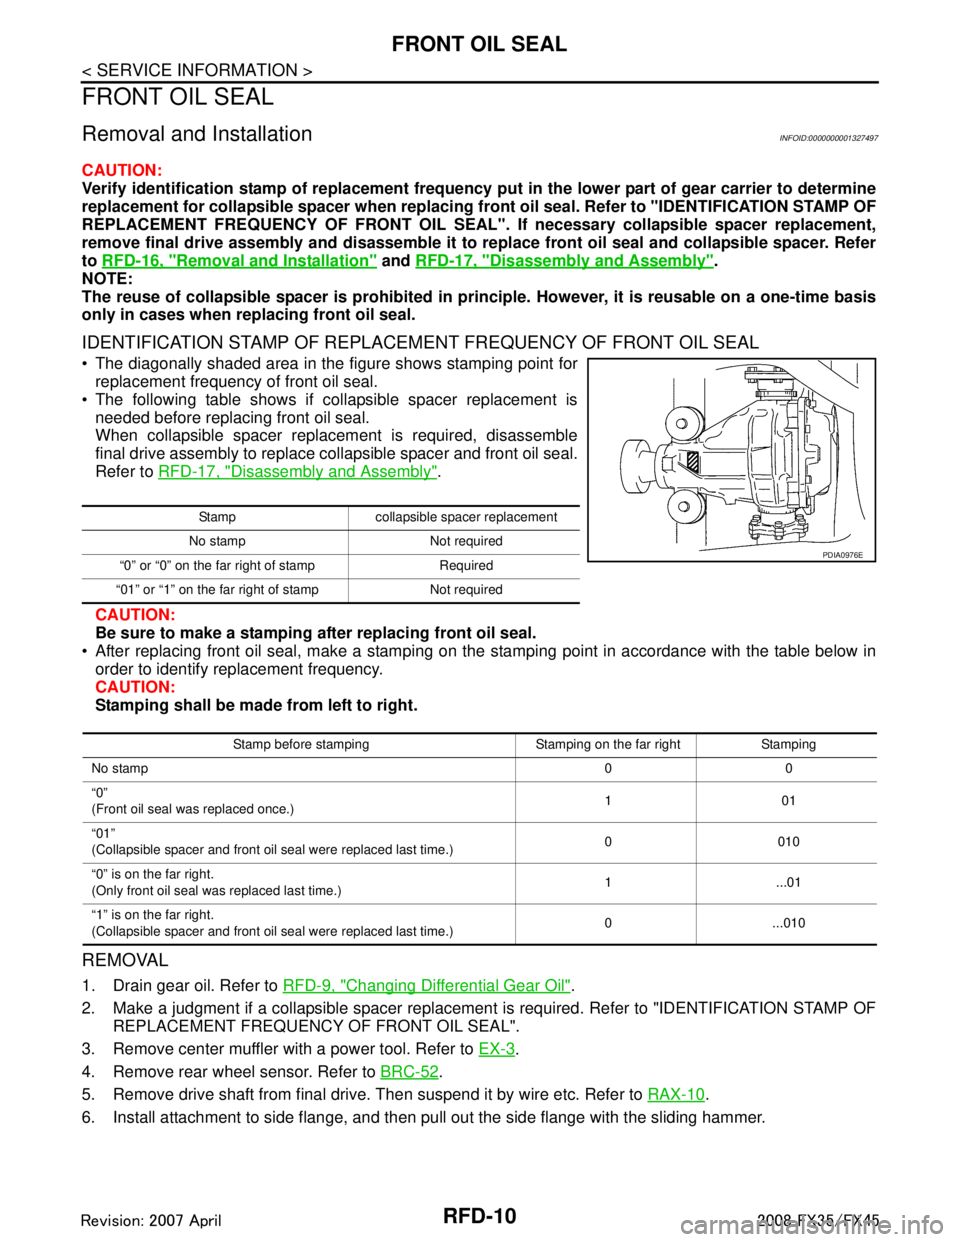
The diagonally shaded area in the figure shows stamping point for replacement frequency of front oil seal.
The following table shows if collapsible spacer replacement is needed before replacing front oil seal.
When collapsible spacer replacement is required, disassemble
final drive assembly to replace collapsible spacer and front oil seal.
Refer to RFD-17, "
Disassembly and Assembly".
CAUTION:
Be sure to make a stamping after replacing front oil seal.
After replacing front oil seal, make a stamping on the stamping point in accordance with the table below in order to identify replacement frequency.
CAUTION:
Stamping shall be made from left to right.
REMOVAL
1. Drain gear oil. Refer to RFD-9, "Changing Differential Gear Oil".
2. Make a judgment if a collapsible spacer replacement is required. Refer to "IDENTIFICATION STAMP OF REPLACEMENT FREQUENCY OF FRONT OIL SEAL".
3. Remove center muffler with a power tool. Refer to EX-3
.
4. Remove rear wheel sensor. Refer to BRC-52
.
5. Remove drive shaft from final drive. Then suspend it by wire etc. Refer to RAX-10
.
6. Install attachment to side flange, and then pull out the side flange with the sliding hammer.
Stamp collapsible spacer replacement
No stamp Not required
“0” or “0” on the far right of stamp Required
“01” or “1” on the far ri ght of stamp Not required
PDIA0976E
Stamp before stamping Stamping on the far right Stamping
No stamp 00
“0”
(Front oil seal was replaced once.) 101
“01”
(Collapsible spacer and front oil seal were replaced last time.) 0010
“0” is on the far right.
(Only front oil seal was replaced last time.) 1 ...01
“1” is on the far right.
(Collapsible spacer and front oil seal were replaced last time.) 0...010
3AA93ABC3ACD3AC03ACA3AC03AC63AC53A913A773A893A873A873A8E3A773A983AC73AC93AC03AC3
3A893A873A873A8F3A773A9D3AAF3A8A3A8C3A863A9D3AAF3A8B3A8C
Page 3555 of 3924
FRONT OIL SEALRFD-13
< SERVICE INFORMATION >
CEF
G H
I
J
K L
M A
B
RFD
N
O P
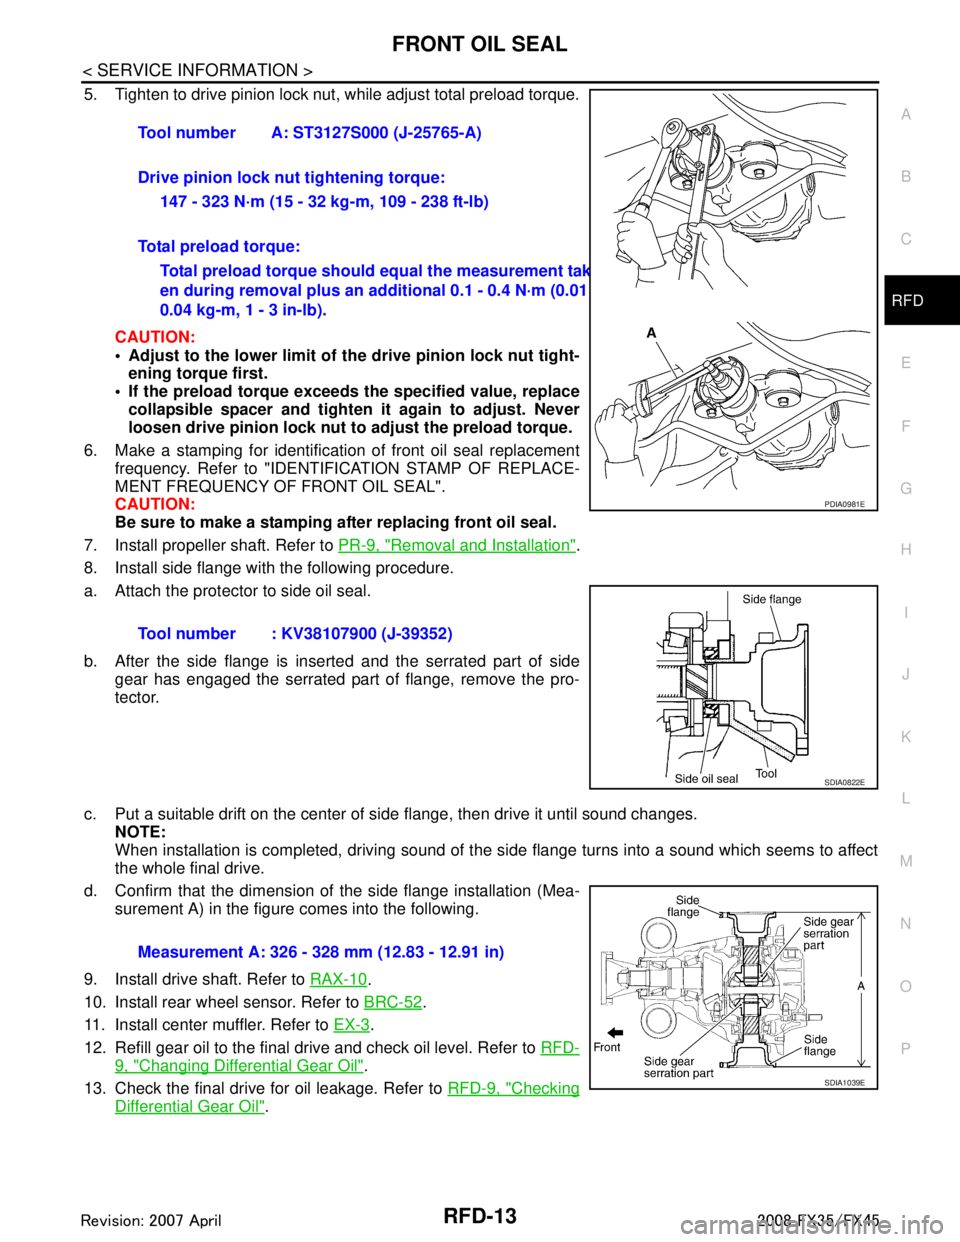
5. Tighten to drive pinion lock nut, while adjust total preload torque.
CAUTION:
Adjust to the lower limit of the drive pinion lock nut tight-
ening torque first.
If the preload torque exceeds the specified value, replace
collapsible spacer and tighte n it again to adjust. Never
loosen drive pinion lock nut to adjust the preload torque.
6. Make a stamping for identificati on of front oil seal replacement
frequency. Refer to "IDENTIFICATION STAMP OF REPLACE-
MENT FREQUENCY OF FRONT OIL SEAL".
CAUTION:
Be sure to make a stamping after replacing front oil seal.
7. Install propeller shaft. Refer to PR-9, "
Removal and Installation".
8. Install side flange with the following procedure.
a. Attach the protector to side oil seal.
b. After the side flange is inserted and the serrated part of side gear has engaged the serrated part of flange, remove the pro-
tector.
c. Put a suitable drift on the center of side flange, then drive it until sound changes.
NOTE:
When installation is completed, driving sound of the side flange turns into a sound which seems to affect
the whole final drive.
d. Confirm that the dimension of the side flange installation (Mea- surement A) in the figure comes into the following.
9. Install drive shaft. Refer to RAX-10
.
10. Install rear wheel sensor. Refer to BRC-52
.
11. Install center muffler. Refer to EX-3
.
12. Refill gear oil to the final drive and check oil level. Refer to RFD-
9, "Changing Differential Gear Oil".
13. Check the final drive for oil leakage. Refer to RFD-9, "
Checking
Differential Gear Oil".
Tool number A: ST3127S000 (J-25765-A)
Drive pinion lock nut tightening torque:
147 - 323 N·m (15 - 32 kg-m, 109 - 238 ft-lb)
Total preload torque: Total preload torque should equal the measurement tak-
en during removal plus an ad ditional 0.1 - 0.4 N·m (0.01 -
0.04 kg-m, 1 - 3 in-lb).
Tool number : KV38107900 (J-39352)
PDIA0981E
SDIA0822E
Measurement A: 326 - 328 mm (12.83 - 12.91 in)
SDIA1039E
3AA93ABC3ACD3AC03ACA3AC03AC63AC53A913A773A893A873A873A8E3A773A983AC73AC93AC03AC3
3A893A873A873A8F3A773A9D3AAF3A8A3A8C3A863A9D3AAF3A8B3A8C
Page 3559 of 3924
REAR FINAL DRIVE ASSEMBLYRFD-17
< SERVICE INFORMATION >
CEF
G H
I
J
K L
M A
B
RFD
N
O P
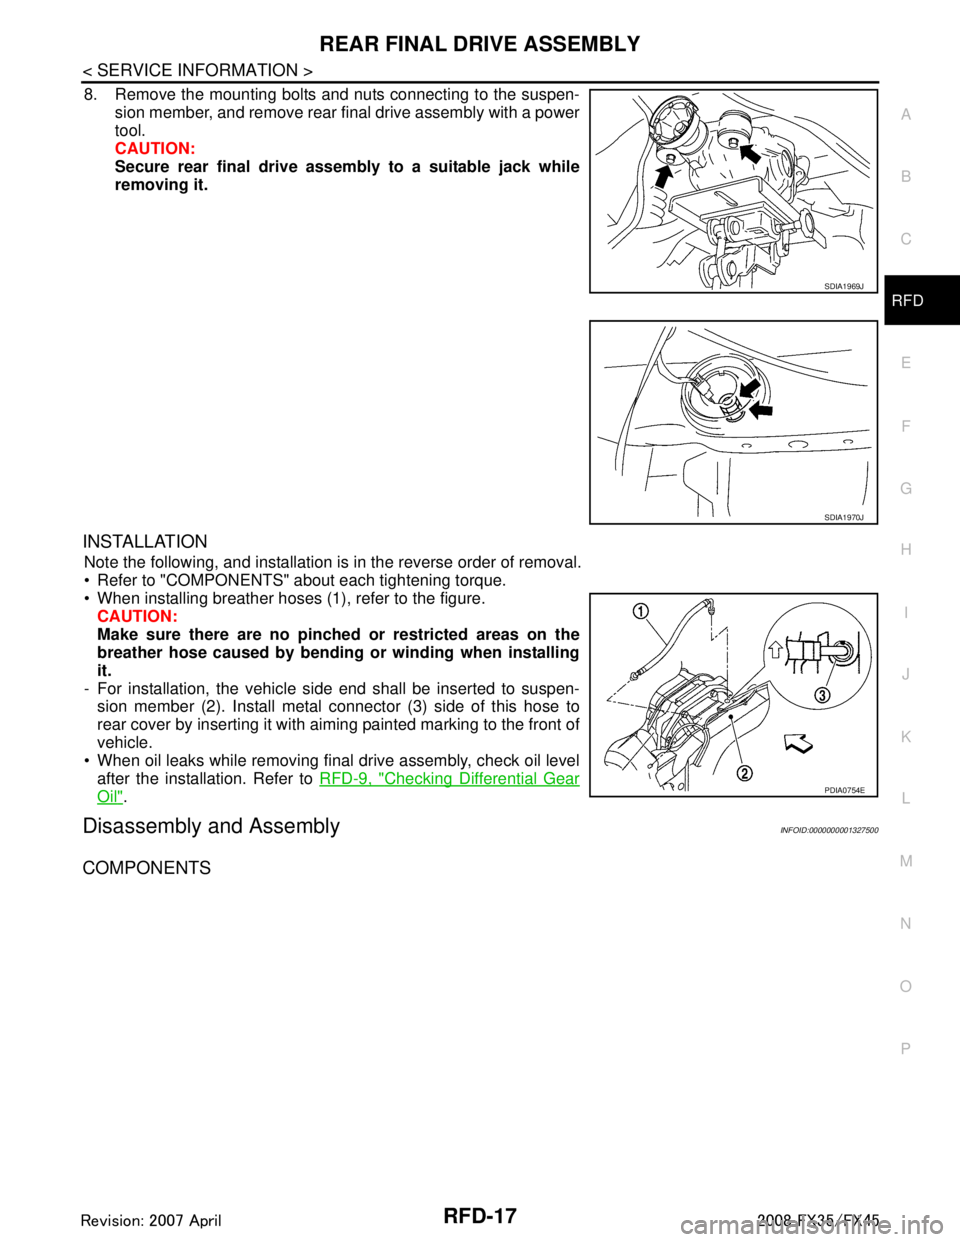
8. Remove the mounting bolts and nuts connecting to the suspen- sion member, and remove rear final drive assembly with a power
tool.
CAUTION:
Secure rear final drive assembly to a suitable jack while
removing it.
INSTALLATION
Note the following, and installation is in the reverse order of removal.
Refer to "COMPONENTS" about each tightening torque.
When installing breather hoses (1), refer to the figure.CAUTION:
Make sure there are no pinched or restricted areas on the
breather hose caused by bending or winding when installing
it.
- For installation, the vehicle side end shall be inserted to suspen- sion member (2). Install metal connector (3) side of this hose to
rear cover by inserting it with aiming painted marking to the front of
vehicle.
When oil leaks while removing final drive assembly, check oil level
after the installation. Refer to RFD-9, "
Checking Differential Gear
Oil".
Disassembly and AssemblyINFOID:0000000001327500
COMPONENTS
SDIA1969J
SDIA1970J
PDIA0754E
3AA93ABC3ACD3AC03ACA3AC03AC63AC53A913A773A893A873A873A8E3A773A983AC73AC93AC03AC3
3A893A873A873A8F3A773A9D3AAF3A8A3A8C3A863A9D3AAF3A8B3A8C
Page 3560 of 3924
RFD-18
< SERVICE INFORMATION >
REAR FINAL DRIVE ASSEMBLY
ASSEMBLY INSPECTION AND ADJUSTMENT
Before inspection and adjustment, drain gear oil.
Total Preload Torque
1. Secure final drive assembly onto an attachment.
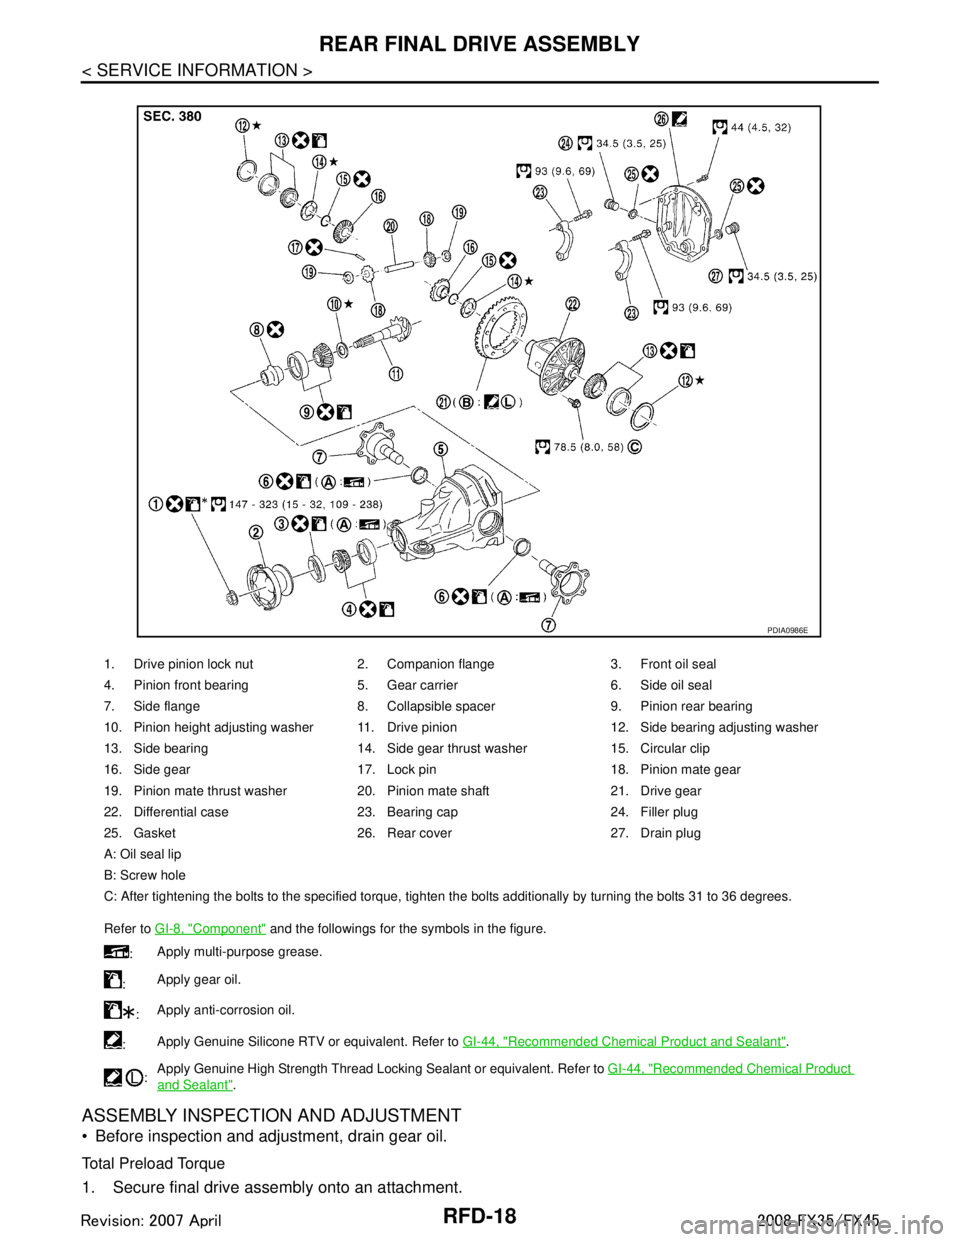
1. Drive pinion lock nut 2. Companion flange 3. Front oil seal
4. Pinion front bearing 5. Gear carrier 6. Side oil seal
7. Side flange 8. Collapsible spacer 9. Pinion rear bearing
10. Pinion height adjusting washer 11. Drive pinion 12. Side bearing adjusting washer
13. Side bearing 14. Side gear thrust washer 15. Circular clip
16. Side gear 17. Lock pin 18. Pinion mate gear
19. Pinion mate thrust washer 20. Pinion mate shaft 21. Drive gear
22. Differential case 23. Bearing cap 24. Filler plug
25. Gasket 26. Rear cover 27. Drain plug
A: Oil seal lip
B: Screw hole
C: After tightening the bolts to the specified torque, tighten the bolts additionally by turning the bolts 31 to 36 degrees.
Refer to GI-8, "
Component" and the followings for the symbols in the figure.
: Apply multi-purpose grease.
: Apply gear oil.
: Apply anti-corrosion oil.
: Apply Genuine Silicone RTV or equivalent. Refer to
GI-44, "
Recommended Chemical Product and Sealant".
: Apply Genuine High Strength Thread Locking Sealant or equivalent. Refer to
GI-44, "
Recommended Chemical Product
and Sealant".
PDIA0986E
3AA93ABC3ACD3AC03ACA3AC03AC63AC53A913A773A893A873A873A8E3A773A983AC73AC93AC03AC3
3A893A873A873A8F3A773A9D3AAF3A8A3A8C3A863A9D3AAF3A8B3A8C
Page 3561 of 3924
REAR FINAL DRIVE ASSEMBLYRFD-19
< SERVICE INFORMATION >
CEF
G H
I
J
K L
M A
B
RFD
N
O P
2. Remove side flanges.
3. Rotate drive pinion back and forth 2 to 3 times to check for unusual noise and rotation malfunction.
4. Rotate drive pinion at least 20 times to check for smooth operation of the bearing.
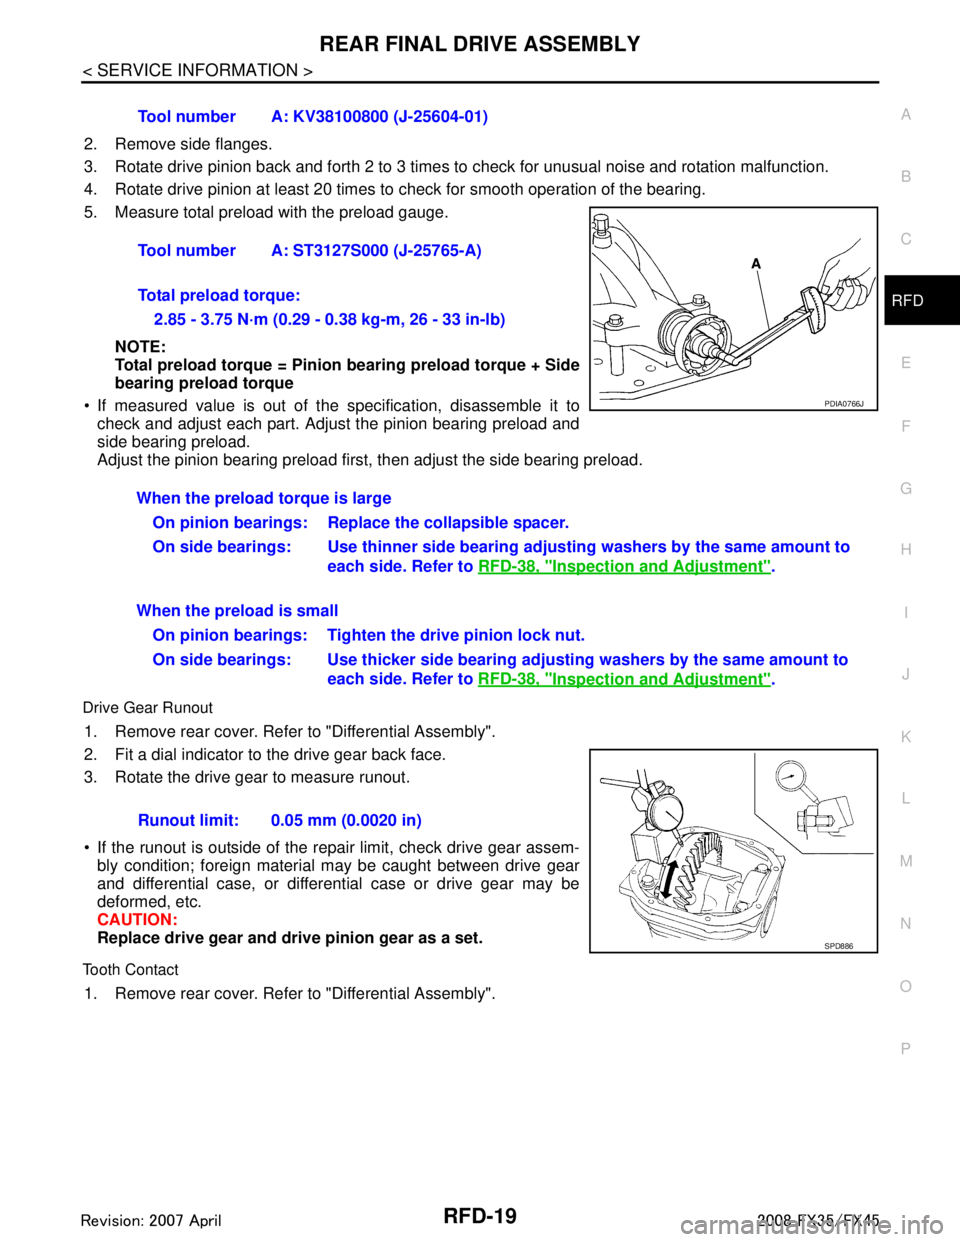
5. Measure total preload with the preload gauge.
NOTE:
Total preload torque = Pinion bearing preload torque + Side
bearing preload torque
If measured value is out of the specification, disassemble it to
check and adjust each part. Adjust the pinion bearing preload and
side bearing preload.
Adjust the pinion bearing preload first, then adjust the side bearing preload.
Drive Gear Runout
1. Remove rear cover. Refer to "Differential Assembly".
2. Fit a dial indicator to the drive gear back face.
3. Rotate the drive gear to measure runout.
If the runout is outside of the repair limit, check drive gear assem- bly condition; foreign material may be caught between drive gear
and differential case, or differential case or drive gear may be
deformed, etc.
CAUTION:
Replace drive gear and dri ve pinion gear as a set.
Tooth Contact
1. Remove rear cover. Refer to "Differential Assembly".Tool number A: KV38100800 (J-25604-01)
Tool number A: ST3127S000 (J-25765-A)
Total preload torque:
2.85 - 3.75 N·m (0.29 - 0.38 kg-m, 26 - 33 in-lb)
PDIA0766J
When the preload torque is largeOn pinion bearings: Replace the collapsible spacer.
On side bearings: Use thinner side bearing adjusting washers by the same amount to
each side. Refer to RFD-38, "
Inspection and Adjustment".
When the preload is small On pinion bearings: Tighten the drive pinion lock nut.
On side bearings: Use thicker side bearing adjusting washers by the same amount to
each side. Refer to RFD-38, "
Inspection and Adjustment".
Runout limit: 0.05 mm (0.0020 in)
SPD886
3AA93ABC3ACD3AC03ACA3AC03AC63AC53A913A773A893A873A873A8E3A773A983AC73AC93AC03AC3
3A893A873A873A8F3A773A9D3AAF3A8A3A8C3A863A9D3AAF3A8B3A8C
Page 3563 of 3924
REAR FINAL DRIVE ASSEMBLYRFD-21
< SERVICE INFORMATION >
CEF
G H
I
J
K L
M A
B
RFD
N
O P
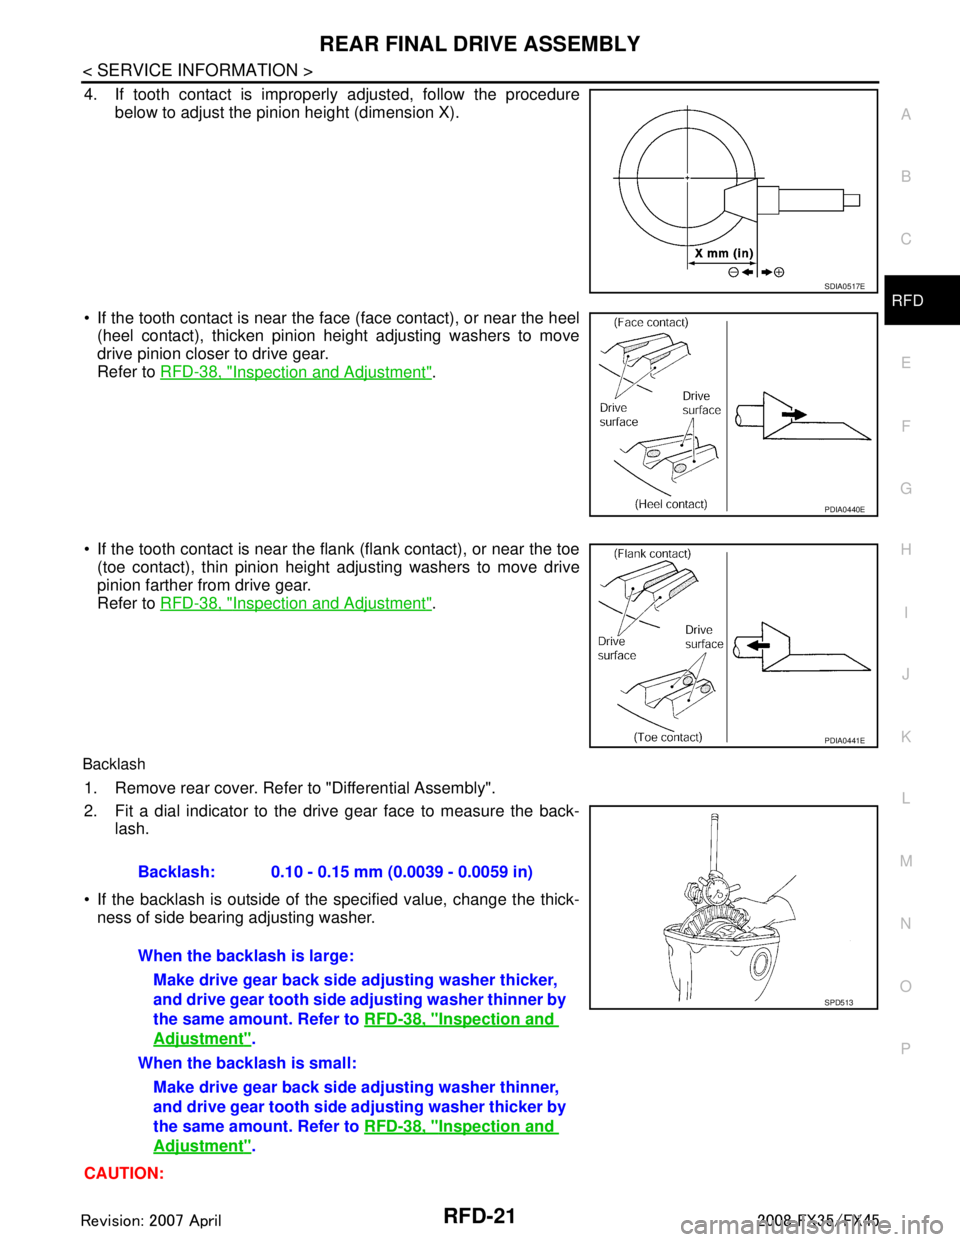
4. If tooth contact is improperly adjusted, follow the procedure
below to adjust the pinion height (dimension X).
If the tooth contact is near the face (face contact), or near the heel (heel contact), thicken pinion height adjusting washers to move
drive pinion closer to drive gear.
Refer to RFD-38, "
Inspection and Adjustment".
If the tooth contact is near the flank (flank contact), or near the toe
(toe contact), thin pinion height adjusting washers to move drive
pinion farther from drive gear.
Refer to RFD-38, "
Inspection and Adjustment".
Backlash
1. Remove rear cover. Refer to "Differential Assembly".
2. Fit a dial indicator to the drive gear face to measure the back-
lash.
If the backlash is outside of the specified value, change the thick- ness of side bearing adjusting washer.
CAUTION:
SDIA0517E
PDIA0440E
PDIA0441E
Backlash: 0.10 - 0.15 mm (0.0039 - 0.0059 in)
When the backlash is large: Make drive gear back side adjusting washer thicker,
and drive gear tooth side adjusting washer thinner by
the same amount. Refer to RFD-38, "
Inspection and
Adjustment".
When the backlash is small: Make drive gear back side adjusting washer thinner,
and drive gear tooth side ad justing washer thicker by
the same amount. Refer to RFD-38, "
Inspection and
Adjustment".
SPD513
3AA93ABC3ACD3AC03ACA3AC03AC63AC53A913A773A893A873A873A8E3A773A983AC73AC93AC03AC3
3A893A873A873A8F3A773A9D3AAF3A8A3A8C3A863A9D3AAF3A8B3A8C
Page 3564 of 3924

RFD-22
< SERVICE INFORMATION >
REAR FINAL DRIVE ASSEMBLY
Never change the total amount of washers as it will change the bearing preload.
Companion Flange Runout
1. Fit a test indicator to the inner side of companion flange (socket
diameter).
2. Rotate companion flange to check for runout.
3. If the runout value is outside t he runout limit, follow the proce-
dure below to adjust.
a. Check for runout while changing the phase between companion flange and drive pinion by 90 ° step, and search for the position
where the runout is the minimum.
b. If the runout value is still outside of the limit after the phase has been changed, possible cause will be an assembly malfunction of drive pinion and pinion bearing and
malfunction of pinion bearing. Check for these items and repair if necessary.
c. If the runout value is still outside of the limit after the check and repair, replace companion flange.
DISASSEMBLY
Differential Assembly
1. Drain gear oil, if necessary.
2. Remove side flange.
3. Remove rear cover mounting bolts.
4. Remove rear cover to insert the seal cutter between gear carrier and rear cover.
CAUTION:
Be careful not to damage the mating surface.
Never insert flat-bladed screwdriver, this way damage the
mating surface.
5. Using two 45 mm (1.77 in) spacers, mount carrier on the attach- ment.Runout limit: 0.08 mm (0.0031 in)
PDIA0490E
Tool number A: KV10111100 (J-37228)
PDIA0756J
Tool number A: KV38100800 (J-25604-01)
PDIA0757J
3AA93ABC3ACD3AC03ACA3AC03AC63AC53A913A773A893A873A873A8E3A773A983AC73AC93AC03AC3
3A893A873A873A8F3A773A9D3AAF3A8A3A8C3A863A9D3AAF3A8B3A8C
Page 3565 of 3924
REAR FINAL DRIVE ASSEMBLYRFD-23
< SERVICE INFORMATION >
CEF
G H
I
J
K L
M A
B
RFD
N
O P
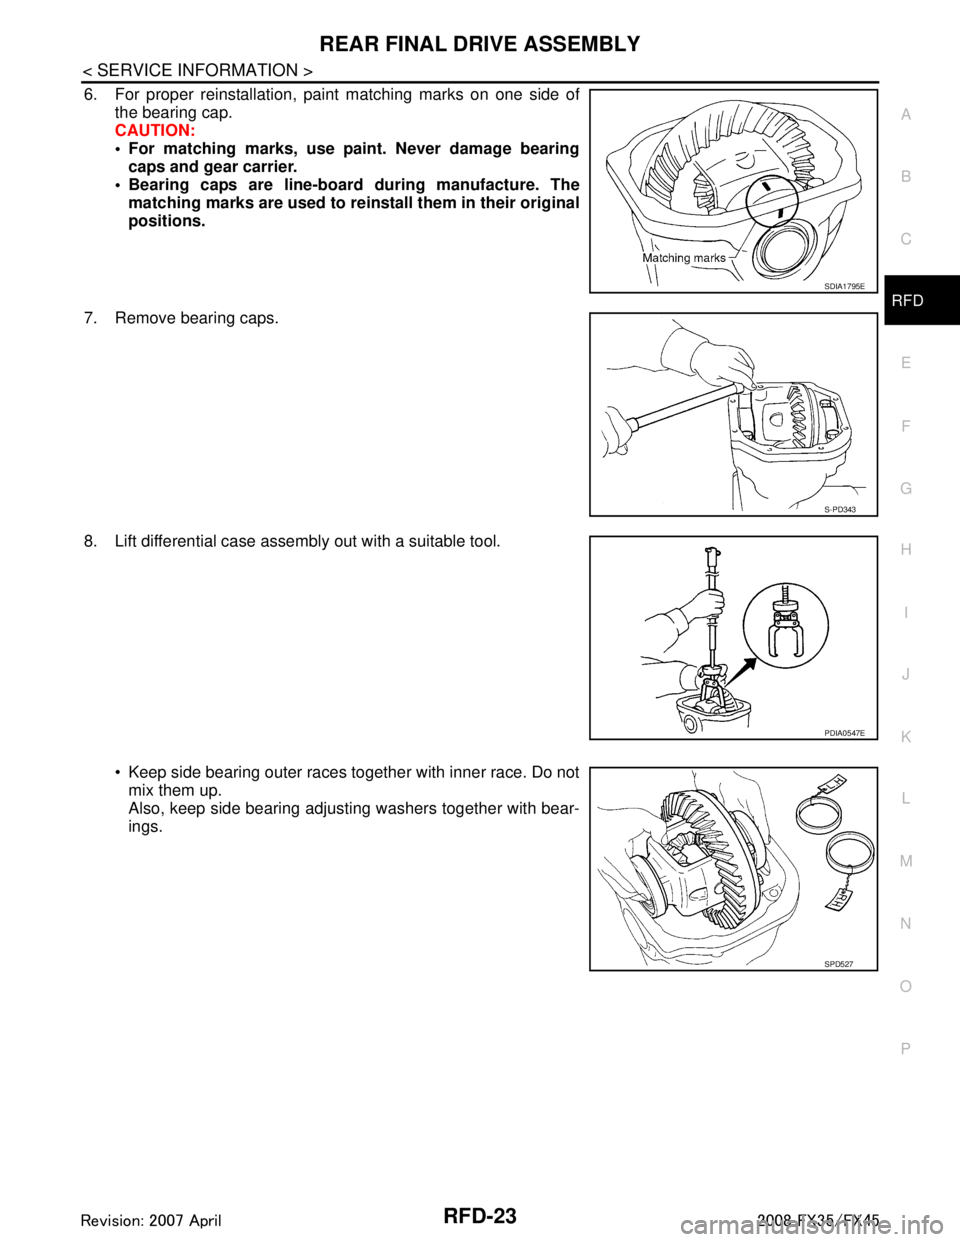
6. For proper reinstallation, paint matching marks on one side of the bearing cap.
CAUTION:
For matching marks, use paint. Never damage bearingcaps and gear carrier.
Bearing caps are line-board during manufacture. The
matching marks are used to re install them in their original
positions.
7. Remove bearing caps.
8. Lift differential case assembly out with a suitable tool.
Keep side bearing outer races together with inner race. Do notmix them up.
Also, keep side bearing adjusting washers together with bear-
ings.
SDIA1795E
S-PD343
PDIA0547E
SPD527
3AA93ABC3ACD3AC03ACA3AC03AC63AC53A913A773A893A873A873A8E3A773A983AC73AC93AC03AC3
3A893A873A873A8F3A773A9D3AAF3A8A3A8C3A863A9D3AAF3A8B3A8C