Page 257 of 404

Child Safety -
---------------''----
& WARNING
Rearward-facing child restraints:
• A child in a rearward-facing child safety seat installed on the
front passenger seat will be seriously injured and can be killed if
the front airbag inflates -even with an Advanced Airbag System.
• The inflating airbag will hit the child safety seat or infant
carrier with great force and will smash the child safety seat and
child against the backrest, center arm rest, door or roof.
• Always be especially careful if you must install a rearward
facing child safety seat on the front passenger seat in exceptional
circumstances.
• A tight tether strap on a rearward-facing child restraint
attached to the front passenger seat can put too much pressure
on the weight-mat in the seat and register a heavier weight in the
Advanced Airbag System. The heavier weight registered can make
the system work as though an adult were on the seat and deploy
the Advanced Airbag when it must be suppressed causing serious or even fatal injury to the child.
• Make sure that the PASSENGER AIR BAG OFF light comes on
and stays on all the time whenever the ignition is switched on .
• If the PASSENGER AIR BAG OFF light does not come on and stay
on, immediately install the rear-facing child safety seat in a rear
seating position and have the airbag system inspected by your
Audi dealer. •
Activating the convertible locking retractor
Use the convertible locking retractor to secure a child
restraint.
Always heed the child safety seat manufacturer's instruc
tions when installing a child restraint in your vehicle. To
activate the convertible locking retractor:
Controls and equip
ment Safety first
Vehicle operation
-Place the child restraint on a seat, preferably on the rear
seat.
-Slowly pull the belt all the way out.
-Route it around or through the child restraint belt path
=>& .
-Push the child safety seat down with your full weight to
get the safety belt really tight.
-Insert the belt tongue into the buckle for that seating
position.
-Guide the safety belt back into the retractor until the belt
lies flat and snug on the child safety seat.
-You should hear a "clicking" noise as the belt winds back
into the inertia reel. Test the convertible locking retractor
by pul ling on the belt. You should no longer be able to
pull the belt out of the retractor. The convertible locking
retractor is now activated.
-Make sure that the red release button is facing away from
the child restraint so that it can be unbuckled quickly.
-Pull on the belt to make sure the safety belt is properly
tight and fastened so that the seat cannot move forward
or sideways more than one inch (2.5 cm).
& WARNING
Using the wrong child restraint or an improperly installed child
restraint can cause serious personal injury or death in a crash.
• Always make sure that the safety belt retractor is locked when
installing a child safety seat. An unlocked safety belt retractor
cannot hold the child safety seat in place during normal driving or
in a crash.
~
Vehicle care Do-it-yourself service Technical data
Page 258 of 404

__ _:C~ h~il ~d !.._ S~ a~fe ~t~ y~ ------------------------------------------
&, WARNING (continued)
• Always buckle the child safety seat firmly in place even if a
child is not sitting in it. A loose child safety seat can fly around
during a sudden stop or in a crash .
• Always make sure the seat backrest to which the child restraint
is installed is in an upright position and securely latched into place
and cannot fold forward. Otherwise, the seat back with the child
safety seat attached to it could fly forward in the event of an acci
dent or other emergency situation.
• Always read and heed all WARNINGS whenever using a child
restrained in a vehicle is being used
=> page 243. Special precau
tions apply when installing a child safety seat on the front
passenger seat
=> page 220, "Child restraints on the front seat -
some important things to know".•
Deactivating the convertible locking retractor
The convertible locking retractor for child restraints will
be deactivated automatically when the belt is wound all the way back into the retractor.
-Press the red button on the safety belt buckle. The belt
tongue will pop out of the buckle.
- Guide the belt all the way back into its stowed position.
Always let the safety belt retract completely into its stowed position.
The safety belt can now be used as an ordinary safety belt without
the convertible locking retractor for child restraints.
If the convertible locking retractor should be activated inadvert
ently, the safety belt must be unfastened and guided completely
back into its stowed position to deactivate this feature. If the
convertible locking retractor is not deactivated, the safety belt will
gradually become tighter and uncomfortable to wear.
& WARNING
Improperly installed child safety seats increase the risk of serious
personal injury and death in a collision.
• Never unfasten the safety belt to deactivate the convertible
locking retractor for child restraints while the vehicle is moving.
You would not be restrained and could be seriously injured in an
accident.
• Always read and heed all WARNINGS whenever using a child
restrained in a vehicle is being used
=> page 243. Special precau
tions apply when installing a child safety seat on the front
passenger seat
=> page 220, "Child restraints on the front seat -
some important things to know" .•
Additional Information
What types of child restraint anchors are
available and how are they related to child
safety?
For years, child restraints have been installed using the safety belts
already present in every vehicle.
Since September
1, 1999, child restraint manufacturers have been
providing tether straps that attach the top of the child restraint to
the vehicles structure, on most of their forward-facing systems in order to comply with U .S . Federal regulations for child restraint
performance in a crash. Vehicle manufacturers are required to
phase -in tether anchorages for attachment of the tether strap in
their U.S. vehicles beginning September 1, 1999.
The combination of the tether anchorages and the lower anchor
ages is now generally called the
LATCH system for "Lower Anchor
and Tether for Children".
~
Page 259 of 404

Child Safet y -
---------------''----
(The term "ISO FIX" regarding lower anchorages had been used by
Audi and other manufactu rers in the past, but LATCH is now the
standard name for the new child restraint anchorage system.)
Some child restraint system manufacturers have been providing
tether straps on certain mode ls of their child restraint systems,
either as standard equipment or as a retrofit, for several years .
Check with the manufacturer of the ch ild restraint system for tether
strap availability .
To provide a simpler and more practicable way to attach the child restraint system on the vehicle seat, U .S . Federal regulations require
the phase -in of lower anchorages in vehic les and devices on new
ch ild restraint systems to attach to the veh icle anchorages.
Child restraint system manufacturers will probably offer two kinds
of lower anchorages on their child safety seats
T hey could come with:
• hooks or other latches attached to adjustable straps or
• rigid latches on bars tha t extend out the back of the child
restraint and are released with release but tons at the bottom of the
child restraint.
In addition to the LATCH lower anchorages, both of these chi ld
restra int systems use tether straps to he lp keep the ch ild restraint
system firmly in place .•
Where can I get additional information about
child restraint application and usage?
There are a number of sources of additional information about child
restra int select ion , instal lat ion and usage :
NH TSA advises that the bes t child saf ety seat is the one that fits
your ch ild and fits in your ve hicle, and that you wi ll use correctly and
consistent ly.
Try before you buy!
Controls and equip ment Safety first Vehicle operation Nat
iona l High way Traffic Safet y Admini stra tion
Te l.: (888) DASH -2 -DOT
www .nhtsa .dot .gov
N ati ona l S AF E K IDS Camp aign
Tel.: (202) 662 -0600
www .safekids.org
Saf ety BeltS afe U .S .A
Tel.: (800) 745-SAFE (English)
Te l.: (800) 7 47-SANO (Spanish)
www.carseat .org
Tr an sport Can ad a
Tel.: (800) 333-0371
www .tc.gc .ca
Aud i Cl ient Rel ations
Te l.: (800) 822-2834
•
Vehicle care Do-it-yourself service Technical data
Page 260 of 404

___ C_h_ i_ld _ S_ a_ f_ e_ t-= y'-------------------------------------------------
Lower anchorages and tether for
children (LATCH)
Location
LATCH is the acronym for Lower Anchor and Tethers for
Children and designates a special child safety seat
restraint system. In Canada, the terms
"top tether" with
"lower universal anchorages" (or "lower universal
anchorage bars") are used to describe the system.
Fig . 244 Schematic
overview: LATCH
anchorage point loca
tions
The illustration =:> fig. 244 shows the seating locations in your
vehicle which are equipped with the lower universal anchorages system. •
Description
The lower anchorage positions are marked for quick
locating.
Fig . 245 Rear seat
backs: locator buttons
for lower anchorages
Fig. 246 Rear seats:
lower anchorage
bracket locations
Attachment locator markers for lower anchorages
Circular locator buttons on the rear seatback indicate the lower
anchorage locations on the rear seating
positions=> fig . 245.
Lower anchorages
The lower anchorage attachment points are located between the
rear seatback and rear seat
cushion =:> fig. 246.
Lower anchorages secure the child restraint in the seat without
using the vehicle's safety belts . Anchorages provide a secure and
.,_
Page 261 of 404

easy-to-use attachment and minimize the possibility of improper
child restraint installation.
All child restraints manufactured after September 1, 2002, must
have lower anchorage attachments for the LATCH system.
Please re member that the lower anchorage points are only intended
for installation and attachment of chi ld restraints specifically certi
fied for use with LATCH lower anchorages. Child restraints that are
not equipped with the lower anchorage attachments can still be
installed in compliance with the child restraint manufacturer's
instructions on using vehicle safety be lts .
& WARNING
Improper installation of child restraints will increase the risk of
injury in a crash.
• Always carefully follow the child restraints manufacturer's
instructions for proper installation of the child restraint and
proper use of the lower anchorages or safety belts in your vehicle.
• Never secure or attach any luggage or other items to the
LATCH
lower anchorages.
• Always read and heed the important information about child
restraints in this chapter and WARNINGS
=> page 243 , "Child
Safety".•
Child Safety
Guidance fixtures far lower anchorages
Special guidance fixtures increase the convenience of the
lower anchorages and are available from your authorized
Audi dealer.
Fig. 247 Outer rear
seats : in stallin g the
guidance fixtures
Fig. 248 Close-up:
fitting the guidance
fixture over the lower
anchorage bracket
T h e lower anchorage attachment points are located on the
rear seats between th e seatback and the seat cushion.
Spec ial guidan ce fixtures increase the co nvenience of the
lower anchorages and help protect th e seat material from
possible damage when installing child restraints that have
rigid lower anchorages and not straps with hooks.
.,_
•
Vehicle care I I irechnical data
Page 262 of 404

--~C:!:h ~i~
ld ~ S~a ~f ~e ~t ,rY ____________________________________________ _
Installing the guidance fixtures
- Push down on the seat cushion so that the lower anchor
ages are visible.
- Hold the guidance fixture with the part number facing downward and push it in the direction of the arrow onto
the
anchorage => page 259, fig. 248.
- Make sure that each of the two guidance fixtures per seat snaps into place.
Removing the guidance fixtures
- Remove the child restraint according the child restraint manufacturer's instructions.
- Push down on the seat cushion so that the lower anchor
ages are visible.
- Pull off the guidance fixtures from the lower anchorages.
-Always remove the guidance fixtures and keep them in a
safe place when not in use.
You may find it easier to install child restraints equipped with hooks
attached to straps without the guidance fixtures in place . If this is
the case, remove the guidance fixtures by pulling them off the
anchorages. However, the guidance fixtures can help you to locate
the
LATCH anchorages.
& WARNING
Improper use of tether anchorages or lower anchorages can cause
serious personal injury in a crash.
• Always carefully follow the child restraint manufacturer's
instructions for proper installation and use of child restraint
systems.
& WARNING (continued)
• Never use the LATCH or tether anchorages to attach safety
belts or other kinds of occupant restraints.
• Child restraint tether attachments and lower attachments are
only designed to secure a child restraint that has been equipped
to use these anchorages.
• Tether anchorages and lower anchorages are designed to with
stand only those loads imposed by correctly fitted child restraints.
Under no circumstances can they be used safely for adult or child
safety belts or harnesses.
• Never mount more than one child restraint to a single tether or
to a lower anchorage point. Attaching two child restraints to a
single anchorage point can cause the anchorage to fail and cause
serious personal injury in a crash.
0 Note
• Remove the guidance fixtures before folding the rear seatback to
prevent damaging the seat cushion.
• If you leave the guidance fixtures installed for several days, they
could leave a mark on the upholstery on the seat cushion and back
rest in the area that the guidance fixtures were installed. The uphol
stery would also be permanently stretched around the guidance
fixtures . This applies especially to leather seats.
[ i] Tips
• Always remove the guidance fixtures when not in use .
• Please keep the guidance fixtures in a safe place with the vehicle
when not in use. •
Page 263 of 404

Installing a child restraint using the lower
anchorages of the LATCH system
Child safety seats equipped with the LATCH system can
quickly and easily be secured to the rear seats.
0 N ;;; t1.
~
Fig . 249 LATCH -type
seat with both latch
bars extended
Fig. 250 Installation of
child safety seat with
rigid latches on bars
Whenever you install a child restraint always refer to the
child restraint manufacturer's instructio ns .
-Make sure the seat back of the rear seat bench is in the
uprig ht positio n and securely latched in place.
-Insta ll the guidance fixtures ~ page 259.
-Insert the latches onto the lower anchorages==> fig. 250.
Child Safety
-Make sure you hear the child restraint click securely into
place. This indicates that the seat is securely mounted on
the anchors.
-Pull on the child restraint once you have mounted it to
make sure it is secure.
& WARNING
Improper use of the LATCH system can increase the risk of serious
personal injury and death in an accident.
• These anchors were developed solely for child safety seats
using the "LATCH" system.
• Never attach other child safety seats, belts or other objects to
these anchors .
• Always make sure that you hear a click when latching the seat
in place. If you do not hear a click the seat is not secure and could
fly forward and hit the interior of the vehicle, or be ejected from
the vehicle .
& WARNING
Improper installation of child restraints will increase the risk of
injury in an accident.
• Always follow the child restraint system manufacturer's
instructions for proper installation of the child restraint system
and proper use of tether straps as well as the lower anchorages or
safety belts in your vehicle .
• Always read and heed the important information and WARN
INGS about child safety and the installation of child restraint
systems ~ page 243, "Child Safety". .,
Vehicle care I I irechnical data
Page 264 of 404

___ C_h _i_ld _ S_a _f_e _t ~y ____________________________________________ _
0 Note
On vehicles with power individual rear seats* some criteria must be
observed when attaching the child restraint using the
LATCH
system:
• To attach the child restraint securely, the seat must be moved to
the farthest rear position, the seat height set to the lowest position and the head restraint must be adjusted to the vertical position
=> page 97.
• If a child safety seat is attached to one of the rear seats, this seat
must not be adjusted using the power controls under any circum
stances. The easy entry function for this seat must also be deacti
vated in the
MMI => page 100 . The child safety seat as well as the
rear seat can be damaged by the adjustment process .•
Mounting and releasing the anchorage hook
If you use a child restraint system with hooks or other
latches attached to adjustable straps.
Mounting
- Press the anchorage hook with the spring catch release
onto the lower anchorage so that the anchorage hook
locks into place .
- Pull on the anchorage hook to make sure that it has
securely engaged the lower anchorage.
- Tighten the strap following the child restraint manufac
turer's instructions.
Releasing
-Loosen the tension on the strap following the child
restraint manufacturer's instructions .
- Depress the spring catch on the hook. -
Hold the spring catch in depressed position.
-Move the hook in the direction of the vehicle floor so that
there is enough space to release the anchorage hook
from the lower anchorage.
& WARNING
• Improper installation of child restraints will increase the risk of
injuries in a crash.
• Always refer to the child restraints manufacturer's instructions
for proper installation of the child restraint and proper use of the
lower anchorages or safety belts in your vehicle.
•
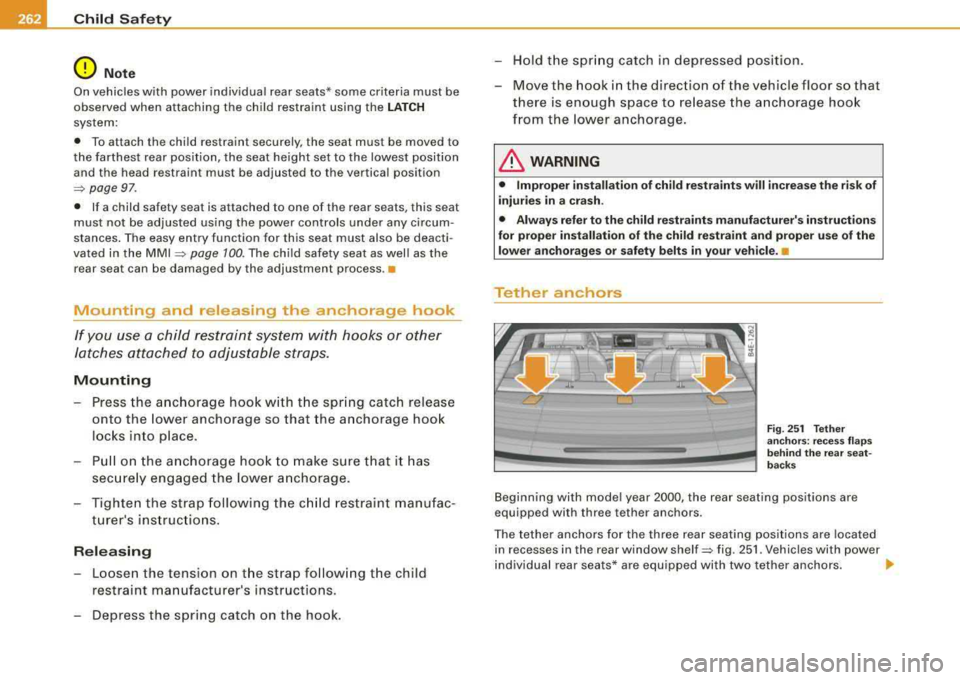
Tether anchors
Fig . 251 Tether
anchors: recess flaps
behind the rear seat
backs
Beginning with model year 2000 , the rear seating positions are
equipped with three tether anchors .
The tether anchors for the three rear seating positions are located
in recesses in the rear window
shelf=> fig. 251 . Vehicles with power
individual rear seats* are equipped with two tether anchors.
.,