Page 4498 of 5883
POWER WINDOW MAIN SWITCH
PWC-37
< ECU DIAGNOSIS >
C
D
E
F
G
H
I
J
L
MA
B
PWC
N
O
P
1: LHD
2: RHD10
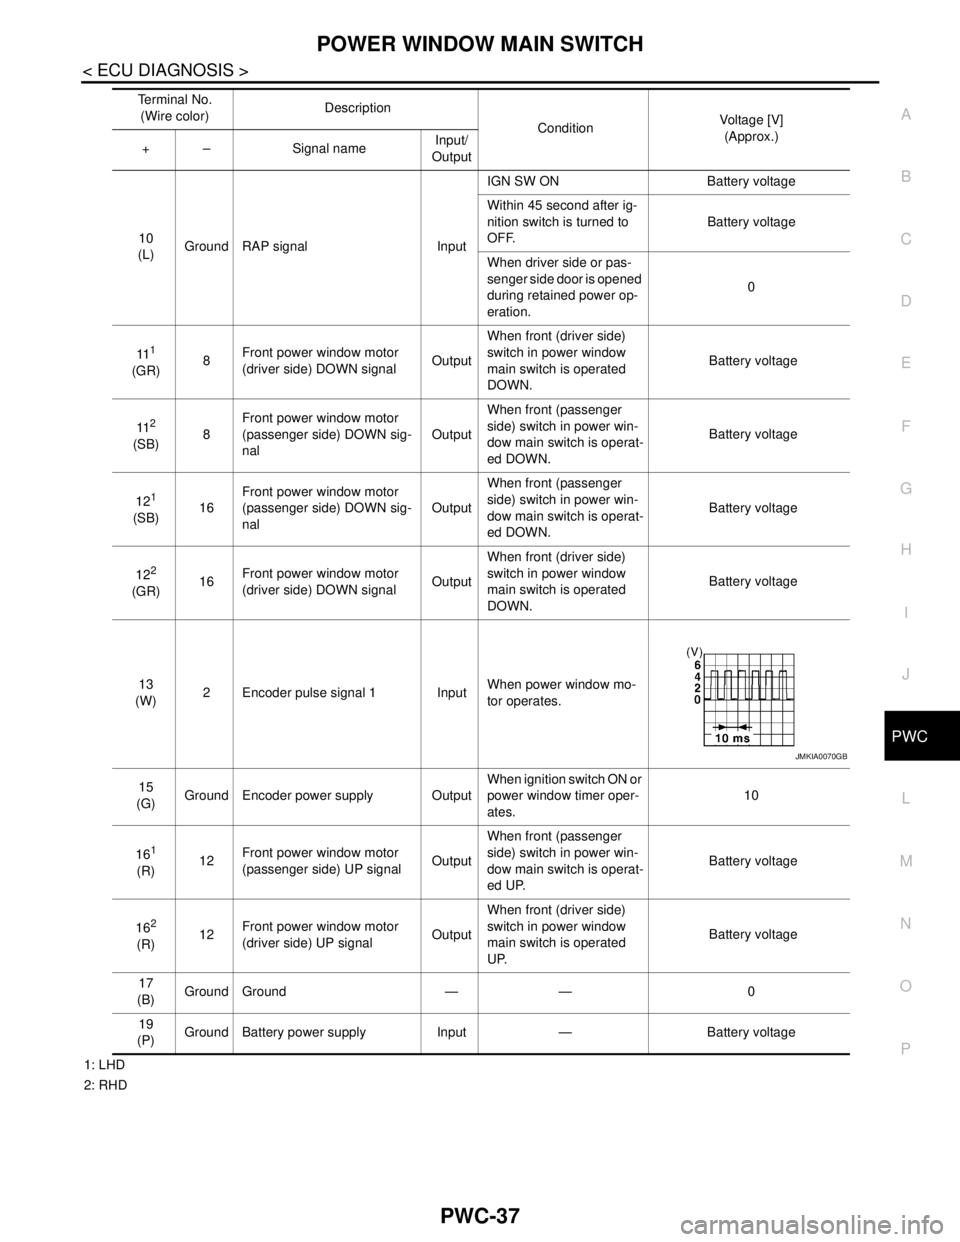
(L)Ground RAP signal InputIGN SW ON Battery voltage
Within 45 second after ig-
nition switch is turned to
OFF.Battery voltage
When driver side or pas-
senger side door is opened
during retained power op-
eration.0
11
1
(GR)8Front power window motor
(driver side) DOWN signalOutputWhen front (driver side)
switch in power window
main switch is operated
DOWN. Battery voltage
11
2
(SB)8Front power window motor
(passenger side) DOWN sig-
nalOutputWhen front (passenger
side) switch in power win-
dow main switch is operat-
ed DOWN. Battery voltage
12
1
(SB)16Front power window motor
(passenger side) DOWN sig-
nalOutputWhen front (passenger
side) switch in power win-
dow main switch is operat-
ed DOWN. Battery voltage
12
2
(GR)16Front power window motor
(driver side) DOWN signalOutputWhen front (driver side)
switch in power window
main switch is operated
DOWN. Battery voltage
13
(W)2 Encoder pulse signal 1 InputWhen power window mo-
tor operates.
15
(G)Ground Encoder power supply OutputWhen ignition switch ON or
power window timer oper-
ates.10
16
1
(R)12Front power window motor
(passenger side) UP signalOutputWhen front (passenger
side) switch in power win-
dow main switch is operat-
ed UP. Battery voltage
16
2
(R)12Front power window motor
(driver side) UP signalOutputWhen front (driver side)
switch in power window
main switch is operated
UP. Battery voltage
17
(B)Ground Ground — — 0
19
(P)Ground Battery power supply Input — Battery voltage Te r m i n a l N o .
(Wire color)Description
ConditionVoltage [V]
(Approx.)
+ – Signal name Input/
Output
JMKIA0070GB
Page 4514 of 5883
NONE OF THE POWER WINDOWS CAN BE OPERATED USING ANY SWITCH
PWC-53
< SYMPTOM DIAGNOSIS >
C
D
E
F
G
H
I
J
L
MA
B
PWC
N
O
P
SYMPTOM DIAGNOSIS
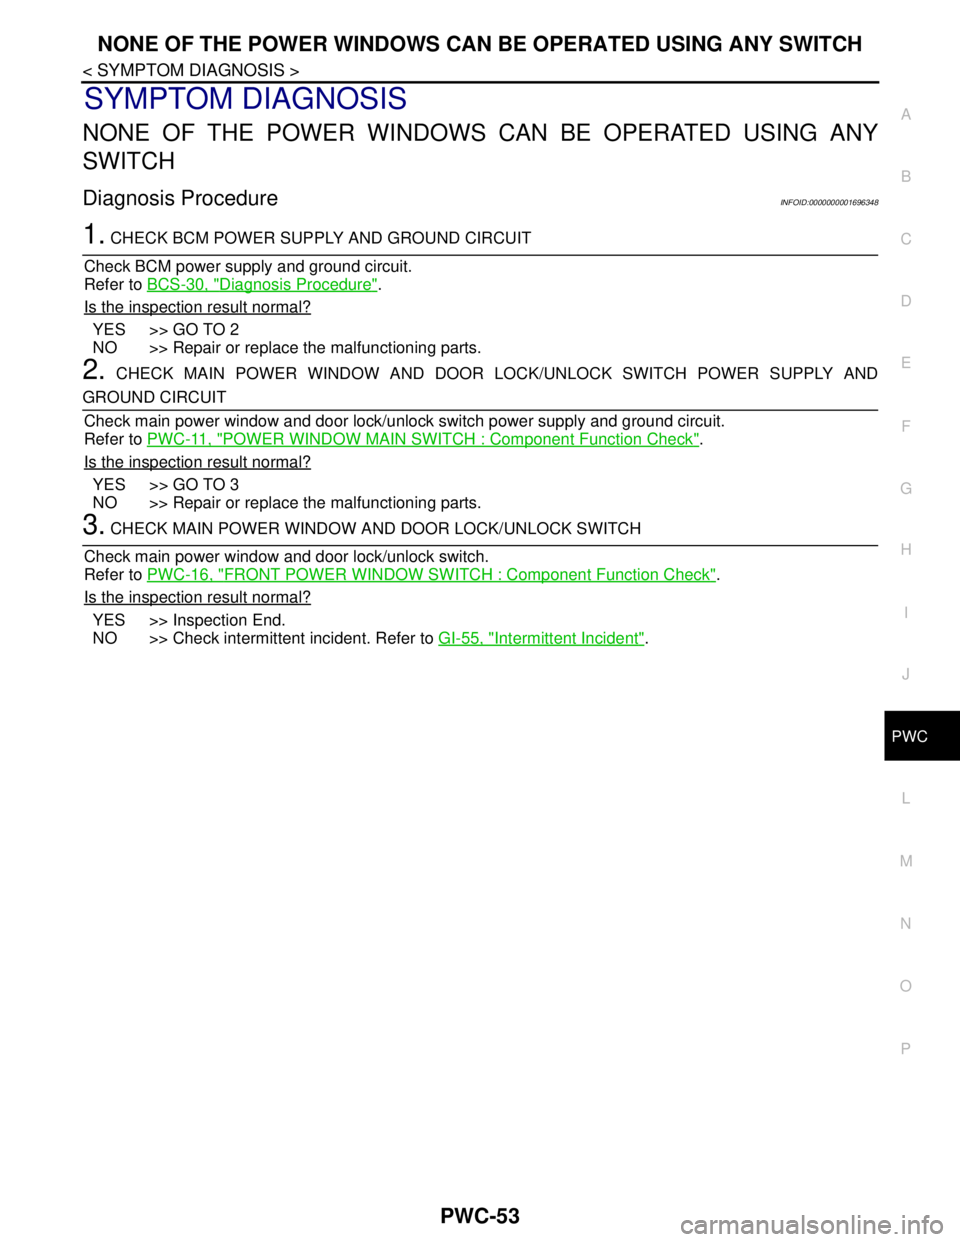
NONE OF THE POWER WINDOWS CAN BE OPERATED USING ANY
SWITCH
Diagnosis ProcedureINFOID:0000000001696348
1. CHECK BCM POWER SUPPLY AND GROUND CIRCUIT
Check BCM power supply and ground circuit.
Refer to BCS-30, "
Diagnosis Procedure".
Is the inspection result normal?
YES >> GO TO 2
NO >> Repair or replace the malfunctioning parts.
2. CHECK MAIN POWER WINDOW AND DOOR LOCK/UNLOCK SWITCH POWER SUPPLY AND
GROUND CIRCUIT
Check main power window and door lock/unlock switch power supply and ground circuit.
Refer to PWC-11, "
POWER WINDOW MAIN SWITCH : Component Function Check".
Is the inspection result normal?
YES >> GO TO 3
NO >> Repair or replace the malfunctioning parts.
3. CHECK MAIN POWER WINDOW AND DOOR LOCK/UNLOCK SWITCH
Check main power window and door lock/unlock switch.
Refer to PWC-16, "
FRONT POWER WINDOW SWITCH : Component Function Check".
Is the inspection result normal?
YES >> Inspection End.
NO >> Check intermittent incident. Refer to GI-55, "
Intermittent Incident".
Page 4515 of 5883
PWC-54
< SYMPTOM DIAGNOSIS >
DRIVER SIDE POWER WINDOW ALONE DOES NOT OPERATE
DRIVER SIDE POWER WINDOW ALONE DOES NOT OPERATE
Diagnosis ProcedureINFOID:0000000001696349
1. CHECK FRONT POWER WINDOW MOTOR (DRIVER SIDE)
Check front power window motor (driver side).
Refer to PWC-22, "
DRIVER SIDE : Component Function Check".
Is the inspection result normal?
YES >> Inspection End.
NO >> Check intermittent incident. Refer to GI-55, "
Intermittent Incident".
Page 4516 of 5883
FRONT PASSENGER SIDE POWER WINDOW ALONE DOES NOT OPERATE
PWC-55
< SYMPTOM DIAGNOSIS >
C
D
E
F
G
H
I
J
L
MA
B
PWC
N
O
P
FRONT PASSENGER SIDE POWER WINDOW ALONE DOES NOT OPER-
AT E
Diagnosis ProcedureINFOID:0000000001696350
1. CHECK POWER WINDOW AND DOOR LOCK/UNLOCK SWITCH (PASSENGER SIDE)
Check power window and door lock/unlock switch (passenger side).
Refer to PWC-16, "
FRONT POWER WINDOW SWITCH : Component Function Check".
Is the inspection result normal?
YES >> GO TO 2
NO >> Repair or replace the malfunctioning parts.
2. CHECK FRONT POWER WINDOW MOTOR (PASSENGER SIDE) CIRCUIT
Check front power window motor (passenger side) circuit.
Refer to PWC-24, "
PASSENGER SIDE : Component Function Check".
Is the inspection result normal?
YES >> Inspection End.
NO >> Check intermittent incident. Refer to GI-55, "
Intermittent Incident".
Page 4521 of 5883
PWC-60
< SYMPTOM DIAGNOSIS >
POWER WINDOW RETAINED POWER OPERATION DOES NOT OPERATE
PROPERLY
POWER WINDOW RETAINED POWER OPERATION DOES NOT OPER-
ATE PROPERLY
Diagnosis ProcedureINFOID:0000000001696355
1. CHECK FRONT DOOR SWITCH
Check front door switch.
Refer to PWC-32, "
Component Function Check".
Is the inspection result normal?
YES >> Inspection End.
NO >> Check intermittent incident. Refer to GI-55, "
Intermittent Incident".
Page 4525 of 5883
PWO-2
< PRECAUTION >
PRECAUTIONS
PRECAUTION
PRECAUTIONS
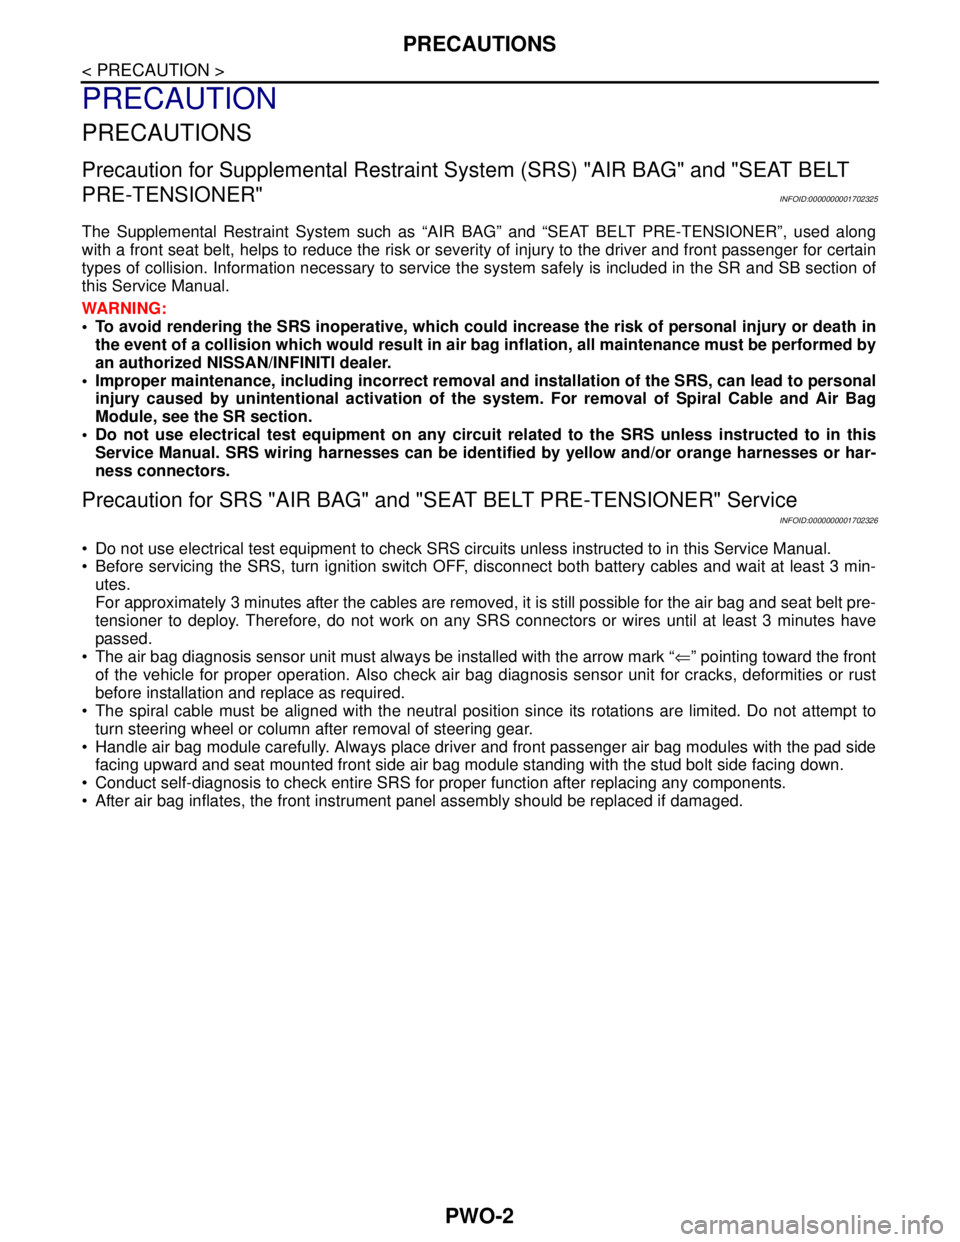
Precaution for Supplemental Restraint System (SRS) "AIR BAG" and "SEAT BELT
PRE-TENSIONER"
INFOID:0000000001702325
The Supplemental Restraint System such as “AIR BAG” and “SEAT BELT PRE-TENSIONER”, used along
with a front seat belt, helps to reduce the risk or severity of injury to the driver and front passenger for certain
types of collision. Information necessary to service the system safely is included in the SR and SB section of
this Service Manual.
WARNING:
• To avoid rendering the SRS inoperative, which could increase the risk of personal injury or death in
the event of a collision which would result in air bag inflation, all maintenance must be performed by
an authorized NISSAN/INFINITI dealer.
Improper maintenance, including incorrect removal and installation of the SRS, can lead to personal
injury caused by unintentional activation of the system. For removal of Spiral Cable and Air Bag
Module, see the SR section.
Do not use electrical test equipment on any circuit related to the SRS unless instructed to in this
Service Manual. SRS wiring harnesses can be identified by yellow and/or orange harnesses or har-
ness connectors.
Precaution for SRS "AIR BAG" and "SEAT BELT PRE-TENSIONER" Service
INFOID:0000000001702326
Do not use electrical test equipment to check SRS circuits unless instructed to in this Service Manual.
Before servicing the SRS, turn ignition switch OFF, disconnect both battery cables and wait at least 3 min-
utes.
For approximately 3 minutes after the cables are removed, it is still possible for the air bag and seat belt pre-
tensioner to deploy. Therefore, do not work on any SRS connectors or wires until at least 3 minutes have
passed.
The air bag diagnosis sensor unit must always be installed with the arrow mark “⇐” pointing toward the front
of the vehicle for proper operation. Also check air bag diagnosis sensor unit for cracks, deformities or rust
before installation and replace as required.
The spiral cable must be aligned with the neutral position since its rotations are limited. Do not attempt to
turn steering wheel or column after removal of steering gear.
Handle air bag module carefully. Always place driver and front passenger air bag modules with the pad side
facing upward and seat mounted front side air bag module standing with the stud bolt side facing down.
Conduct self-diagnosis to check entire SRS for proper function after replacing any components.
After air bag inflates, the front instrument panel assembly should be replaced if damaged.
Page 4530 of 5883
PRECAUTIONS
RAX-3
< PRECAUTION >
C
E
F
G
H
I
J
K
L
MA
B
RAX
N
O
P
PRECAUTION
PRECAUTIONS
Precaution for Supplemental Restraint System (SRS) "AIR BAG" and "SEAT BELT
PRE-TENSIONER"
INFOID:0000000001724594
The Supplemental Restraint System such as “AIR BAG” and “SEAT BELT PRE-TENSIONER”, used along
with a front seat belt, helps to reduce the risk or severity of injury to the driver and front passenger for certain
types of collision. Information necessary to service the system safely is included in the SR and SB section of
this Service Manual.
WARNING:
• To avoid rendering the SRS inoperative, which could increase the risk of personal injury or death in
the event of a collision which would result in air bag inflation, all maintenance must be performed by
an authorized NISSAN/INFINITI dealer.
Improper maintenance, including incorrect removal and installation of the SRS, can lead to personal
injury caused by unintentional activation of the system. For removal of Spiral Cable and Air Bag
Module, see the SR section.
Do not use electrical test equipment on any circuit related to the SRS unless instructed to in this
Service Manual. SRS wiring harnesses can be identified by yellow and/or orange harnesses or har-
ness connectors.
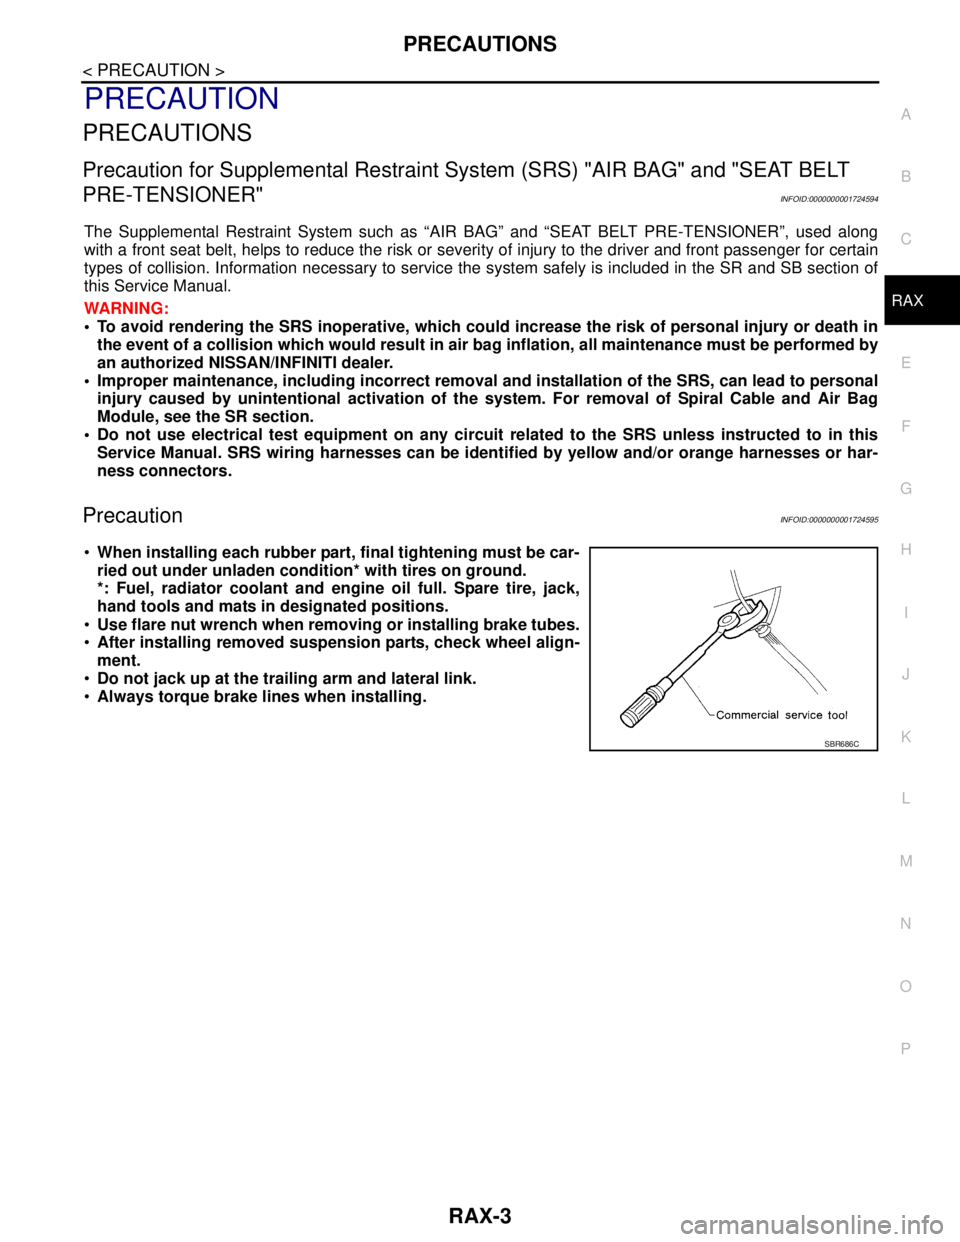
PrecautionINFOID:0000000001724595
When installing each rubber part, final tightening must be car-
ried out under unladen condition* with tires on ground.
*: Fuel, radiator coolant and engine oil full. Spare tire, jack,
hand tools and mats in designated positions.
Use flare nut wrench when removing or installing brake tubes.
After installing removed suspension parts, check wheel align-
ment.
Do not jack up at the trailing arm and lateral link.
Always torque brake lines when installing.
SBR686C
Page 4537 of 5883
PRECAUTIONS
RF-3
< PRECAUTION >
C
D
E
F
G
H
I
J
L
MA
B
RF
N
O
P
PRECAUTION
PRECAUTIONS
Precaution for Supplemental Restraint System (SRS) "AIR BAG" and "SEAT BELT
PRE-TENSIONER"
INFOID:0000000001731063
The Supplemental Restraint System such as “AIR BAG” and “SEAT BELT PRE-TENSIONER”, used along
with a front seat belt, helps to reduce the risk or severity of injury to the driver and front passenger for certain
types of collision. Information necessary to service the system safely is included in the “SRS AIRBAG” and
“SEAT BELT” of this Service Manual.
WARNING:
• To avoid rendering the SRS inoperative, which could increase the risk of personal injury or death in
the event of a collision which would result in air bag inflation, all maintenance must be performed by
an authorized NISSAN/INFINITI dealer.
Improper maintenance, including incorrect removal and installation of the SRS, can lead to personal
injury caused by unintentional activation of the system. For removal of Spiral Cable and Air Bag
Module, see the “SRS AIRBAG”.
Do not use electrical test equipment on any circuit related to the SRS unless instructed to in this
Service Manual. SRS wiring harnesses can be identified by yellow and/or orange harnesses or har-
ness connectors.