2007 MITSUBISHI LANCER EVOLUTION heater
[x] Cancel search: heaterPage 1411 of 1449

HEATER, AIR CONDITIONER AND VENTILATION-Troubleshooting55-9
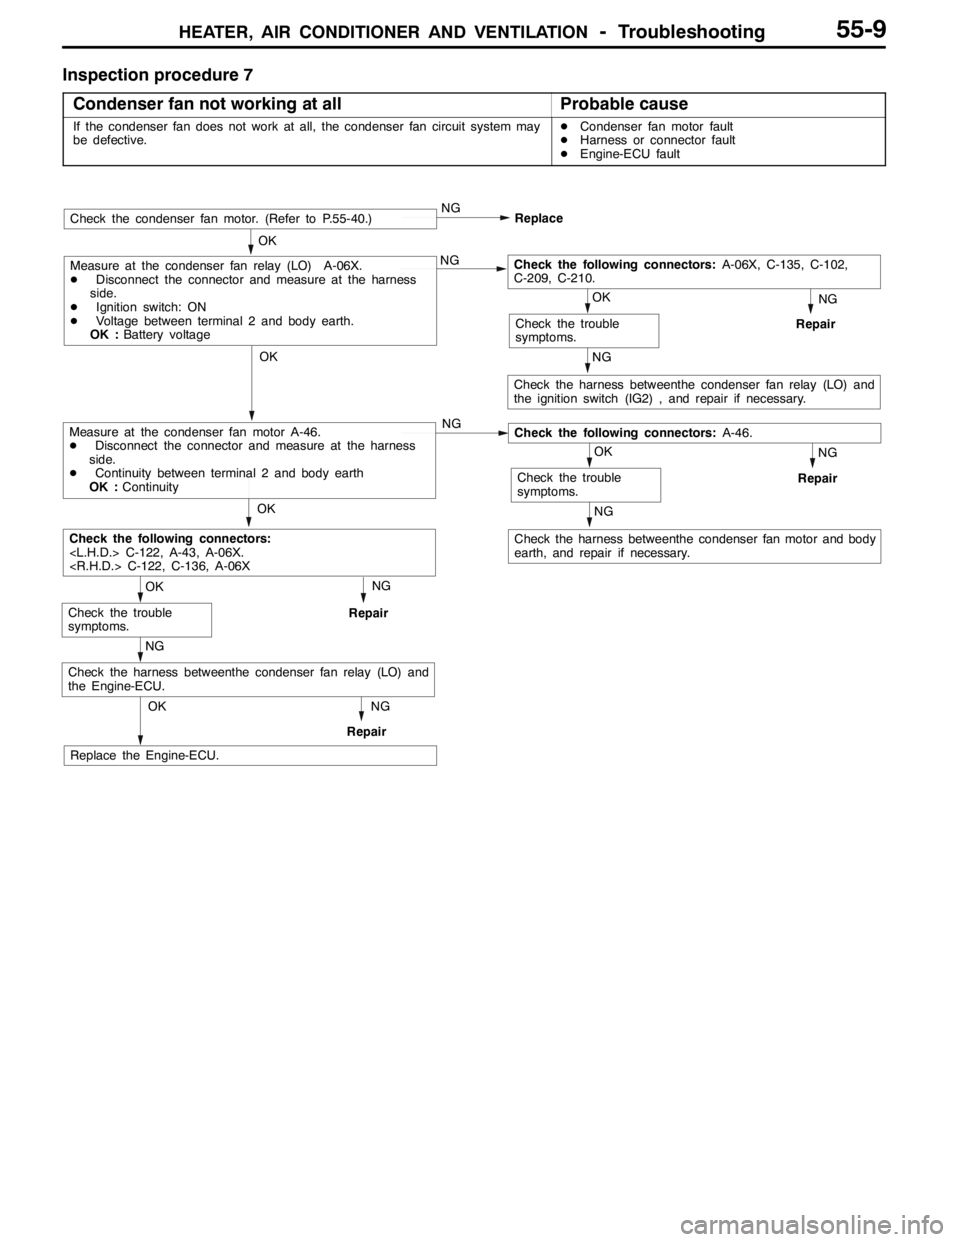
Inspection procedure 7
Condenser fan not working at all
Probable cause
If the condenser fan does not work at all, the condenser fan circuit system may
be defective.DCondenser fan motor fault
DHarness or connector fault
DEngine-ECU fault
NG
Check the harness betweenthe condenser fan relay (LO) and
the ignition switch (IG2) , and repair if necessary.
OK
Check the trouble
symptoms.
NG
Repair
NG
Replace
OK
Check the condenser fan motor. (Refer to P.55-40.)
NGCheck the following connectors:A-06X, C-135, C-102,
C-209, C-210.
OK
Measure at the condenser fan relay (LO) A-06X.
DDisconnect the connector and measure at the harness
side.
DIgnition switch: ON
DVoltage between terminal 2 and body earth.
OK :Battery voltage
NG
Check the harness betweenthe condenser fan motor and body
earth, and repair if necessary.
OK
Check the trouble
symptoms.Repair
NGCheck the following connectors:A-46.
NG
OK
Measure at the condenser fan motor A-46.
DDisconnect the connector and measure at the harness
side.
DContinuity between terminal 2 and body earth
OK :Continuity
NG
OK
Check the trouble
symptoms.RepairNG
Check the following connectors:
Replace the Engine-ECU.
OK
RepairNG
Check the harness betweenthe condenser fan relay (LO) and
the Engine-ECU.
Page 1412 of 1449

HEATER, AIR CONDITIONER AND VENTILATION-Troubleshooting55-10
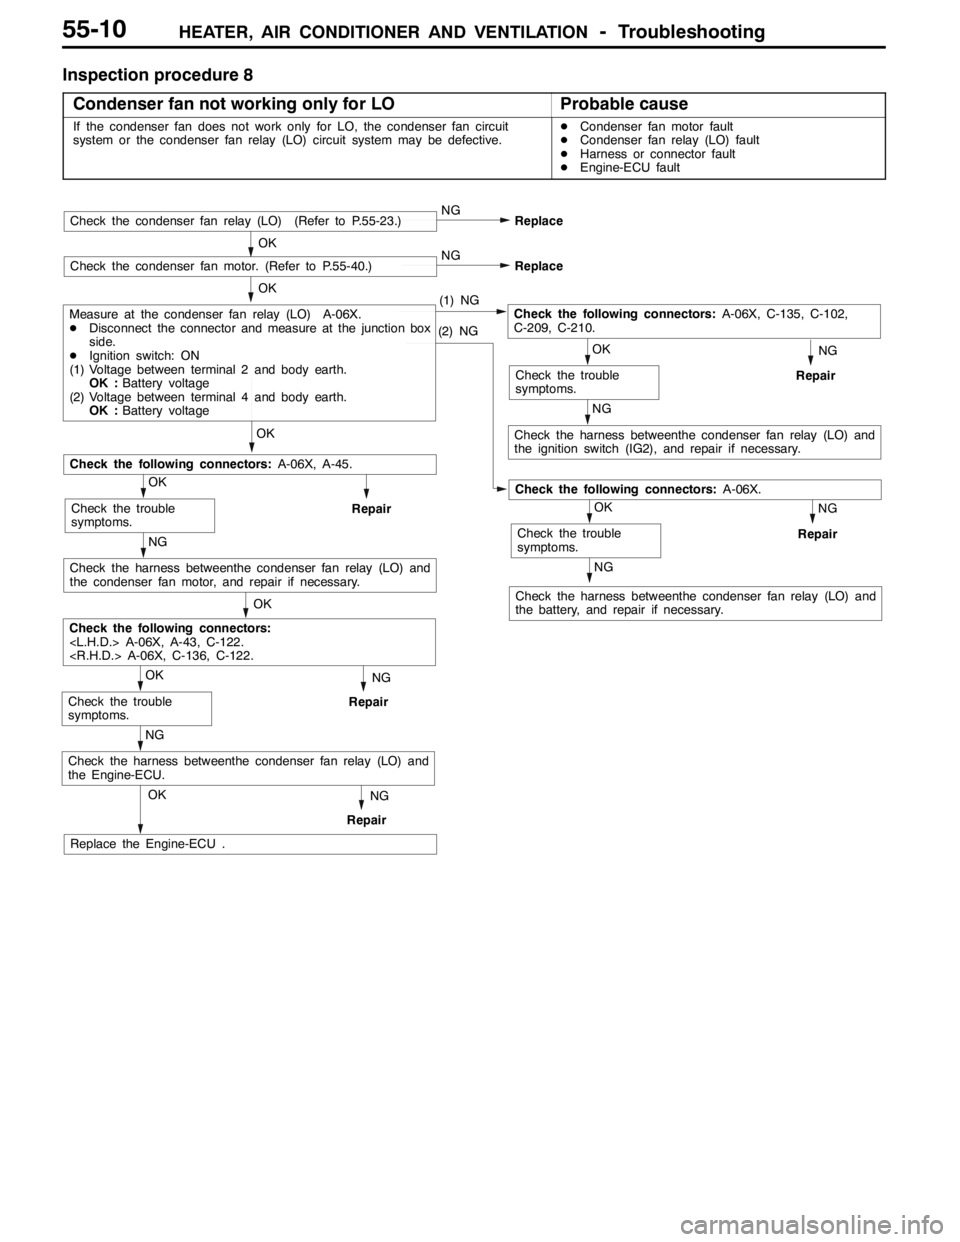
Inspection procedure 8
Condenser fan not working only for LO
Probable cause
If the condenser fan does not work only for LO, the condenser fan circuit
system or the condenser fan relay (LO) circuit system may be defective.DCondenser fan motor fault
DCondenser fan relay (LO) fault
DHarness or connector fault
DEngine-ECU fault
NG
Check the harness betweenthe condenser fan relay (LO) and
the ignition switch (IG2), and repair if necessary.
OK
Check the trouble
symptoms.
NG
Repair
NG
Replace
OK
Check the condenser fan motor. (Refer to P.55-40.)
Check the following connectors:A-06X, C-135, C-102,
C-209, C-210.
OK
NG
OK
Check the trouble
symptoms.Repair
Check the following connectors:A-06X.
NG
NG
OK
Check the trouble
symptoms.RepairNG
Check the following connectors:
Replace the Engine-ECU .
OK
RepairNG
Check the harness betweenthe condenser fan relay (LO) and
the Engine-ECU.
(2) NG
Measure at the condenser fan relay (LO) A-06X.
DDisconnect the connector and measure at the junction box
side.
DIgnition switch: ON
(1) Voltage between terminal 2 and body earth.
OK :Battery voltage
(2) Voltage between terminal 4 and body earth.
OK :Battery voltage(1) NG
NG
Replace
OK
Check the condenser fan relay (LO) (Refer to P.55-23.)
NG
OK
Check the trouble
symptoms.Repair
Check the following connectors:A-06X, A-45.
OK
Check the harness betweenthe condenser fan relay (LO) and
the condenser fan motor, and repair if necessary.
Check the harness betweenthe condenser fan relay (LO) and
the battery, and repair if necessary.
Page 1413 of 1449

HEATER, AIR CONDITIONER AND VENTILATION-Troubleshooting55-11
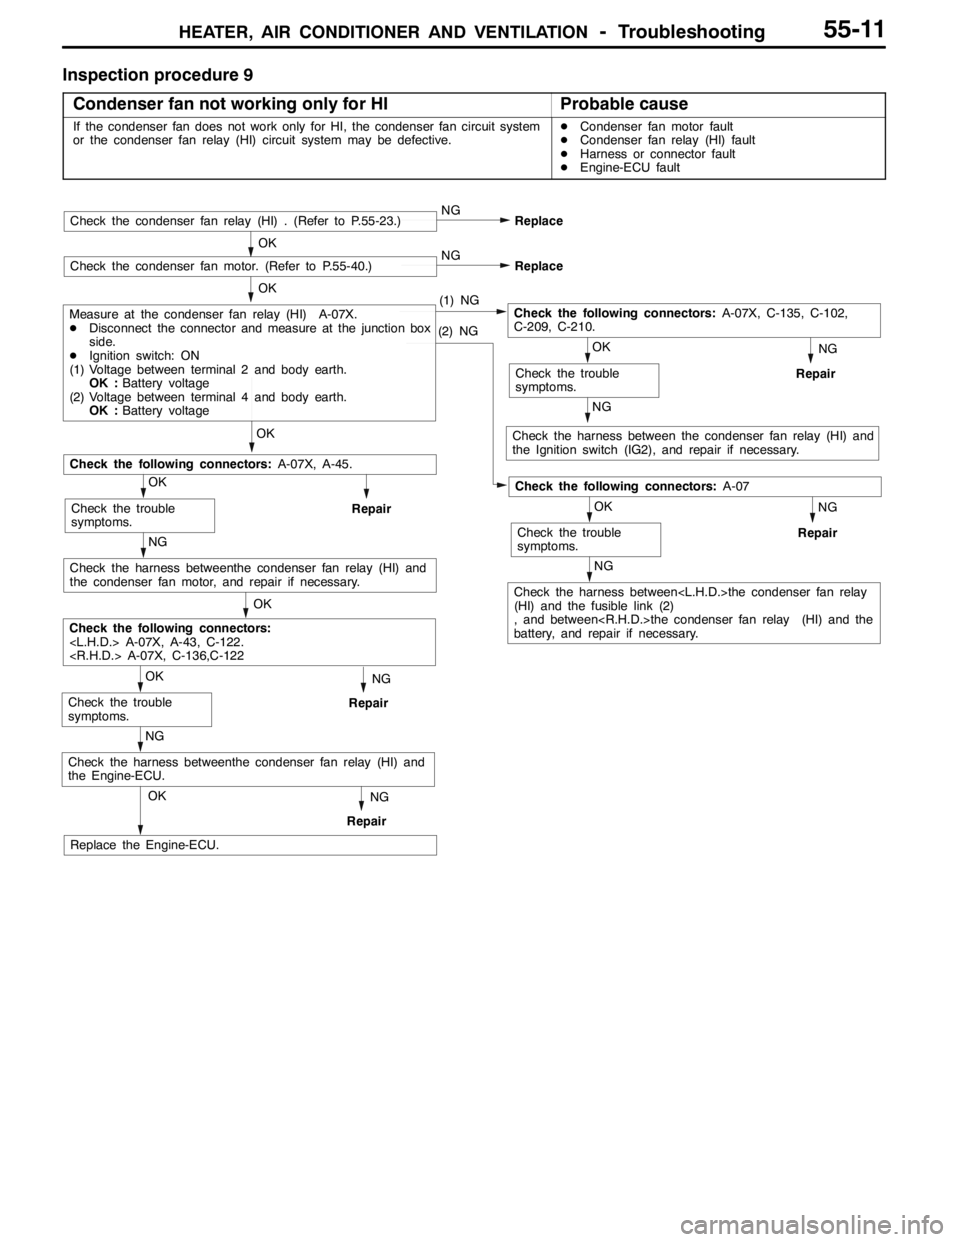
Inspection procedure 9
Condenser fan not working only for HI
Probable cause
If the condenser fan does not work only for HI, the condenser fan circuit system
or the condenser fan relay (HI) circuit system may be defective.DCondenser fan motor fault
DCondenser fan relay (HI) fault
DHarness or connector fault
DEngine-ECU fault
NG
Check the harness between the condenser fan relay (HI) and
the Ignition switch (IG2), and repair if necessary.
OK
Check the trouble
symptoms.
NG
Repair
NG
Replace
OK
Check the condenser fan motor. (Refer to P.55-40.)
Check the following connectors:A-07X, C-135, C-102,
C-209, C-210.
OK
NG
Check the harness between
(HI) and the fusible link (2)
, and between
battery, and repair if necessary.
OK
Check the trouble
symptoms.Repair
Check the following connectors:A-07
NG
NG
OK
Check the trouble
symptoms.RepairNG
Check the following connectors:
Replace the Engine-ECU.
OK
RepairNG
Check the harness betweenthe condenser fan relay (HI) and
the Engine-ECU.
(2) NG
Measure at the condenser fan relay (HI) A-07X.
DDisconnect the connector and measure at the junction box
side.
DIgnition switch: ON
(1) Voltage between terminal 2 and body earth.
OK :Battery voltage
(2) Voltage between terminal 4 and body earth.
OK :Battery voltage(1) NG
NG
Replace
OK
Check the condenser fan relay (HI) . (Refer to P.55-23.)
NG
Check the harness betweenthe condenser fan relay (HI) and
the condenser fan motor, and repair if necessary.
OK
Check the trouble
symptoms.Repair
Check the following connectors:A-07X, A-45.
OK
Page 1414 of 1449

HEATER, AIR CONDITIONER AND VENTILATION-TroubleshootingHEATER, AIR CONDITIONER AND VENTILATION-Troubleshooting55-12
CHECK AT THE ENGINE-ECU TERMINAL
Terminal no.Check itemCheck whenNormal state
21Fan controller outputRadiator fan: ON0 - 0.3 Vp
Radiator fan: OFF0.7 V or more
22A/C compressor outputA/C compressor relay: OFF0Vpp
A/C compressor relay: ONBattery voltage
or temporarily
6V or more→
1V or less
24A/C-ECU input (A/C2)At A/C low loadBattery voltage
32Condenser fan motor relay (HI)Fan: OFF(engine coolant temperature:90_C
or lower)Battery voltage
Fan: ON(engine coolant tempera-
ture:105_C or lower)1V or more
34Condenser fan motor relay (LOW)Fan: OFF(engine coolant temperature:90_C
or lower)Battery voltage
Fan: ON(engine coolant tempera-
ture:105_C or lower)1V or more
45A/C-ECU input (A/C1)A/C ON (When dual pressure switch is ON)Battery voltage
CHECK AT THE A/C-ECU TERMINAL
Termi-
nal no.Check itemCheck whenNormal state
1Rear defogger switchDefogger switch: ON0Vgg
Defogger switch: OFFBattery voltage
2Inside/outside air changeover
dt(tidi)
When damper moved to inside circulation position0Vg
damper motor (outside air)When damper moved to outside air induction
positionBattery voltage
3Inside/outside air changeover
dt(i idi)
When damper moved to inside circulation positionBattery voltageg
damper motor (inside air)When damper moved to outside air induction
position0V
4Engine-ECU output (A/C1)When A/C OFF0Vgp()
A/C switch: ON, blower: ON (room temperature)Battery voltage
5Engine-ECU output (A/C2)At A/C low loadBattery voltagegp()
At A/C high load0V
6Illumination power supplyLighting switches: ONBattery voltage
7---
8Blower switch (LO)Blower switch: LOBattery voltage
Page 1415 of 1449

HEATER, AIR CONDITIONER AND VENTILATION-Troubleshooting55-13
Termi-
nal no.Normal state Check when Check item
9---
10Ignition switch (IG2) power supplyIgnition switch: ONBattery voltage
11Illumination earthAny time0V
12EarthAny time0V
13Air thermo sensorWhen temperature around sensor 25_C (1.5kΩ)2.2 V
14---
15---
16Air thermo sensor earthAny time0V
CHECK AT THE A/C-ECU TERMINAL
Termi-
nal no.Check itemCheck whenNormal state
1Engine-ECU output (A/C1)When A/C OFF0Vgp()
A/C switch: ON, blower: ON (room temperature)Battery voltage
2Engine-ECU output (A/C2)At A/C low loadBattery voltagegp()
At A/C high load0V
3EarthAny time0V
4Air thermo sensor earthAny time0V
5Illumination power supplyLighting switches: ONBattery voltage
6Air thermo sensorWhen temperature around sensor 25_C (1.5kΩ)2.2 V
7Ignition switch (IG2) power supplyIgnition switch: ONBattery voltage
8Blower switch (LO)Blower switch: LOBattery voltage
9Rear defogger switchDefogger switch: ON0Vgg
Defogger switch: OFFBattery voltage
10Inside/outside air changeover
dt(tidi)
When damper moved to inside circulation position0Vg
damper motor (outside air)When damper moved to outside air induction
positionBattery voltage
11Inside/outside air changeover
dt(i idi)
When damper moved to inside circulation positionBattery voltageg
damper motor (inside air)When damper moved to outside air induction
position0V
12Illumination earthAny time0V
Page 1416 of 1449

HEATER, AIR CONDITIONER AND VENTILATION–On-vehicle Service55-14
ON-VEHICLE SERVICE
REFRIGERANT LEVEL TEST THROUGH
PERFORMANCE TEST
1. Start the engine.
2. Turn on the A/C switch, and set the A/C control to MAX.
COOL.
3. Adjust the engine speed to 1,500 r/min.
4. Check the refrigerant level (bubble state) through the
sight glass.
ItemState
Insufficient refriger-
antMany bubbles are seen. If refrigerant
is extremely low, it appears white.
Sufficient or excess
refrigerantNo bubbles are seen
NOTE
1. If insufficient, replenish the refrigerant as follows.
a) Replenish until bubbles disappear from the sight
glass.
b) After the bubbles disappear from the sight glass,
replenish 100g of refrigerant.
2. If excessive, replenish the refrigerant as follows.
a) Drain the refrigerant until bubbles can be seen
through the sight glass.
b) Replenish until bubbles disappear from the sight
glass.
c) After the bubbles disappear from the sight glass,
replenish 100g of refrigerant.
MAGNETIC CLUTCH TEST
1. Disconnect the connector to the magnetic clutch.
2. Connect battery (+) voltage directly to the connector for
the magnetic clutch.
3. If the magnetic clutch is normal, there will be ”click”. If
the pulley and armature do not make contact (’click’),
there is a malfunction.
RECEIVER DRIER TEST
Operate the unit and check the piping temperature by touching
the receiver drier outlet and inlet.
If there is a difference in the temperatures, the receiver drier
is restricted.
Replace the receiver drier.
Insufficient
refrigerantSufficient or excess
refrigerant
Bubbles
Page 1417 of 1449

HEATER, AIR CONDITIONER AND VENTILATION–On-vehicle Service55-15
COMPRESSOR DRIVE BELT ADJUSTMENT
Refer to GROUP 11 - On-vehicle Service.
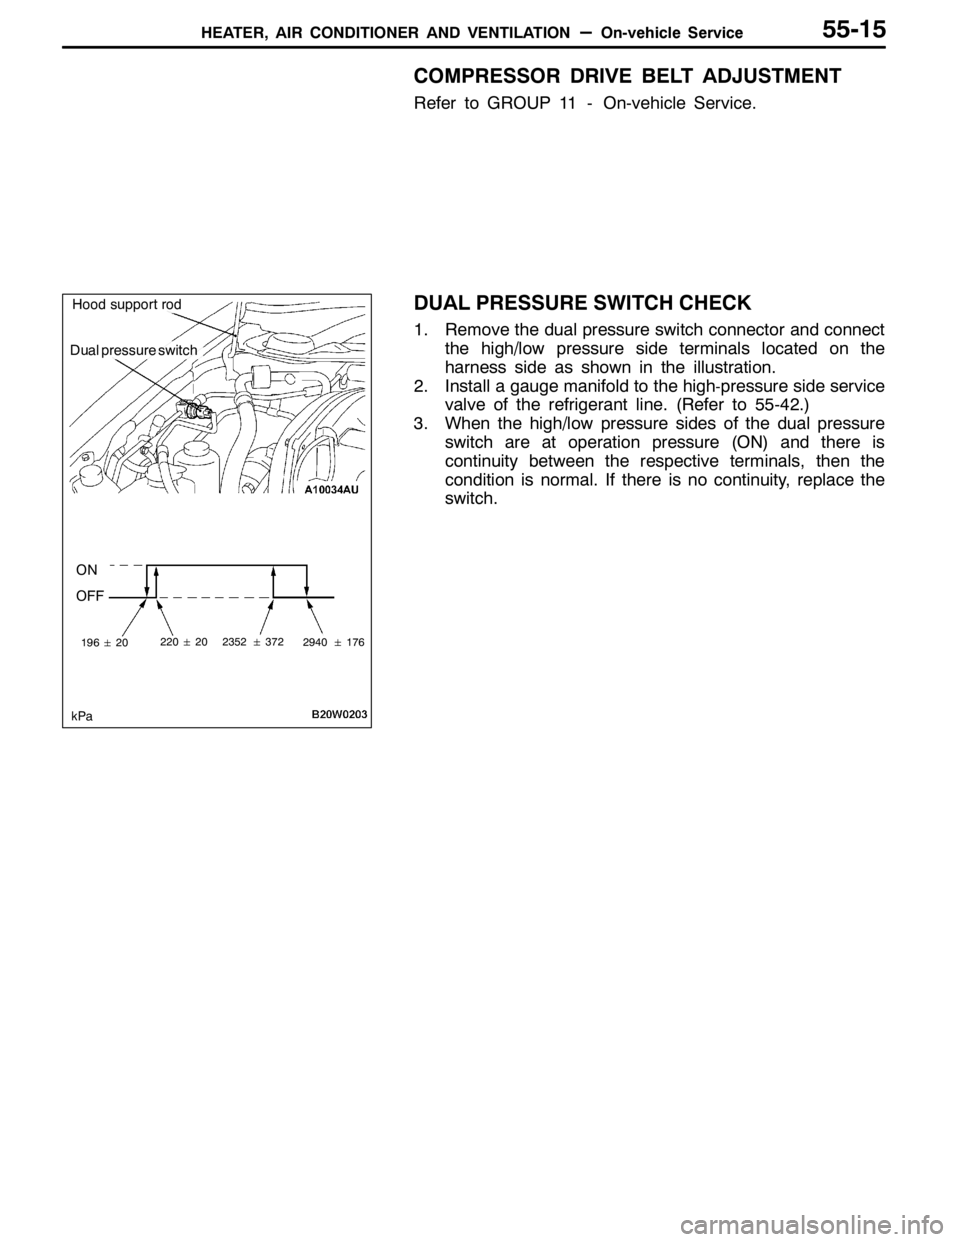
DUAL PRESSURE SWITCH CHECK
1. Remove the dual pressure switch connector and connect
the high/low pressure side terminals located on the
harness side as shown in the illustration.
2. Install a gauge manifold to the high
-pressure side service
valve of the refrigerant line. (Refer to 55-42.)
3. When the high/low pressure sides of the dual pressure
switch are at operation pressure (ON) and there is
continuity between the respective terminals, then the
condition is normal. If there is no continuity, replace the
switch.
Dual pressure switch
ON
OFF
19620
kPa
2202023523722940176
Hood support rod
Page 1418 of 1449

HEATER, AIR CONDITIONER AND VENTILATION–On-vehicle Service55-16
CHARGING
1. With the handles turned back all the way (valve closed),
install the adaptor valve to the low-pressure side of the
gauge manifold.
2. Connect the charging hose (blue) to the adaptor valve.
3. Connect the quick joint (for low
-pressure) to the charging
hose (blue).
4. Connect the quick joint (for low
-pressure) to the low-
pressure service valve.
NOTE
The low-pressure service valve should be connected to
the suction hose.
Caution
(1) Use tools that are suited to R134a.
(2) To install the quick joint, press section “A” firmly
against the service valve until a click is heard.
When connecting, run your hand along the hose
while pressing to ensure that there are no bends
in the hose.
5. Close the high and low
-pressure valves of the gauge
manifold.
6. Install the vacuum pump adaptor to the vacuum pump.
7. Connect the vacuum pump plug to the vacuum pump
adaptor.
8. Connect the charging hose (yellow) to the R-134a
connection port of the vacuum pump adaptor.
9. Tighten the adaptor valve handle (valve open).
10. Open the low
-pressure valve of the gauge manifold.
11. Turn the power switch of the vacuum pump to the ON
position.
NOTE
Even if the vacuum pump power switch is turned ON,
the vacuum pump will not operate because of the power
supply connection in step (7).
Low-pressure
valveHigh-pressure
valve
Gauge manifold
Adapter
valveCharging hose
(yellow)
Charging hose
(blue)
R-12
connection
portSwitch
R-134a
connection
port
Vacuum
pump
adaptor
Vacuum
pump
Power supply
plug
Switch Quick
joint (for
low pres-
sure)
Low-pressure
service valve
SleeveA