Page 431 of 1449

ENGINE -Oil Pan11A-25
INSTALLATION SERVICE POINTS
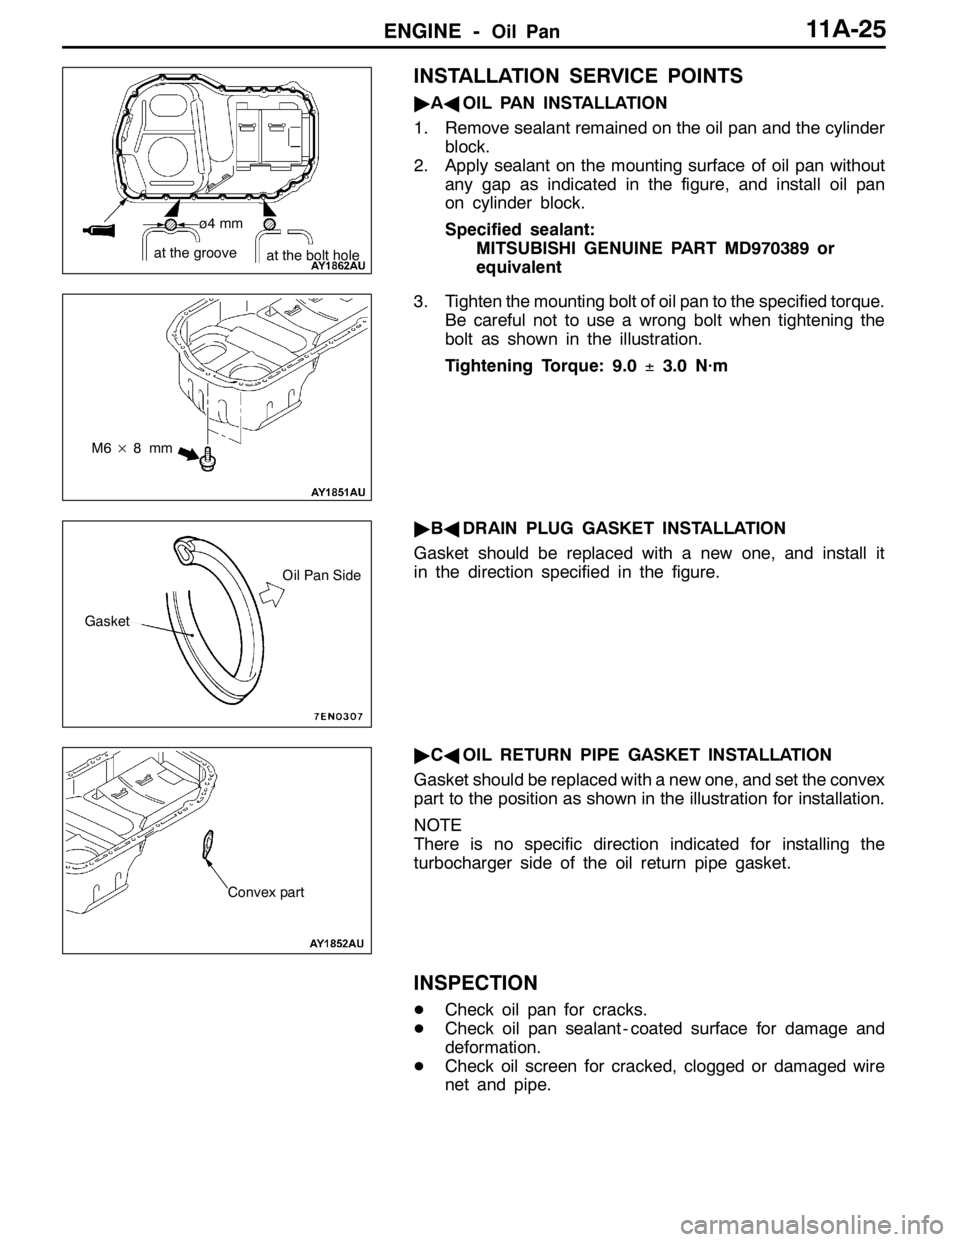
"AAOIL PAN INSTALLATION
1. Remove sealant remained on the oil pan and the cylinder
block.
2. Apply sealant on the mounting surface of oil pan without
any gap as indicated in the figure, and install oil pan
on cylinder block.
Specified sealant:
MITSUBISHI GENUINE PART MD970389 or
equivalent
3. Tighten the mounting bolt of oil pan to the specified torque.
Be careful not to use a wrong bolt when tightening the
bolt as shown in the illustration.
Tightening Torque: 9.0±3.0 N·m
"BADRAIN PLUG GASKET INSTALLATION
Gasket should be replaced with a new one, and install it
in the direction specified in the figure.
"CAOIL RETURN PIPE GASKET INSTALLATION
Gasket should be replaced with a new one, and set the convex
part to the position as shown in the illustration for installation.
NOTE
There is no specific direction indicated for installing the
turbocharger side of the oil return pipe gasket.
INSPECTION
DCheck oil pan for cracks.
DCheck oil pan sealant - coated surface for damage and
deformation.
DCheck oil screen for cracked, clogged or damaged wire
net and pipe.
ø4 mm
at the groove
at the bolt hole
M6×8mm
Gasket
Oil Pan Side
Convex part
Page 434 of 1449

ENGINE -Cylinder Head Gasket11A-28
CYLINDER HEAD GASKET
REMOVAL AND INSTALLATION
Caution
If the vehicle is equipped with the Brembo disc brake, during maintenance, take care not to contact
the parts or tools to the caliper because the paint of caliper will be scratched.
Pre-removal and Post-installation Operation
DFuel Outflow Preventive Operation (Refer to GROUP 13A - On-vehicle Service.)
DFuel Leak Check
DStrut Tower Bar Removal and Installation (Refer to GROUP 42.)
DUnder Cover Removal and Installation (Refer to GROUP 51 - Front Bumper.)
DDrive Belt Tension Check (Refer to P.11A-7.)
DAccelerator Cable Adjustment (Refer to GROUP 17 - On-vehicle Service.)
DDrainage and Refilling Engine Oil (Refer to GROUP 12 - On-vehicle Service.)
DDrainage and Refilling of Engine Coolant (Refer to GROUP 14 - On-vehicle Service.)
DAir Cleaner Assembly Removal and Installation (Refer to GROUP 15.)
DAir Hose E, Air Pipe C, Air hose D Removal and Installation (Refer to GROUP 15 - Intercooler.)
DBattery Removal and Installation
DCenter Cover Removal and Installation (Refer to P.11A-17.)
DAccelerator Cable Removal and Installation (Refer to GROUP 17.)
DRadiator Removal and Installation (Refer to GROUP 14.)
DSecondary Air Control Valve Bracket Removal and Installation (Refer to GROUP 15 - Secondary Air Supply System.)
DCrossmember Bar Removal and Installation (Refer to GROUP32 - Engine Roll Stopper, Centermember.)
DFront Exhaust Pipe Removal and Installation (Refer to GROUP 15.)
DStarter Removal and Installation (Refer to GROUP 16.)
DTiming Belt Removal and Installation (Refer to P.11A-34.)
Page 438 of 1449

ENGINE -Cylinder Head Gasket11A-32
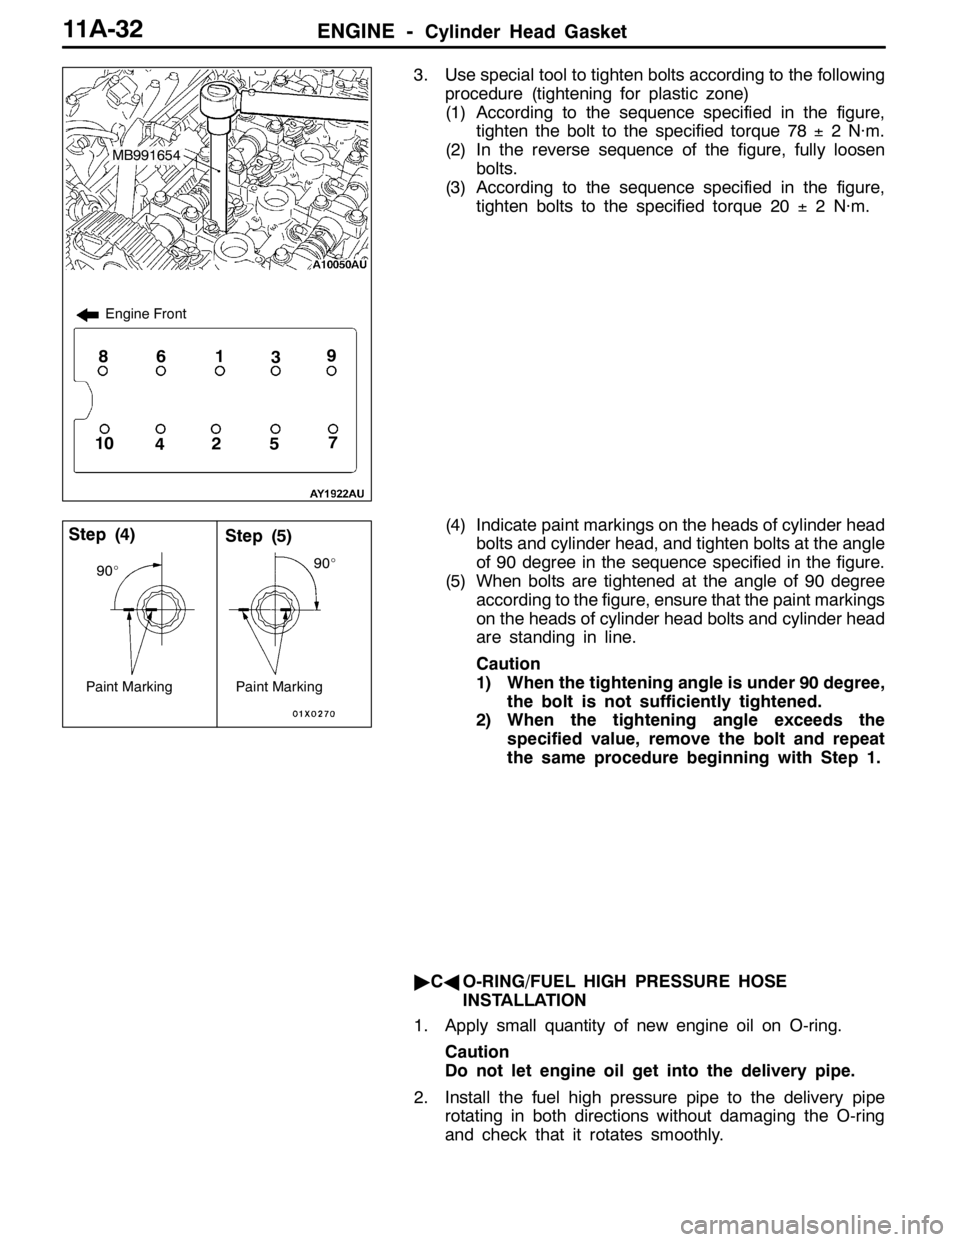
3. Use special tool to tighten bolts according to the following
procedure (tightening for plastic zone)
(1) According to the sequence specified in the figure,
tighten the bolt to the specified torque 78±2 N·m.
(2) In the reverse sequence of the figure, fully loosen
bolts.
(3) According to the sequence specified in the figure,
tighten bolts to the specified torque 20±2 N·m.
(4) Indicate paint markings on the heads of cylinder head
bolts and cylinder head, and tighten bolts at the angle
of 90 degree in the sequence specified in the figure.
(5) When bolts are tightened at the angle of 90 degree
according to the figure, ensure that the paint markings
on the heads of cylinder head bolts and cylinder head
are standing in line.
Caution
1) When the tightening angle is under 90 degree,
the bolt is not sufficiently tightened.
2) When the tightening angle exceeds the
specified value, remove the bolt and repeat
the same procedure beginning with Step 1.
"CAO-RING/FUEL HIGH PRESSURE HOSE
INSTALLATION
1. Apply small quantity of new engine oil on O-ring.
Caution
Do not let engine oil get into the delivery pipe.
2. Install the fuel high pressure pipe to the delivery pipe
rotating in both directions without damaging the O-ring
and check that it rotates smoothly.
1
5427
3869
10
Engine Front
MB991654
Step (4)Step (5)
Paint Marking
90_
Paint Marking
90_
Page 439 of 1449
ENGINE -Cylinder Head Gasket11A-33
3. In case of not rotating smoothly, remove the fuel high
pressure hose and insert it to the delivery pipe again
after checking damage of the O-ring since there is a
possibility of O-ring engagement.
4. Tighten fuel high pressure hose mounting bolts to the
specified torque.
Tightening Torque: 5.0±1.0 N·m
"DAOIL RETURN PIPE GASKET INSTALLATION
Gasket should be replaced with a new one, and set the convex
part to the position as shown in the illustration for installation.
NOTE
There is no specific direction indicated for installing the
turbocharger side of the oil return pipe gasket.
Convex part
Page 445 of 1449

ENGINE -Timing Belt and Timing Belt B11A-39
"FATIMING BELT INSTALLATION
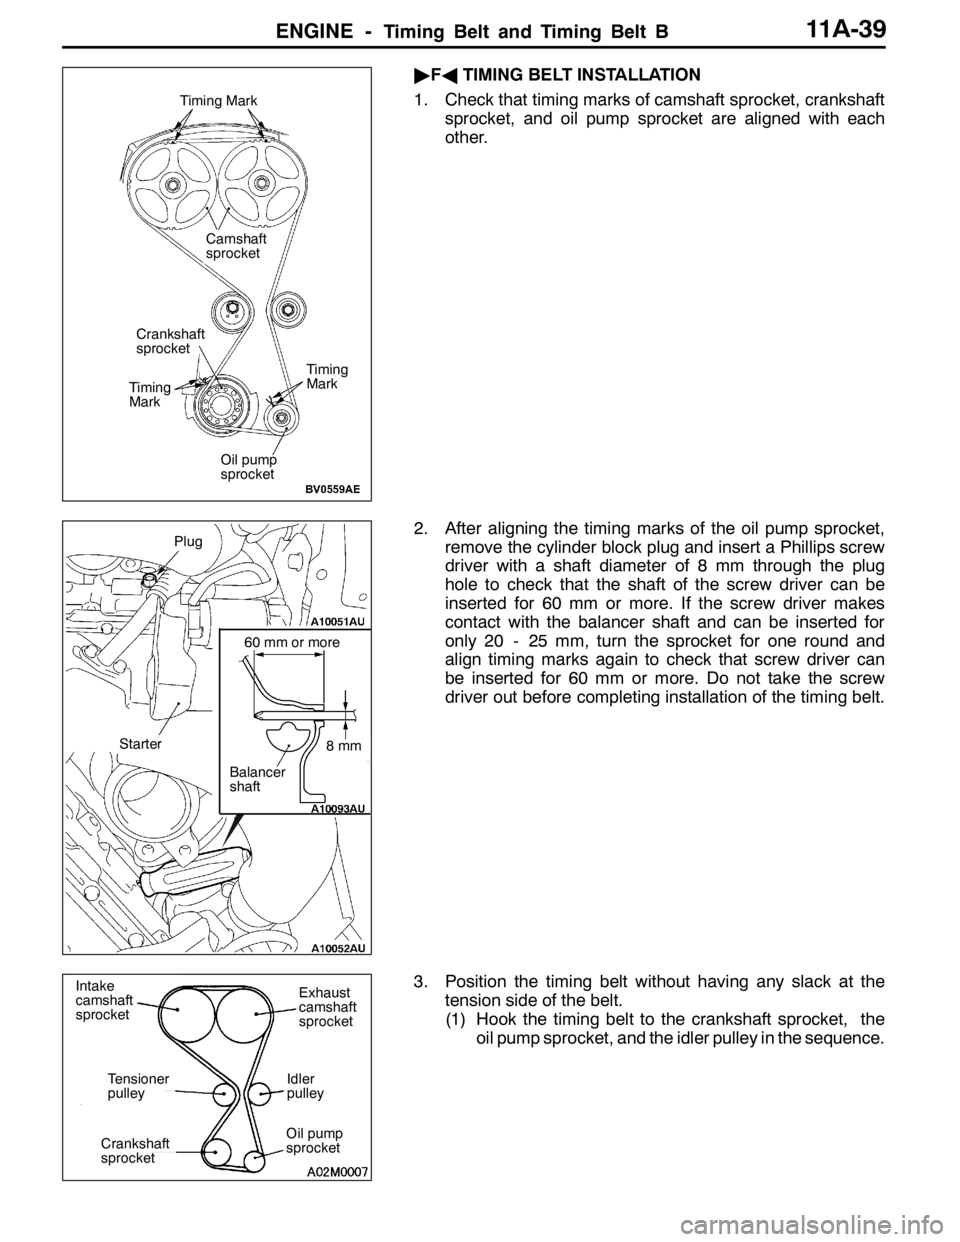
1. Check that timing marks of camshaft sprocket, crankshaft
sprocket, and oil pump sprocket are aligned with each
other.
2. After aligning the timing marks of the oil pump sprocket,
remove the cylinder block plug and insert a Phillips screw
driver with a shaft diameter of 8 mm through the plug
hole to check that the shaft of the screw driver can be
inserted for 60 mm or more. If the screw driver makes
contact with the balancer shaft and can be inserted for
only 20 - 25 mm, turn the sprocket for one round and
align timing marks again to check that screw driver can
be inserted for 60 mm or more. Do not take the screw
driver out before completing installation of the timing belt.
3. Position the timing belt without having any slack at the
tension side of the belt.
(1) Hook the timing belt to the crankshaft sprocket, the
oil pump sprocket, and the idler pulley in the sequence.
Timing Mark
Timing
Mark
Timing
Mark
Crankshaft
sprocket
Oil pump
sprocket
Camshaft
sprocket
8mm
60 mm or more
Balancer
shaft
Plug
Starter
Intake
camshaft
sprocketExhaust
camshaft
sprocket
Idler
pulley
Oil pump
sprocketCrankshaft
sprocket
Tensioner
pulley
Page 448 of 1449

ENGINE -Timing belt and timing belt B11A-42
INSPECTION
AUTO-TENSIONER CHECK
1. Check the sealant for oil leakage and replace if necessary.
2. Check the rod end for wear or damage and replace if
necessary.
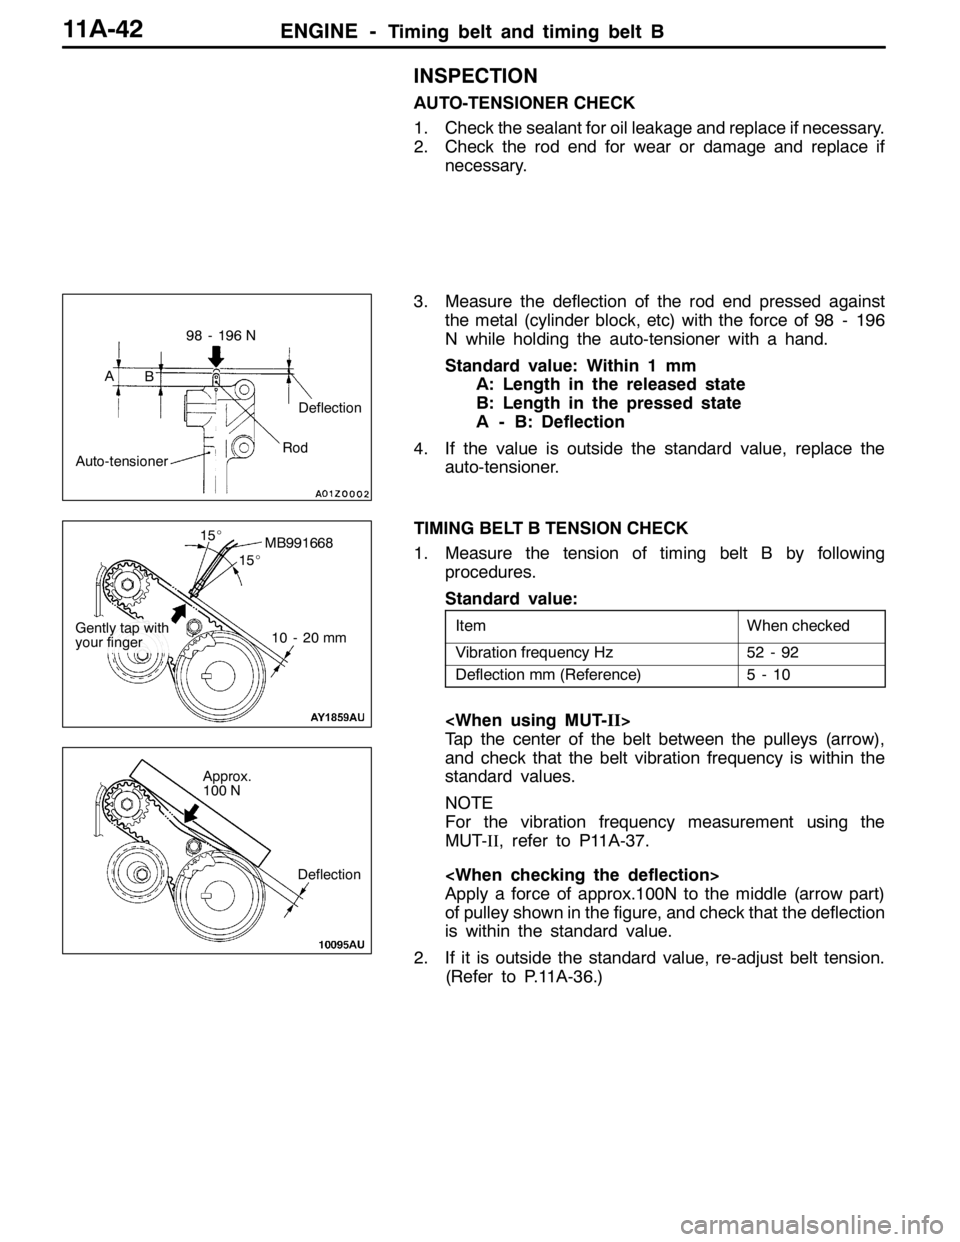
3. Measure the deflection of the rod end pressed against
the metal (cylinder block, etc) with the force of 98 - 196
N while holding the auto-tensioner with a hand.
Standard value: Within 1 mm
A: Length in the released state
B: Length in the pressed state
A - B: Deflection
4. If the value is outside the standard value, replace the
auto-tensioner.
TIMING BELT B TENSION CHECK
1. Measure the tension of timing belt B by following
procedures.
Standard value:
ItemWhen checked
Vibration frequency Hz52 - 92
Deflection mm (Reference)5-10
Tap the center of the belt between the pulleys (arrow),
and check that the belt vibration frequency is within the
standard values.
NOTE
For the vibration frequency measurement using the
MUT-II, refer to P11A-37.
Apply a force of approx.100N to the middle (arrow part)
of pulley shown in the figure, and check that the deflection
is within the standard value.
2. If it is outside the standard value, re-adjust belt tension.
(Refer to P.11A-36.)
AB
Auto-tensioner
98 - 196 N
Deflection
Rod
MB991668
10 - 20 mm
15_
15_
Gently tap with
your finger
Deflection
Approx.
100 N
Page 449 of 1449

ENGINE -Engine Assembly11A-43
ENGINE ASSEMBLY
REMOVAL AND INSTALLATION
Caution
1. If the vehicle is equipped with the Brembo disc brake, during maintenance, take care not to
contact the parts or tools to the caliper because the paint of caliper will be scratched.
2. Tightening sections indicated in the mark (*) should be finally tightened with engine weight
applied on the body after lightly tightening.
Pre-removal and Post-installation Operation
DFuel Outflow Preventive Operation (Refer to GROUP 13A - On-vehicle Service.)
DFuel Leak Check
DRemoval and Installation of Hood (Refer to GROUP 42.)
DRemoval and Installation of Strut Tower Bar (Refer to GROUP 42.)
DRemoval and Installation of Under Cover (Refer to GROUP 51 - Front Bumper.)
DRemoval and Installation of Side Cover.
DDrive Belt Tension Check (Refer to P.11A - 7.)
DAccelerator Cable Adjustment (Refer to GROUP 17 - On-vehicle Service.)
DDrainage and Refilling Engine Oil(Refer to GROUP 12 - On-vehicle Service.)
DDrainage and Refilling of Engine Coolant (Refer to GROUP 14 - On-vehicle Service.)
DAir Cleaner Removal and Installation (Refer to GROUP 15)
DRemoval and Installation of Air Pipe C, Air Pipe B and Air Hose A (Refer to GROUP 15 - Intercooler.)
DBattery and Battery Tray Removal and Installation
DRemoval and Installation of Center Cover (Refer to P.11A - 17.)
DRemoval and Installation of Accelerator Cable (Refer to GROUP 17.)
DRemoval and Installation of Radiator (Refer to GROUP 14.)
DRemoval and Installation of Crossmember Bar (Refer to GROUP 32 - Engine Roll Stopper, Centermember.)
DRemoval and Installation of Front Exhaust Pipe (Refer to GROUP 15.)
DRemoval and Installation of Air Outlet Fitting (Refer to GROUP 15 - Exhaust manifold.)
Page 453 of 1449

ENGINE -Engine Assembly11A-47
AD"ENGINE ASSEMBLY REMOVAL
After checking that all the cables, hoses, and harness
connectors have been disconnected, lift the engine with a
chain block slowly and remove the engine assembly located
at the upper engine room.
INSTALLATION SERVICE POINTS
"AAENGINE ASSEMBLY INSTALLATION
Install the engine assembly while checking that none of cables,
hoses, or harness connectors, etc. has been engaged.
"BAENGINE MOUNTING BRACKET AND STOPPER
ASSEMBLY INSTALLATION
1. Support the engine oil pan with a garage jack via a block
of wood cut adjusting the engine position and install the
engine mounting bracket and stopper assembly. Position
the engine mounting stopper so that a mark indicated
by an arrow can face the direction shown in the illustration.
2. Support engine with garage jack.
3. Remove the chain block and hold the engine assembly
with the special tool.(Tool used for removal of transmission
assembly)
"CAO-RING/FUEL HIGH PRESSURE HOSE
INSTALLATION
1. Apply small quantity of new engine oil on O-ring.
Caution
Do not let engine oil get into the delivery pipe.
2. Install the fuel high pressure pipe to the delivery pipe
rotating in both directions without damaging the O-ring
and check that it rotates smoothly.
3. In case of not rotating smoothly, remove the fuel high
pressure hose and insert it to the delivery pipe again
after checking damage of the O-ring since there is a
possibility of O-ring engagement.
4. Tighten fuel high pressure hose mounting bolt to the
specified torque.
Tightening Torque: 5.0±1.0 N·m
Engine mounting stopper
Engine side
Engine side