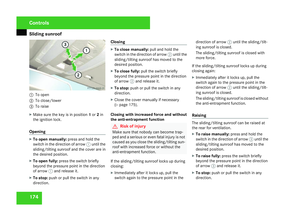
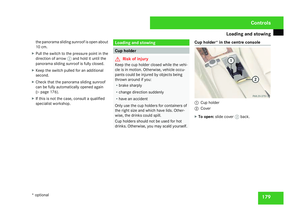
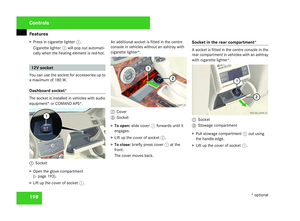
Page 193 of 377
Loading and stowing
190
Safety net with luggage compartment
enlargemen
t 1
Tab
2 Retainers
X Fold the left and right rear seat backrest
forwards (Y page 188).
X Move the safety net up by tab 1and hook
it into retainers 2. Luggage compartment cover Pulling out the luggage compartment
cover
1
Cover shield
2 Grab handle
X Position cover shield 1horizontally.
X Pull the luggage cover back using grab han-
dle 2until it engages in the guides on th e
left and right sides. Rolling up the luggage compartment
cover 1
Cover shield
2 Grab handle
X Press lightly on grab handle 2.
The luggage compartment cover rolls up
automatically.
X If necessary, fold cover shield 1upward s
or downwards to the detent .
Removing the combined luggage cover
and ne t
X Make sure that the safety net and the lug-
gage compartment cover are rolled up.
X Fold the left and right rear seat backrest
forwards (Y page 188). Controls
204_AKB; 2; 3, en-GB
mkalafa,
2007-06-26T23:11:51+02:00 - Seite 190
Page 194 of 377

Loading and stowing
1911
Guide rail
2 Combined luggage cover and ne t
X Push combined luggage cover and net 2
to the left until it extends out of guide rail s
1 .
X Remove combined luggage cover and ne t
2 . EASY-PACK load-securing kit
*
(Estate)
The EASY-PACK load-securing kit allows you
to use your luggage compartment for a variety
of purposes. The accessory parts are located
under the luggage compartment floor.
X Open the luggage compartment floor
(Y page 184). EASY-PACK load-securing kit accessory parts
1
Brackets
2 Luggage holders
3 Telescopic rod Inserting the brackets into the loading
rail
1
Bracke t
2 Release butto n
3 Locking button
4 Loading rail
5 Lashing eyelet
X Insert bracket 1into the front of loading
rail 4.
X Press release button 2and push bracke t
1 in loading rail 4into the desired posi-
tion .
X Let go of release button 2.
X Press locking button 3.
Bracket 1is locked in loading rail 4. Cont
rols
* optional
204_AKB; 2; 3, en-GB
mkalafa,
2007-06-26T23:11:51+02:00 - Seite 191 Z
Page 195 of 377

Loading and stowing
192
X
If necessary, fold lashing eyelet 5
upwards. G
Risk of injury
Distribute the load on the lashing eyelets
evenly .
Otherwise, vehicle occupants could be
injured by objects being thrown around if
you:
R brake sharply
R change direction suddenly
R have an accident
Please observe the loading guidelines.
Luggage holder The luggage holder can be used to secure
light loads against the side wall of the luggage
compartment to prevent them from moving
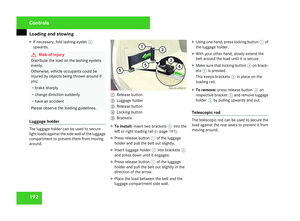
around. 1
Release butto n
2 Luggage holder
3 Release butto n
4 Locking button
5 Brackets
X To install: insert two brackets 5into the
left or right loading rail (Y page 191).
X Press release button 1of the luggage
holder and pull the belt out slightly.
X Insert luggage holder 2into brackets 5
and press down until it engages .
X Press release button 1of the luggage
holder and pull the belt out slightly in the
direction of the arrow.
X Place the load between the belt and the
luggage compartment side wall. X
Using one hand, press locking button 1of
the luggage holder.
X With your other hand, slowly extend the
belt around the load until it is secure.
X Make sure that locking button 4on brack-
ets 5is pressed.
This keeps brackets 5in place on the
loading rail.
X To remove :press release button 3on
respective bracket 5and remove luggage
holder 2by pulling upwards and out.
Telescopic rod The telescopic rod can be used to secure the
load against the rear seats to prevent it from
moving around.Controls
204_AKB; 2; 3, en-GB
mkalafa,
2007-06-26T23:11:51+02:00 - Seite 192
Page 196 of 377

Loading and stowing
1931
Telescopic rod
2 Brackets
3 Locking button
4 Release butto n
X To install: insert one bracket 2into bot h
the left and the right loading rails and slid e
it to the desired position (Y page 191).
X Insert telescopic rod 1into brackets 2
and press downwards until they engage.
X Make sure that locking button 3on brack-
ets 2is pressed.
This keeps brackets 2in place on the
loading rail.
X To remove :press release button 4on
respective bracket 2and remove tele-
scopic rod 1by pulling upwards and out. Stowage compartment
s G
Risk of injury
The stowage compartments must be closed
when items are stored in them. Luggage
nets are not designed to secure heavy
items of luggage.
You or other vehicle occupants could be
injured by objects being thrown around if
you:
R brake sharply
R change direction suddenly
R have an accident
Sharp-edged and fragile objects must not
be carried in the luggage net.
Do not place hard objects in the map pock-
ets. Objects must not protrude from the
map pockets. Glove compartment 1
Handl e
2 Glove compartment lid
X To open: pull handle 1and open glov e
compartment lid 2.
X To close: fold glove compartment cove r
2 up until it engages . Cont
rols
204_AKB; 2; 3, en-GB
mkalafa,
2007-06-26T23:11:51+02:00 - Seite 193
Page 197 of 377
Loading and stowing
194$
To unlock
% To lock
X To lock :insert the emergency key elemen t
( Y page 300) into the lock and turn it 90°
clockwise to position %.
X To unlock: insert the emergency key ele-
ment (Y page 300) into the lock and turn
it 90° anti-clockwise to position $.
i Vehicles with audio equipment* or
COMAND APS*: the AUX jack is in the glove
compartment. Stowage compartment on top of the
dashboard
1
Stowage compartment
2 Button
X To open: press button 2.
Stowage compartment 1opens.
i On vehicles with Audio 20*, Audio 50*
and COMAND APS*, the audio display is
under the cover. Stowage compartment in the centre
console 1
Cove r
X To open: slide cover 1back. Controls
* optional
204_AKB; 2; 3, en-GB
mkalafa,
2007-06-26T23:11:51+02:00 - Seite 194
Page 198 of 377
Features
195
Stowage compartment/telephon
e
compartment under the armrest 1
Right-hand butto n
2 Left-hand button
X To open: press left-hand button 2or right-
hand button 1.
The stowage compartment opens.
i A small and a large stowage compartment
are located under the armrest. The small
stowage compartment can be removed for
emptying. The telephone bracket* is loca-
ted in the large stowage compartment. Stowage compartment in the rear seat
armres t 1
Cove r
2 Rear seat armres t
X Fold down rear seat armrest 2.
X Fold cover 1of the rear seat armrest
upwards. Features
Sun visors
G
Risk of accident
Keep the mirrors in the sun visors covered
while driving. You could otherwise be daz-
zled by bright lights, impairing your view of
traffic conditions. As a result you could
cause an accident. 1
Mirror light
2 Retainer
3 Retaining clip, e.g. for a car park ticket
4 Vanity mirror
5 Mirror cover Controls
* optional
204_AKB; 2; 3, en-GB
mkalafa,
2007-06-26T23:11:51+02:00 - Seite 195
Page 199 of 377

Features
196
Mirror in the sun viso
rMirror light
1only comes on if the sun visor
is clipped into retainer 2and mirror cover
5 has been folded up.
Glare from the side X
Fold down the sun visor.
X Pull the sun visor from retainer 2.
X Swing the sun visor to the side. Roller sunblinds* for the rear side
windows 1
Tab
2 Retainers X
To extend: pull the roller sunblind out by
tab 1and hook it onto retainers 2at th e
top of the window.
! Always guide the roller sunblind by hand.
Do not let it snap back suddenly, as thi s
would damage the automatic roller mech-
anism.
! If you drive with the roller sunblind exten-
ded and the window open, the roller sun-
blind may pop out of the retainer and
suddenly spring back if you drive at high
speeds, e.g. on the motorway. This could
damage the inertia reel. Therefore, either
close the window or retract the roller sun-
blind before driving at high speeds. Rear window blind* (Saloon
) 1
Button for rear window blind
! Make sure that the rear window blind can
move freely. Otherwise, the blind or othe r
objects could be damaged.
X To extend or retract: briefly press button
1 .
The rear window blind fully extends or fully
retracts. Controls
* optional
204_AKB; 2; 3, en-GB
mkalafa,
2007-06-26T23:11:51+02:00 - Seite 196
Page 200 of 377

Features
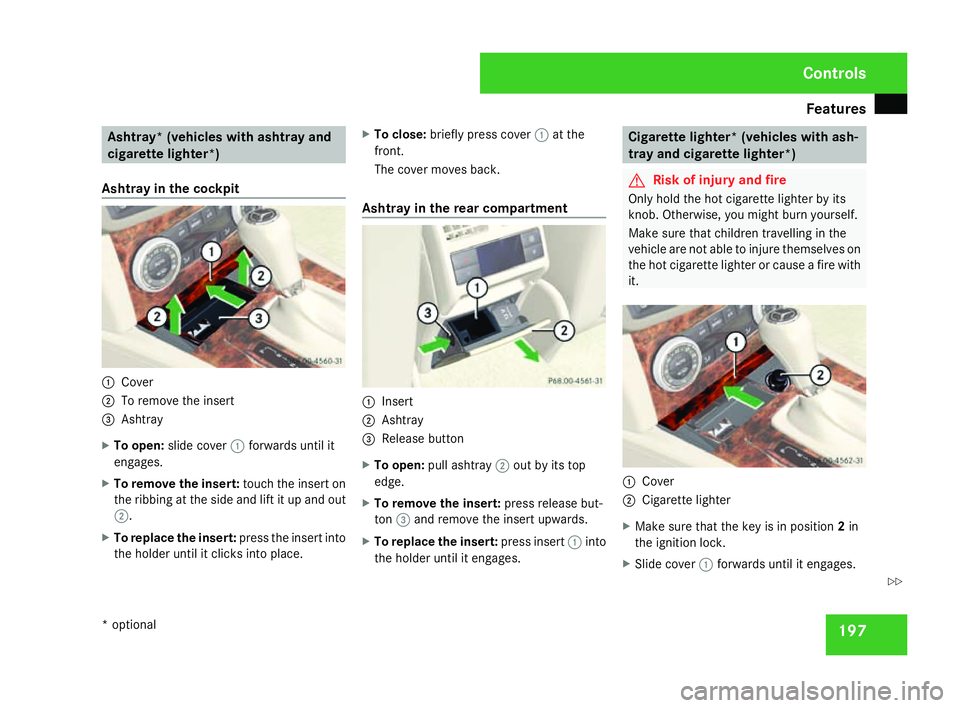
197Ashtray* (vehicles with ashtray and
cigarette lighter*)
Ashtray in the cockpit 1
Cove r
2 To remove the insert
3 Ashtray
X To open: slide cover 1forwards until it
engages.
X To remove the insert: touch the insert on
the ribbing at the side and lift it up and ou t
2 .
X To replace the insert: press the insert into
the holder until it clicks into place .X
To close: briefly press cover 1at th e
front.
The cover moves back.
Ashtray in the rear compartment 1
Insert
2 Ashtray
3 Release butto n
X To open: pull ashtray 2out by its top
edge.
X To remove the insert: press release but-
ton 3and remove the insert upwards .
X To replace the insert: press insert1into
the holder until it engages . Cigarette lighter* (vehicles with ash
-
tray and cigarette lighter*) G
Risk of injury and fire
Only hold the hot cigarette lighter by its
knob. Otherwise, you might burn yourself.
Make sure that children travelling in the
vehicle are not able to injure themselves on
the hot cigarette lighter or cause a fire with
it. 1
Cove r
2 Cigarette lighter
X Make sure that the key is in position 2in
the ignition lock .
X Slide cover 1forwards until it engages. Controls
* optional
204_AKB; 2; 3, en-GB
mkalafa,
2007-06-26T23:11:51+02:00 - Seite 197 Z