Page 81 of 94
 80
Before
UseGetting
started
RoutingAddress
Book
Vo i c e Recognition
Navigation
Set Up
RDM-TMC
Rear View Monitor
Rear View Monitor Operation
The operation of the rear view monitor when reversing")
80
Before
UseGetting
started
RoutingAddress
Book
Vo i c e Recognition
Navigation
Set Up
RDM-TMC
Rear View Monitor
Rear View Monitor Operation
The operation of the rear view monitor when reversing the vehicle varies depending on the
traffic, road, and vehicle conditions. The amount of steering and the timing also varies
depending on conditions, so confirm the surrounding conditions directly with your eyes and
steer the vehicle in accordance with the conditions.
Be well aware of the above cautions prior to using the rear view monitor.
Note
Images taken by the rear view parking camera and displayed on the navigation display are
mirror images.
(1) Shift the shift lever to R to switch the display to the rear view monitor display.
(2) Confirming the surrounding conditions, reverse the vehicle.
(3) When the shift lever is shifted from R to another shift lever position, the screen returns to the previous display.
(Screen display) (Actual view)
�%�:�����A�'�#���D�Q�Q�M�����2�C�I�G�����������6�J�W�T�U�F�C�[�����/�C�T�E�J���������������������������������2�/
Page 82 of 94
 81
Rear View Monitor
Variance Between Actual Road
Conditions and Displayed Image
Some variance occurs between the actual road and the displayed road. Such variance in
distance perspective could lead")
81
Rear View Monitor
Variance Between Actual Road
Conditions and Displayed Image
Some variance occurs between the actual road and the displayed road. Such variance in
distance perspective could lead to an accident. Note the following conditions that may cause
a variance in distance perspective.
1When the vehicle is tilted due to the weight of passengers and
load
When the vehicle rear is lowered, the object displayed on the screen appears farther than the
actual distance.
2When there is a steep grade behind the vehicle
When there is a steep upgrade (downgrade) behind the vehicle, the object displayed on the
screen appears farther (downgrade: closer) than the actual distance.
Object
Variance
Appears
farther than
actual
distance Appears
closer than
actual
distance
Object at actual position Object at actual
position
Object on screen
Object on screen
A: Distance between the vehicle and object displayed on the screen.B: Actual distance between the vehicle and object.
�%�:�����A�'�#���D�Q�Q�M�����2�C�I�G�����������6�J�W�T�U�F�C�[�����/�C�T�E�J���������������������������������2�/
Page 83 of 94
 7
Before Use
If necessary
Rear View
Monitor
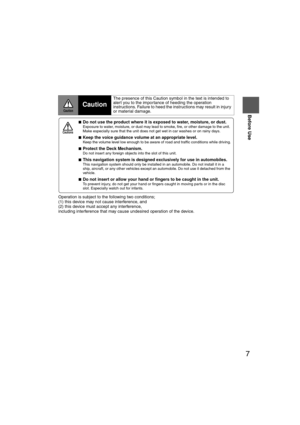
Operation is subject to the following two conditions;
(1) this device may not cause interference, and
(2) this device must accept any interference,
incl")
7
Before Use
If necessary
Rear View
Monitor
Operation is subject to the following two conditions;
(1) this device may not cause interference, and
(2) this device must accept any interference,
including interference that may cause undesired operation of the device.
Caution
Caution
The presence of this Caution symbol in the text is intended to
alert you to the importance of heeding the operation
instructions. Failure to heed the instructions may result in injury
or material damage.
nDo not use the product where it is exposed to water, moisture, or dust. Exposure to water, moisture, or dust may lead to smoke, fire, or other damage to the unit.
Make especially sure that the unit does not get wet in car washes or on rainy days.
n
Keep the voice guidance volume at an appropriate level. Keep the volume level low enough to be aware of road and traffic conditions while driving.
n
Protect the Deck Mechanism.Do not insert any foreign objects into the slot of this unit.
n
This navigation system is designed exclusively for use in automobiles.This navigation system should only be installed in an automobile. Do not install it in a
ship, aircraft, or any other vehicles except an automobile. Do not use it detached from the
vehicle.
n
Do not insert or allow your hand or fingers to be caught in the unit. To prevent injury, do not get your hand or fingers caught in moving parts or in the disc
slot. Especially watch out for infants.
Cautions
�%�:�����A�'�#���D�Q�Q�M�����2�C�I�G���������6�J�W�T�U�F�C�[�����/�C�T�E�J���������������������������������2�/
Page 84 of 94
 10
Before Use
Navigation
Set Up
RDM-TMCIf
necessary
Rear View
Monitor
8. RTN button*2 :
Button used to return to the previous screen.
9. DISP button: Screen brightness/contrast mode selection and a")
10
Before Use
Navigation
Set Up
RDM-TMCIf
necessary
Rear View
Monitor
8. RTN button*2 :
Button used to return to the previous screen.
9. DISP button: Screen brightness/contrast mode selection and adjustment
display.
10.POWER/VOLUME button: The volume can be adjusted by turning the dial. Turn the audio unit off by pressing the dial.
11.TUNE/SEEK button: Performs tuning (short press) and searching (long press) in FM/AM mode. Performs track skip (short press) and fast-
forward/reverse (long press) in CD mode.
12.SCAN button: Performs scanning operation in FM/AM and CD modes.
13.AUDIO button: Audio unit-related operation screen display (preset display of
FM and AM).
The on-screen touch button "SOUND" is constantly displayed
at the bottom of the audio unit-related screen for displaying the
sound quality adjustment screen when selected.
*1 : The external input terminal is not equipped on your vehicle
because it is not standard equipment.
*2 : For navigation unit operation
Note
lIf there is no response after selecting the on-screen button, remove your finger from the
screen and select it again.
l On-screen buttons that cannot be operated are not illuminated.
Select the on-screen button lightly with your finger.
Selecting the on-screen buttons using objects that have a hard or sharp end such
as a ball point pen or mechanical pencil could cause a malfunction.
Caution
�%�:�����A�'�#���D�Q�Q�M�����2�C�I�G�����������6�J�W�T�U�F�C�[�����/�C�T�E�J���������������������������������2�/
Page 85 of 94
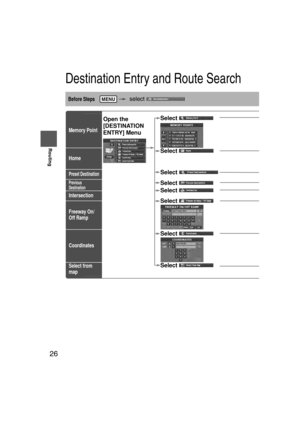
 12
RoutingAddress
Book
Getting started
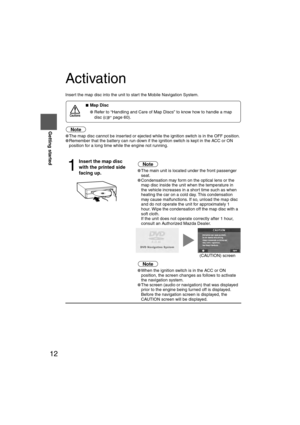
Activation
Insert the map disc into the unit to start the Mobile Navigation System.
Note
l
The map disc cannot be inserted or ejected while the ignition switch i")
12
RoutingAddress
Book
Getting started
Activation
Insert the map disc into the unit to start the Mobile Navigation System.
Note
l
The map disc cannot be inserted or ejected while the ignition switch is in the OFF position.
l Remember that the battery can run down if the ignition switch is kept in the ACC or ON
position for a long time while the engine not running.
nMap Disc
l Refer to “Handling and Care of Map Discs” to know how to handle a map
disc ( page 60).
1
Insert the map disc
with the printed side
facing up.Note
lThe main unit is located under the front passenger
seat.
l Condensation may form on the optical lens or the
map disc inside the unit when the temperature in
the vehicle increases in a short time such as when
heating the car on a cold day. This condensation
may cause malfunctions. If so, unload the map disc
and do not operate the unit for approximately 1
hour. Wipe the condensation off the map disc with a
soft cloth.
If the unit does not operate correctly after 1 hour,
consult an Authorized Mazda Dealer.
Note
lWhen the ignition switch is in the ACC or ON
position, the screen changes as follows to activate
the navigation system.
l The screen (audio or navigation) that was displayed
prior to the engine being turned off is displayed.
Before the navigation screen is displayed, the
CAUTION screen will be displayed.
Cautions
(CAUTION) screen
�%�:�����A�'�#���D�Q�Q�M�����2�C�I�G�����������6�J�W�T�U�F�C�[�����/�C�T�E�J���������������������������������2�/
Page 86 of 94
 13
Getting started
If necessary
Rear View
Monitor
lThe Current Position screen appears.
Note
lYou can select the language by selecting the on-screen button. You can also
change the selected langua")
13
Getting started
If necessary
Rear View
Monitor
lThe Current Position screen appears.
Note
lYou can select the language by selecting the on-screen button. You can also
change the selected language using Language Selection. ( page 51)
l The CAUTION screen remains on the display unless you select the on-screen
button.
Select the on-screen button lightly with your finger.
Colors for unavailable buttons will be pale.
2
Read the CAUTION
carefully, and select
the on-screen
button.
Removing the Map Disc
1
With the ignition switch in the ACC position, remove the bracket.
2
Press (EJECT).
On-screen Buttons
Most functions are inhibited while the
vehicle is in motion.
Please read the handbook for operation
instructions.
Always obey traffic regulations.
Caution
Screw Screw
Bracket
Do not get your hand or fingers caught in
moving parts or in the disc slot. This can
cause injuries. Children are inquisitive, try
to install or remove the map disc without
infants looking on.
Caution
�%�:�����A�'�#���D�Q�Q�M�����2�C�I�G�����������6�J�W�T�U�F�C�[�����/�C�T�E�J���������������������������������2�/
Page 87 of 94
 19
Getting started
If necessary
Rear View
Monitor
Screen change
nDo not keep your eyes fixed on the monitor screen or operate the system
while driving
Do not change the settings and destination loc")
19
Getting started
If necessary
Rear View
Monitor
Screen change
nDo not keep your eyes fixed on the monitor screen or operate the system
while driving
Do not change the settings and destination locations while driving. Minimize the time
spent viewing the monitor screen and listening to the voice guidance while driving.
Operating the system will distract the driver from looking ahead of the vehicle and may
cause an accident. Always stop the vehicle in a safe location and use the parking brake
before operating the system.
Map
orientation
Map scale
Changing the Map Orientation/Scale
Warning
1
Select , on-
screen button.lNorth Up: Geographic north is up.
lHead Up: The direction you are heading is up.
1
Select or on-screen
button.
lThe map can be displayed in
13 steps with scales from
to . l
ZOOM OUT: Enlarges the map.
lZOOM IN: Reduces the map.
(more detail.)
Position before change
Imperial
display1/32 mi
(mile) 1/4 mi
(mile)2 mi
(mile)16 mi
(mile)128 mi
(mile)
Metric
display 50 m 500 m 4 km 32 km 256 km
�%�:�����A�'�#���D�Q�Q�M�����2�C�I�G�����������6�J�W�T�U�F�C�[�����/�C�T�E�J���������������������������������2�/
Page 88 of 94
 21
Routing
If necessary
Rear View
Monitor
0
lFor Character Entry, please refer to page 29.
lDo not keep your eyes fixed on the monitor screen or operate the system while driving.Do not change the set")
21
Routing
If necessary
Rear View
Monitor
0
lFor Character Entry, please refer to page 29.
lDo not keep your eyes fixed on the monitor screen or operate the system while driving.Do not change the settings and destination locations while driving. Minimize the time spent
viewing the monitor screen and listening to the voice guidance while driving. Operating the system
will distract the driver from looking ahead of the vehicle and may cause an accident. Always stop
the vehicle in a safe location before operating the system.
lRoute searches with the navigation system can include roads that you cannot drive on and roads that you
are prohibited from driving on due to traffic regulations. Please comply with the traffic regulations.
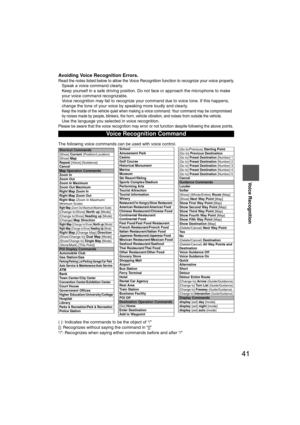
Warnings
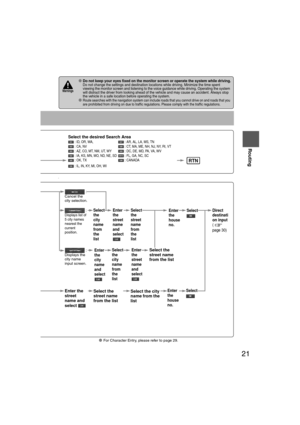
RTN
Select the desired Search Area : ID, OR, WA, : AR, AL, LA, MS, TN
: CA, NV : CT, MA, ME, NH, NJ, NY, RI, VT
: AZ, CO, MT, NM, UT, WY : DC, DE, MD, PA, VA, WV
: IA, KS, MN, MO, ND, NE, SD : FL, GA, NC, SC
: OK, TX : CANADA
: IL, IN, KY, MI, OH, WI
n narrowing n to city namect
n narrowing n to street namet
Enter the
street
name and
select
:
Cancel the
city selection.
:
Displays list of
5 city name
s
nearest the
current
position.
:
Displays the
city name
input screen.
Select the
street name
from the list
Select
the
city
name
from
the
list
Enter
the
city
name
and
selectEnter
the
street
name
and
select
Select
the
city
name
from
the
list
Select the city
name from the
list
Select
the
street
name
from
the
listEnter
the
street
name
and
select
Select the
street name
from the list
Enter
the
house
no. Enter
the
house
no.
Select
SelectDirect
destinati
on input
(
page 30)
�%�:�����A�'�#���D�Q�Q�M�����2�C�I�G�����������6�J�W�T�U�F�C�[�����/�C�T�E�J���������������������������������2�/