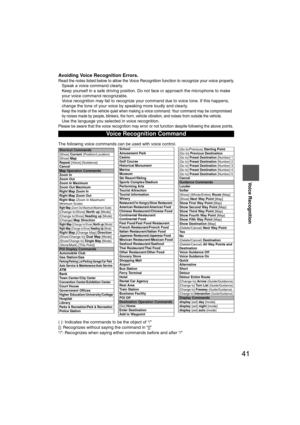
Page 17 of 94
 16
RoutingAddress
Book
Getting started
nDaytime/Night screen
When the headlights are on, daytime mode can also be selected (Daytime mode can also
be selected while the headlights are turned on.).
nT")
16
RoutingAddress
Book
Getting started
nDaytime/Night screen
When the headlights are on, daytime mode can also be selected (Daytime mode can also
be selected while the headlights are turned on.).
nTilt display operation
Select the on-screen button to tilt the display, to close it.
The display angle can be adjusted in three stages.
When opening, the display angle changes one stage at a time each time the on-
screen button is pressed.
When closing, the display angle changes one stage at a time each time the on-screen
button is pressed.
Press the (DISP) button followed by the on-screen button to display the
settings menu.
nReturning to the navigation screen from the audio unit screen
l Select the on-screen button to set the function to return to the navigation screen
from the audio unit screen by operation of the button only.
l Select the on-screen button to set the function to return to the navigation screen
from the audio unit screen automatically after 20 seconds.
nBeep sound settings
lSelect the on-screen button to activate the operation beep sound.
l Select the on-screen button to deactivate the operation beep sound.
nScreen Size Setting
The size of the screen can be changed during external image input*.
1. Press the (MEDIA) button .
2. Select the on-screen button to set the desired screen size.
3. The on-screen button of the desired screen size is selected.
�%�:�����A�'�#���D�Q�Q�M�����2�C�I�G�����������6�J�W�T�U�F�C�[�����/�C�T�E�J���������������������������������2�/
Page 18 of 94
17
Getting started
If necessary
Rear View
Monitor
nFull screen
A full-screen image is displayed.
l A 16:9 screen ratio image is shown in the above figure.
nNormal screen
A 4:3 screen ratio image is the standard display, and black bands appear on each side of the
screen.
l A 16:9 screen ratio image is scaled to a 4:3 screen ratio.
nWide screen
The center area of the image is compressed toward the center, and the surrounding area is
enlarged toward the edge.
l A 16:9 screen ratio image is shown in the above figure.
�%�:�����A�'�#���D�Q�Q�M�����2�C�I�G�����������6�J�W�T�U�F�C�[�����/�C�T�E�J���������������������������������2�/
Page 19 of 94
18
RoutingAddress
Book
Getting started
nCinema screen
The image is enlarged upward and downward. A 4:3 and 16:9 screen ratio image are dis-
played with the upper/lower part of the image cut off.
l A 16:9 screen ratio image is shown in the above figure.
Note
The display varies depending on the style of the image recorded on the disc.
Refer to the following table and set the screen size.
* The external input terminal is not equipped on your vehicle because it is not standard equipment.
Image styleRecommendation
4:3 Normal or wide screen
16:9 Full screen
Letter box Full or cinema screen
�%�:�����A�'�#���D�Q�Q�M�����2�C�I�G�����������6�J�W�T�U�F�C�[�����/�C�T�E�J���������������������������������2�/
Page 20 of 94
 19
Getting started
If necessary
Rear View
Monitor
Screen change
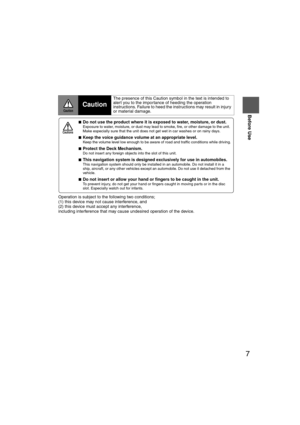
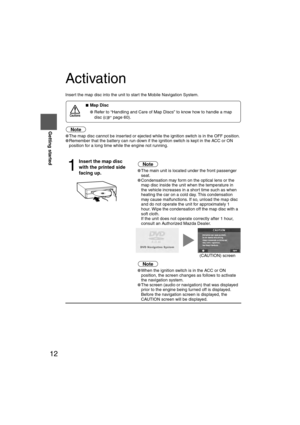
nDo not keep your eyes fixed on the monitor screen or operate the system \
while driving
Do not change the settings and destination l")
19
Getting started
If necessary
Rear View
Monitor
Screen change
nDo not keep your eyes fixed on the monitor screen or operate the system \
while driving
Do not change the settings and destination locations while driving. Minimize the time
spent viewing the monitor screen and listening to the voice guidance while driving.
Operating the system will distract the driver from looking ahead of the vehicle and may
cause an accident. Always stop the vehicle in a safe location and use the parking brake
before operating the system.
Map
orientation
Map scale
Changing the Map Orientation/Scale
Warning
1
Select , on-
screen button.lNorth Up: Geographic north is up.
lHead Up: The direction you are heading is up.
1
Select or on-screen
button.
lThe map can be displayed in
13 steps with scales from
to . l
ZOOM OUT: Enlarges the map.
lZOOM IN: Reduces the map.
(more detail.)
Position before change
Imperial
display1/32 mi
(mile) 1/4 mi
(mile)2 mi
(mile)16 mi
(mile)128 mi
(mile)
Metric
display 50 m 500 m 4 km 32 km 256 km
�%�:�����A�'�#���D�Q�Q�M�����2�C�I�G�����������6�J�W�T�U�F�C�[�����/�C�T�E�J���������������������������������2�/
Page 21 of 94
20
RoutingAddress
Book
Routing
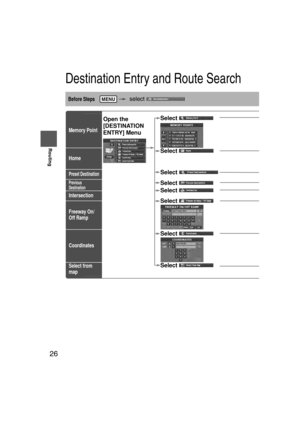
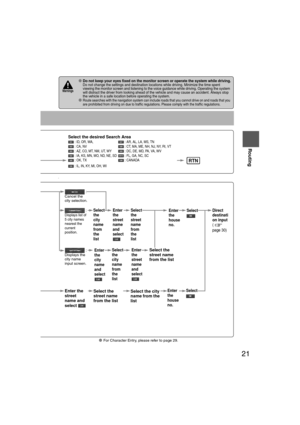
Destination Entry and Route Search
l
You can set the destination using various methods provided by the system.
Before Steps select
Change
(Change
Search Area)
Address
MENU
Open the [DESTINATION
ENTRY] Menu
SelectSelect the: ID, OR, W : CA, NV: AZ, CO,
: IA, KS,
M : OK, TX
: IL, IN, K
Y
Open the
[DESTINATION
ENTRY] MenuSelectWhen narrowing
down to city name
Select
When narrowing
down to street name
Select
Enter the
street
name and
select
:
Cancel the
city selection.
:
Displays list of
5 city name
s
nearest the
current
position.
:
Displays the
city name
input screen.
�%�:�����A�'�#���D�Q�Q�M�����2�C�I�G�����������6�J�W�T�U�F�C�[�����/�C�T�E�J���������������������������������2�/
Page 22 of 94
 21
Routing
If necessary
Rear View
Monitor
0
lFor Character Entry, please refer to page 29.
lDo not keep your eyes fixed on the monitor screen or operate the system while driving.Do not change the set")
21
Routing
If necessary
Rear View
Monitor
0
lFor Character Entry, please refer to page 29.
lDo not keep your eyes fixed on the monitor screen or operate the system while driving.Do not change the settings and destination locations while driving. Minimize the time spent
viewing the monitor screen and listening to the voice guidance while driving. Operating the system
will distract the driver from looking ahead of the vehicle and may cause an accident. Always stop
the vehicle in a safe location before operating the system.
lRoute searches with the navigation system can include roads that you cannot drive on and roads that you
are prohibited from driving on due to traffic regulations. Please comply with the traffic regulations.
Warnings
RTN
Select the desired Search Area : ID, OR, WA, : AR, AL, LA, MS, TN
: CA, NV : CT, MA, ME, NH, NJ, NY, RI, VT
: AZ, CO, MT, NM, UT, WY : DC, DE, MD, PA, VA, WV
: IA, KS, MN, MO, ND, NE, SD : FL, GA, NC, SC
: OK, TX : CANADA
: IL, IN, KY, MI, OH, WI
n narrowing n to city namect
n narrowing n to street namet
Enter the
street
name and
select
:
Cancel the
city selection.
:
Displays list of
5 city name
s
nearest the
current
position.
:
Displays the
city name
input screen.
Select the
street name
from the list
Select
the
city
name
from
the
list
Enter
the
city
name
and
selectEnter
the
street
name
and
select
Select
the
city
name
from
the
list
Select the city
name from the
list
Select
the
street
name
from
the
listEnter
the
street
name
and
select
Select the
street name
from the list
Enter
the
house
no. Enter
the
house
no.
Select
SelectDirect
destinati
on input
(
page 30)
�%�:�����A�'�#���D�Q�Q�M�����2�C�I�G�����������6�J�W�T�U�F�C�[�����/�C�T�E�J���������������������������������2�/
Page 23 of 94
22
RoutingAddress
Book
Routing
Destination Entry and Route Search
Point of
interest
Open the
[DESTINATION
ENTRY] MenuSelectWhen entering
the destination
point directly
Select
When narrowing
down to
category name
Select
When narrowing
down to city
name
Select
When narrowing
down to the
nearest facility
Select
When narrowing
down to a phone
number
Select
Select the
category
name from
the list :
Cancel the
city selection.
:
Displays list
of 5 city
names
nearest the
current
position.
:
Displays the
city name
input screen.
for facilities clonearest city ha
for facilities neaposition.
:facilities near t
position.
Searches for fathe current des
Enter the phon
and select
�%�:�����A�'�#���D�Q�Q�M�����2�C�I�G�����������6�J�W�T�U�F�C�[�����/�C�T�E�J���������������������������������2�/
Page 24 of 94
 23
Routing
If necessary
Rear View
Monitor
lFor Character Entry, please refer to page 29.
When entering he destination oint directly elect
When narrowing own to ategory nameelect
When narrowing own to")
23
Routing
If necessary
Rear View
Monitor
lFor Character Entry, please refer to page 29.
When entering he destination oint directly elect
When narrowing own to ategory nameelect
When narrowing own to city ameelect
When narrowing own to the earest facilityelect
When narrowing own to a phone umberelect
Select the
category
name from
the list :
Cancel the
city selection.
:
Displays list
of 5 city
names
nearest the
current
position.
:
Displays the
city name
input screen.
: Searches
for facilities close to the
nearest city hall.
: Searches
for facilities near the current
position.
: Searches for
facilities near the current
position.
:
Searches for facilities near
the current destinations.
Select the
city name
from the
list
Enter the
city name
and select
Select the
city name
from the
list
Enter the city
center name
and select
Select
Scroll the map
as necessary
and select
Enter the
POI name
and select Select the
POI from
the list
Select
Select the
city center
name from
the list and
select
Select the
Category
name from
the list and
select
Select the
facility from
the list and
select
Enter the phone number
and select
�%�:�����A�'�#���D�Q�Q�M�����2�C�I�G�����������6�J�W�T�U�F�C�[�����/�C�T�E�J���������������������������������2�/


 17
Getting started
If necessary
Rear View
Monitor
nFull screen
A full-screen image is displayed.
l A 16:9 screen ratio image is shown in the above figure.
nNormal screen
A 4:3 screen ratio image is t")
 18
RoutingAddress
Book
Getting started
nCinema screen
The image is enlarged upward and downward. A 4:3 and 16:9 screen ratio image are dis-
played with the upper/lower part of the image cut off.
l A 1")
 20
RoutingAddress
Book
Routing
Destination Entry and Route Search
l
You can set the destination using various methods provided by the system.
Before Steps select
Change
(Change
Search Area)
Addres")
![MAZDA MODEL CX-7 2007 Navigation Manual (in English) 22
RoutingAddress
Book
Routing
Destination Entry and Route Search
Point of
interest
Open the
[DESTINATION
ENTRY] MenuSelectWhen entering
the destination
point directly
Select
When narrowing
dow](/manual-img/28/13911/w960_13911-22.png "MAZDA MODEL CX-7 2007 Navigation Manual (in English) 22
RoutingAddress
Book
Routing
Destination Entry and Route Search
Point of
interest
Open the
[DESTINATION
ENTRY] MenuSelectWhen entering
the destination
point directly
Select
When narrowing
dow")