2007 ISUZU KB P190 ECO mode
[x] Cancel search: ECO modePage 3626 of 6020
Starting System – V6 Page 6D1-2–18
Cranking Voltage Test
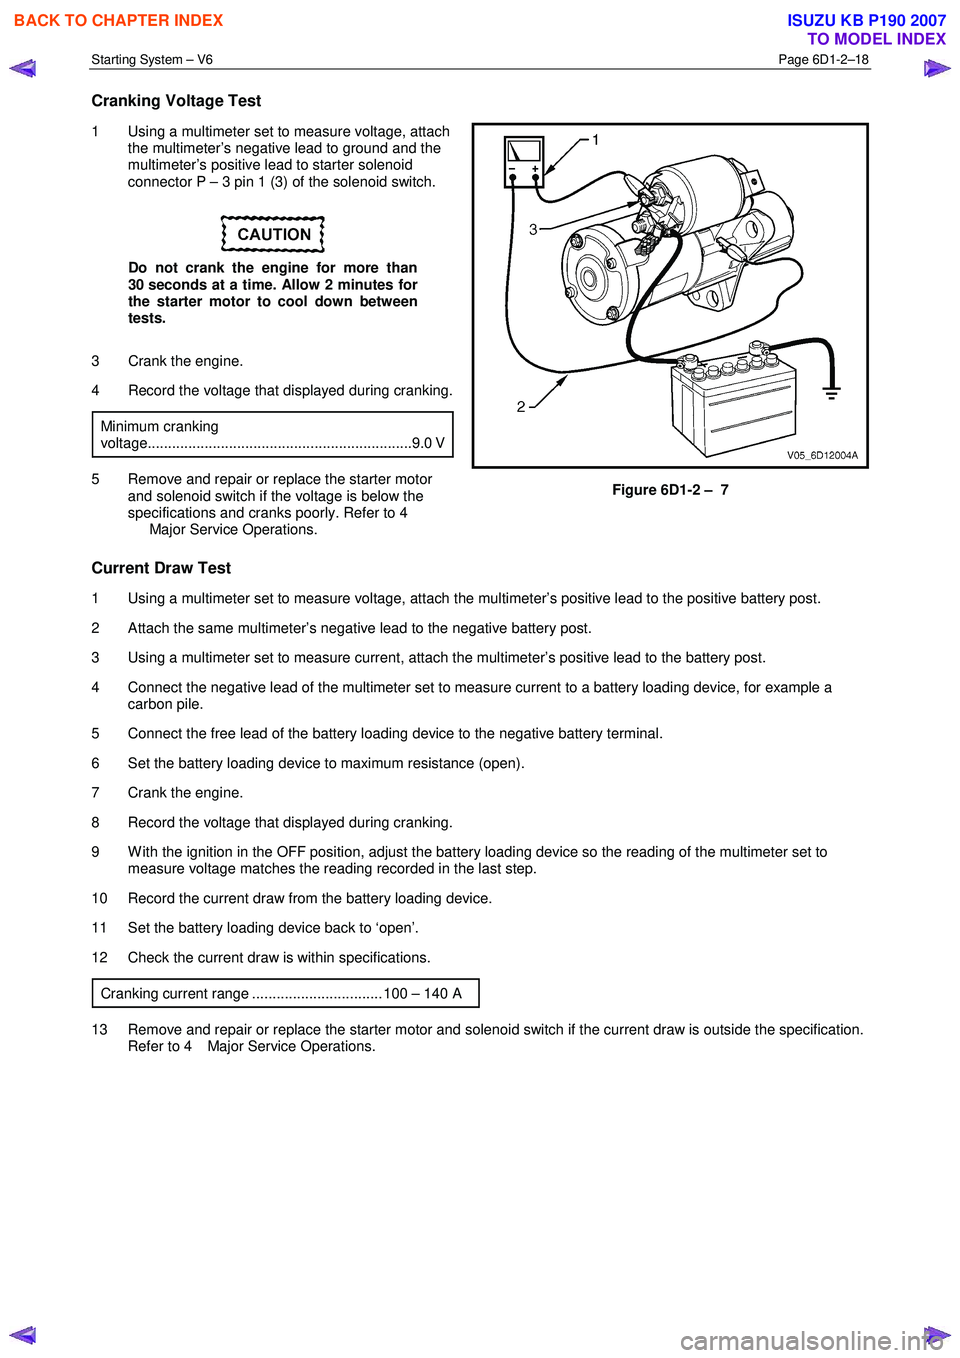
1 Using a multimeter set to measure voltage, attach
the multimeter’s negative lead to ground and the
multimeter’s positive lead to starter solenoid
connector P – 3 pin 1 (3) of the solenoid switch.
Do not crank the engine for more than
30 seconds at a time. Allow 2 minutes for
the starter motor to cool down between
tests.
3 Crank the engine.
4 Record the voltage that displayed during cranking.
Minimum cranking
voltage.................................................................9.0 V
5 Remove and repair or replace the starter motor and solenoid switch if the voltage is below the
specifications and cranks poorly. Refer to 4
Major Service Operations. Figure 6D1-2 – 7
Current Draw Test
1 Using a multimeter set to measure voltage, attach the multimeter’s positive lead to the positive battery post.
2 Attach the same multimeter’s negative lead to the negative battery post.
3 Using a multimeter set to measure current, attach the multimeter’s positive lead to the battery post.
4 Connect the negative lead of the multimeter set to measure current to a battery loading device, for example a carbon pile.
5 Connect the free lead of the battery loading device to the negative battery terminal.
6 Set the battery loading device to maximum resistance (open).
7 Crank the engine.
8 Record the voltage that displayed during cranking.
9 W ith the ignition in the OFF position, adjust the battery loading device so the reading of the multimeter set to measure voltage matches the reading recorded in the last step.
10 Record the current draw from the battery loading device.
11 Set the battery loading device back to ‘open’.
12 Check the current draw is within specifications.
Cranking current range ................................ 100 – 140 A
13 Remove and repair or replace the starter motor and solenoid switch if the current draw is outside the specification. Refer to 4 Major Service Operations.
BACK TO CHAPTER INDEX
TO MODEL INDEX
ISUZU KB P190 2007
Page 3632 of 6020
Starting System – V6 Page 6D1-2–24
No Load Test
1 Clamp the starter motor securely to a test bench.
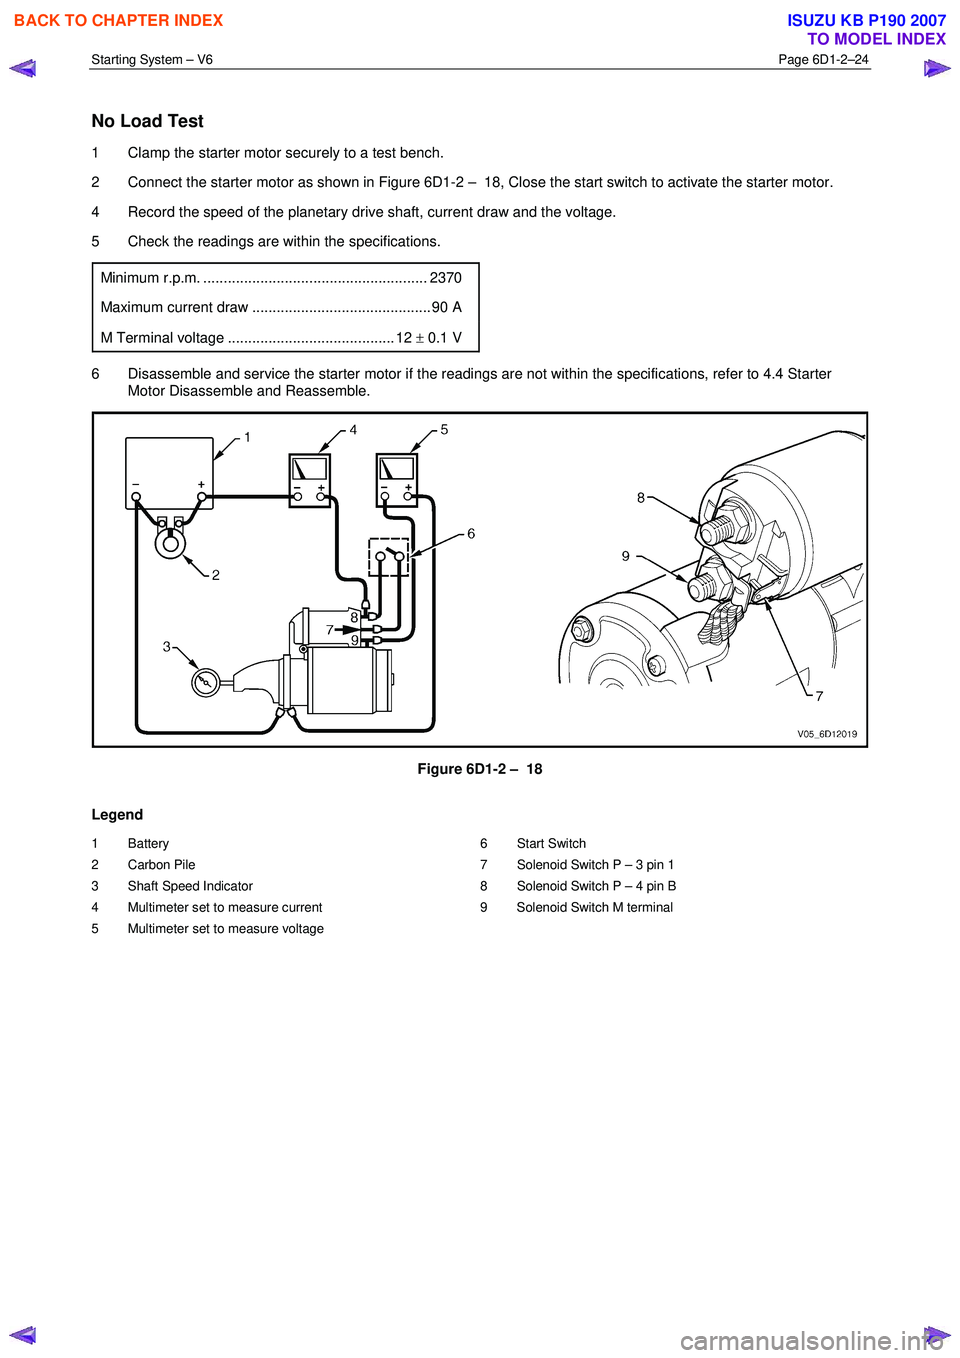
2 Connect the starter motor as shown in Figure 6D1-2 – 18, Close the start switch to activate the starter motor.
4 Record the speed of the planetary drive shaft, current draw and the voltage.
5 Check the readings are within the specifications.
Minimum r.p.m. ....................................................... 2370
Maximum current draw ............................................ 90 A
M Terminal voltage ......................................... 12 ± 0.1 V
6 Disassemble and service the starter motor if the readings are not within the specifications, refer to 4.4 Starter
Motor Disassemble and Reassemble.
Figure 6D1-2 – 18
Legend
1 Battery
2 Carbon Pile
3 Shaft Speed Indicator
4 Multimeter set to measure current
5 Multimeter set to measure voltage 6 Start Switch
7 Solenoid Switch P – 3 pin 1
8 Solenoid Switch P – 4 pin B
9 Solenoid Switch M terminal
BACK TO CHAPTER INDEX
TO MODEL INDEX
ISUZU KB P190 2007
Page 3635 of 6020
Starting System – V6 Page 6D1-2–27
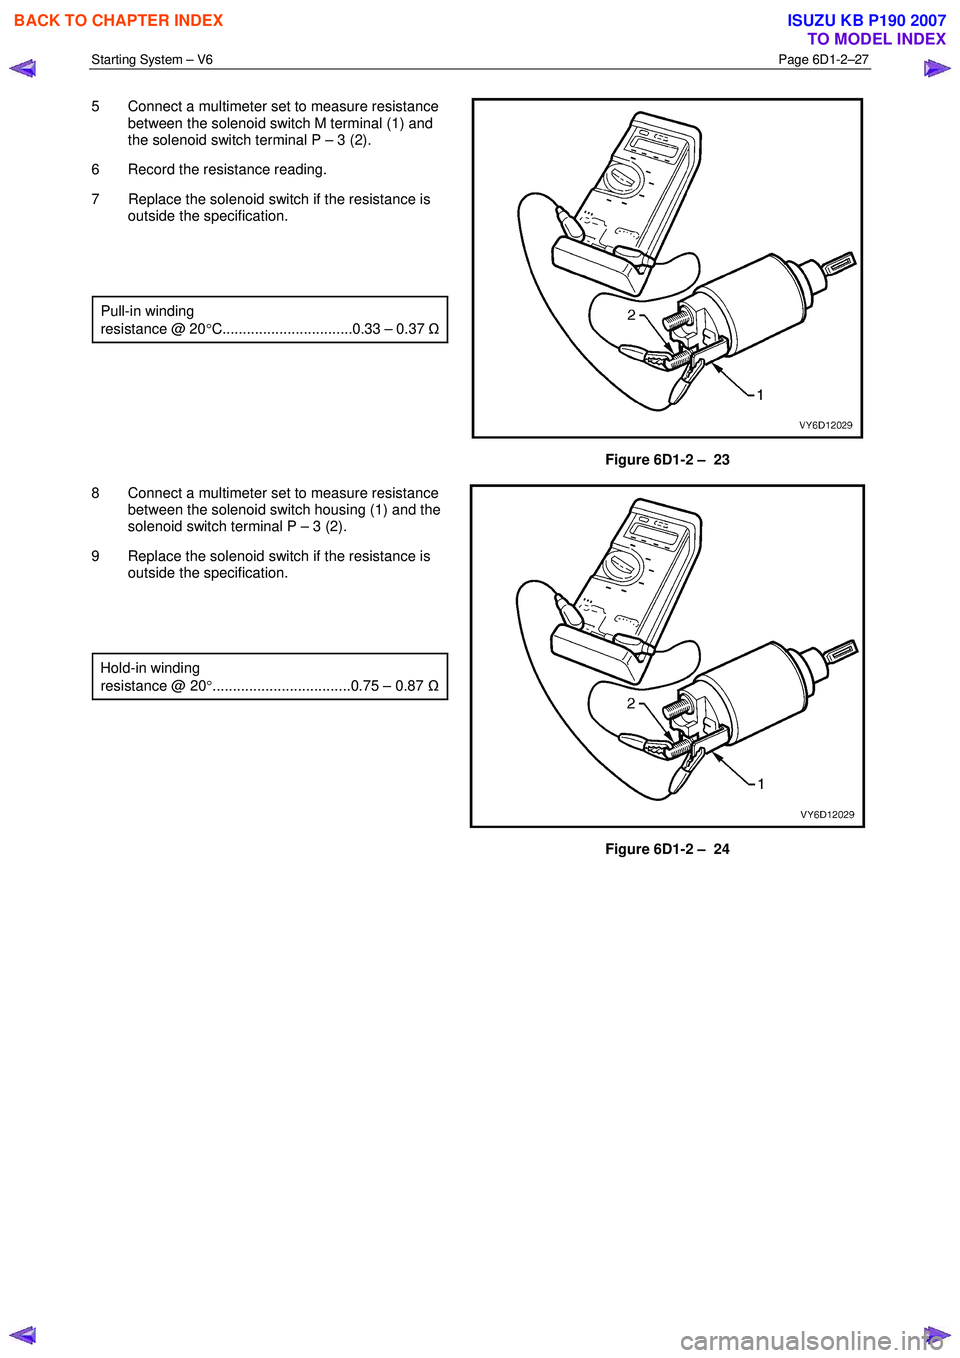
5 Connect a multimeter set to measure resistance
between the solenoid switch M terminal (1) and
the solenoid switch terminal P – 3 (2).
6 Record the resistance reading.
7 Replace the solenoid switch if the resistance is outside the specification.
Pull-in winding
resistance @ 20 °C................................0.33 – 0.37 Ω
Figure 6D1-2 – 23
8 Connect a multimeter set to measure resistance between the solenoid switch housing (1) and the
solenoid switch terminal P – 3 (2).
9 Replace the solenoid switch if the resistance is outside the specification.
Hold-in winding
resistance @ 20 °..................................0.75 – 0.87 Ω
Figure 6D1-2 – 24
BACK TO CHAPTER INDEX
TO MODEL INDEX
ISUZU KB P190 2007
Page 3636 of 6020

Starting System – V6 Page 6D1-2–28
10 Fit a rubber band (1) around the plunger and
switch housing to avoid ejecting the plunger.
11 Hold the solenoid switch vertically with the plunger pointing upwards.
12 Use a power supply (2) capable of supplying 30 A or use a battery and a variable resistor.
13 Set the power supply to 3.0 V.
14 Connect the power supply negative lead to the solenoid switch body.
15 Connect the power supply positive lead to the solenoid switch terminal P – 3 (5).
16 Connect a test lamp (3) between the solenoid switch terminal P – 4 (7) and the battery.
17 Connect a multimeter set to measure voltage (4) between the solenoid switch terminal P – 3 (5)
and the solenoid switch housing.
18 Press the solenoid plunger in until the test lamp illuminates.
19 Allow the plunger to move out by 8 – 10 mm.
20 Hold the plunger in this position.
The test duration for the following step
should be no more than 2 seconds.
Figure 6D1-2 – 25
21 Slowly increase the power supply voltage on the solenoid switch terminal P – 3 until the plunger pulls in.
22 Record the multimeter reading and reduce the voltage applied to the solenoid switch terminal P – 3.
23 Replace the solenoid switch if the voltage reading is significantly higher than the specification.
Pull-in voltage @ 20 °C ............................................ 8.0 V
24 Check the continuity across the main contacts in the switch.
25 Increase the voltage on the solenoid switch terminal P – 3 (5) until the plunger pulls in.
26 Ensure the test lamp illuminates fully.
BACK TO CHAPTER INDEX
TO MODEL INDEX
ISUZU KB P190 2007
Page 3637 of 6020
Starting System – V6 Page 6D1-2–29
27 Replace the solenoid switch if the test lamp
illuminates poorly.
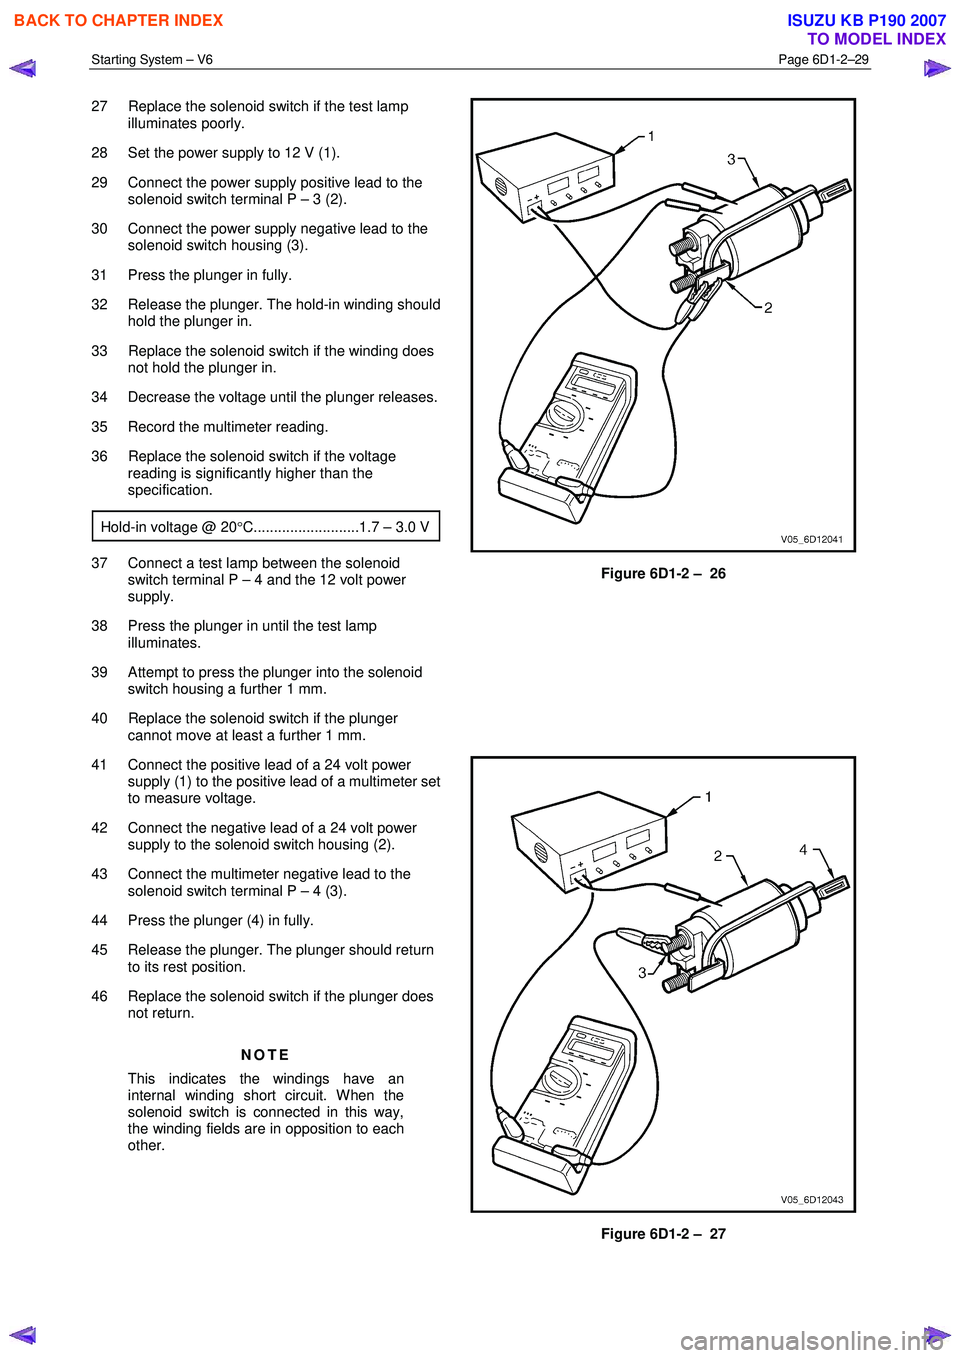
28 Set the power supply to 12 V (1).
29 Connect the power supply positive lead to the solenoid switch terminal P – 3 (2).
30 Connect the power supply negative lead to the solenoid switch housing (3).
31 Press the plunger in fully.
32 Release the plunger. The hold-in winding should hold the plunger in.
33 Replace the solenoid switch if the winding does not hold the plunger in.
34 Decrease the voltage until the plunger releases.
35 Record the multimeter reading.
36 Replace the solenoid switch if the voltage reading is significantly higher than the
specification.
Hold-in voltage @ 20 °C..........................1.7 – 3.0 V
37 Connect a test lamp between the solenoid
switch terminal P – 4 and the 12 volt power
supply.
38 Press the plunger in until the test lamp illuminates.
39 Attempt to press the plunger into the solenoid switch housing a further 1 mm.
40 Replace the solenoid switch if the plunger cannot move at least a further 1 mm.
Figure 6D1-2 – 26
41 Connect the positive lead of a 24 volt power supply (1) to the positive lead of a multimeter set
to measure voltage.
42 Connect the negative lead of a 24 volt power supply to the solenoid switch housing (2).
43 Connect the multimeter negative lead to the solenoid switch terminal P – 4 (3).
44 Press the plunger (4) in fully.
45 Release the plunger. The plunger should return to its rest position.
46 Replace the solenoid switch if the plunger does not return.
NOTE
This indicates the windings have an
internal winding short circuit. When the
solenoid switch is connected in this way,
the winding fields are in opposition to each
other.
Figure 6D1-2 – 27
BACK TO CHAPTER INDEX
TO MODEL INDEX
ISUZU KB P190 2007
Page 3643 of 6020
Battery Page 6D1-3–3
1 General Information
The vehicle is fitted with a 12 V battery located in the front right-hand corner of the engine compartment. The battery
provides:
• power for cranking the engine,
• power for a limited time when the electrical load exceeds the generator output,
• power for the accessories when the engine is not running, and
• a voltage stabilising load for the electrical system.
1.1 WARNING, CAUTION and NOTES
This Section contains various W ARNINGS, CAUTIONS and NOTE statements that you must observe carefully to reduce
the risk of death or injury during service, repair procedures or vehicle operation. Incorrect service or repair procedures
may damage the vehicle or cause operational faults. W ARNINGS, CAUTION and NOTE statements are not exhaustive.
HOLDEN LTD can not possibly warn of all the potentially hazardous consequences of failure to follow these instructions.
Definition of WARNING, CAUTION and NOTE Statements
Diagnosis and repair procedures in this Section contain both general and specific W ARNING, CAUTION and NOTE
statements. HOLDEN LTD is dedicated to the presentation of service information that helps the technician to diagnose
and repair the systems necessary for proper operation of the vehicle. Certain procedures may present a hazard to the
technician if they are not followed in the recommended manner. W ARNING, CAUTION and NOTE statements are
designed to help prevent these hazards from occurring, but not all hazards can be foreseen.
WARNING defined
A W ARNING statement immediately precedes an operating procedure or maintenance practice which, if not correctly
followed, could result in death or injury. A W ARNING statement alerts you to take necessary action or not to take a
prohibited action. If a W ARNING statement is ignored, the following consequences may occur:
• Death or injury to the technician or other personnel working on the vehicle,
• Death or injury to other people in or near the workplace area, and / or
• Death or injury to the driver / or passenger(s) of the vehicle or other people, if the vehicle has been improperly
repaired.
CAUTION defined
A CAUTION statement immediately precedes an operating procedure or maintenance practice which, if not correctly
followed, could result in damage to or destruction of equipment, or corruption of data. If a CAUTION statement is ignored,
the following consequences may occur:
• Damage to the vehicle,
• Unnecessary vehicle repairs or component replacement,
• Faulty operation or performance of any system or component being repaired,
• Damage to any system or components which depend on the proper operation of the system or component being
repaired,
• Faulty operation or performance of any systems or components which depend on the proper operation or
performance of the system or component under repair,
• Damage to fasteners, basic tools or special tools and / or
• Leakage of coolant, lubricant or other vital fluids.
NOTE defined
A NOTE statement immediately precedes or follows an operating procedure, maintenance practice or condition that
requires highlighting. A NOTE statement also emphasises necessary characteristics of a diagnostic or repair procedure.
A NOTE statement is designed to:
BACK TO CHAPTER INDEX
TO MODEL INDEX
ISUZU KB P190 2007
Page 3644 of 6020
Battery Page 6D1-3–4
• Clarify a procedure,
• Present additional information for accomplishing a procedure,
• Give insight into the reasons for performing a procedure in the recommended manner, and / or
Present information that gives the technician the benefit of past experience in accomplishing a procedure with greater
ease.
1.2 Battery Terminals and Cables
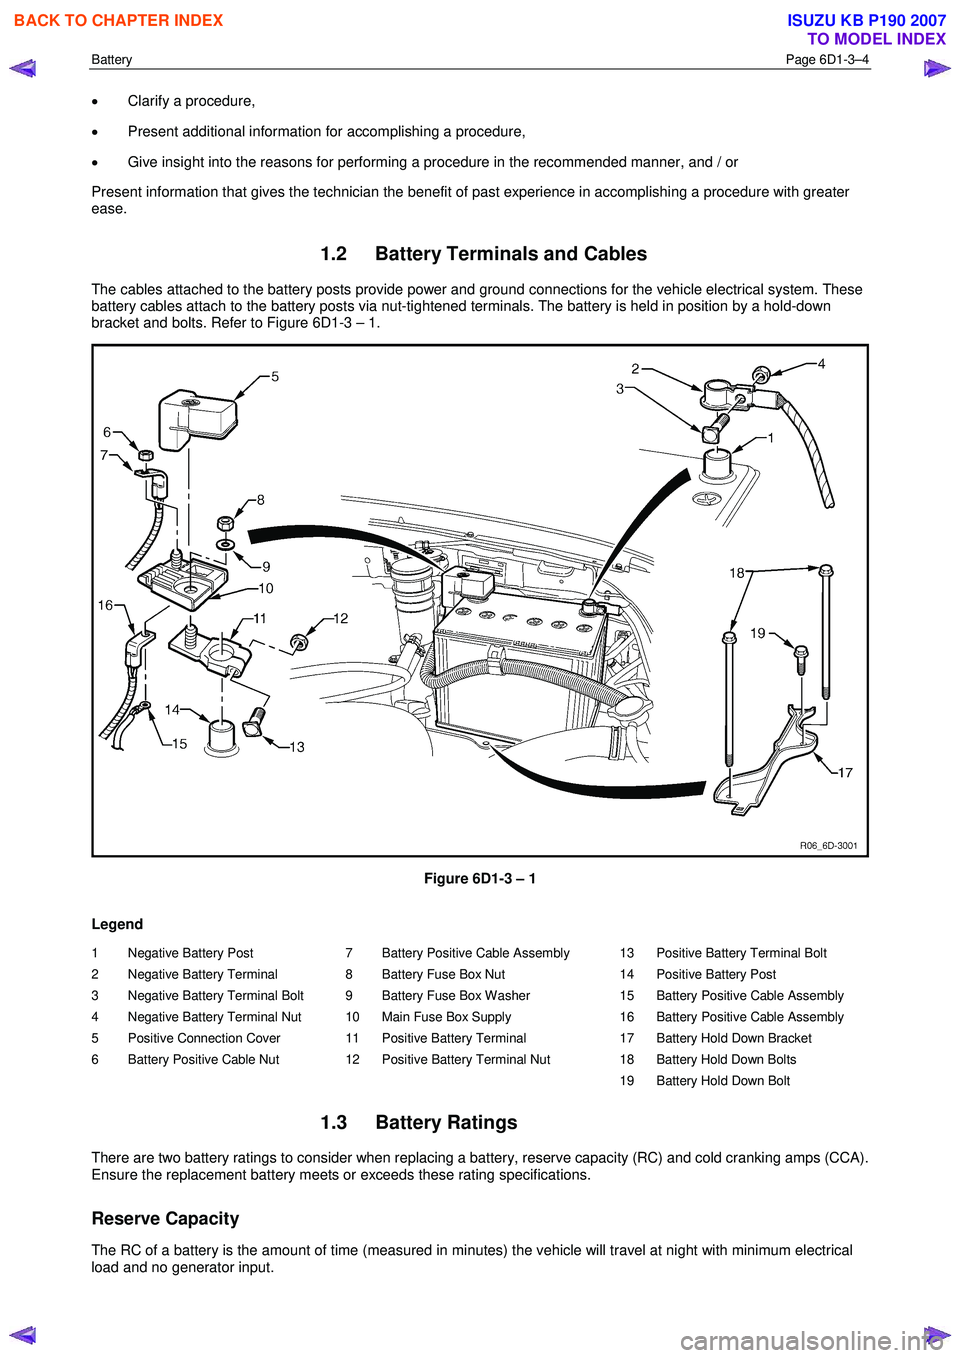
The cables attached to the battery posts provide power and ground connections for the vehicle electrical system. These
battery cables attach to the battery posts via nut-tightened terminals. The battery is held in position by a hold-down
bracket and bolts. Refer to Figure 6D1-3 – 1.
Figure 6D1-3 – 1
Legend
1 Negative Battery Post
2 Negative Battery Terminal
3 Negative Battery Terminal Bolt
4 Negative Battery Terminal Nut
5 Positive Connection Cover
6 Battery Positive Cable Nut 7 Battery Positive Cable Assembly
8 Battery Fuse Box Nut
9 Battery Fuse Box Washer
10 Main Fuse Box Supply
11 Positive Battery Terminal
12 Positive Battery Terminal Nut 13 Positive Battery Terminal Bolt
14 Positive Battery Post
15 Battery Positive Cable Assembly
16 Battery Positive Cable Assembly
17 Battery Hold Down Bracket
18 Battery Hold Down Bolts
19 Battery Hold Down Bolt
1.3 Battery Ratings
There are two battery ratings to consider when replacing a battery, reserve capacity (RC) and cold cranking amps (CCA).
Ensure the replacement battery meets or exceeds these rating specifications.
Reserve Capacity
The RC of a battery is the amount of time (measured in minutes) the vehicle will travel at night with minimum electrical
load and no generator input.
BACK TO CHAPTER INDEX
TO MODEL INDEX
ISUZU KB P190 2007
Page 3645 of 6020
Battery Page 6D1-3–5
This time is measured as the time taken for the battery voltage to reduce to 10.5 V from the following initial conditions:
• a fully charged battery at 25 °C, and
• discharged at a constant current of 25 A.
Cold Cranking Amps
The CCA rating indicates the ability of the battery to maintain enough voltage for ignition requirements while supplying
engine cranking current for long enough to start the engine under severely cold conditions.
The rating is the minimum amperage maintained when the engine is cranked for 30 seconds. The battery must maintain
at least 7.2 V at 18 °C.
Ratings
A specification label on the top of the battery displays the original equipment part number.
All vehicles are fitted with a low maintenance, 85 minute RC and 430 CCA battery.
BACK TO CHAPTER INDEX
TO MODEL INDEX
ISUZU KB P190 2007