2007 ISUZU KB P190 Harness
[x] Cancel search: HarnessPage 5597 of 6020
Cruise Control – HFV6 Page 8C–19
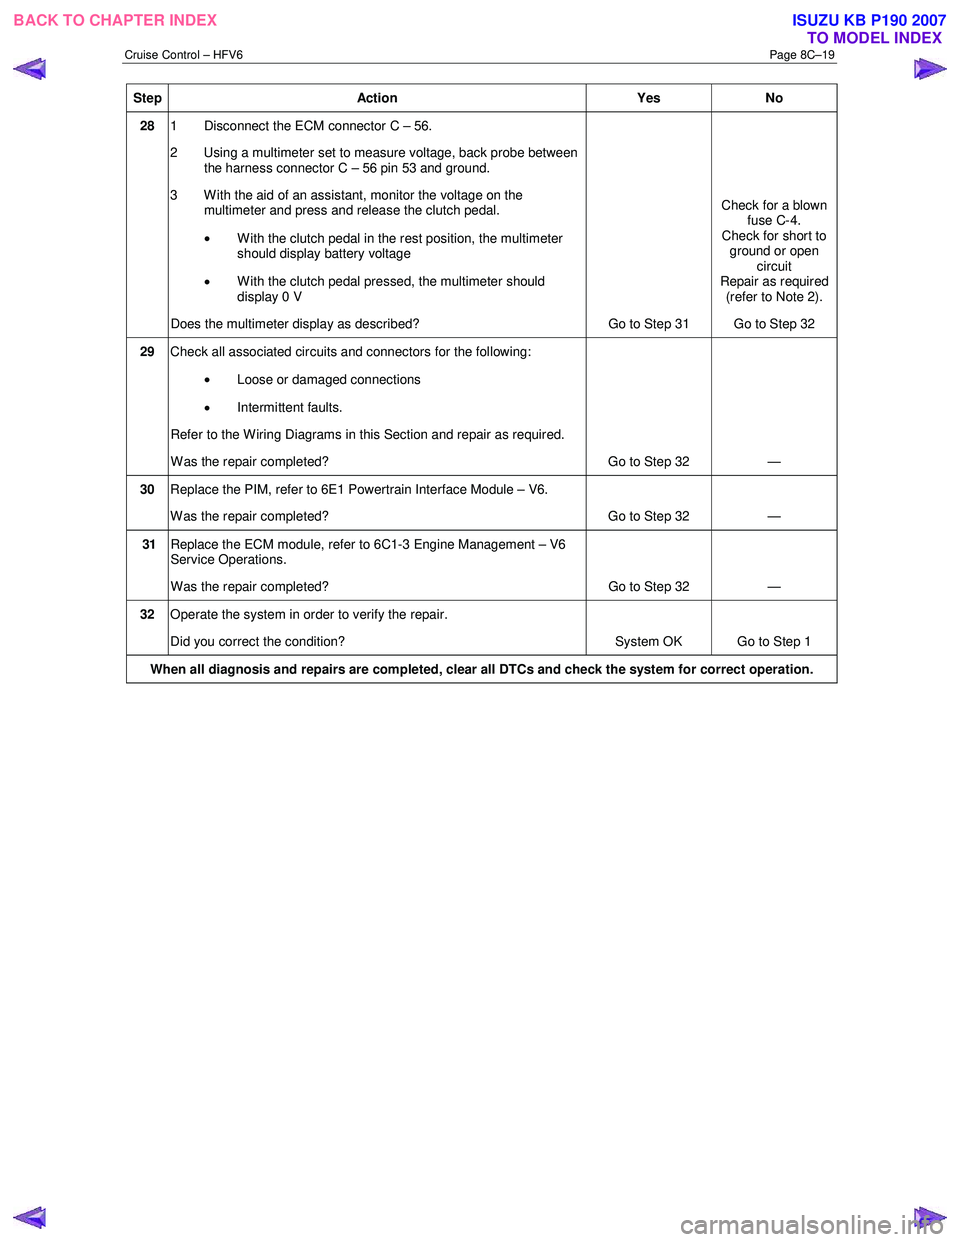
Step Action Yes No
28 1 Disconnect the ECM connector C – 56.
2 Using a multimeter set to measure voltage, back probe between the harness connector C – 56 pin 53 and ground.
3 W ith the aid of an assistant, monitor the voltage on the multimeter and press and release the clutch pedal.
• With the clutch pedal in the rest position, the multimeter
should display battery voltage
• W ith the clutch pedal pressed, the multimeter should
display 0 V
Does the multimeter display as described? Go to Step 31 Check for a blown
fuse C-4.
Check for short to ground or open circuit
Repair as required (refer to Note 2).
Go to Step 32
29 Check all associated circuits and connectors for the following:
• Loose or damaged connections
• Intermittent faults.
Refer to the Wiring Diagrams in this Section and repair as required.
W as the repair completed? Go to Step 32 —
30 Replace the PIM, refer to 6E1 Powertrain Interface Module – V6.
W as the repair completed? Go to Step 32 —
31 Replace the ECM module, refer to 6C1-3 Engine Management – V6
Service Operations.
W as the repair completed? Go to Step 32 —
32 Operate the system in order to verify the repair.
Did you correct the condition? System OK Go to Step 1
When all diagnosis and repairs are completed, clear all DTCs and check the system for correct operation.
BACK TO CHAPTER INDEX
TO MODEL INDEXISUZU KB P190 2007
Page 5599 of 6020
Cruise Control – HFV6 Page 8C–21
3.2 Cruise Control Switch Assembly
Remove
To remove the cruise control switch assembly, refer to 8 B Cruise Control System.
Test
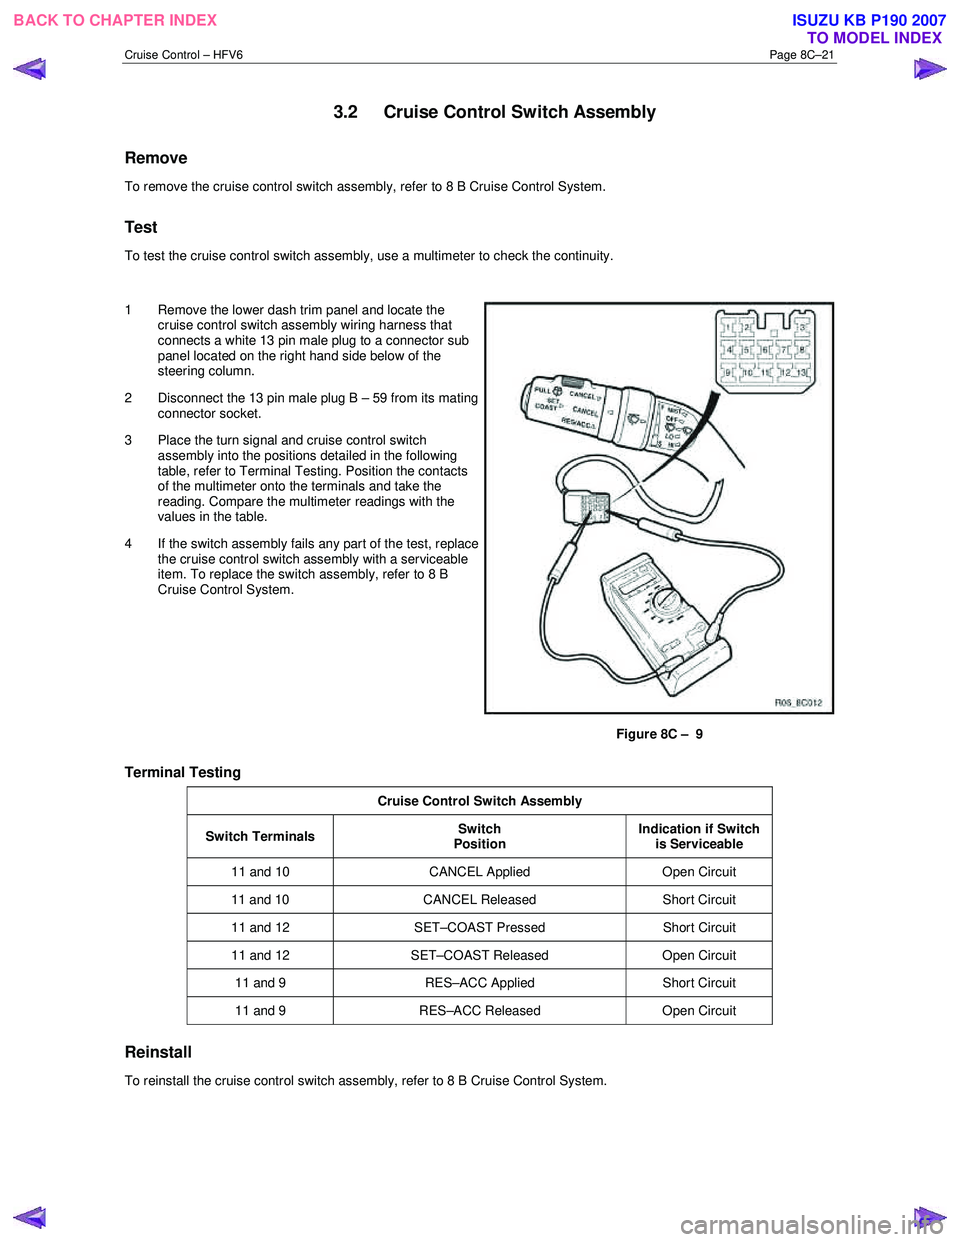
To test the cruise control switch assembly, use a multimeter to check the continuity.
1 Remove the lower dash trim panel and locate the cruise control switch assembly wiring harness that
connects a white 13 pin male plug to a connector sub
panel located on the right hand side below of the
steering column.
2 Disconnect the 13 pin male plug B – 59 from its mating connector socket.
3 Place the turn signal and cruise control switch assembly into the positions detailed in the following
table, refer to Terminal Testing. Position the contacts
of the multimeter onto the terminals and take the
reading. Compare the multimeter readings with the
values in the table.
4 If the switch assembly fails any part of the test, replace the cruise control switch assembly with a serviceable
item. To replace the switch assembly, refer to 8 B
Cruise Control System.
Figure 8C – 9
Terminal Testing
Cruise Control Switch Assembly
Switch Terminals Switch
Position Indication if Switch
is Serviceable
11 and 10 CANCEL Applied Open Circuit
11 and 10 CANCEL Released Short Circuit
11 and 12 SET–COAST Pressed Short Circuit
11 and 12 SET–COAST Released Open Circuit
11 and 9 RES–ACC Applied Short Circuit
11 and 9 RES–ACC Released Open Circuit
Reinstall
To reinstall the cruise control switch assembly, refer to 8 B Cruise Control System.
BACK TO CHAPTER INDEX
TO MODEL INDEXISUZU KB P190 2007
Page 5604 of 6020
Cruise Control – HFV6 Page 8C–26
4 Special Tools
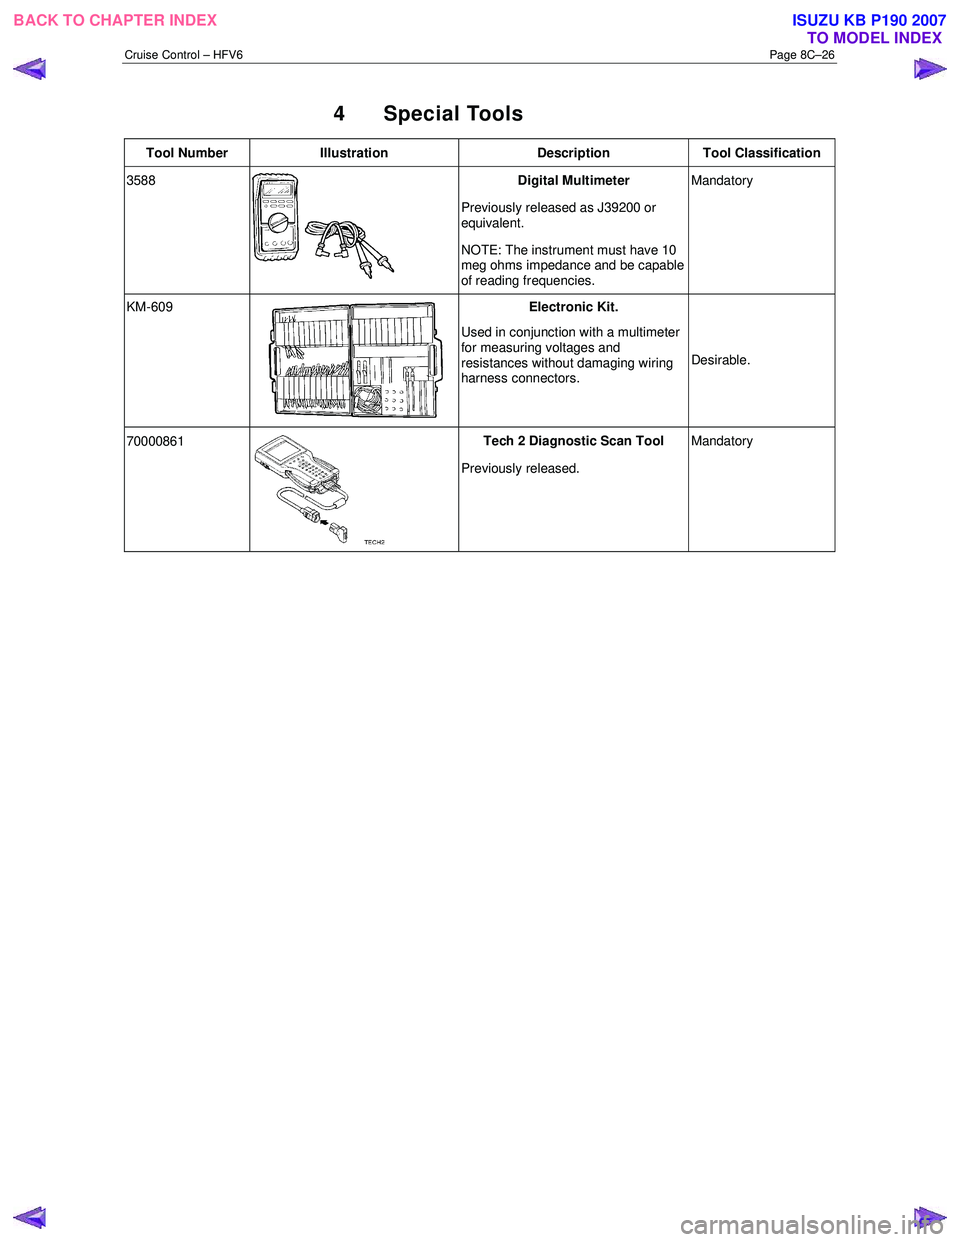
Tool Number Illustration Description Tool Classification
3588
Digital Multimeter
Previously released as J39200 or
equivalent.
NOTE: The instrument must have 10
meg ohms impedance and be capable
of reading frequencies. Mandatory
KM-609 Electronic Kit.
Used in conjunction with a multimeter
for measuring voltages and
resistances without damaging wiring
harness connectors. Desirable.
70000861
Tech 2 Diagnostic Scan Tool
Previously released. Mandatory
BACK TO CHAPTER INDEX
TO MODEL INDEXISUZU KB P190 2007
Page 5649 of 6020
9A-14 SUPPLEMENTAL RESTRAINT SYSTEM
Component Description
SRS Control Unit
WARNING: DURING SERVICE PROCEDURES, BE
VERY CAREFUL WHEN HANDLING A SRS
CONTROL UNIT. NEVER STRIKE OR JAR THE SRS
CONTORL UNIT. NEVER POWER UP THE SRS
WHEN THE SRS CONTROL UNIT IS NOT RIGIDLY
ATTACHED TO THE VEHICLE. ALL SRS CONTROL
UNIT AND MOUNTING BRACKET FASTENERS
MUST BE CAREFULLY TORQUED AND THE
ARROW MUST BE POINTED TOWARD THE FRONT
OF THE VEHICLE TO ENSURE PROPER
OPERATION OF THE SRS. THE SRS CONTROL
UNIT COULD BE ACTIVATED WHEN POWERED
WHILE NOT RIGIDLY ATTACHED TO THE
VEHICLE WHICH COULD CAUSE DEPLOYMENT
AND RESULT IN PERSONAL INJURY.
The SRS control unit is designed to perform the
following functions in the SRS:
1. Energy Reserve — The SRS control unit maintains 30–Volt Loop Reserve (30VLR) energy supply to
provide deployment energy when ignition voltage is
lost in a frontal crash.
2. Frontal Crash Detection — The SRS control unit monitors vehicle velocity changes to detect frontal
crashes which are severe enough to warrant
deployment.
3. Air Bag Deployment — W hen a frontal crash o
f
sufficient force is detected, the SRS control unit
will cause enough current to flow through the ai
r
bag assembly to deploy the air bag.
4. Malfunction Detection — The SRS control unit performs diagnostic monitoring of SRS electrical
components and sets a diagnostic trouble code
when a malfunction is detected.
5. Frontal Crash Recording — The SRS control unit records information regarding SRS status during
frontal crash.
6. Malfunction Diagnosis — The SRS control unit displays SRS diagnostic trouble codes and system
status information through the use of a scan tool.
7. Driver Notification — The SRS control unit warns the vehicle driver of SRS malfunctions b
y
controlling the “SRS” warning lamp.
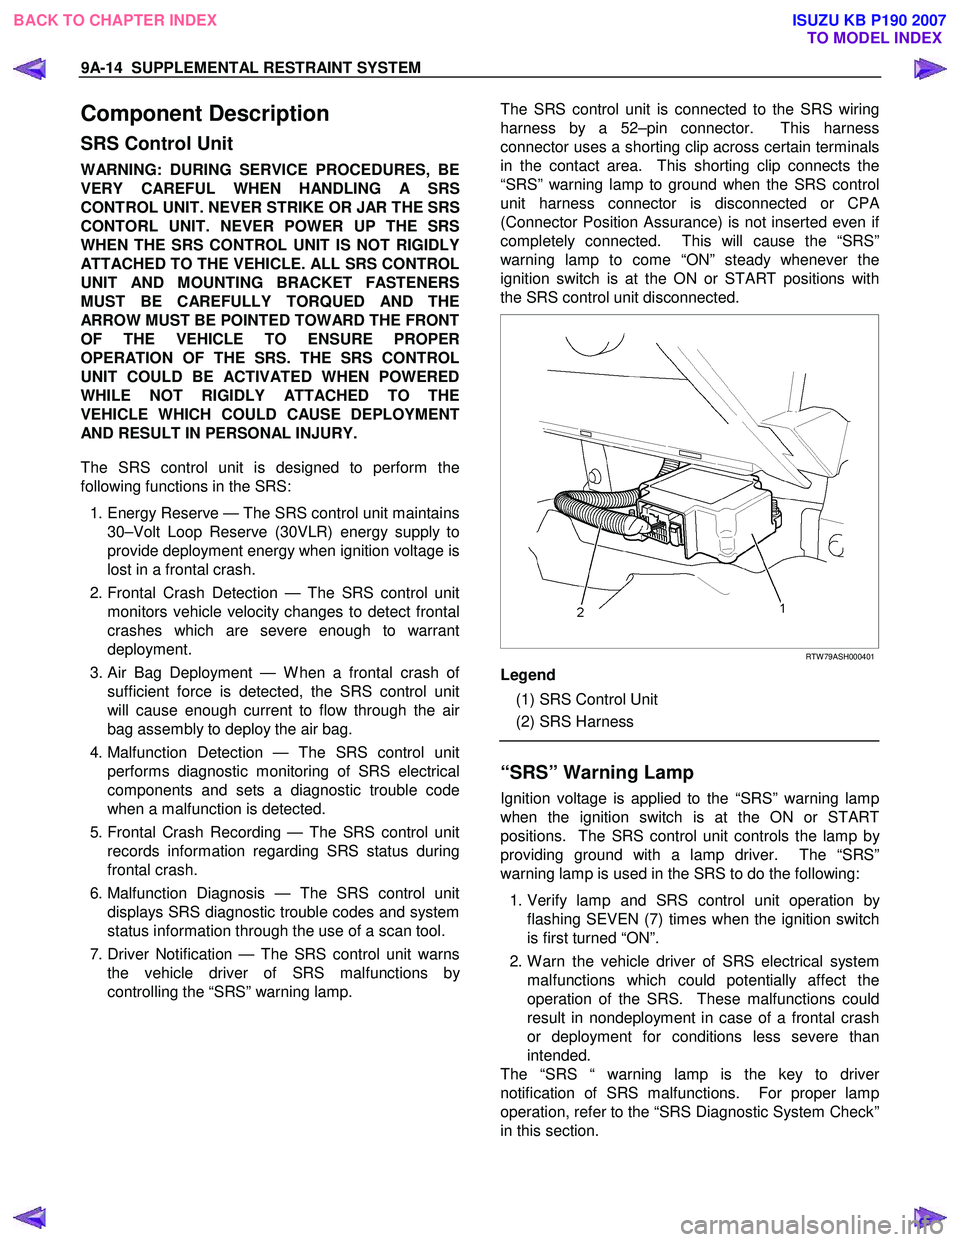
The SRS control unit is connected to the SRS wiring
harness by a 52–pin connector. This harness
connector uses a shorting clip across certain terminals
in the contact area. This shorting clip connects the
“SRS” warning lamp to ground when the SRS control
unit harness connector is disconnected or CP
A
(Connector Position Assurance) is not inserted even i
f
completely connected. This will cause the “SRS”
warning lamp to come “ON” steady whenever the
ignition switch is at the ON or START positions with
the SRS control unit disconnected.
RTW 79ASH000401
Legend
(1) SRS Control Unit
(2) SRS Harness
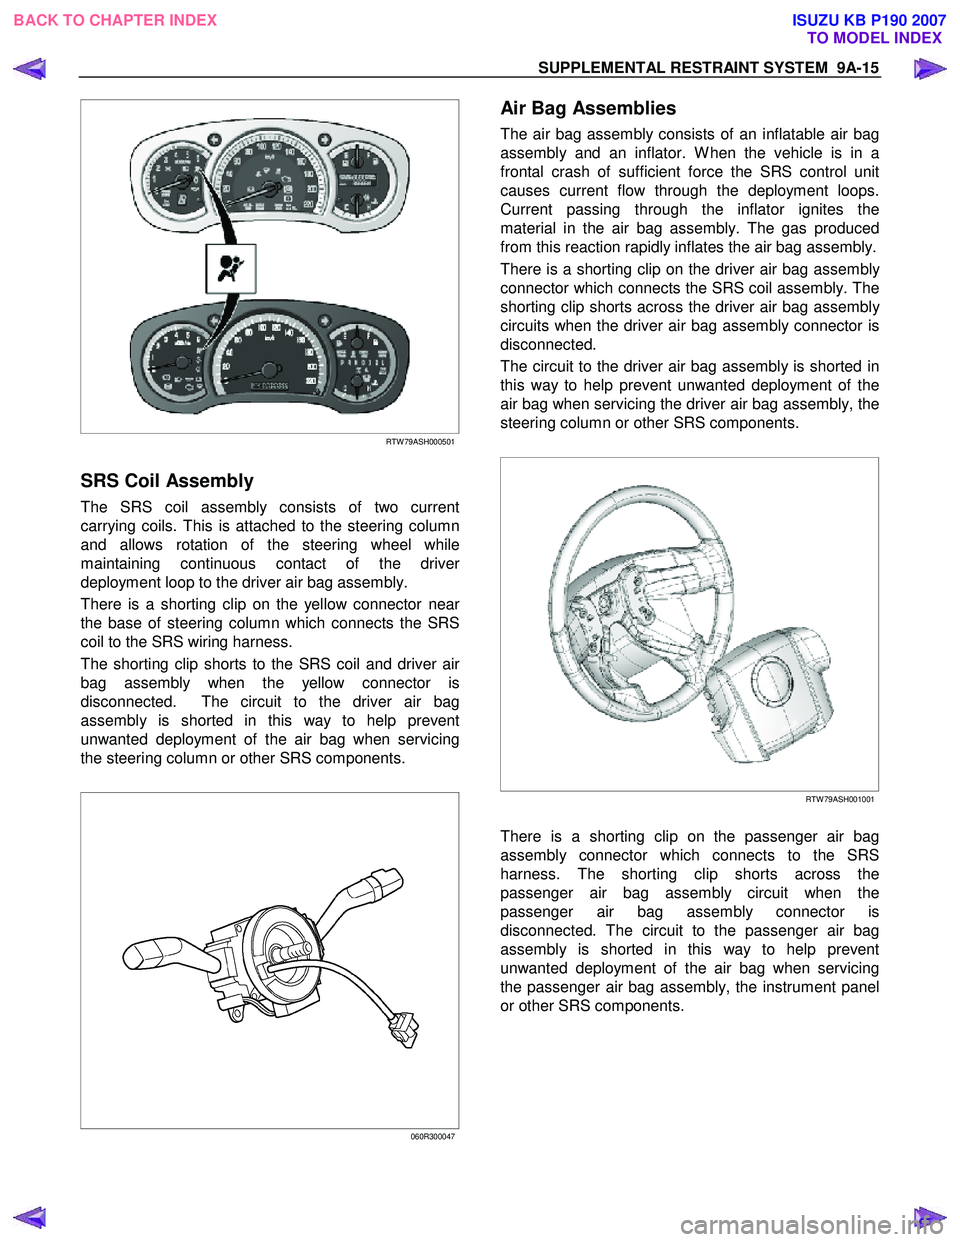
“SRS” Warning Lamp
Ignition voltage is applied to the “SRS” warning lamp
when the ignition switch is at the ON or START
positions. The SRS control unit controls the lamp b
y
providing ground with a lamp driver. The “SRS”
warning lamp is used in the SRS to do the following:
1. Verify lamp and SRS control unit operation b
y
flashing SEVEN (7) times when the ignition switch
is first turned “ON”.
2. W arn the vehicle driver of SRS electrical system malfunctions which could potentially affect the
operation of the SRS. These malfunctions could
result in nondeployment in case of a frontal crash
or deployment for conditions less severe than
intended.
The “SRS “ warning lamp is the key to drive
r
notification of SRS malfunctions. For proper lamp
operation, refer to the “SRS Diagnostic System Check”
in this section.
BACK TO CHAPTER INDEX TO MODEL INDEXISUZU KB P190 2007
Page 5650 of 6020
SUPPLEMENTAL RESTRAINT SYSTEM 9A-15
RTW 79ASH000501
SRS Coil Assembly
The SRS coil assembly consists of two current
carrying coils. This is attached to the steering column
and allows rotation of the steering wheel while
maintaining continuous contact of the drive
r
deployment loop to the driver air bag assembly.
There is a shorting clip on the yellow connector nea
r
the base of steering column which connects the SRS
coil to the SRS wiring harness.
The shorting clip shorts to the SRS coil and driver ai
r
bag assembly when the yellow connector is
disconnected. The circuit to the driver air bag
assembly is shorted in this way to help prevent
unwanted deployment of the air bag when servicing
the steering column or other SRS components.
060R300047
Air Bag Assemblies
The air bag assembly consists of an inflatable air bag
assembly and an inflator. W hen the vehicle is in a
frontal crash of sufficient force the SRS control unit
causes current flow through the deployment loops.
Current passing through the inflator ignites the
material in the air bag assembly. The gas produced
from this reaction rapidly inflates the air bag assembly.
There is a shorting clip on the driver air bag assembl
y
connector which connects the SRS coil assembly. The
shorting clip shorts across the driver air bag assembl
y
circuits when the driver air bag assembly connector is
disconnected.
The circuit to the driver air bag assembly is shorted in
this way to help prevent unwanted deployment of the
air bag when servicing the driver air bag assembly, the
steering column or other SRS components.
RTW 79ASH001001
There is a shorting clip on the passenger air bag
assembly connector which connects to the SRS
harness. The shorting clip shorts across the
passenger air bag assembly circuit when the
passenger air bag assembly connector is
disconnected. The circuit to the passenger air bag
assembly is shorted in this way to help prevent
unwanted deployment of the air bag when servicing
the passenger air bag assembly, the instrument panel
or other SRS components.
BACK TO CHAPTER INDEX TO MODEL INDEXISUZU KB P190 2007
Page 5652 of 6020
SUPPLEMENTAL RESTRAINT SYSTEM 9A-17
“Continuous Monitoring”
Tests are performed by the SRS control unit on the
SRS every 100 milliseconds while “Ignition 1” voltage
is in the normal operating voltage range at the SRS
control unit.
Data Link Connector (DLC)
Formerly “DLC”, a connector which allows
communication with an external computer, such as a
scan tool.
Datum Line
A base line parallel to the plane of the underbody or
frame from which all vertical measurements originate.
Deploy
To inflate the air bag.
Deployment Loops
The circuits which supply current to the air bag
assemblies to deploy the air bag.
Diagnostic Trouble Code (DTC)
Formerly “Code”, a numerical designator used by the
SRS control unit to indicate specific SRS malfunctions.
Driver Current Source
An output of the SRS control unit which applies current
into the driver air bag assembly circuit during the
“Initiator Assembly Resistance Test”.
Driver Air Bag Assembly
An assembly located in the steering wheel hub
consisting of an inflatable bag, an inflator and an
initiator.
EEPROM
Electrically Erasable Programmable Read Onl
y
Memory. Memory which retains its contents when
power is removed from the SRS control unit.
Ignition Cycle
The voltage at the SRS control unit “Ignition 1” input,
with ignition switch “ON”, is within the normal operating
voltage range for at least ten seconds before turning
the ignition switch “OFF”.
Ignition 1
A battery voltage (B+) circuit which is only powered
when the ignition switch is in the ON, or START
position.
Initiator
The electrical component inside the air bag assembl
y
which, when sufficient current flows, sets off the
chemical reaction that inflates the air bag.
“Initiator Assembly Resistance Test”
Tests are performed once for each ignition cycle when
no malfunctions are detected during “Turn–ON” o
r
“Continuous Monitoring”. This test checks for the
correct SRS control unit configuration for the vehicle,
shorts to “Ignition 1” in the deployment loops, high
resistance or opens in the “Driver Side” and
“Passenger Side” circuits and measures the resistance
of the inflator assembly consisting of 1) Initiators, 2)
SRS coil assembly (driver side only), 3) Connectors
and associated wiring.
Normal Operating Voltage Range
The voltage measured between the SRS control unit
“Ignition 1” terminals and “Ground” terminals is
between 9 and 16 volts.
Passenger Current Source
An output of the SRS control unit which applies current
into the passenger air bag assembly circuit during the
“Initiator Assembly Resistance Test”.
Passenger Air Bag Assembly
An assembly located in the front of the passenger side
of the instrument panel consisting of an inflatable bag,
an inflator and an initiator.
Scan Tool
An external computer used to read diagnostic
information from on–board computers via the data link
connector.
SRS control unit
SRS control unit which provides reserve energy to the
deployment loops, deploys the air bags when required
and performs diagnostic monitoring of all SRS
components.
Serial Data
Information representing the status of the SRS.
SRS
Supplemental Restraint System.
SRS Coil Assembly
An assembly of two current–carrying coils in the drive
r
deployment loop that allows the rotation of the steering
wheel while maintaining the continuous contact of the
driver deployment loop to the driver air bag assembly.
SRS Wiring Harness
The wires and connectors that electrically connect the
components in the SRS.
“Turn–ON”
Test which the SRS control unit performs on the SRS
once during each ignition cycle immediately afte
r
“Ignition 1” voltage is applied to the SRS control unit
and before “Continuous Monitoring”.
BACK TO CHAPTER INDEX TO MODEL INDEXISUZU KB P190 2007
Page 5655 of 6020
9A-20 SUPPLEMENTAL RESTRAINT SYSTEM
Repairs And Inspections Required
After An Accident
If any SRS components are damaged, they must be
replaced. If SRS component mounting points are
damaged, they must be replaced.
• Never use SRS parts from another vehicle. This does not include remanufactured parts purchased
from an authorized dealer; they may be used fo
r
SRS repairs.
• Do not attempt to service the SRS control unit, the SRS coil assembly, or the air bag assembly.
Service of these items is by replacement only.
• Verify the part number of the replacement air bag assembly.
CAUTION: Never use the air bag assembly from
another vehicle or different model year air bag
assembly.
Use only a new air bag assembly matched to the
TFR/S which is being repaired.
CAUTION: Proper operation of the sensors and
supplemental restraint system (SRS) requires that
any repairs to the vehicle structure return it to the
original production configuration. Deployment
requires, at a minimum, replacement of the SRS
control unit, air bag assembly and dimensional
inspection of the steering column. Any visible
damage to the SRS control unit mounting bracket
(s) requires replacement, and the steering column
must be dimensionally inspected, whethe
r
deployment occurred or not.
Accident With Deployment – Component
Replacement And Inspections
Certain SRS components must be replaced or
inspected for damage after a frontal crash involving air
bag deployment. Those components are:
• Air bag assembly
• SRS control unit
CAUTION: Refer to “SRS control unit Replacement
Guidelines” below for important information on
SRS control unit replacement in both deployment
and non-deployment crashes.
• SRS coil assembly — Inspect wiring and connecto
r
for any signs of scorching, melting, or damage due
to excessive heat. Replace if damaged. Refer to
section “SRS Coil Assembly” in this manual.
Accident With or Without Deployment –
Component Inspection
Certain SRS system components and rotation parts
must be inspected after any crash, whether the air bag
has been deployed or not. Those components are:
• Steering column — Refer to Inspection Required “After an Accident” in this manual.
• Knee bolsters and mounting points — Inspect fo
r
any distortion, bending, cracking, or other damage.
• I/P steering column reinforcement plate — Inspect for any distortion, bending, cracking, or othe
r
damage.
• I/P braces — Inspect for any distortion, bending, cracking, or other damage.
• Seat belts and mounting points — Refer to “Seat Belts” in Section “Seat Belt” of this workshop
manual.
SRS Control Unit Replacement Guidelines
SRS control unit replacement policy requires
replacement of the SRS control unit after a crash
involving air bag deployment when the “SRS W arning
Lamp” turned “ON”, the “SRS Diagnosis” should be
done according to Section “Restraint Control System.”
Wiring Damage
If any SRS wire harness is damaged, it should be
replaced. Don't repair the SRS harness. It is
replacement only.
SRS Connector (Plastic Body And
Terminal Metal Pin) Damage
If any connector or terminal in the SRS wire harness
(except pigtails) is damaged, it should be replaced.
SRS Wire Pigtail Damage
If the wiring pigtail (a wire or wires attached directly to
the device, not by a connector) is damaged, the entire
component (with pigtail) must be replaced. Examples
of “pigtail” components are the driver air bag
assembly, the passenger air bag assembly, and the
SRS coil assembly.
BACK TO CHAPTER INDEX TO MODEL INDEXISUZU KB P190 2007
Page 5658 of 6020
SUPPLEMENTAL RESTRAINT SYSTEM 9A-23
Air Bag Assembly Scrapping Procedure
During the course of a vehicle's useful life, certain
situations may arise which will necessitate the disposal
of a live (undeployed) air bag assembly. This
information covers proper procedures for disposing o
f
a live air bag assembly.
Before a live air bag assembly can be disposed of, it
must be deployed.
A live air bag assembly must not
be disposed of through normal refuse channels.
WARNING: FAILURE TO FOLLOW PROPER
SUPPLEMENTAL RESTRAINT SYSTEM (SRS) AIR
BAG ASSEMBLY DISPOSAL PROCEDURES CAN
RESULT IN AIR BAG DEPLOYMENT WHICH MAY
CAUSE PERSONAL INJURY. AN UNDEPLOYED
AIR BAG ASSEMBLY MUST NOT BE DISPOSED
OF THROUGH NORMAL REFUSE CHANNELS.
THE UNDEPLOYED AIR BAG ASSEMBLY
CONTAINS SUBSTANCES THAT CAN CAUSE
SEVERE ILLNESS OR PERSONAL INJURY IF THE
SEALED CONTAINER IS DAMAGED DURING
DISPOSAL. DISPOSAL IN ANY MANNER
INCONSISTENT WITH PROPER PROCEDURES
MAY BE A VIOLATION OF FEDERAL, STATE, AND
/
OR LOCAL LAW.
In situations which require deployment of a live air bag
assembly, deployment may be accomplished inside o
r
outside the vehicle. The method employed depends
upon the final disposition of the particular vehicle, as
noted in “Deployment Outside Vehicle” and
“Deployment Inside Vehicle” in this section.
Deployment Outside Vehicle (Driver Air
Bag Assembly)
Deployment outside the vehicle is proper when the
vehicle is to be returned to service. This includes, fo
r
example, situations in which the vehicle will be
returned to useful service after a functionally o
r
cosmetically deficient air bag assembly is replaced.
Deployment and disposal of a malfunctioning air bag
assembly is, of course, subject to any required
retention period.
For deployment of a live (undeployed) air bag
assembly outside the vehicle, the deployment
procedure must be followed exactly. Always wea
r
safety glasses during this deployment procedure until
a deployed air bag assembly is scrapped or until an
undeployed air bag assembly is shipped. Before
performing the procedures you should be familiar with
servicing the SRS and with proper handling of the ai
r
bag assembly. Procedures should be read fully before
they are performed.
The following procedure requires use of a 5-8840-
2468-06 SRS deployment harness with appropriate
pigtail adapter. Do not attempt the procedure without
a 5-8840-2468-0 adapter.
WARNING: F
AILURE TO FOLLOW PROCEDURES
IN THE ORDER LISTED MAY RESULT IN
PERSONAL INJURY. NEVER CONNECT THE
DEPLOYMENT HARNESS TO ANY POWER
SOURCE BEFORE CONNECTING THE
DEPLOYMENT HARNESS TO THE DRIVER AIR
BAG ASSEMBLY. DEPLOYMENT HARNESS
SHALL REMAIN SHORTED AND NOT BE
CONNECTED TO A POWER SOURCE UNTIL THE
AIR BAG IS TO BE DEPLOYED. THE AIR BAG
ASSEMBLY WILL IMMEDIATELY DEPLOY THE AIR
BAG WHEN A POWER SOURCE IS CONNECTED
TO IT. WEAR SAFETY GLASSES THROUGHOUT
THIS ENTIRE DEPLOYMENT AND DISPOSAL
PROCEDURE.
NOTE: This information applies only to driver air bag
assembly. Refer to “Deployment Outside Vehicle
(Passenger Air Bag assembly)” in this section fo
r
information on passenger air bag assembly scrapping.
1. Turn the ignition switch to “LOCK”, remove the ke
y
and put on safety glasses.
2. Inspect the 5-8840-2468-0 SRS Deployment Harness and appropriate pigtail adapter fo
r
damage. If the harness or pigtail adapter is
damaged, discard and obtain a replacement.
3. Short the two SRS deployment harness leads together by fully seating one banana plug into the
other. The SRS deployment harness shall remain
shorted and not be connected to a power source
until the air bag is to be deployed.
827RS004
4. Connect the appropriate pigtail adapter to the SRS deployment harness.
5. Remove the driver air bag assembly from the vehicle. Refer to “Inflator Module Removal” in this
manual.
BACK TO CHAPTER INDEX TO MODEL INDEXISUZU KB P190 2007