2007 ISUZU KB P190 Harness
[x] Cancel search: HarnessPage 5670 of 6020
SUPPLEMENTAL RESTRAINT SYSTEM 9A-35
SRS Control Unit
Service Precautions
WARNING: DURING SERVICE PROCEDURES, BE
VERY CAREFUL WHEN HANDLING THE SRS
CONTROL UNIT. NEVER STRIKE OR JAR THE SRS
CONTROL UNIT. UNDER SOME
CIRCUMSTANCES, IT COULD CAUSE
DEPLOYMENT AND RESULT IN PERSONAL
INJURY OR IMPROPER OPERATION OF THE
SUPPLEMENTAL RESTRAINT SYSTEM (SRS).
THE SRS CONTROL UNIT MOUNTING BRACKET
BOLTS MUST BE CAREFULLY TORQUED TO
ASSURE PROPER OPERATION. NEVER POWER
UP THE SRS WHEN THE SRS CONTROL UNIT IS
NOT RIGIDLY ATTACHED TO THE VEHICLE. THE
SRS CONTROL UNIT COULD BE ACTIVATED
WHEN POWERED WHILE NOT RIGIDLY
ATTACHED TO THE VEHICLE WHICH COULD
CAUSE DEPLOYMENT AND RESULT IN
PERSONAL INJURY.
WARNING: PROPER OPERATION OF THE SRS
CONTROL UNIT REQUIRES THE SRS CONTROL
UNIT TO BE RIGIDLY ATTACHED TO THE
VEHICLE STRUCTURE AND THAT THE ARROW
ON THE SENSOR BE POINTING TOWARD THE
FRONT OF THE VEHICLE.
The SRS control unit is specifically calibrated and is
keyed to the SRS control unit location SRS wiring
harness. Caution should be used to ensure prope
r
location of the SRS control unit. The keying of the
SRS control unit to its location and wiring harness
connectors should never be modified in the field.
Removal
1. Disable the SRS (Refer to “Disabling the SRS” in this section).
2. Remove the transmission knob (for M/T) and transfer lever knob.
3. Remove the front console assembly and disconnect the wiring harness connector.
4. Disconnect the SRS control unit harness connector.
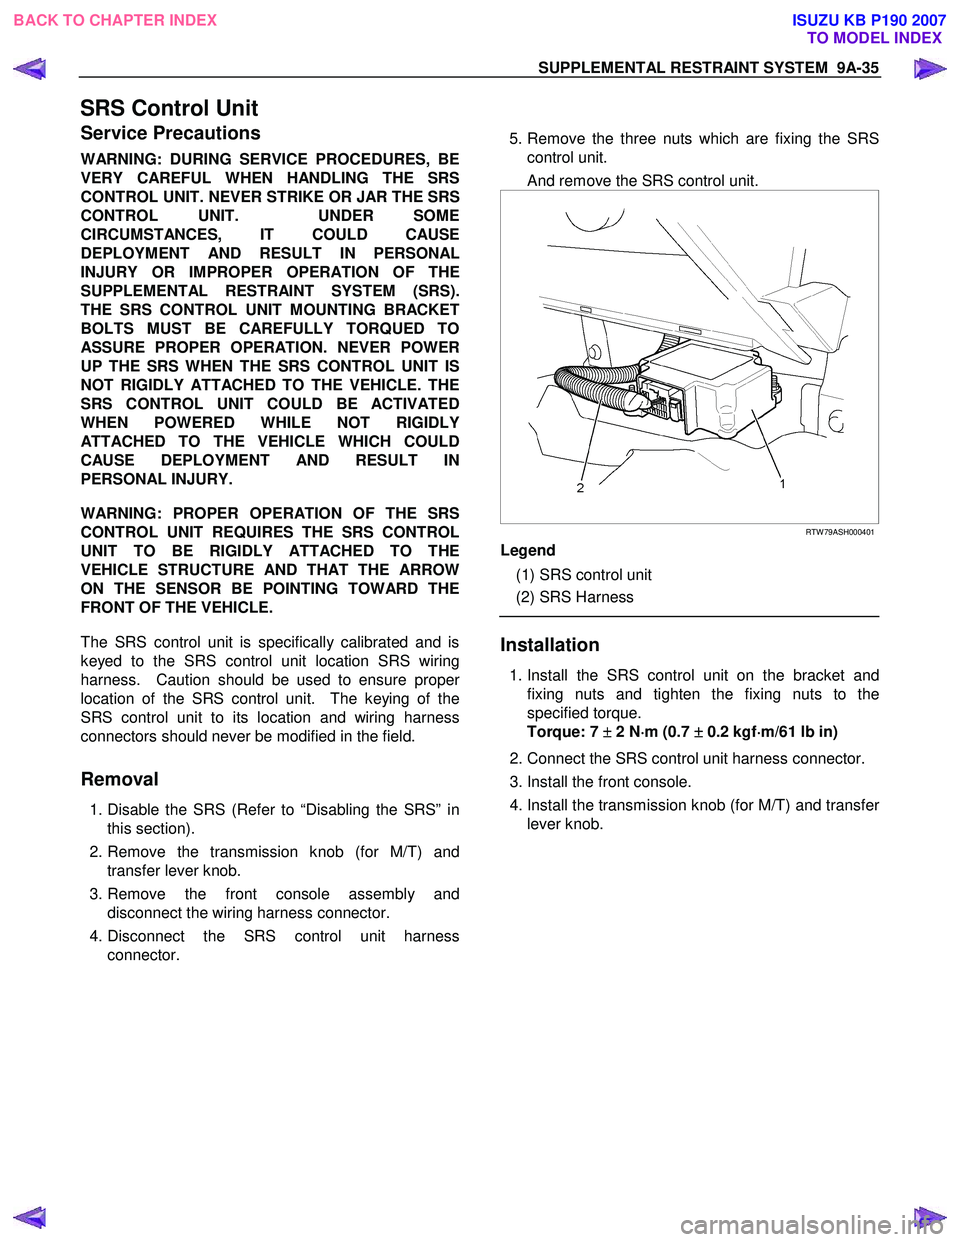
5. Remove the three nuts which are fixing the SRS
control unit.
And remove the SRS control unit.
RTW 79ASH000401
Legend
(1) SRS control unit
(2) SRS Harness
Installation
1. Install the SRS control unit on the bracket and
fixing nuts and tighten the fixing nuts to the
specified torque.
Torque: 7 ±
±±
±
2 N ⋅
⋅⋅
⋅
m (0.7 ±
±±
±
0.2 kgf ⋅
⋅⋅
⋅
m/61 lb in)
2. Connect the SRS control unit harness connector.
3. Install the front console.
4. Install the transmission knob (for M/T) and transfe
r
lever knob.
BACK TO CHAPTER INDEX TO MODEL INDEXISUZU KB P190 2007
Page 5671 of 6020
9A-36 SUPPLEMENTAL RESTRAINT SYSTEM
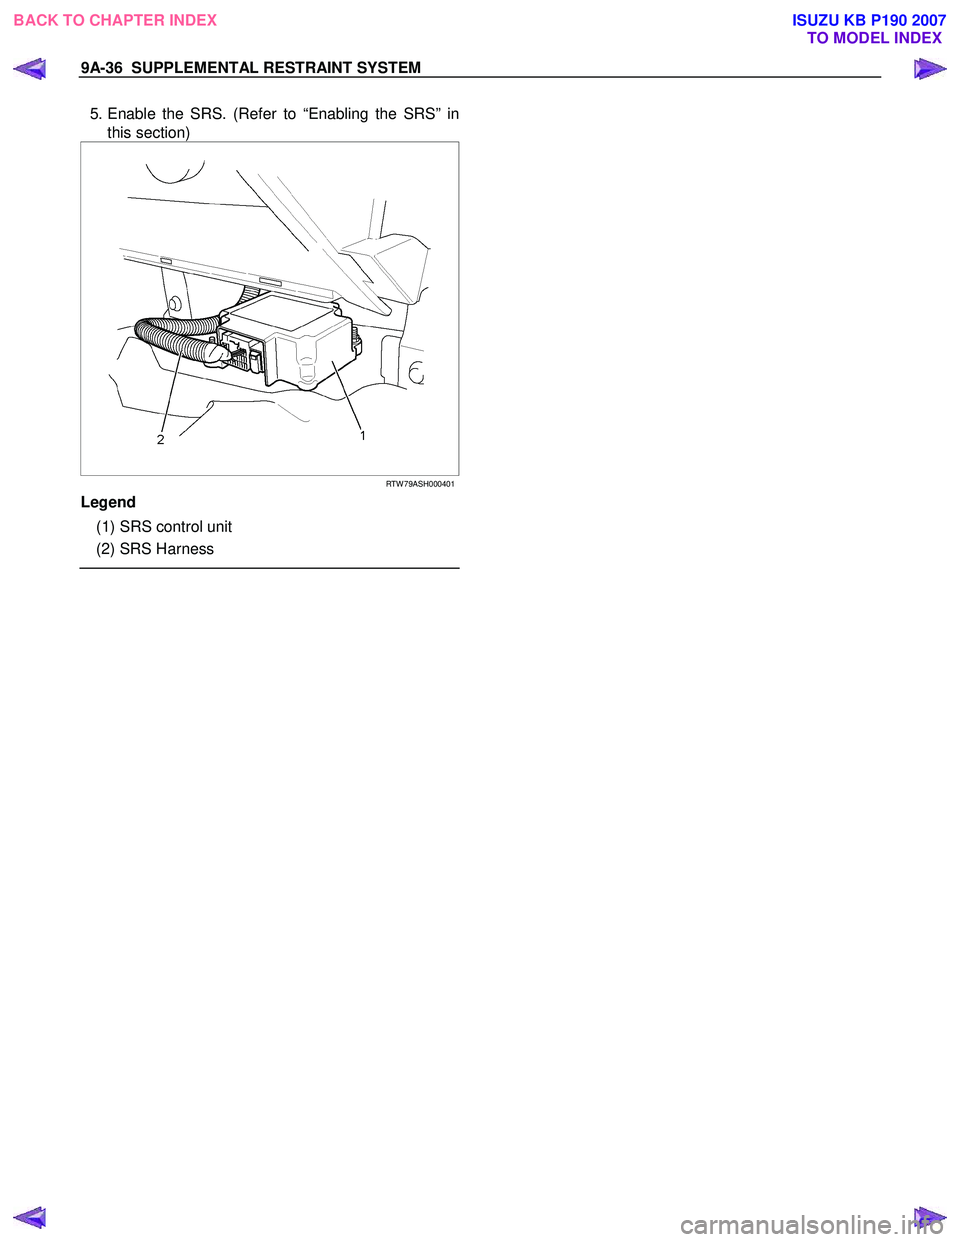
5. Enable the SRS. (Refer to “Enabling the SRS” in
this section)
RTW 79ASH000401
Legend
(1) SRS control unit
(2) SRS Harness
BACK TO CHAPTER INDEX
TO MODEL INDEXISUZU KB P190 2007
Page 5676 of 6020
SUPPLEMENTAL RESTRAINT SYSTEM 9A-41
Passenger Air Bag Assembly
Service Precautions
WARNING: SAFETY PRECAUTIONS MUST BE
FOLLOWED WHEN HANDLING A DEPLOYED AIR
BAG ASSEMBLY. AFTER DEPLOYMENT, THE AIR
BAG ASSEMBLY SURFACE MAY CONTAIN
A
SMALL AMOUNT OF SODIUM HYDROXIDE, A BY–
PRODUCT OF THE DEPLOYMENT REACTION
THAT IS IRRITATING TO THE SKIN AND EYES.
MOST OF THE POWDER ON THE AIR BAG
ASSEMBLY IS HARMLESS. AS A PRECAUTION,
WEAR GLOVES AND SAFETY GLASSES WHEN
HANDLING A DEPLOYED AIR BAG ASSEMBLY,
AND WASH YOUR HANDS WITH MILD SOAP AND
WATER AFTERWARDS.
WARNING: WHEN CARRYING A LIVE AIR BAG
ASSEMBLY, MAKE SURE THE BAG AND TRIM
COVER ARE POINTED AWAY FROM YOU. NEVER
CARRY AN AIR BAG ASSEMBLY BY THE WIRES
OR CONNECTOR ON THE UNDERSIDE OF THE
MODULE. IN THE CASE OF AN ACCIDENTAL
DEPLOYMENT, THE BAG WILL THEN DEPLOY
WITH MINIMAL CHANCE OF INJURY. WHEN
PLACING ALIVE AIR BAG ASSEMBLY ON
A
BENCH OR OTHER SURFACE, ALWAYS FACE
THE BAG AND TRIM COVER UP, AWAY FROM THE
SURFACE. NEVER REST A STEERING COLUMN
ASSEMBLY ON THE STEERING WHEEL WITH THE
AIR BAG ASSEMBLY FACE DOWN AND COLUMN
VERTICAL. THIS IS NECESSARY SO THAT A FREE
SPACE IS PROVIDED TO ALLOW THE AIR BAG
ASSEMBLY TO EXPAND IN THE UNLIKELY EVENT
OF ACCIDENTAL DEPLOYMENT. OTHERWISE,
PERSONAL INJURY COULD RESULT.
WARNING: IN THE EVENT DEPLOYMENT HAS
OCCURRED, INSPECT THE COIL ASSEMBLY
WIRE FOR ANY SIGNS OF SCORCHING, MELTING
OR ANY OTHER DAMAGE DUE TO EXCESSIVE
HEAT. IF THE COIL HAS BEEN DAMAGED,
REPLACE IT.
Removal
1. Disable the SRS. (Refer to “Disabling the SRS” in this section)
2. Remove the glove box.
3. Remove the glove box cover.
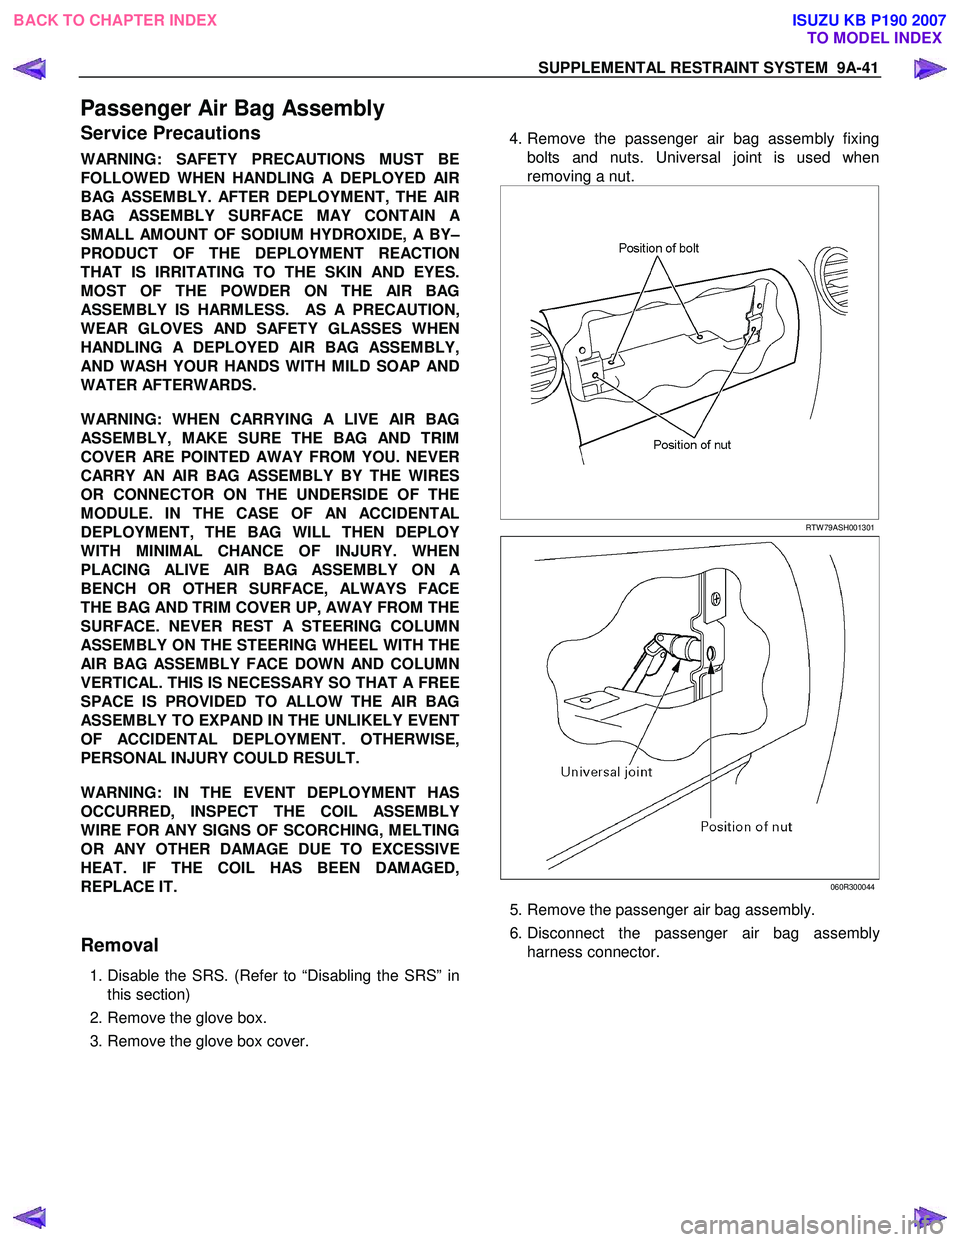
4. Remove the passenger air bag assembly fixing
bolts and nuts. Universal joint is used when
removing a nut.
RTW 79ASH001301
060R300044
5. Remove the passenger air bag assembly.
6. Disconnect the passenger air bag assembl
y
harness connector.
BACK TO CHAPTER INDEX TO MODEL INDEXISUZU KB P190 2007
Page 5677 of 6020
9A-42 SUPPLEMENTAL RESTRAINT SYSTEM
Installation
1. Connect the passenger air bag assembly harness
connector.
2. Install the passenger air bag assembly.
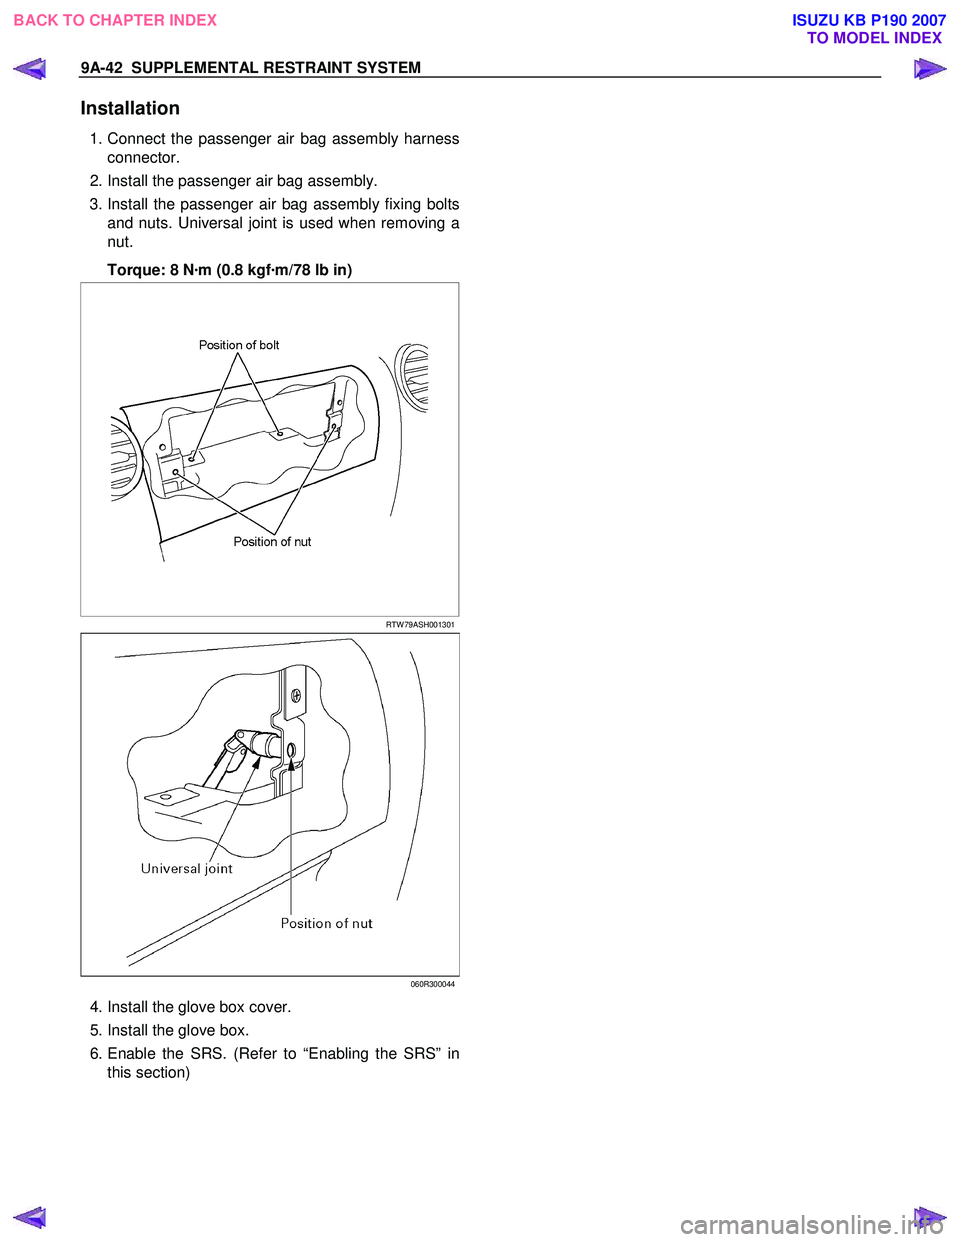
3. Install the passenger air bag assembly fixing bolts and nuts. Universal joint is used when removing a
nut.
Torque: 8 N ·m (0.8 kgf ·m/78 lb in)
RTW 79ASH001301
060R300044
4. Install the glove box cover.
5. Install the glove box.
6. Enable the SRS. (Refer to “Enabling the SRS” in this section)
BACK TO CHAPTER INDEX TO MODEL INDEXISUZU KB P190 2007
Page 5678 of 6020
SUPPLEMENTAL RESTRAINT SYSTEM 9A-43
Pretensioner Seat Belt (If so equipped)
Service Precaution
WARNING: WHEN PERFORMING SERVICE ON OR
AROUND THE PRETENSIONER SEAT BELT OR
THE PRETENSIONER SEAT BELT WIRING,
FOLLOW THE PROCEDURES LISTED BELOW TO
TEMPORARILY DISABLE THE PRETENSIONER
SEAT BELT.
FAILURE TO FOLLOW PROCEDURES COULD
RESULT IN POSSIBLE THE PRETENSIONER SEAT
BELT DEPLOYMENT, PERSONAL INJURY OR
OTHERWISE UNNEEDED THE PRETENSIONER
SEAT BELT REPAIR.
AS A PRECAUTION, WEAR GLOVES AND SAFETY
GLASSES WHEN PERFORMING THE
PRETENSIONER SEAT BELT. WHEN DEPLOY
A
LIVE PRETENSIONER SEAT BELT AT OUTSIDE
THE
VEHICLE, DEPLOYMENT HARNESS SHALL
REMAIN SHORTED AND NOT BE CONNECTED TO
A POWER SOURCE UNTIL THE PRETENSIONER
SEAT BELT IS TO BE DEPLOYED. THE
PRETENSIONER SEAT BELT WILL IMMEDIATELY
DEPLOY WHEN A POWER SOURCE IS
CONNECTED TO IT. CONNECTING THE
DEPLOYMENT HARNESS SHOULED ALWAYS BE
THE FINAL STEP IN THE PRETENSIONER SEAT
BELT DEPLOYMENT PROCEDURE. FAILURE TO
FOLLOW PROCEDURES IN THE ORDER LISTED
COULD RESULT IN PERSONAL INJURY.
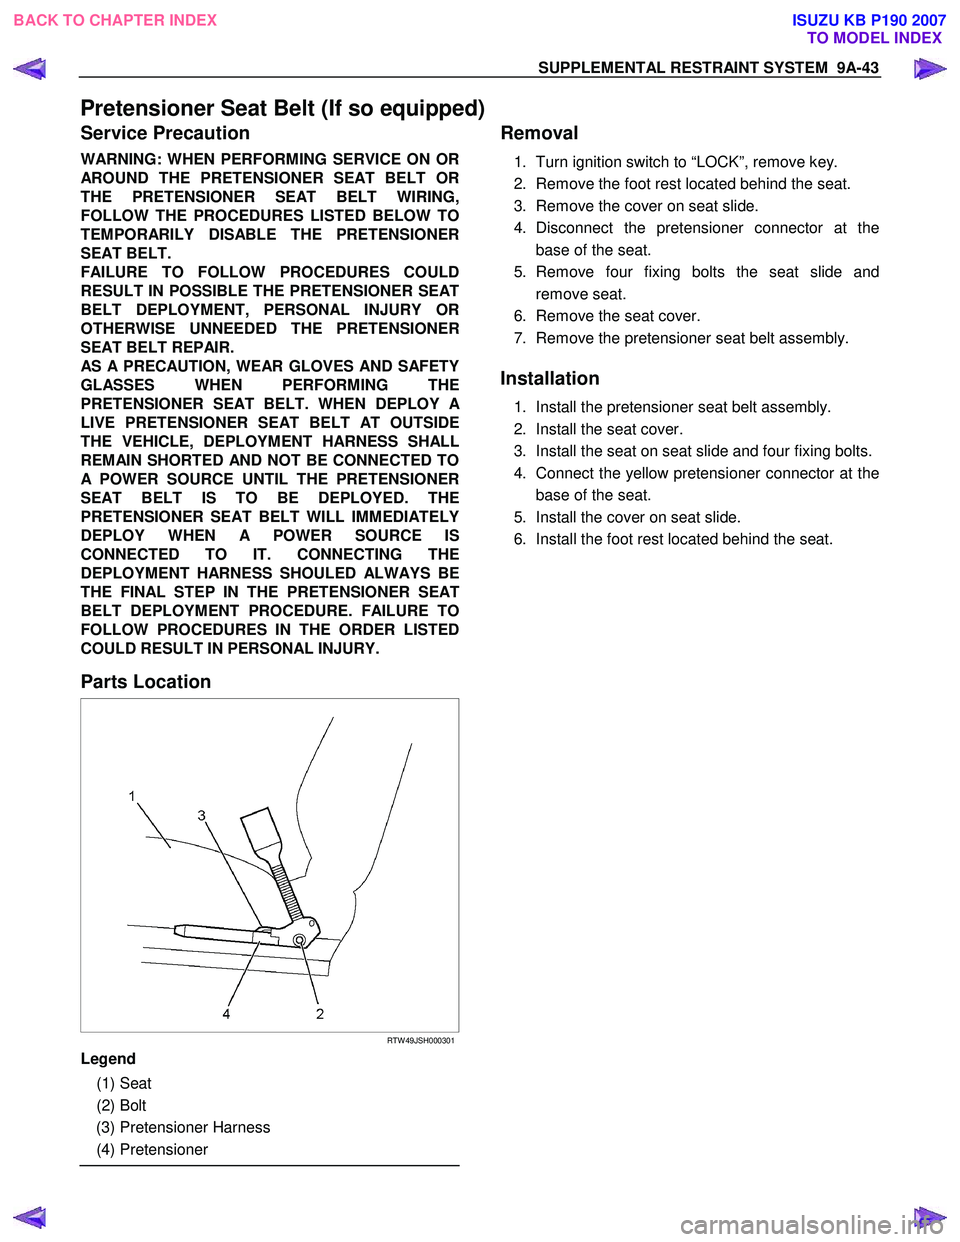
Parts Location
RTW 49JSH000301
Legend
(1) Seat
(2) Bolt
(3) Pretensioner Harness
(4) Pretensioner
Removal
1. Turn ignition switch to “LOCK”, remove key.
2. Remove the foot rest located behind the seat.
3. Remove the cover on seat slide.
4. Disconnect the pretensioner connector at the base of the seat.
5. Remove four fixing bolts the seat slide and remove seat.
6. Remove the seat cover.
7. Remove the pretensioner seat belt assembly.
Installation
1. Install the pretensioner seat belt assembly.
2. Install the seat cover.
3. Install the seat on seat slide and four fixing bolts.
4. Connect the yellow pretensioner connector at the base of the seat.
5. Install the cover on seat slide.
6. Install the foot rest located behind the seat.
BACK TO CHAPTER INDEX TO MODEL INDEXISUZU KB P190 2007
Page 5680 of 6020
SUPPLEMENTAL RESTRAINT SYSTEM 9A-45
Special Tools
WARNING: TO AVOID DEPLOYMENT WHEN
TROUBLESHOOTING THE SRS, DO NOT USE
ELECTRICAL TEST EQUIPMENT SUCH AS
A
BATTERY–POWERED OR AC–POWERED
VOLTMETER, OHMMETER, ETC., OR ANY TYPE
OF ELECTRICAL EQUIPMENT OTHER THAN THAT
SPECIFIED IN THIS MANUAL. DO NOT USE AN
UNPOWERED PROBE–TYPE TESTER.
INSTRUCTIONS IN THIS MANUAL MUST BE
FOLLOWED CAREFULLY, OTHERWISE
PERSONAL INJURY MAY RESULT.
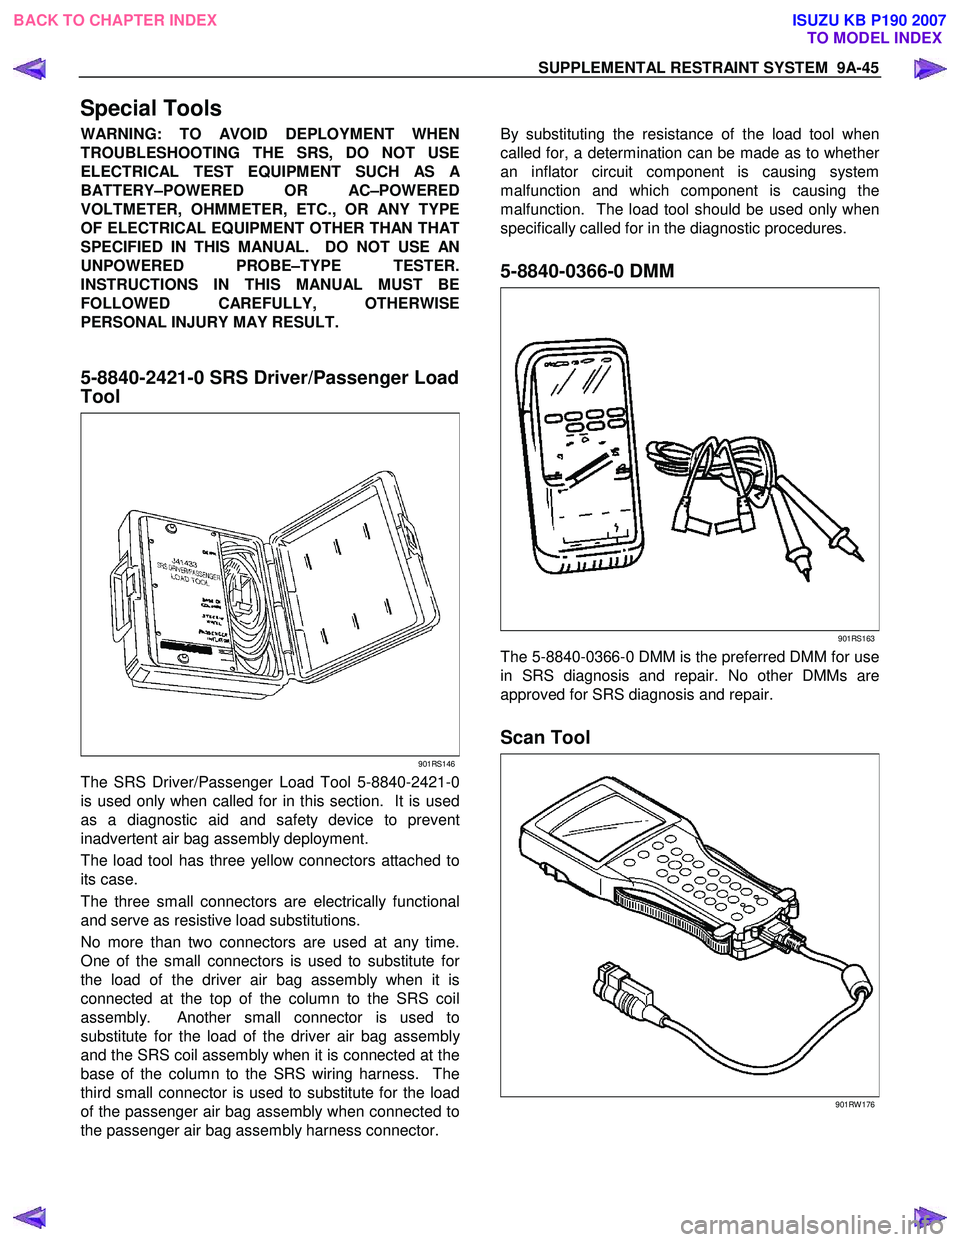
5-8840-2421-0 SRS Driver/Passenger Load
Tool
901RS146
The SRS Driver/Passenger Load Tool 5-8840-2421-0
is used only when called for in this section. It is used
as a diagnostic aid and safety device to prevent
inadvertent air bag assembly deployment.
The load tool has three yellow connectors attached to
its case.
The three small connectors are electrically functional
and serve as resistive load substitutions.
No more than two connectors are used at any time.
One of the small connectors is used to substitute fo
r
the load of the driver air bag assembly when it is
connected at the top of the column to the SRS coil
assembly. Another small connector is used to
substitute for the load of the driver air bag assembl
y
and the SRS coil assembly when it is connected at the
base of the column to the SRS wiring harness. The
third small connector is used to substitute for the load
of the passenger air bag assembly when connected to
the passenger air bag assembly harness connector.
By substituting the resistance of the load tool when
called for, a determination can be made as to whethe
r
an inflator circuit component is causing system
malfunction and which component is causing the
malfunction. The load tool should be used only when
specifically called for in the diagnostic procedures.
5-8840-0366-0 DMM
901RS163
The 5-8840-0366-0 DMM is the preferred DMM for use
in SRS diagnosis and repair. No other DMMs are
approved for SRS diagnosis and repair.
Scan Tool
901RW 176
BACK TO CHAPTER INDEX TO MODEL INDEXISUZU KB P190 2007
Page 5695 of 6020
RESTRAINT CONTROL SYSTEM 9A1-13
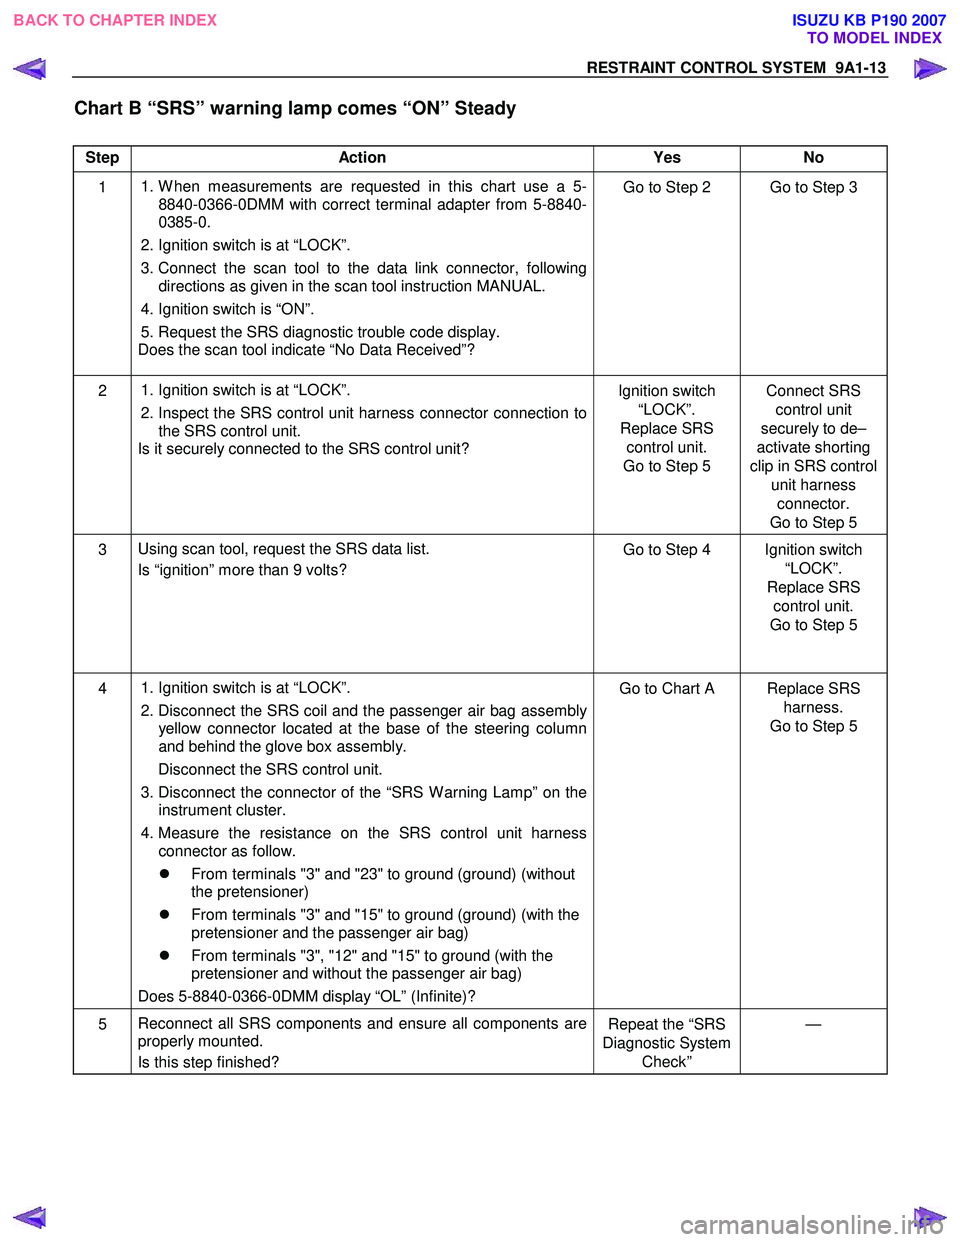
Chart B “SRS” warning lamp comes “ON” Steady
Step Action Yes No
1
1. W hen measurements are requested in this chart use a 5-
8840-0366-0DMM with correct terminal adapter from 5-8840-
0385-0.
2. Ignition switch is at “LOCK”.
3. Connect the scan tool to the data link connector, following
directions as given in the scan tool instruction MANUAL.
4. Ignition switch is “ON”.
5. Request the SRS diagnostic trouble code display.
Does the scan tool indicate “No Data Received”? Go to Step 2 Go to Step 3
2
1. Ignition switch is at “LOCK”.
2. Inspect the SRS control unit harness connector connection to
the SRS control unit.
Is it securely connected to the SRS control unit? Ignition switch
“LOCK”.
Replace SRS control unit.
Go to Step 5 Connect SRS
control unit
securely to de–
activate shorting
clip in SRS control unit harness connector.
Go to Step 5
3 Using scan tool, request the SRS data list.
Is “ignition” more than 9 volts? Go to Step 4 Ignition switch
“LOCK”.
Replace SRS control unit.
Go to Step 5
4
1. Ignition switch is at “LOCK”.
2. Disconnect the SRS coil and the passenger air bag assembly
yellow connector located at the base of the steering column
and behind the glove box assembly.
Disconnect the SRS control unit.
3. Disconnect the connector of the “SRS W arning Lamp” on the
instrument cluster.
4. Measure the resistance on the SRS control unit harness connector as follow.
�z From terminals "3" and "23" to ground (ground) (without
the pretensioner)
�z From terminals "3" and "15" to ground (ground) (with the
pretensioner and the passenger air bag)
�z From terminals "3", "12" and "15" to ground (with the
pretensioner and without the passenger air bag)
Does 5-8840-0366-0DMM display “OL” (Infinite)? Go to Chart A Replace SRS
harness.
Go to Step 5
5 Reconnect all SRS components and ensure all components are
properly mounted.
Is this step finished? Repeat the “SRS
Diagnostic System Check” —
BACK TO CHAPTER INDEX
TO MODEL INDEX
ISUZU KB P190 2007
Page 5697 of 6020
RESTRAINT CONTROL SYSTEM 9A1-15
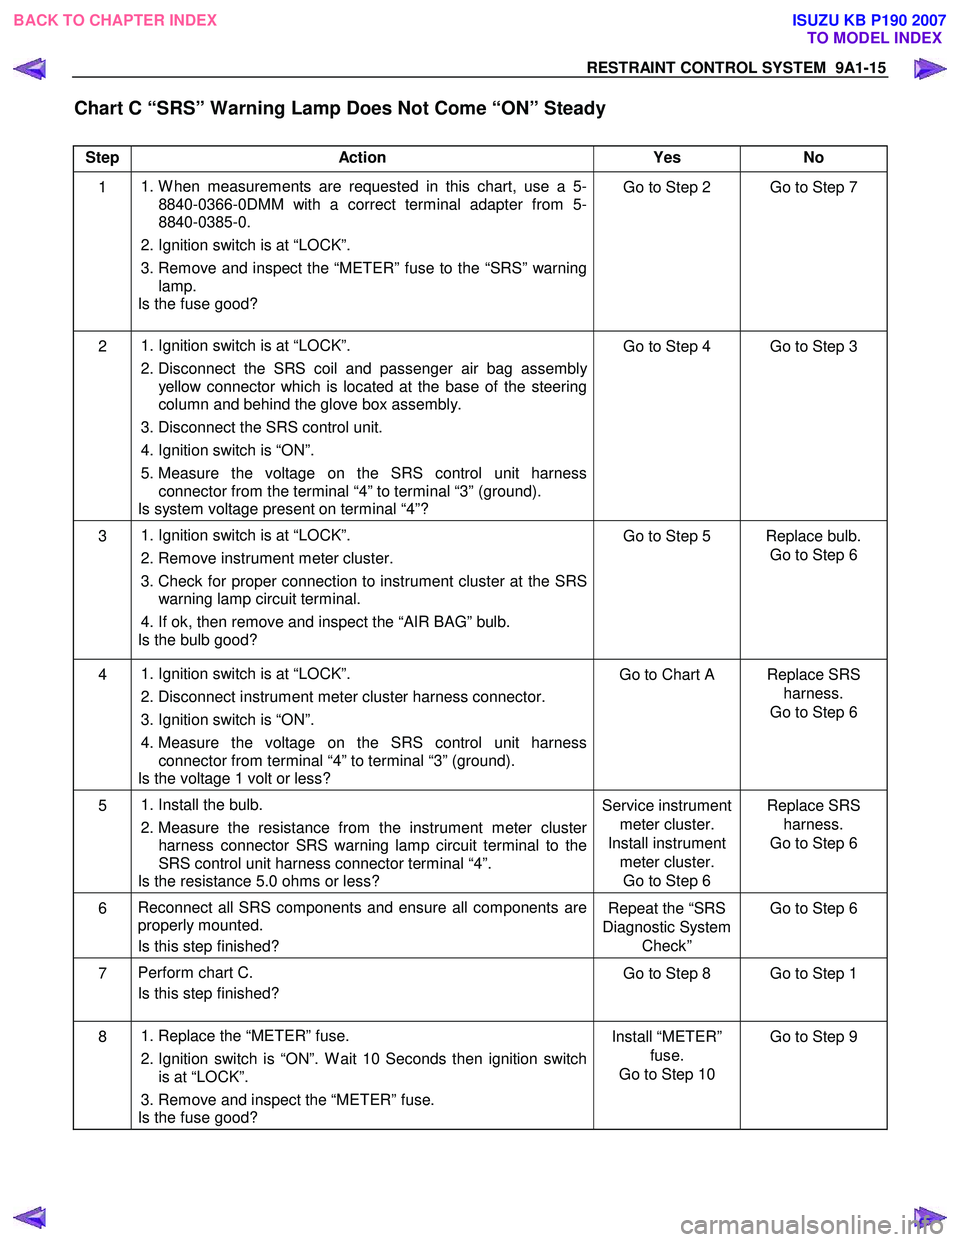
Chart C “SRS” Warning Lamp Does Not Come “ON” Steady
Step Action Yes No
1
1. W hen measurements are requested in this chart, use a 5-
8840-0366-0DMM with a correct terminal adapter from 5-
8840-0385-0.
2. Ignition switch is at “LOCK”.
3. Remove and inspect the “METER” fuse to the “SRS” warning lamp.
Is the fuse good? Go to Step 2 Go to Step 7
2
1. Ignition switch is at “LOCK”.
2. Disconnect the SRS coil and passenger air bag assembly
yellow connector which is located at the base of the steering
column and behind the glove box assembly.
3. Disconnect the SRS control unit.
4. Ignition switch is “ON”.
5. Measure the voltage on the SRS control unit harness connector from the terminal “4” to terminal “3” (ground).
Is system voltage present on terminal “4”? Go to Step 4 Go to Step 3
3
1. Ignition switch is at “LOCK”.
2. Remove instrument meter cluster.
3. Check for proper connection to instrument cluster at the SRS warning lamp circuit terminal.
4. If ok, then remove and inspect the “AIR BAG” bulb.
Is the bulb good? Go to Step 5 Replace bulb.
Go to Step 6
4
1. Ignition switch is at “LOCK”.
2. Disconnect instrument meter cluster harness connector.
3. Ignition switch is “ON”.
4. Measure the voltage on the SRS control unit harness
connector from terminal “4” to terminal “3” (ground).
Is the voltage 1 volt or less? Go to Chart A Replace SRS
harness.
Go to Step 6
5
1. Install the bulb.
2. Measure the resistance from the instrument meter cluster
harness connector SRS warning lamp circuit terminal to the
SRS control unit harness connector terminal “4”.
Is the resistance 5.0 ohms or less? Service instrument
meter cluster.
Install instrument meter cluster. Go to Step 6 Replace SRS
harness.
Go to Step 6
6 Reconnect all SRS components and ensure all components are
properly mounted.
Is this step finished? Repeat the “SRS
Diagnostic System Check” Go to Step 6
7
Perform chart C.
Is this step finished? Go to Step 8 Go to Step 1
8
1. Replace the “METER” fuse.
2. Ignition switch is “ON”. W ait 10 Seconds then ignition switch
is at “LOCK”.
3. Remove and inspect the “METER” fuse.
Is the fuse good? Install “METER”
fuse.
Go to Step 10 Go to Step 9
BACK TO CHAPTER INDEX
TO MODEL INDEX
ISUZU KB P190 2007