Page 5350 of 6020
8A-412 ELECTRICAL-BODY AND CHASSIS
INSPECTION AND REPAIR
Harness side
D20 D5
Driver’s Side Power Window & Door Lock
Switch
1. Harness Side Connector Circuit
Check voltage and continuity between the switch harness side connector terminals as shown in the following table.
Terminal No. Wire
color Connecting to Check item Connectin
g terminal Check condition
Standard
Door lock SW
Driver’s Lock Continuity
(Lock) side door
Unlock No continuity
Door lock SW
Driver’s Lock No continuity
(Unlock) side door
Unlock Continuity
3 (D5) L/R Ground Continuity 3-Ground
- Continuity
4 (D5)
L/R Door lock
actuator (Lock) (Resistance)
4-5
- Continuity
There is some
resistance
5 (D5)
L Door lock
actuator
(Unlock)
5-4
- Continuity
There is some
resistance
1 (D5) LG/W Fuse
C21 (20A) Voltage 1- Ground
- Battery voltage
(Approx. 12V)
14-Ground
L/R
14 (D20)
13-Ground
L/Y
13 (D20)
BACK TO CHAPTER INDEX
TO MODEL INDEXISUZU KB P190 2007
Page 5351 of 6020
ELECTRICAL-BODY AND CHASSIS 8A-413
Harness side
D20 D5
2. Switch Side Connector Circuit
Remove the switch connector, and check continuity and voltage between the switch connector terminals.
(Connect the (+) terminal of the battery to 1
D5and the
(-) terminal to 3
D5.)
3
D5 - 4 D5.................. Continuity
3 D5 - 5 D5.................. Continuity
(Then, ground 3 D5.)
4
D5.......... Current flow for approx. 1 second
(Disconnect the ground of 14 D20 , and ground 13 D20.)
5
D5.......... Current flow for approx. 1 second
Harness side
D5
3. Door Lock Operation Test
After confirming that there is continuity between the switch
harness side connector terminals 4
D5 and 5 D5,
apply the battery voltage to each of the terminals to conduct
the operation test.
W hen the door lock will not operate, check the door lock actuator for any trouble.
Connecting terminals
5 (L) 4 (L/R)
+ - Unlock
- + Lock
Operation
BACK TO CHAPTER INDEX TO MODEL INDEXISUZU KB P190 2007
Page 5352 of 6020

8A-414 ELECTRICAL-BODY AND CHASSIS
Switch side
D4
Driver’s Side Door Lock Switch
1. Switch Side Connector Circuit
Check continuity between the switch connector terminals
Terminal No.
SW position 1 2 3
Lock
Unlock
Actuator side
D9
Front Passenger’s Side Door Lock Actuator
1. Actuator Side Connector Circuit
Apply the battery voltage to the actuator connecto
r
terminals to check the operation.
W hen the door lock actuator is checked on the vehicle and there is no continuity, and when the door lock actuator itsel
f
is checked and no trouble is found, check the circuit
between the door lock actuator and the driver seat side
power window & door lock switch for any failure.
Connecting terminals
1 2
+ - Lock
- + Unlock
Operation
Door lock actuator Rear – RH/LH Harness side
D14 D18
Rear Door Lock Actuator -LH & RH
1. Actuator Side Connector Circuit
Apply the battery voltage to the actuator connecto
r
terminals to check the operation.
W hen the door lock actuator is checked on the vehicle and there is no continuity, and when the door lock actuator itsel
f
is checked and no trouble is found, check the circuit
between the door lock actuator and the driver seat side
power window & door lock switch for any failure.
Connecting terminals
1 2
+ - Lock
- + Unlock
Operation
BACK TO CHAPTER INDEX TO MODEL INDEXISUZU KB P190 2007
Page 5365 of 6020

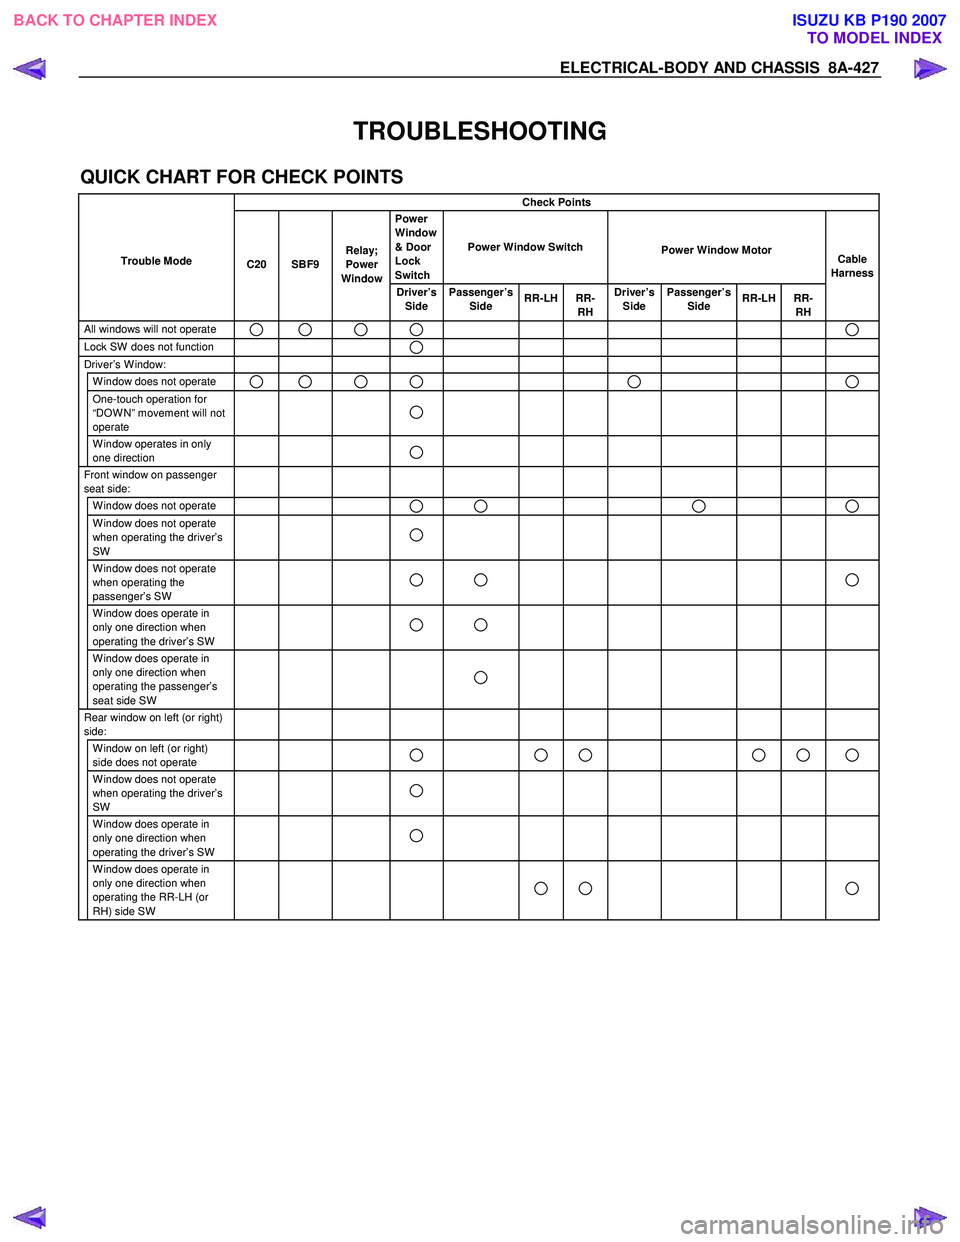
ELECTRICAL-BODY AND CHASSIS 8A-427
TROUBLESHOOTING
QUICK CHART FOR CHECK POINTS
Check Points
Trouble Mode Power
Window
& Door
Lock
Switch Power Window Switch
Power Window Motor
Driver’s
Side Passenger’s
Side RR-LH RR-
RH Driver’s
Side Passenger’s
Side RR-LH RR-
RH
All windows will not operate
Lock SW does not function Driver’s W indow:
W indow does not operate One-touch operation for
“DOW N” movement will not
operate
W indow operates in only
one direction
Front window on passenger
seat side:
W indow does not operate
W indow does not operate
when operating the driver’s
SW
W indow does not operate
when operating the
passenger’s SW
W indow does operate in
only one direction when
operating the driver’s SW
W indow does operate in
only one direction when
operating the passenger’s
seat side SW
Rear window on left (or right)
side:
W indow on left (or right)
side does not operate
W indow does not operate
when operating the driver’s
SW
W indow does operate in
only one direction when
operating the driver’s SW
W indow does operate in
only one direction when
operating the RR-LH (or
RH) side SW
Cable
Harness
Relay;
Power
Window
SBF9
C20
BACK TO CHAPTER INDEX TO MODEL INDEXISUZU KB P190 2007
Page 5366 of 6020

8A-428 ELECTRICAL-BODY AND CHASSIS
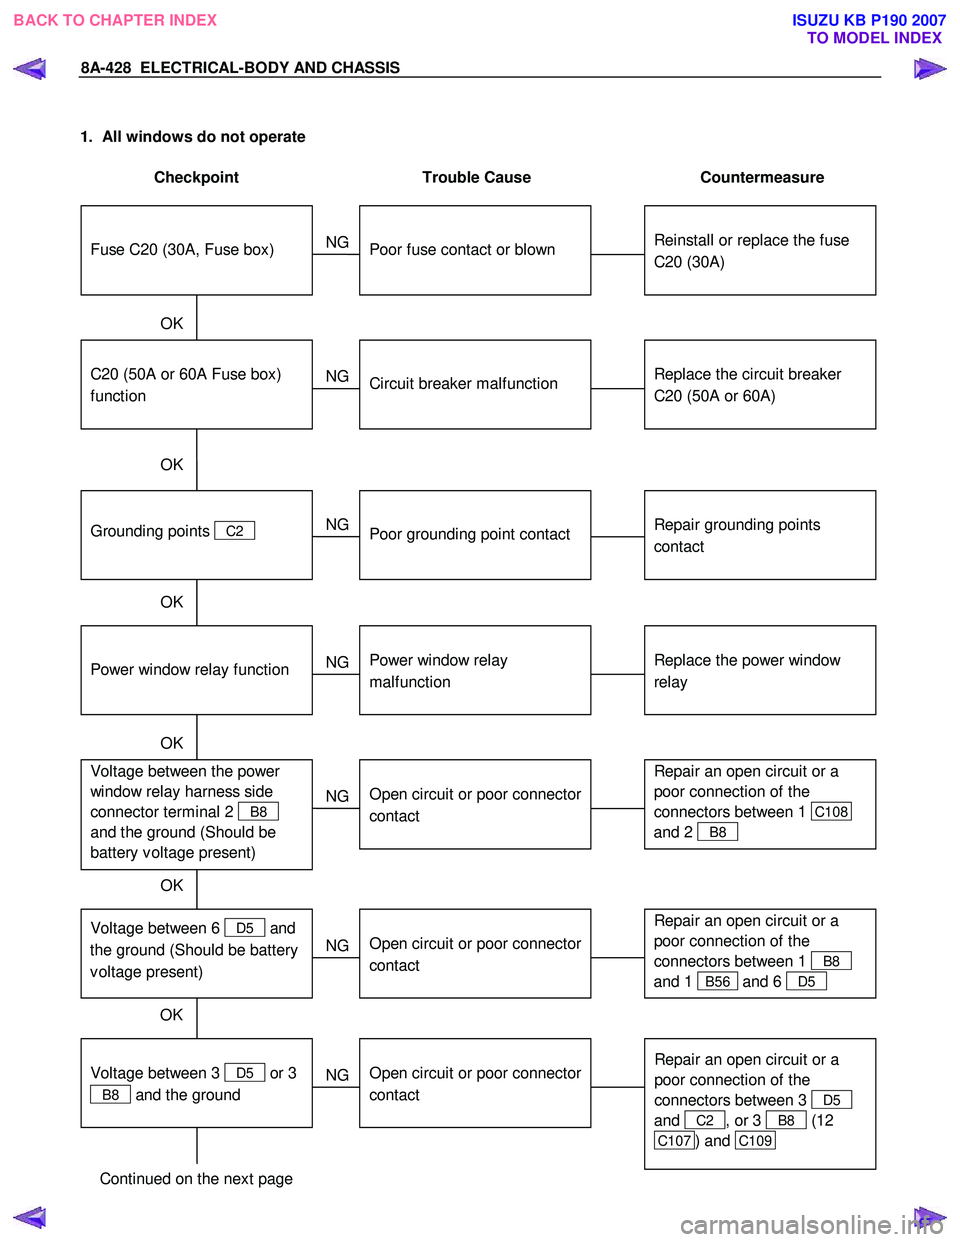
1. All windows do not operate
Checkpoint Trouble Cause Countermeasure
Reinstall or replace the fuse
C20 (30A)
Poor fuse contact or blown
NG
Replace the circuit breaker
C20 (50A or 60A)
C20 (50A or 60A Fuse box)
function
Circuit breaker malfunction
Repair grounding points
contact
Grounding points C2
Poor grounding point contact
NG
NG
OK
OK
OK
Fuse C20 (30A, Fuse box)
Replace the power window
relay
Power window relay
malfunction
NG
Repair an open circuit or a
poor connection of the
connectors between 1
C108
and 2
B8
Voltage between the power
window relay harness side
connector terminal 2
B8
and the ground (Should be
battery v oltage present)
Open circuit or poor connector
contact
NG
OK
Power window relay function
OK
Repair an open circuit or a
poor connection of the
connectors between 1
B8
and 1
B56 and 6 D5
Open circuit or poor connector
contact
NG Voltage between 6 D5 and
the ground (Should be battery
v oltage present)
OK
Repair an open circuit or a
poor connection of the
connectors between 3
D5
and
C2 , or 3 B8 (12
C107 ) and C109
Open circuit or poor connector
contact
NG
Continued on the next page
Voltage between 3
D5 or 3
B8 and the ground
BACK TO CHAPTER INDEX TO MODEL INDEXISUZU KB P190 2007
Page 5372 of 6020

8A-434 ELECTRICAL-BODY AND CHASSIS
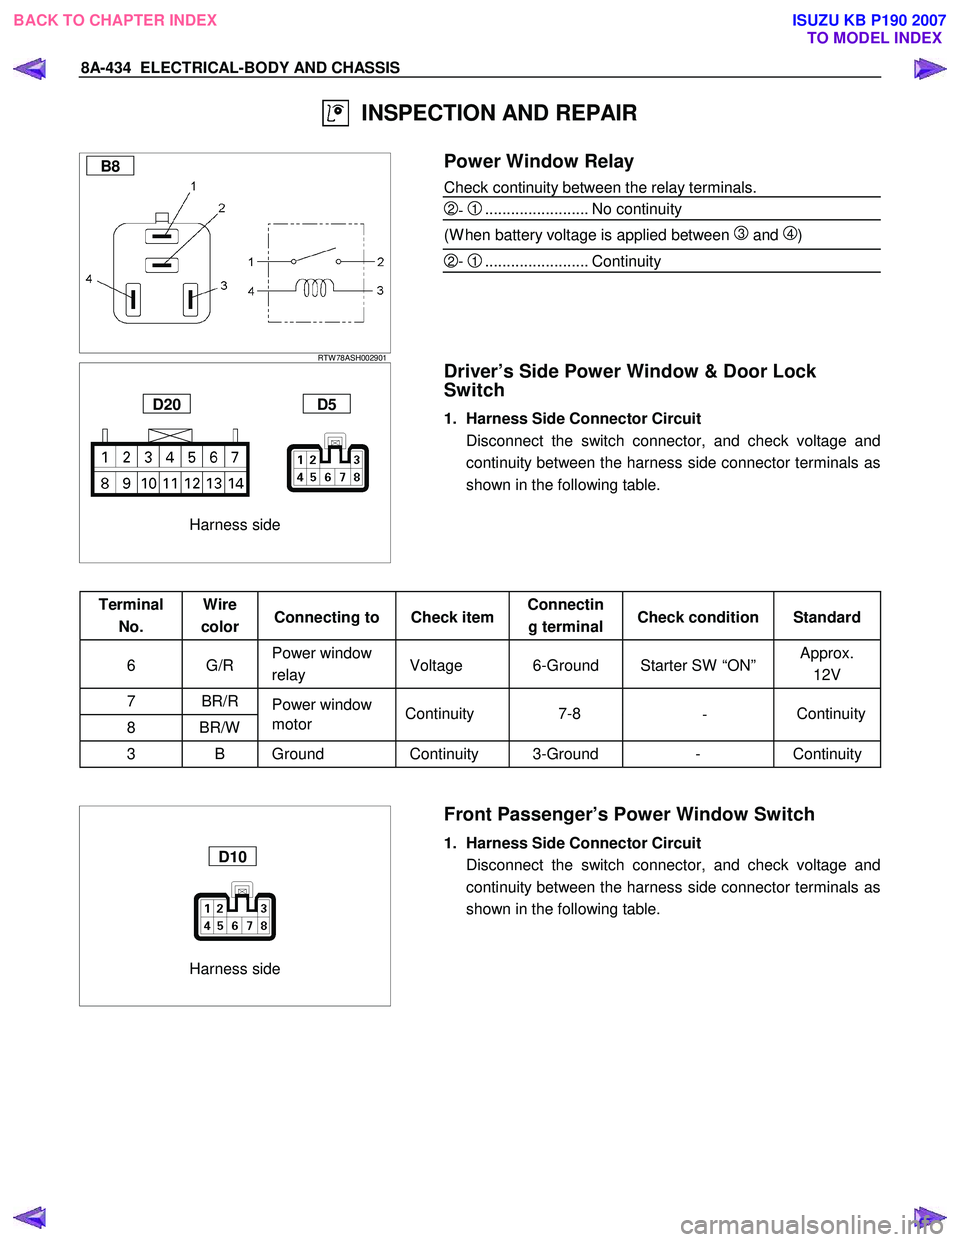
INSPECTION AND REPAIR
B8
RTW 78ASH002901
Power Window Relay
Check continuity between the relay terminals.
2- 1........................ No continuity
(W hen battery voltage is applied between
3 and 4)
2- 1........................ Continuity
Harness side
D20 D5
Driver’s Side Power Window & Door Lock
Switch
1. Harness Side Connector Circuit
Disconnect the switch connector, and check voltage and continuity between the harness side connector terminals as
shown in the following table.
Terminal No. Wire
color Connecting to Check item Connectin
g terminal Check condition Standard
6 G/R Power window
relay Voltage 6-Ground Starter SW “ON” Approx.
12V
7 BR/R Power window
8 BR/W motor
3 B Ground Continuity 3-Ground - Continuity
Harness side
D10
Front Passenger’s Power Window Switch
1. Harness Side Connector Circuit
Disconnect the switch connector, and check voltage and continuity between the harness side connector terminals as
shown in the following table.
Continuity
-
7-8
Continuity
BACK TO CHAPTER INDEX
TO MODEL INDEXISUZU KB P190 2007
Page 5373 of 6020

ELECTRICAL-BODY AND CHASSIS 8A-435
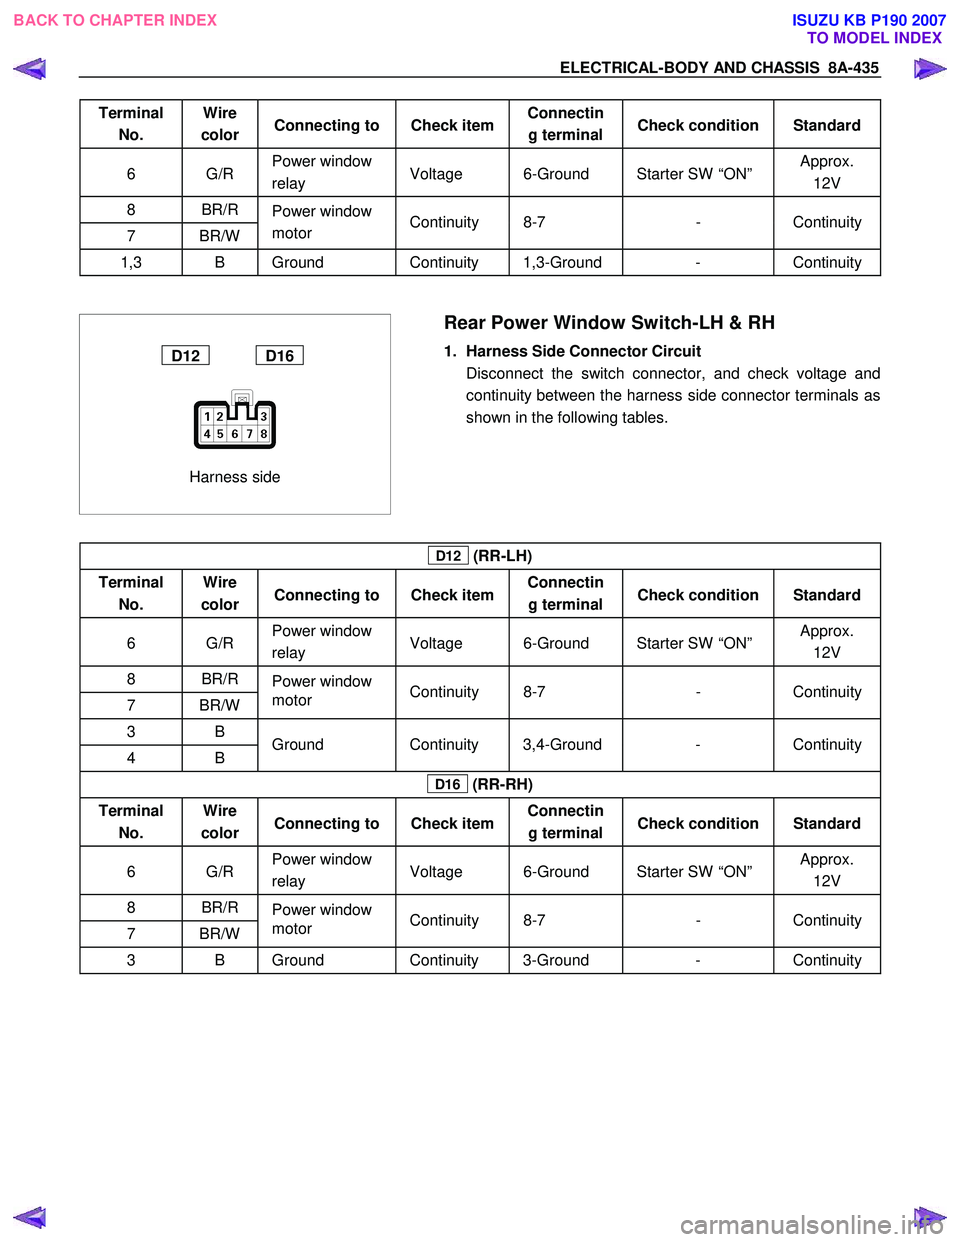
Terminal No. Wire
color Connecting to Check item Connectin
g terminal Check condition Standard
6 G/R Power window
relay Voltage 6-Ground Starter SW “ON” Approx.
12V
8 BR/R
7 BR/W Power window
motor Continuity 8-7
- Continuity
1,3 B Ground Continuity 1,3-Ground - Continuity
Harness side
D12 D16
Rear Power Window Switch-LH & RH
1. Harness Side Connector Circuit
Disconnect the switch connector, and check voltage and continuity between the harness side connector terminals as
shown in the following tables.
D12 (RR-LH)
Terminal No. Wire
color Connecting to Check item Connectin
g terminal Check condition Standard
6 G/R Power window
relay Voltage 6-Ground Starter SW “ON” Approx.
12V
8 BR/R
7 BR/W Power window
motor Continuity 8-7
- Continuity
3 B
4 B Ground Continuity 3,4-Ground - Continuity
D16 (RR-RH)
Terminal
No. Wire
color Connecting to Check item Connectin
g terminal Check condition Standard
6 G/R Power window
relay Voltage 6-Ground Starter SW “ON” Approx.
12V
8 BR/R
7 BR/W Power window
motor Continuity 8-7
- Continuity
3 B Ground Continuity 3-Ground - Continuity
BACK TO CHAPTER INDEX
TO MODEL INDEXISUZU KB P190 2007
Page 5374 of 6020
8A-436 ELECTRICAL-BODY AND CHASSIS
Harness side
D5
Driver’s Side Power Window Motor
1. Driver’s Side Power Window & Door Lock Switch
Connector Circuit
Disconnect the switch connector, apply the battery voltage (12V) to the harness side connector terminals and check
operation.
Connecting terminals Operation
7 (BR/R) 8 (BR/W ) direction
- + DOW N
+ - UP
D1
2. Driver’s Side Power Window Motor Connector Circuit
Disconnect the switch connector, apply the battery voltage (12V) to the motor side connector terminals and check
operation.
Connecting terminals Operation
1 2 direction
+ - DOW N
- + UP
BACK TO CHAPTER INDEX
TO MODEL INDEXISUZU KB P190 2007