2007 INFINITI QX56 belt
[x] Cancel search: beltPage 1545 of 3061
EC-462
< SERVICE INFORMATION >
DTC P1140, P1145 IVT CONTROL POSITION SENSOR
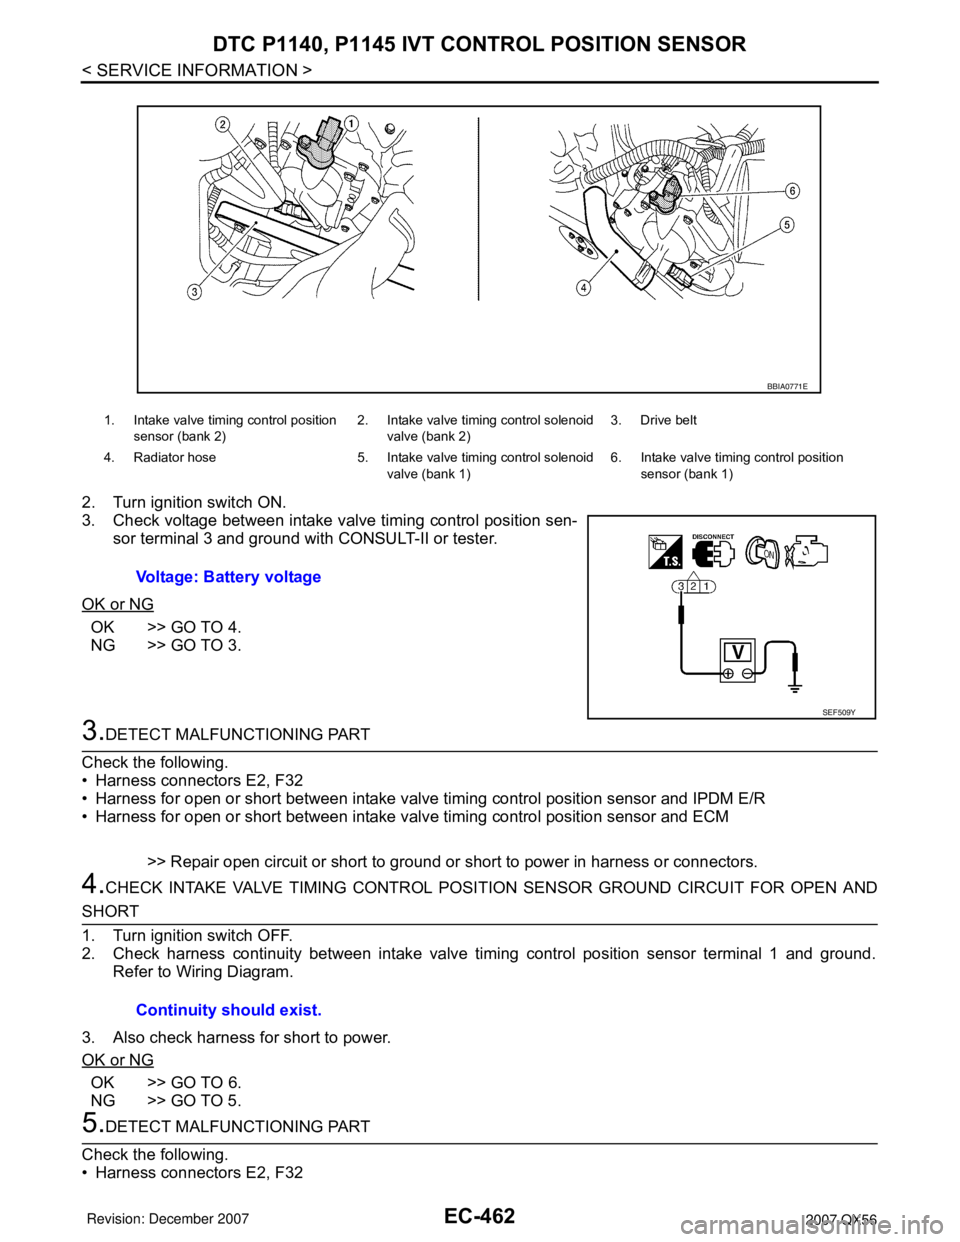
2. Turn ignition switch ON.
3. Check voltage between intake valve timing control position sen-
sor terminal 3 and ground with CONSULT-II or tester.
OK or NG
OK >> GO TO 4.
NG >> GO TO 3.
3.DETECT MALFUNCTIONING PART
Check the following.
• Harness connectors E2, F32
• Harness for open or short between intake valve timing control position sensor and IPDM E/R
• Harness for open or short between intake valve timing control position sensor and ECM
>> Repair open circuit or short to ground or short to power in harness or connectors.
4.CHECK INTAKE VALVE TIMING CONTROL POSITION SENSOR GROUND CIRCUIT FOR OPEN AND
SHORT
1. Turn ignition switch OFF.
2. Check harness continuity between intake valve timing control position sensor terminal 1 and ground.
Refer to Wiring Diagram.
3. Also check harness for short to power.
OK or NG
OK >> GO TO 6.
NG >> GO TO 5.
5.DETECT MALFUNCTIONING PART
Check the following.
• Harness connectors E2, F32
1. Intake valve timing control position
sensor (bank 2)2. Intake valve timing control solenoid
valve (bank 2)3. Drive belt
4. Radiator hose 5. Intake valve timing control solenoid
valve (bank 1)6. Intake valve timing control position
sensor (bank 1)
Voltage: Battery voltage
BBIA0771E
SEF509Y
Continuity should exist.
Page 1730 of 3061
EI-1
BODY
C
D
E
F
G
H
J
K
L
M
SECTION EI
A
B
EI
N
O
P
CONTENTS
EXTERIOR & INTERIOR
SERVICE INFORMATION ............................2
PRECAUTIONS ...................................................2
Service Notice ...........................................................2
Precaution for Supplemental Restraint System
(SRS) "AIR BAG" and "SEAT BELT PRE-TEN-
SIONER" ...................................................................
2
PREPARATION ...................................................3
Special Service Tool .................................................3
Commercial Service Tool ..........................................3
SQUEAK AND RATTLE TROUBLE DIAGNO-
SIS .......................................................................
4
Work Flow .................................................................4
Generic Squeak and Rattle Troubleshooting ............6
Diagnostic Worksheet ...............................................8
CLIP AND FASTENER .......................................10
Description ..............................................................10
FRONT BUMPER ...............................................12
Removal and Installation .........................................12
REAR BUMPER .................................................14
Removal and Installation .........................................14
FRONT GRILLE .................................................16
Removal and Installation .........................................16
COWL TOP .........................................................17
Removal and Installation .........................................17
FRONT FENDER ................................................19
Removal and Installation .........................................19
OVER FENDER ..................................................20
Removal and Installation .........................................20
FENDER PROTECTOR ....................................22
Removal and Installation .........................................22
LICENSE LAMP FINISHER ..............................23
Removal and Installation .........................................23
RUNNING BOARDS .........................................24
Removal and Installation .........................................24
REAR SPOILER ................................................25
Removal and Installation .........................................25
ROOF RACK .....................................................26
Removal and Installation .........................................26
DOOR OUTSIDE MOLDING .............................27
Removal and Installation .........................................27
SIDE GUARD MOLDING ..................................29
Removal and Installation .........................................29
DOOR FINISHER ..............................................31
Removal and Installation .........................................31
BODY SIDE TRIM .............................................34
Removal and Installation .........................................34
FLOOR TRIM ....................................................36
Removal and Installation .........................................36
HEADLINING ....................................................37
Removal and Installation .........................................37
LUGGAGE FLOOR TRIM .................................39
Removal and Installation .........................................39
BACK DOOR TRIM ...........................................41
Removal and Installation .........................................41
Page 1731 of 3061
EI-2
< SERVICE INFORMATION >
PRECAUTIONS
SERVICE INFORMATION
PRECAUTIONS
Service NoticeINFOID:0000000003533114
• When removing or installing various parts, place a cloth or padding on the vehicle body to prevent scratches.
• Handle trim, molding, instruments, grille, etc. carefully during removing or installing. Be careful not to soil or
damage them.
• Apply sealing compound where necessary when installing parts.
• When applying sealing compound, be careful that the sealing compound does not protrude from parts.
• When replacing any metal parts (for example body outer panel, members, etc.), be sure to take rust preven-
tion measures.
Precaution for Supplemental Restraint System (SRS) "AIR BAG" and "SEAT BELT
PRE-TENSIONER"
INFOID:0000000003533115
The Supplemental Restraint System such as “AIR BAG” and “SEAT BELT PRE-TENSIONER”, used along
with a front seat belt, helps to reduce the risk or severity of injury to the driver and front passenger for certain
types of collision. This system includes seat belt switch inputs and dual stage front air bag modules. The SRS
system uses the seat belt switches to determine the front air bag deployment, and may only deploy one front
air bag, depending on the severity of a collision and whether the front occupants are belted or unbelted.
Information necessary to service the system safely is included in the SRS and SB section of this Service Man-
ual.
WARNING:
• To avoid rendering the SRS inoperative, which could increase the risk of personal injury or death in
the event of a collision which would result in air bag inflation, all maintenance must be performed by
an authorized NISSAN/INFINITI dealer.
• Improper maintenance, including incorrect removal and installation of the SRS, can lead to personal
injury caused by unintentional activation of the system. For removal of Spiral Cable and Air Bag
Module, see the SRS section.
• Do not use electrical test equipment on any circuit related to the SRS unless instructed to in this
Service Manual. SRS wiring harnesses can be identified by yellow and/or orange harnesses or har-
ness connectors.
Page 1764 of 3061
BODY SIDE TRIM
EI-35
< SERVICE INFORMATION >
C
D
E
F
G
H
J
K
L
MA
B
EI
N
O
P Removal
1. Remove front and rear door welts.
2. Remove seat belt anchor. Refer to SB-3, "
Removal and Installation of Front Seat Belt" .
• On RH side, disconnect seat belt tension sensor.
3. Remove front and rear kicking plates.
4. Remove center pillar lower finisher.
Installation
Installation is in the reverse order of removal.
CENTER PILLAR UPPER FINISHER
Removal
1. Remove center pillar lower finisher.
2. Remove assist grip.
3. Remove center pillar upper finisher.
Installation
Installation is in the reverse order of removal.
FRONT PILLAR FINISHER
Removal
1. Remove assist grip.
2. Remove front pillar finisher.
Installation
Installation is in the reverse order of removal.
KICKING PLATES
Removal and Installation
Release clips and remove front and/or rear kicking plates.
Installation
Installation is in the reverse order of removal.
MUDGUARD FINISHERS
Removal
Release clips and remove front and/or rear mudguard finishers.
Installation
Installation is in the reverse order of removal.
DOOR PARTING SEALS
Removal
1. Open front and/or rear doors fully.
2. Release clips and remove parting seals.
Installation is in the reverse order of removal.
Page 1765 of 3061
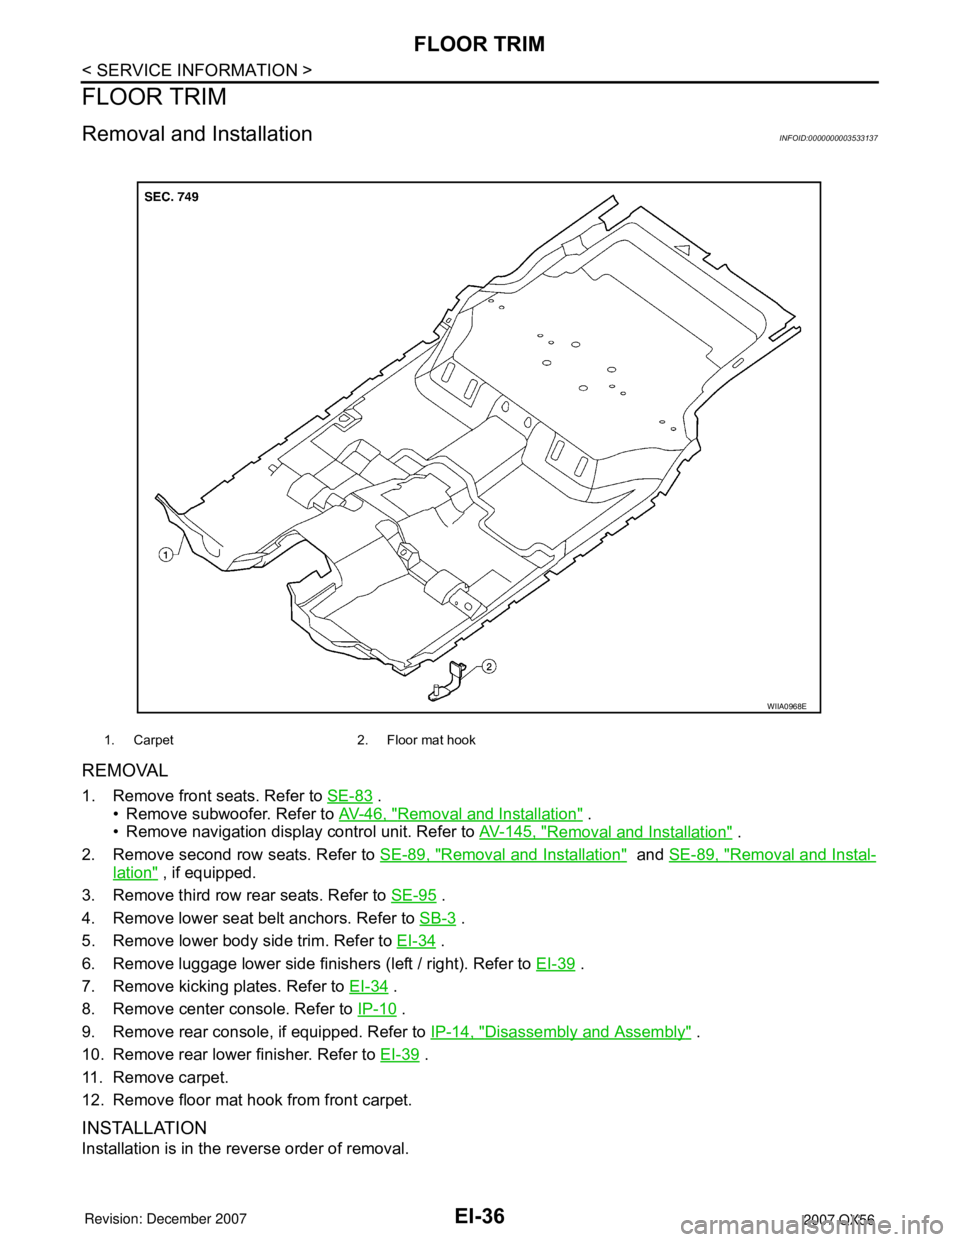
EI-36
< SERVICE INFORMATION >
FLOOR TRIM
FLOOR TRIM
Removal and InstallationINFOID:0000000003533137
REMOVAL
1. Remove front seats. Refer to SE-83 .
• Remove subwoofer. Refer to AV-46, "
Removal and Installation" .
• Remove navigation display control unit. Refer to AV-145, "
Removal and Installation" .
2. Remove second row seats. Refer to SE-89, "
Removal and Installation" and SE-89, "Removal and Instal-
lation" , if equipped.
3. Remove third row rear seats. Refer to SE-95
.
4. Remove lower seat belt anchors. Refer to SB-3
.
5. Remove lower body side trim. Refer to EI-34
.
6. Remove luggage lower side finishers (left / right). Refer to EI-39
.
7. Remove kicking plates. Refer to EI-34
.
8. Remove center console. Refer to IP-10
.
9. Remove rear console, if equipped. Refer to IP-14, "
Disassembly and Assembly" .
10. Remove rear lower finisher. Refer to EI-39
.
11. Remove carpet.
12. Remove floor mat hook from front carpet.
INSTALLATION
Installation is in the reverse order of removal.
1. Carpet 2. Floor mat hook
WIIA0968E
Page 1768 of 3061
LUGGAGE FLOOR TRIM
EI-39
< SERVICE INFORMATION >
C
D
E
F
G
H
J
K
L
MA
B
EI
N
O
P
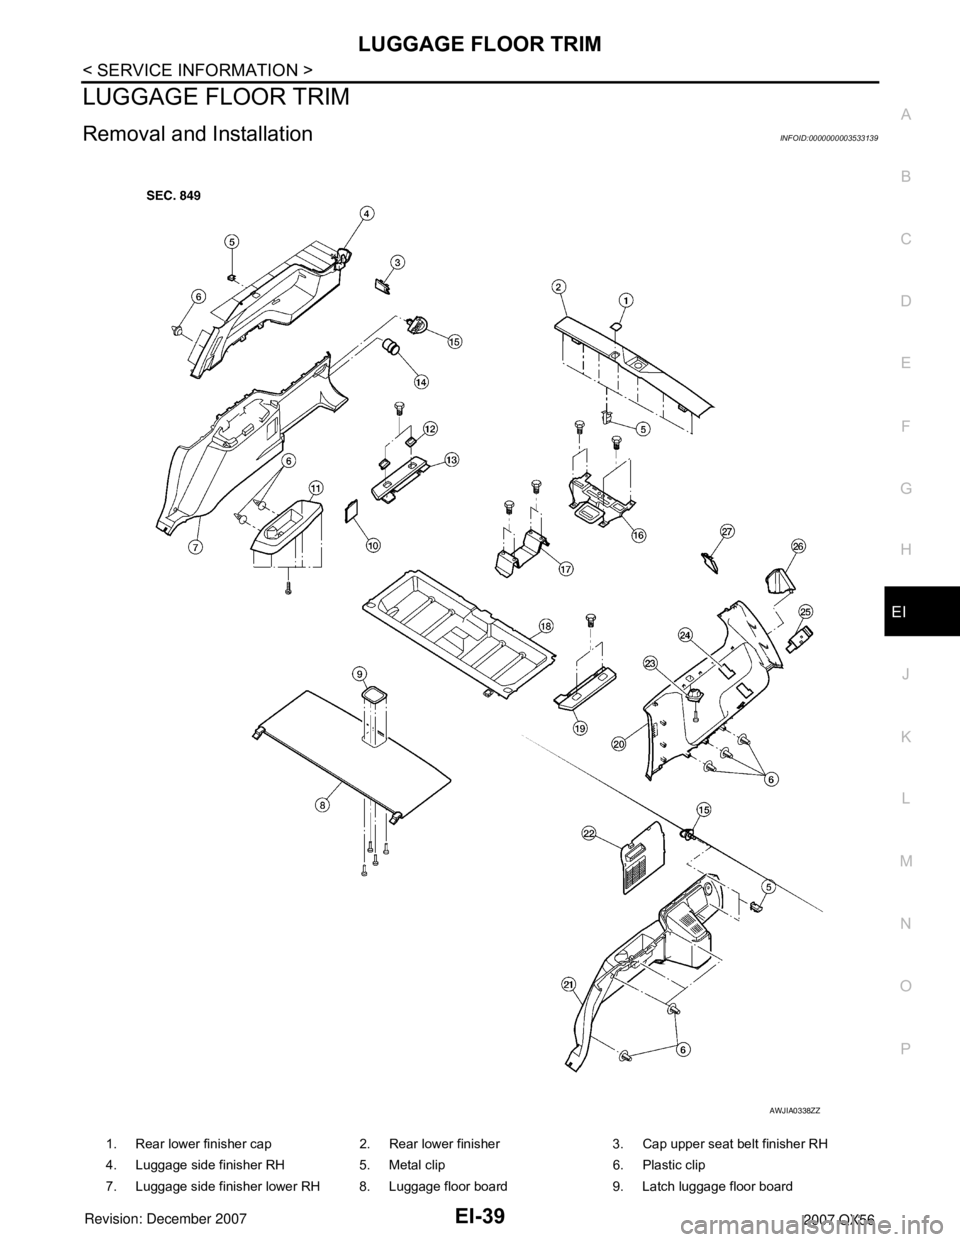
LUGGAGE FLOOR TRIM
Removal and InstallationINFOID:0000000003533139
1. Rear lower finisher cap 2. Rear lower finisher 3. Cap upper seat belt finisher RH
4. Luggage side finisher RH 5. Metal clip 6. Plastic clip
7. Luggage side finisher lower RH 8. Luggage floor board 9. Latch luggage floor board
AWJIA0338ZZ
Page 1769 of 3061
EI-40
< SERVICE INFORMATION >
LUGGAGE FLOOR TRIM
REMOVAL
1. Remove 2nd and 3rd row seat belts. Refer to SB-3.
2. Remove third row seat belt buckles.
3. Remove third row seat assembly. Refer to SE-95
.
4. Remove back door weatherstrip. Refer to EI-41
.
5. Remove rear luggage room lamp. Refer to EI-37
.
• Disconnect harness from lamp.
6. Remove rear upper finisher. Refer to EI-37
.
7. Remove rear door kicking plates. Refer to EI-34
.
8. Remove rear lower finisher.
9. Disconnect door open/close link. Refer to BL-114
.
10. Remove cargo net hooks.
11. Remove luggage side lower finishers LH/RH.
• Disconnect power point, RH side.
12. Remove coat hooks.
13. Remove luggage side upper finishers LH/RH.
• Disconnect harness to door open/close switch, LH side.
14. Remove tie down hooks LH/RH.
15. Remove floor side finishers LH/RH.
16. Remove luggage floor board.
17. Remove storage box.
18. Remove front luggage floor bracket.
19. Remove rear luggage box bracket.
INSTALLATION
Installation is in the reverse order of removal.
10. Leak check cap 11. Cup holder 12. Tie down hook
13. Floor side finisher RH 14. Power point assembly 15. Cargo net hook
16. Rear luggage box bracket 17. Front luggage floor bracket 18. Storage box
19. Floor side finisher LH 20. Luggage side finisher upper LH 21. Luggage side finisher lower LH
22. Lid luggage side lower 23. Coat hook 24. Cap lower seat belt finisher
25. Back door open/close switch 26. Cap luggage side upper 27. Cap upper seat belt finisher LH
Page 1771 of 3061
EM-1
ENGINE
C
DE
F
G H
I
J
K L
M
SECTION EM
A
EM
N
O P
CONTENTS
ENGINE MECHANICAL
SERVICE INFORMATION .. ..........................3
PRECAUTIONS .............................................. .....3
Precaution for Supplemental Restraint System
(SRS) "AIR BAG" and "SEAT BELT PRE-TEN-
SIONER" ............................................................. ......
3
Precaution for Drain Engine Coolant .........................3
Precaution for Disconnecting Fuel Piping .................3
Precaution for Removal and Disassembly ................3
Precaution for Inspection, Repair and Replace-
ment .................................................................... ......
3
Precaution for Assembly and Installation ..................3
Parts Requiring Angular Tightening ..........................4
Precaution for Liquid Gasket ............................... ......4
PREPARATION ...................................................6
Special Service Tool ........................................... ......6
Commercial Service Tool ..........................................8
NOISE, VIBRATION AND HARSHNESS
(NVH) TROUBLESHOOTING ............................
10
NVH Troubleshooting - Engine Noise ................. ....10
Use the Chart Below to Help You Find the Cause
of the Symptom .......................................................
11
ENGINE ROOM COVER ....................................12
Removal and Installation .........................................12
DRIVE BELTS ................................................ ....13
Checking Drive Belts ........................................... ....13
Removal and Installation .........................................13
Drive Belt Auto Tensioner and Idler Pulley ......... ....14
AIR CLEANER AND AIR DUCT ........................15
Removal and Installation .........................................15
Removal and Installation (Viscous paper type) ... ....15
INTAKE MANIFOLD ...........................................17
Removal and Installation .........................................17
EXHAUST MANIFOLD AND THREE WAY
CATALYST ..................................................... ....
21
Removal and Installation ..................................... ....21
OIL PAN AND OIL STRAINER .........................24
Removal and Installation .........................................24
IGNITION COIL .................................................28
Removal and Installation .........................................28
SPARK PLUG ...................................................29
Removal and Installation .........................................29
FUEL INJECTOR AND FUEL TUBE ................31
Removal and Installation .........................................31
ROCKER COVER .............................................35
Removal and Installation .........................................35
TIMING CHAIN ..................................................37
Exploded View ..................................................... ....37
Removal and Installation .........................................38
CAMSHAFT .......................................................46
Removal and Installation .........................................46
Inspection after Installation ......................................55
Valve Clearance .................................................. ....56
OIL SEAL ..........................................................61
Removal and Installation of Valve Oil Seal ..............61
Removal and Installation of Front Oil Seal ..............61
Removal and Installation of Rear Oil Seal ...............62
CYLINDER HEAD .............................................64
On-Vehicle Service .............................................. ....64
Removal and Installation .........................................65
Disassembly and Assembly .....................................67
Inspection After Disassembly ..................................69
ENGINE ASSEMBLY ........................................74
Removal and Installation ..................................... ....74
CYLINDER BLOCK ...........................................78
Disassembly and Assembly .....................................78
How to Select Piston and Bearing ....................... ....86