Page 2957 of 3061
TRANSFER ASSEMBLY
TF-135
< SERVICE INFORMATION >
C
E
F
G
H
I
J
K
L
MA
B
TF
N
O
P
22. Remove the snap ring and internal gear using suitable tool.
23. Remove the front oil seal using suitable tool.
CAUTION:
Do not damage front case.
24. Remove the snap ring from the front case.
25. Remove the input front bearing from the front case using Tool.
26. Remove the snap ring from the planetary carrier assembly using
suitable tool.
SMT004D
SDIA2170E
SDIA2171E
Tool number : ST33200000 (J-26082)
SDIA2178E
SDIA2146E
Page 2960 of 3061
TF-138
< SERVICE INFORMATION >
TRANSFER ASSEMBLY
7. Remove the bolts and main oil pump cover.
8. Remove the outer gear, inner gear and main oil pump housing
from the center case.
9. Remove the seal ring from the main oil pump cover.
10. Remove the stem bleeder from the bleed hole.
11. Remove the snap ring and washer holder from the mainshaft.
SDIA2130E
SDIA2131E
SDIA2783E
SDIA2780E
SDIA2104E
Page 2963 of 3061
TRANSFER ASSEMBLY
TF-141
< SERVICE INFORMATION >
C
E
F
G
H
I
J
K
L
MA
B
TF
N
O
P
22. Remove the mainshaft from the clutch drum and clutch hub
using suitable tool.
23. Remove the needle bearing and spacer from the mainshaft.
24. Remove the snap ring from the clutch hub using suitable tool.
25. Remove the oil pressure check plug from the oil pressure check
port.
26. Apply air gradually from the oil pressure check port, and remove
the clutch piston assembly from the center case.
27. Remove the thrust needle bearing race from the clutch piston by
hooking a edge into 3 notches of the thrust needle bearing race
using suitable tool.
CAUTION:
Do not damage clutch piston or thrust needle bearing race.
SMT914C
WDIA0101E
SDIA3188E
SDIA2116E
SDIA2118E
Page 2964 of 3061
TF-142
< SERVICE INFORMATION >
TRANSFER ASSEMBLY
28. Remove the two D-rings from the clutch piston.
29. Remove the mainshaft rear bearing from the center case using
Tool.
30. Remove the two bolts and oil strainer.
31. Remove the two O-rings from the oil strainer.
32. Remove the snap ring. Then push the connector assembly into
the center case to remove the control valve assembly.
SDIA2781E
Tool number : KV38100300 (J-25523)
SDIA2129E
SDIA2119E
SDIA2782E
SDIA2122E
Page 2967 of 3061
TRANSFER ASSEMBLY
TF-145
< SERVICE INFORMATION >
C
E
F
G
H
I
J
K
L
MA
B
TF
N
O
P
38. Remove the sub oil pump cover bolts.
39. Thread two bolts (M4 x 0.8) into the holes of sub oil pump cover
as shown, and pull out to remove the sub oil pump assembly.
40. Remove the outer gear and inner gear from the sub oil pump
housing.
41. Remove the oil filter bolts and oil filter.
CAUTION:
• Do not damage center case and oil filter.
• Loosen bolts and detach oil filter evenly.
42. Remove the O-rings (1) from the oil filter (2).
SDIA2134E
SMT934C
SDIA2135E
SDIA2136E
WDIA0285E
Page 2968 of 3061
TF-146
< SERVICE INFORMATION >
TRANSFER ASSEMBLY
43. Remove the oil filter stud from the oil filter.
44. Remove the O-ring from the oil filter stud.
INSPECTION AFTER DISASSEMBLY
Shift Rod Components
• Check the working face of the shift rod and fork for wear, partial
wear, bending and other abnormality. If any is found, replace with a
new one.
• Measure the clearance between the shift fork and sleeve. If it is out
of specification, replace it with a new one.
Planetary Carrier
• Measure the end play of each pinion gear. If it is out of specifica-
tion, replace the planetary carrier assembly with a new one.
• Check the working face of each gear and bearing for damage,
burrs, partial wear, dents and other abnormality. If any is found,
replace the planetary carrier assembly with a new one.
Sun Gear
SDIA3180E
SMT009D
Specification : Less than 0.36 mm (0.0142 in)
SMT010D
Pinion gear end play : 0.1 - 0.7 mm (0.004 - 0.028 in)
PDIA0185E
Page 2969 of 3061

TRANSFER ASSEMBLY
TF-147
< SERVICE INFORMATION >
C
E
F
G
H
I
J
K
L
MA
B
TF
N
O
P
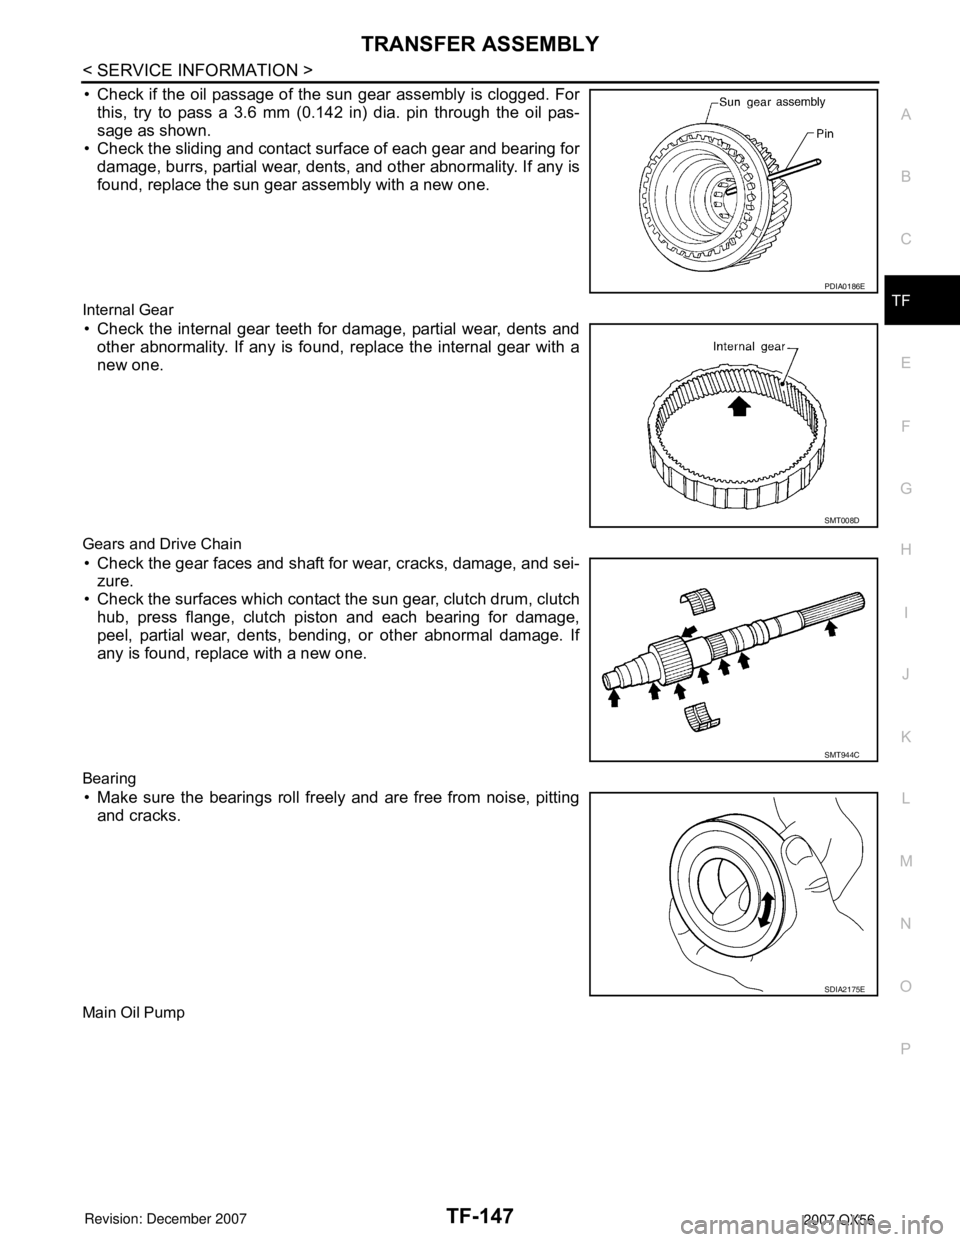
• Check if the oil passage of the sun gear assembly is clogged. For
this, try to pass a 3.6 mm (0.142 in) dia. pin through the oil pas-
sage as shown.
• Check the sliding and contact surface of each gear and bearing for
damage, burrs, partial wear, dents, and other abnormality. If any is
found, replace the sun gear assembly with a new one.
Internal Gear
• Check the internal gear teeth for damage, partial wear, dents and
other abnormality. If any is found, replace the internal gear with a
new one.
Gears and Drive Chain
• Check the gear faces and shaft for wear, cracks, damage, and sei-
zure.
• Check the surfaces which contact the sun gear, clutch drum, clutch
hub, press flange, clutch piston and each bearing for damage,
peel, partial wear, dents, bending, or other abnormal damage. If
any is found, replace with a new one.
Bearing
• Make sure the bearings roll freely and are free from noise, pitting
and cracks.
Main Oil Pump
PDIA0186E
SMT008D
SMT944C
SDIA2175E
Page 2970 of 3061

TF-148
< SERVICE INFORMATION >
TRANSFER ASSEMBLY
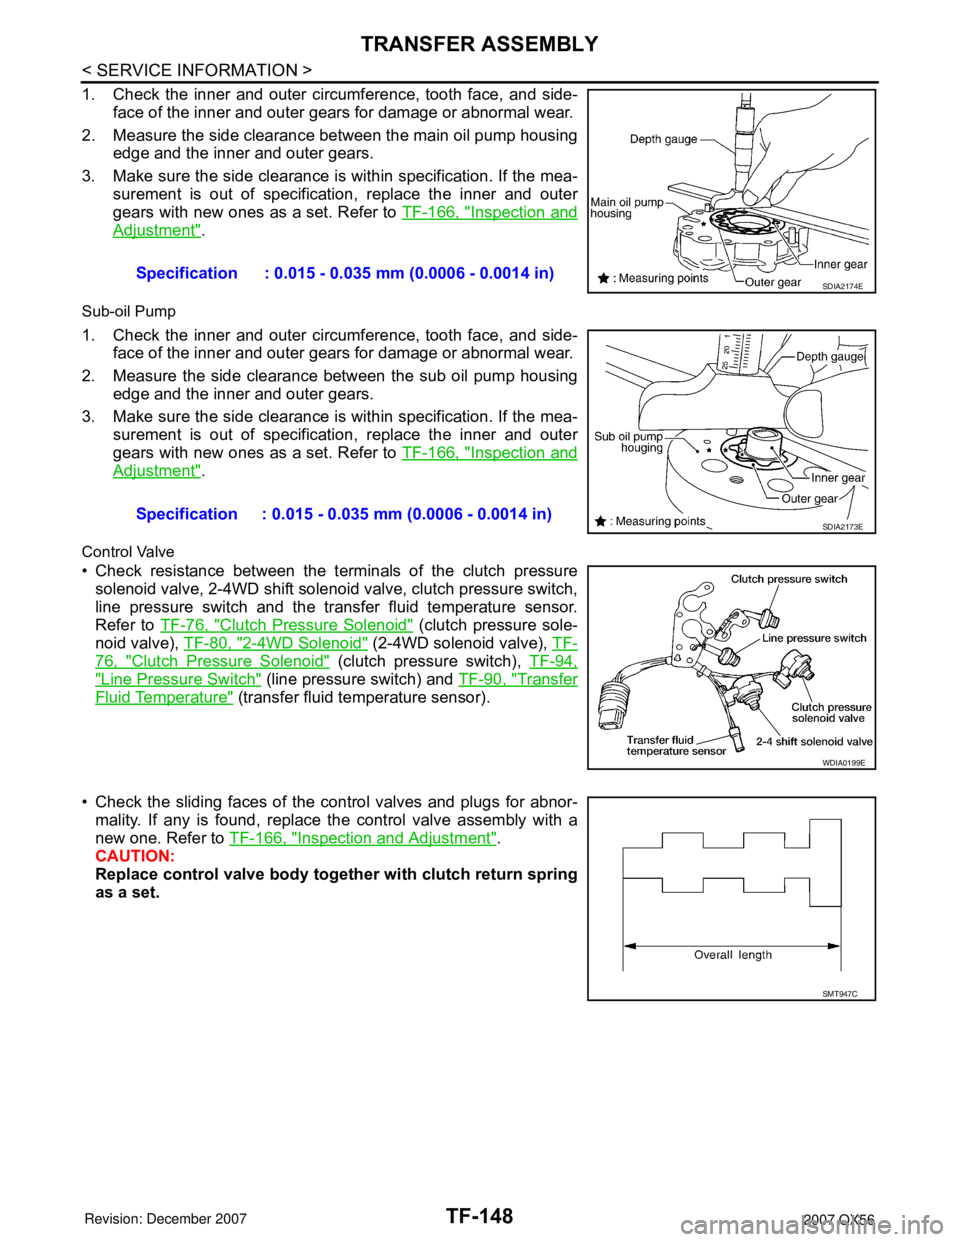
1. Check the inner and outer circumference, tooth face, and side-
face of the inner and outer gears for damage or abnormal wear.
2. Measure the side clearance between the main oil pump housing
edge and the inner and outer gears.
3. Make sure the side clearance is within specification. If the mea-
surement is out of specification, replace the inner and outer
gears with new ones as a set. Refer to TF-166, "
Inspection and
Adjustment".
Sub-oil Pump
1. Check the inner and outer circumference, tooth face, and side-
face of the inner and outer gears for damage or abnormal wear.
2. Measure the side clearance between the sub oil pump housing
edge and the inner and outer gears.
3. Make sure the side clearance is within specification. If the mea-
surement is out of specification, replace the inner and outer
gears with new ones as a set. Refer to TF-166, "
Inspection and
Adjustment".
Control Valve
• Check resistance between the terminals of the clutch pressure
solenoid valve, 2-4WD shift solenoid valve, clutch pressure switch,
line pressure switch and the transfer fluid temperature sensor.
Refer to TF-76, "
Clutch Pressure Solenoid" (clutch pressure sole-
noid valve), TF-80, "
2-4WD Solenoid" (2-4WD solenoid valve), TF-
76, "Clutch Pressure Solenoid" (clutch pressure switch), TF-94,
"Line Pressure Switch" (line pressure switch) and TF-90, "Transfer
Fluid Temperature" (transfer fluid temperature sensor).
• Check the sliding faces of the control valves and plugs for abnor-
mality. If any is found, replace the control valve assembly with a
new one. Refer to TF-166, "
Inspection and Adjustment".
CAUTION:
Replace control valve body together with clutch return spring
as a set.Specification : 0.015 - 0.035 mm (0.0006 - 0.0014 in)
SDIA2174E
Specification : 0.015 - 0.035 mm (0.0006 - 0.0014 in)SDIA2173E
WDIA0199E
SMT947C