Page 2971 of 3061
TRANSFER ASSEMBLY
TF-149
< SERVICE INFORMATION >
C
E
F
G
H
I
J
K
L
MA
B
TF
N
O
P
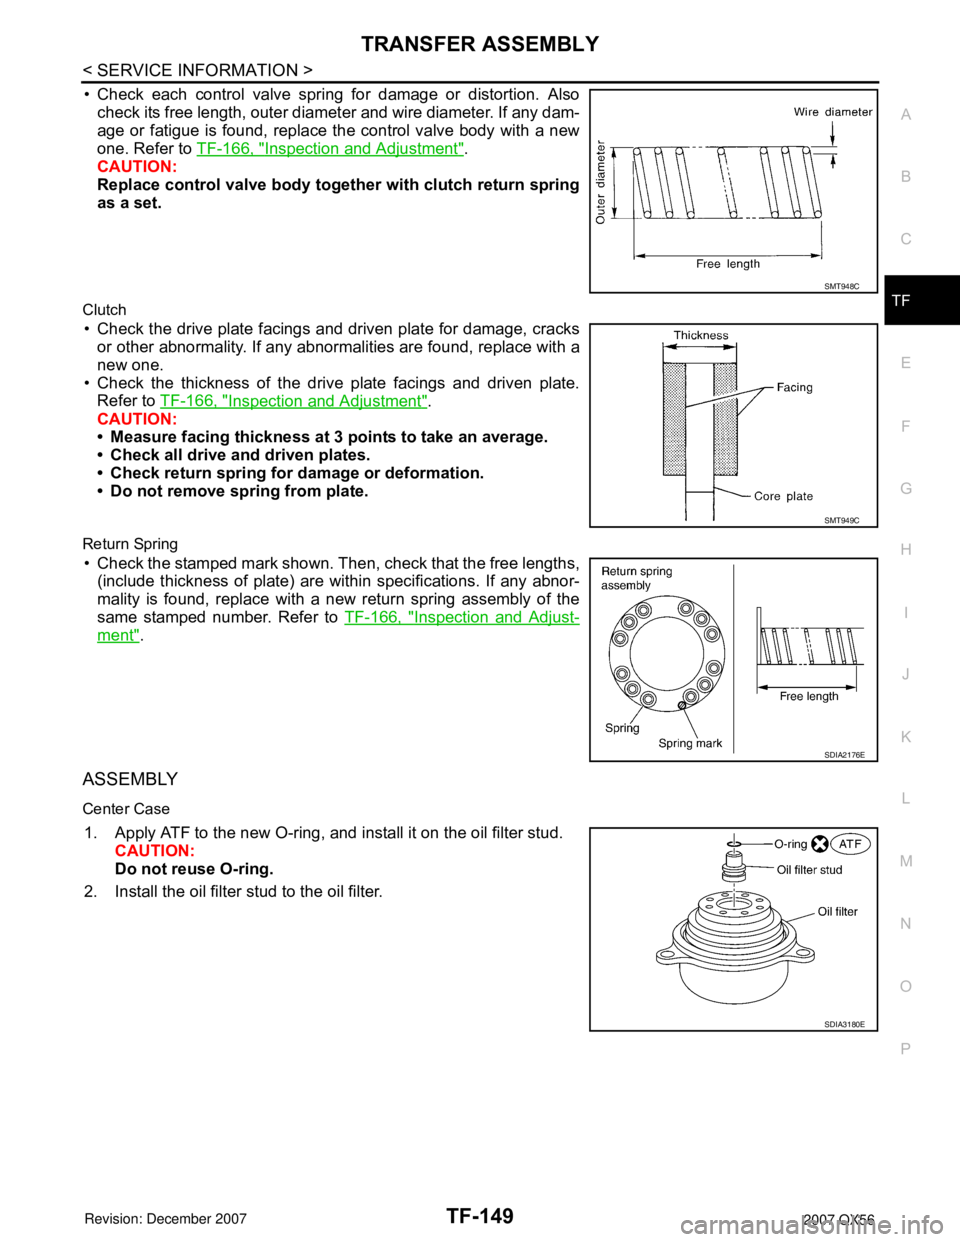
• Check each control valve spring for damage or distortion. Also
check its free length, outer diameter and wire diameter. If any dam-
age or fatigue is found, replace the control valve body with a new
one. Refer to TF-166, "
Inspection and Adjustment".
CAUTION:
Replace control valve body together with clutch return spring
as a set.
Clutch
• Check the drive plate facings and driven plate for damage, cracks
or other abnormality. If any abnormalities are found, replace with a
new one.
• Check the thickness of the drive plate facings and driven plate.
Refer to TF-166, "
Inspection and Adjustment".
CAUTION:
• Measure facing thickness at 3 points to take an average.
• Check all drive and driven plates.
• Check return spring for damage or deformation.
• Do not remove spring from plate.
Return Spring
• Check the stamped mark shown. Then, check that the free lengths,
(include thickness of plate) are within specifications. If any abnor-
mality is found, replace with a new return spring assembly of the
same stamped number. Refer to TF-166, "
Inspection and Adjust-
ment".
ASSEMBLY
Center Case
1. Apply ATF to the new O-ring, and install it on the oil filter stud.
CAUTION:
Do not reuse O-ring.
2. Install the oil filter stud to the oil filter.
SMT948C
SMT949C
SDIA2176E
SDIA3180E
Page 2972 of 3061
TF-150
< SERVICE INFORMATION >
TRANSFER ASSEMBLY
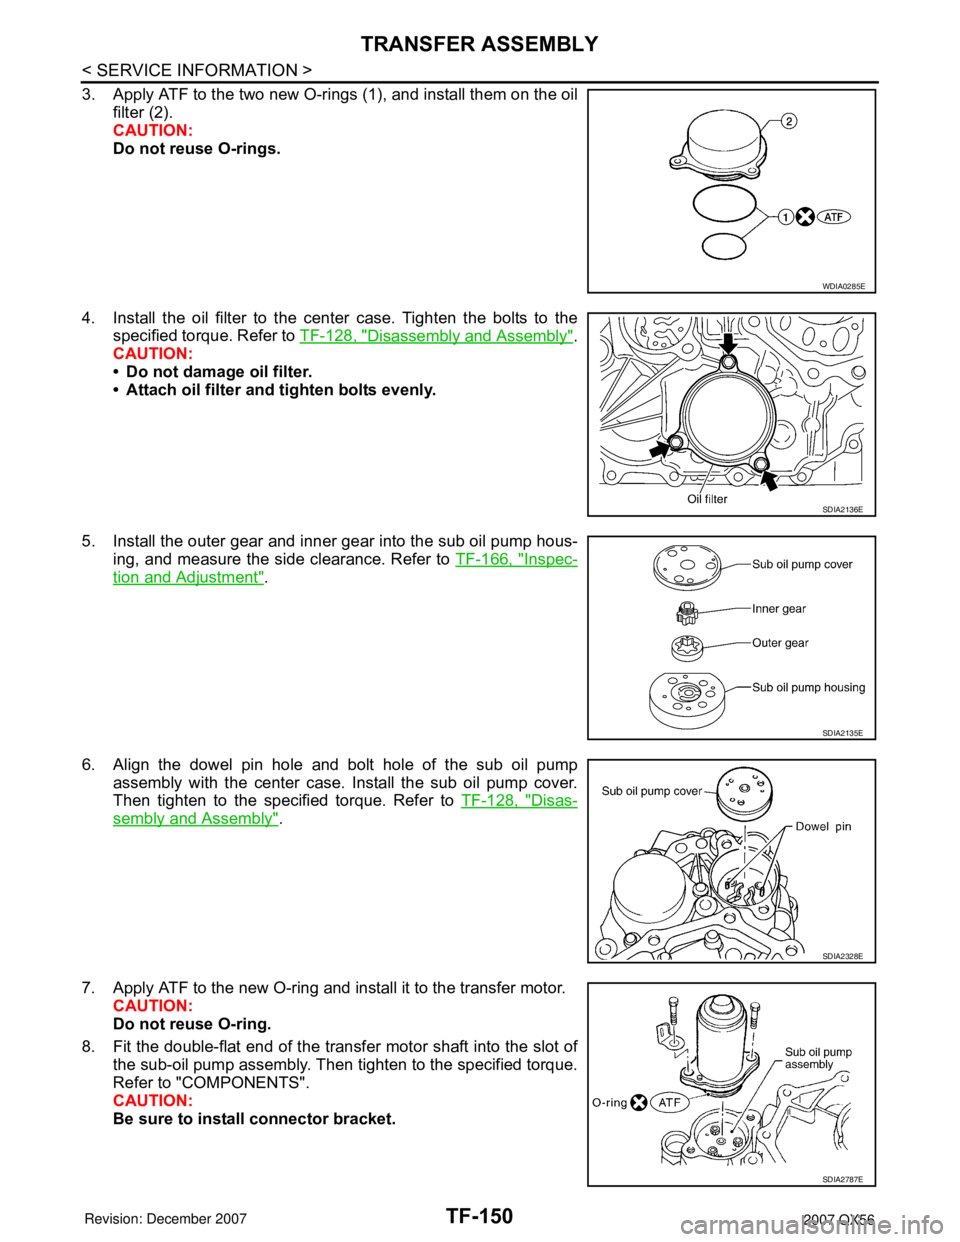
3. Apply ATF to the two new O-rings (1), and install them on the oil
filter (2).
CAUTION:
Do not reuse O-rings.
4. Install the oil filter to the center case. Tighten the bolts to the
specified torque. Refer to TF-128, "
Disassembly and Assembly".
CAUTION:
• Do not damage oil filter.
• Attach oil filter and tighten bolts evenly.
5. Install the outer gear and inner gear into the sub oil pump hous-
ing, and measure the side clearance. Refer to TF-166, "
Inspec-
tion and Adjustment".
6. Align the dowel pin hole and bolt hole of the sub oil pump
assembly with the center case. Install the sub oil pump cover.
Then tighten to the specified torque. Refer to TF-128, "
Disas-
sembly and Assembly".
7. Apply ATF to the new O-ring and install it to the transfer motor.
CAUTION:
Do not reuse O-ring.
8. Fit the double-flat end of the transfer motor shaft into the slot of
the sub-oil pump assembly. Then tighten to the specified torque.
Refer to "COMPONENTS".
CAUTION:
Be sure to install connector bracket.
WDIA0285E
SDIA2136E
SDIA2135E
SDIA2328E
SDIA2787E
Page 2974 of 3061
TF-152
< SERVICE INFORMATION >
TRANSFER ASSEMBLY
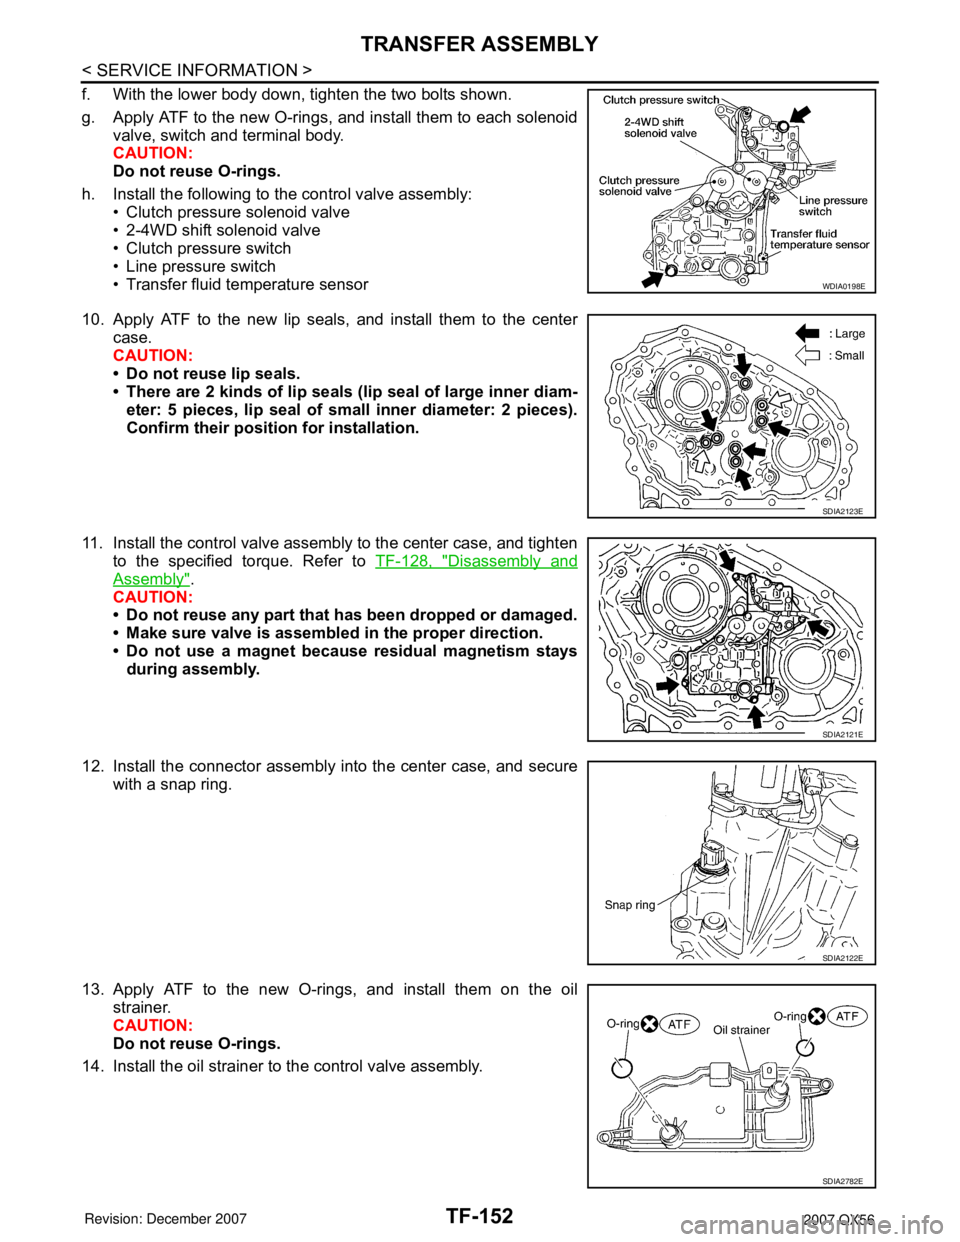
f. With the lower body down, tighten the two bolts shown.
g. Apply ATF to the new O-rings, and install them to each solenoid
valve, switch and terminal body.
CAUTION:
Do not reuse O-rings.
h. Install the following to the control valve assembly:
• Clutch pressure solenoid valve
• 2-4WD shift solenoid valve
• Clutch pressure switch
• Line pressure switch
• Transfer fluid temperature sensor
10. Apply ATF to the new lip seals, and install them to the center
case.
CAUTION:
• Do not reuse lip seals.
• There are 2 kinds of lip seals (lip seal of large inner diam-
eter: 5 pieces, lip seal of small inner diameter: 2 pieces).
Confirm their position for installation.
11. Install the control valve assembly to the center case, and tighten
to the specified torque. Refer to TF-128, "
Disassembly and
Assembly".
CAUTION:
• Do not reuse any part that has been dropped or damaged.
• Make sure valve is assembled in the proper direction.
• Do not use a magnet because residual magnetism stays
during assembly.
12. Install the connector assembly into the center case, and secure
with a snap ring.
13. Apply ATF to the new O-rings, and install them on the oil
strainer.
CAUTION:
Do not reuse O-rings.
14. Install the oil strainer to the control valve assembly.
WDIA0198E
SDIA2123E
SDIA2121E
SDIA2122E
SDIA2782E
Page 2975 of 3061
TRANSFER ASSEMBLY
TF-153
< SERVICE INFORMATION >
C
E
F
G
H
I
J
K
L
MA
B
TF
N
O
P
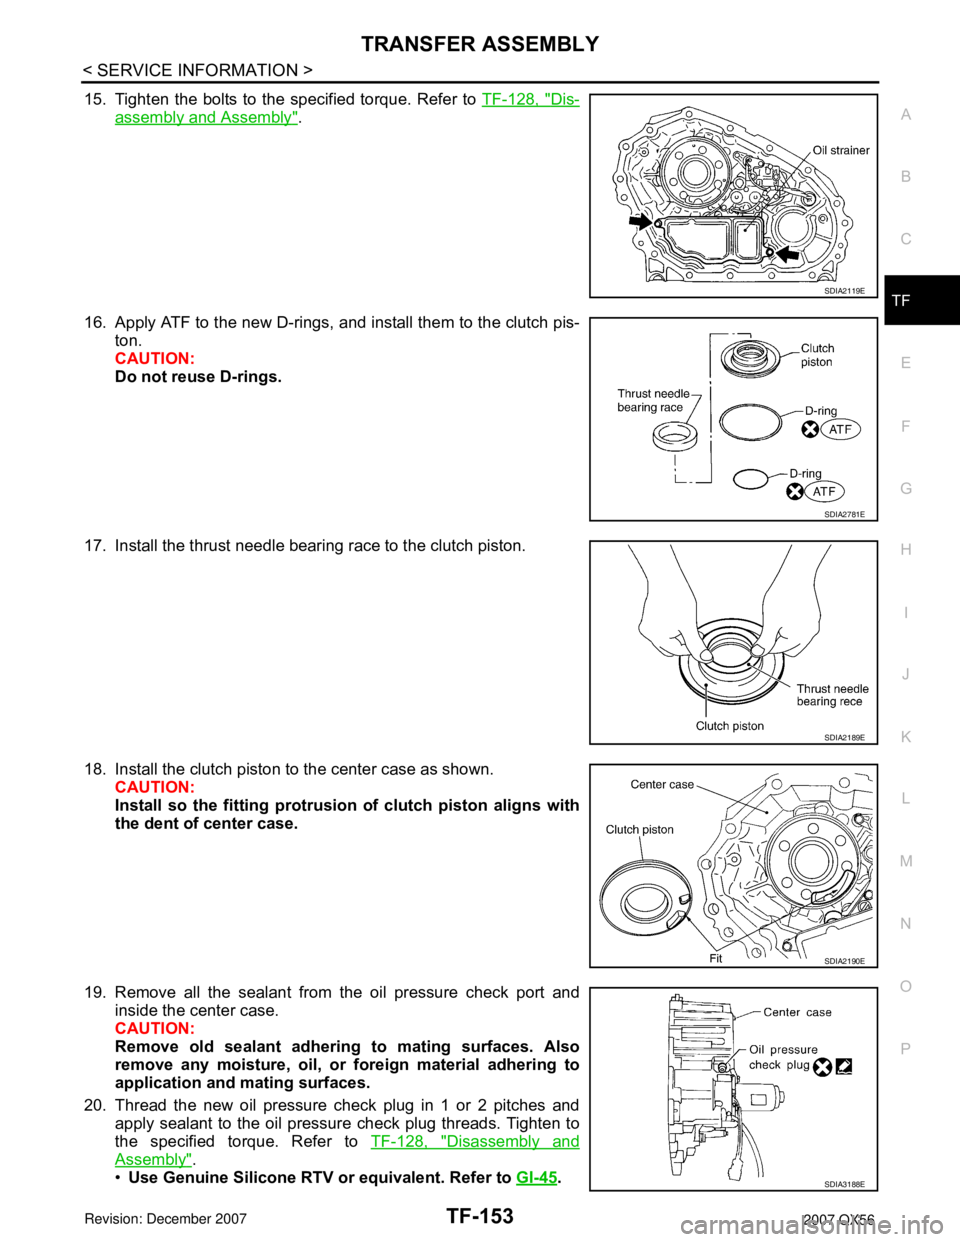
15. Tighten the bolts to the specified torque. Refer to TF-128, "Dis-
assembly and Assembly".
16. Apply ATF to the new D-rings, and install them to the clutch pis-
ton.
CAUTION:
Do not reuse D-rings.
17. Install the thrust needle bearing race to the clutch piston.
18. Install the clutch piston to the center case as shown.
CAUTION:
Install so the fitting protrusion of clutch piston aligns with
the dent of center case.
19. Remove all the sealant from the oil pressure check port and
inside the center case.
CAUTION:
Remove old sealant adhering to mating surfaces. Also
remove any moisture, oil, or foreign material adhering to
application and mating surfaces.
20. Thread the new oil pressure check plug in 1 or 2 pitches and
apply sealant to the oil pressure check plug threads. Tighten to
the specified torque. Refer to TF-128, "
Disassembly and
Assembly".
•Use Genuine Silicone RTV or equivalent. Refer to GI-45
.
SDIA2119E
SDIA2781E
SDIA2189E
SDIA2190E
SDIA3188E
Page 2976 of 3061
TF-154
< SERVICE INFORMATION >
TRANSFER ASSEMBLY
CAUTION:
Do not reuse oil pressure check plug.
21. Install the new snap ring to the clutch hub using suitable tool.
CAUTION:
Do not reuse snap ring.
22. Apply petroleum jelly to the needle bearing, and install the nee-
dle bearing, spacer, clutch drum and clutch hub to the main-
shaft.
23. Install the new snap ring to the mainshaft.
CAUTION:
Do not reuse snap ring.
24. Apply ATF to each plate, then install them into the clutch drum
as shown.
WDIA0101E
WDIA0129E
SDIA2192E
SDIA2193E
Page 2979 of 3061
TRANSFER ASSEMBLY
TF-157
< SERVICE INFORMATION >
C
E
F
G
H
I
J
K
L
MA
B
TF
N
O
P
35. Apply petroleum jelly to the stem bleeder and install it to the cen-
ter case.
36. Apply ATF to the new seal ring and install it to the main oil pump
cover.
CAUTION:
Do not reuse seal ring.
37. Install the inner gear and outer gear in the main oil pump hous-
ing. Then measure the side clearance. Refer to TF-166, "
Inspec-
tion and Adjustment".
38. Install the main oil pump housing, outer gear and inner gear to
the center case.
39. Install the main oil pump cover to the center case, and tighten to
the specified torque. Refer to TF-128, "
Disassembly and
Assembly".
SDIA2780E
SDIA2783E
SDIA2174E
SDIA2188E
SDIA2130E
Page 2980 of 3061
TF-158
< SERVICE INFORMATION >
TRANSFER ASSEMBLY
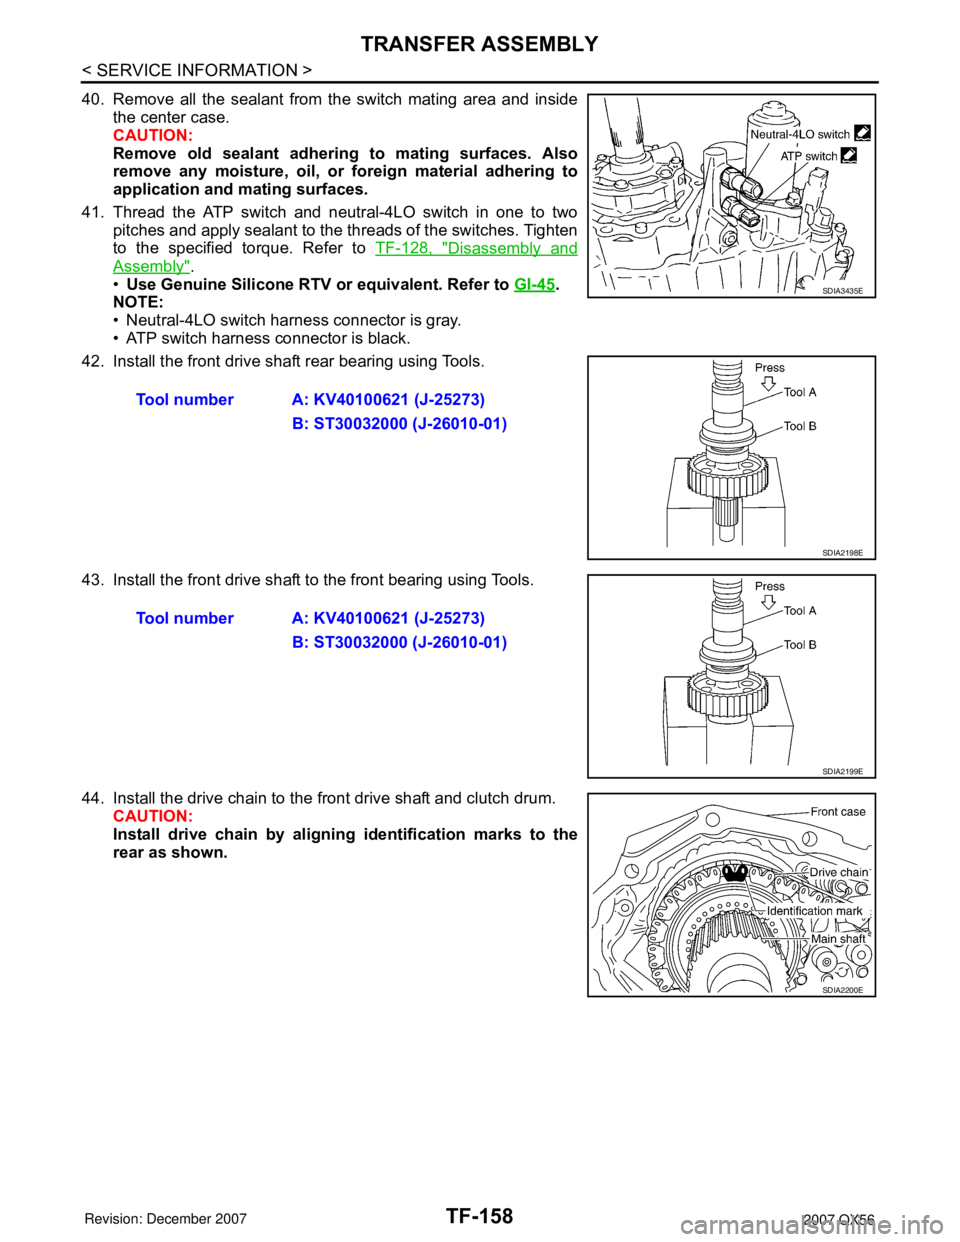
40. Remove all the sealant from the switch mating area and inside
the center case.
CAUTION:
Remove old sealant adhering to mating surfaces. Also
remove any moisture, oil, or foreign material adhering to
application and mating surfaces.
41. Thread the ATP switch and neutral-4LO switch in one to two
pitches and apply sealant to the threads of the switches. Tighten
to the specified torque. Refer to TF-128, "
Disassembly and
Assembly".
•Use Genuine Silicone RTV or equivalent. Refer to GI-45
.
NOTE:
• Neutral-4LO switch harness connector is gray.
• ATP switch harness connector is black.
42. Install the front drive shaft rear bearing using Tools.
43. Install the front drive shaft to the front bearing using Tools.
44. Install the drive chain to the front drive shaft and clutch drum.
CAUTION:
Install drive chain by aligning identification marks to the
rear as shown.Tool number A: KV40100621 (J-25273)
B: ST30032000 (J-26010-01)SDIA3435E
SDIA2198E
Tool number A: KV40100621 (J-25273)
B: ST30032000 (J-26010-01)
SDIA2199E
SDIA2200E
Page 2983 of 3061
TRANSFER ASSEMBLY
TF-161
< SERVICE INFORMATION >
C
E
F
G
H
I
J
K
L
MA
B
TF
N
O
P
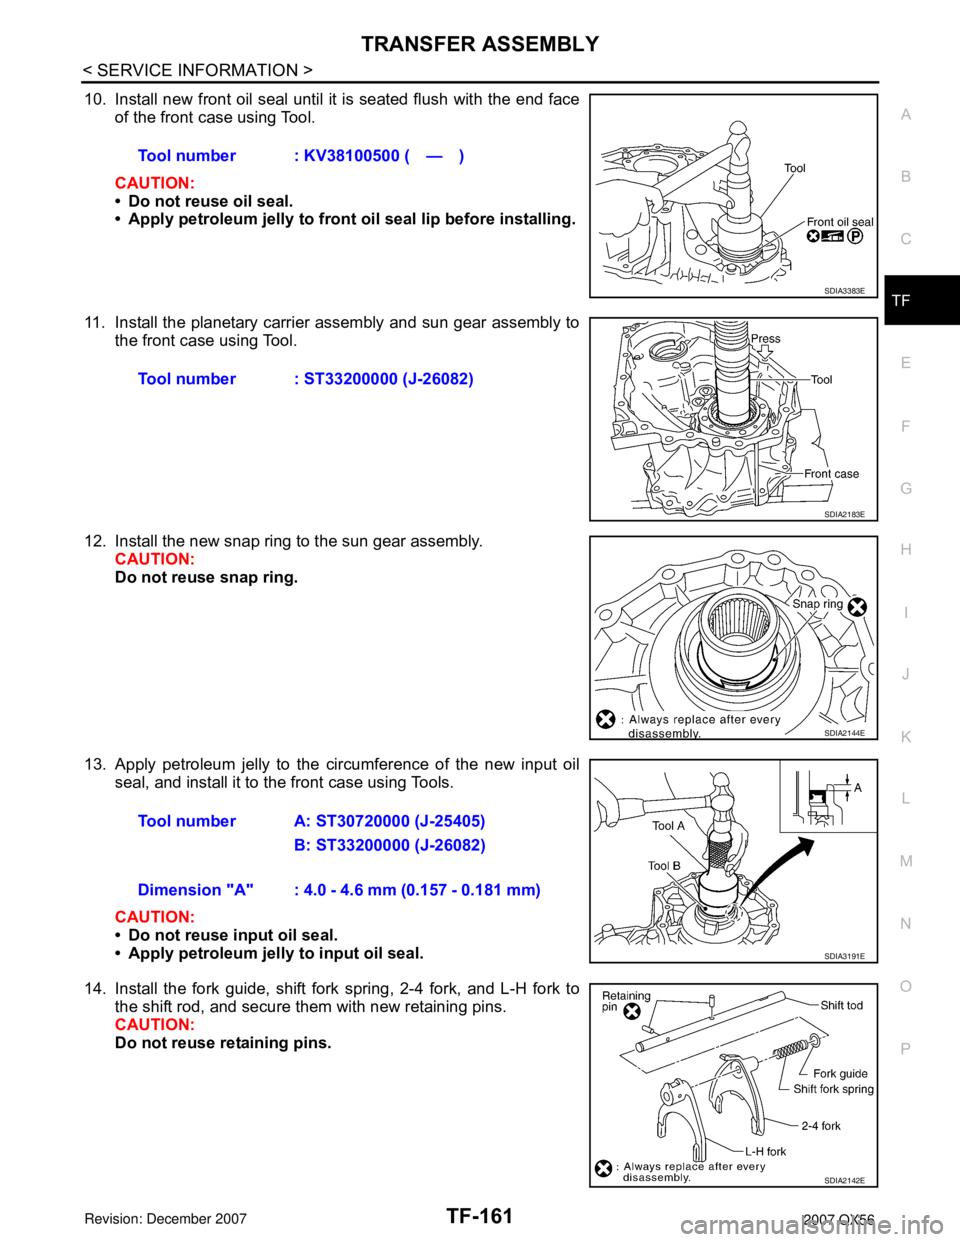
10. Install new front oil seal until it is seated flush with the end face
of the front case using Tool.
CAUTION:
• Do not reuse oil seal.
• Apply petroleum jelly to front oil seal lip before installing.
11. Install the planetary carrier assembly and sun gear assembly to
the front case using Tool.
12. Install the new snap ring to the sun gear assembly.
CAUTION:
Do not reuse snap ring.
13. Apply petroleum jelly to the circumference of the new input oil
seal, and install it to the front case using Tools.
CAUTION:
• Do not reuse input oil seal.
• Apply petroleum jelly to input oil seal.
14. Install the fork guide, shift fork spring, 2-4 fork, and L-H fork to
the shift rod, and secure them with new retaining pins.
CAUTION:
Do not reuse retaining pins.Tool number : KV38100500 ( — )
SDIA3383E
Tool number : ST33200000 (J-26082)
SDIA2183E
SDIA2144E
Tool number A: ST30720000 (J-25405)
B: ST33200000 (J-26082)
Dimension "A" : 4.0 - 4.6 mm (0.157 - 0.181 mm)
SDIA3191E
SDIA2142E