2007 INFINITI QX56 reset
[x] Cancel search: resetPage 1108 of 3061
ENGINE CONTROL SYSTEM
EC-25
< SERVICE INFORMATION >
C
D
E
F
G
H
I
J
K
L
MA
EC
N
P O
*1: This sensor is not used to control the engine system. This is used only for the on board diagnosis.
*2: This signal is sent to the ECM through CAN communication line.
*3: ECM determines the start signal status by the signals of engine speed and battery voltage.
SYSTEM DESCRIPTION
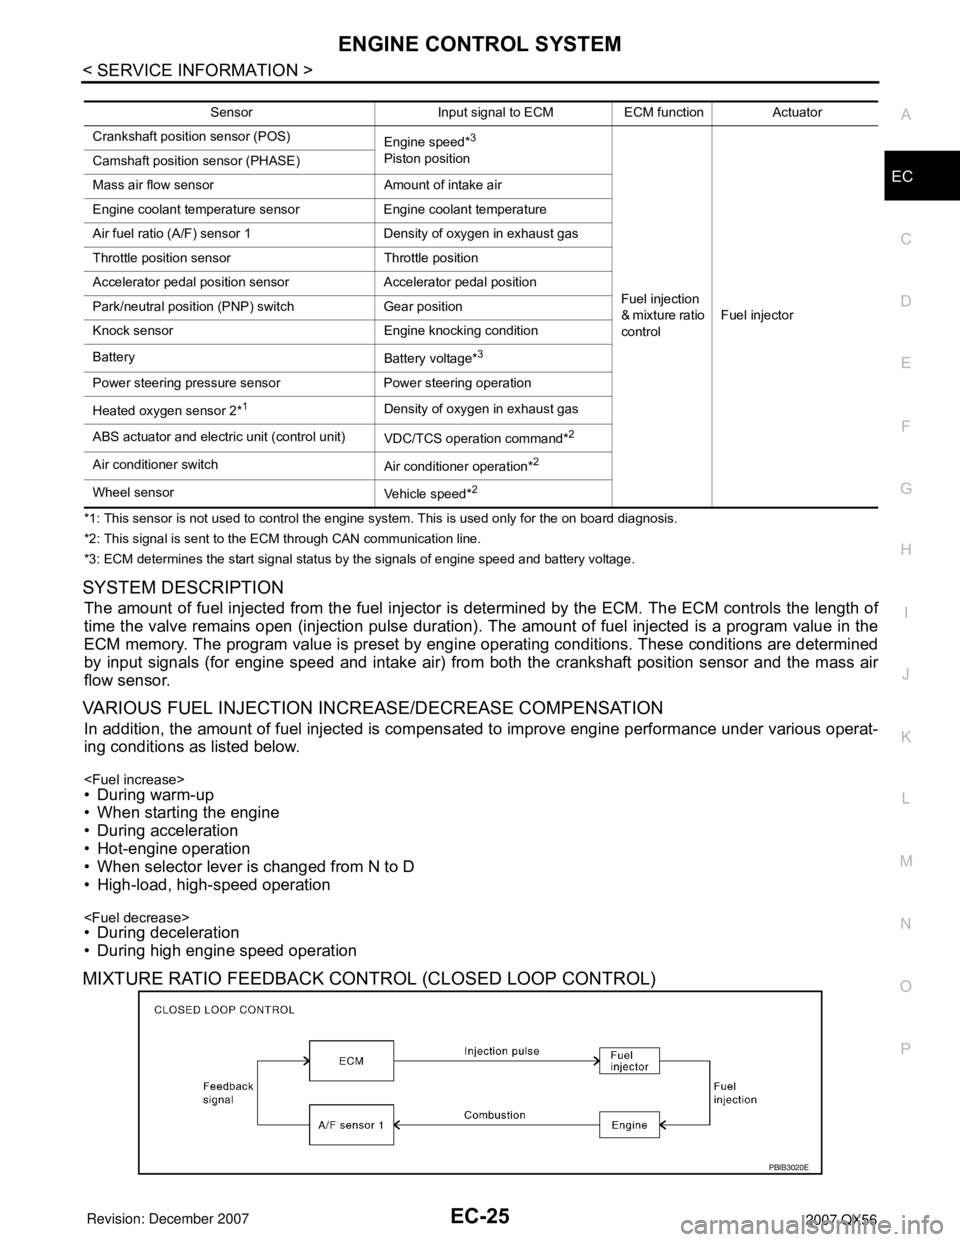
The amount of fuel injected from the fuel injector is determined by the ECM. The ECM controls the length of
time the valve remains open (injection pulse duration). The amount of fuel injected is a program value in the
ECM memory. The program value is preset by engine operating conditions. These conditions are determined
by input signals (for engine speed and intake air) from both the crankshaft position sensor and the mass air
flow sensor.
VARIOUS FUEL INJECTION INCREASE/DECREASE COMPENSATION
In addition, the amount of fuel injected is compensated to improve engine performance under various operat-
ing conditions as listed below.
• When starting the engine
• During acceleration
• Hot-engine operation
• When selector lever is changed from N to D
• High-load, high-speed operation
• During deceleration
• During high engine speed operation
MIXTURE RATIO FEEDBACK CONTROL (CLOSED LOOP CONTROL)
Sensor Input signal to ECM ECM function Actuator
Crankshaft position sensor (POS)
Engine speed*
3
Piston position
Fuel injection
& mixture ratio
controlFuel injector Camshaft position sensor (PHASE)
Mass air flow sensor Amount of intake air
Engine coolant temperature sensor Engine coolant temperature
Air fuel ratio (A/F) sensor 1 Density of oxygen in exhaust gas
Throttle position sensor Throttle position
Accelerator pedal position sensor Accelerator pedal position
Park/neutral position (PNP) switch Gear position
Knock sensor Engine knocking condition
Battery
Battery voltage*
3
Power steering pressure sensor Power steering operation
Heated oxygen sensor 2*
1Density of oxygen in exhaust gas
ABS actuator and electric unit (control unit)
VDC/TCS operation command*
2
Air conditioner switch
Air conditioner operation*2
Wheel sensor
Vehicle speed*2
PBIB3020E
Page 1148 of 3061
ON BOARD DIAGNOSTIC (OBD) SYSTEM
EC-65
< SERVICE INFORMATION >
C
D
E
F
G
H
I
J
K
L
MA
EC
N
P O
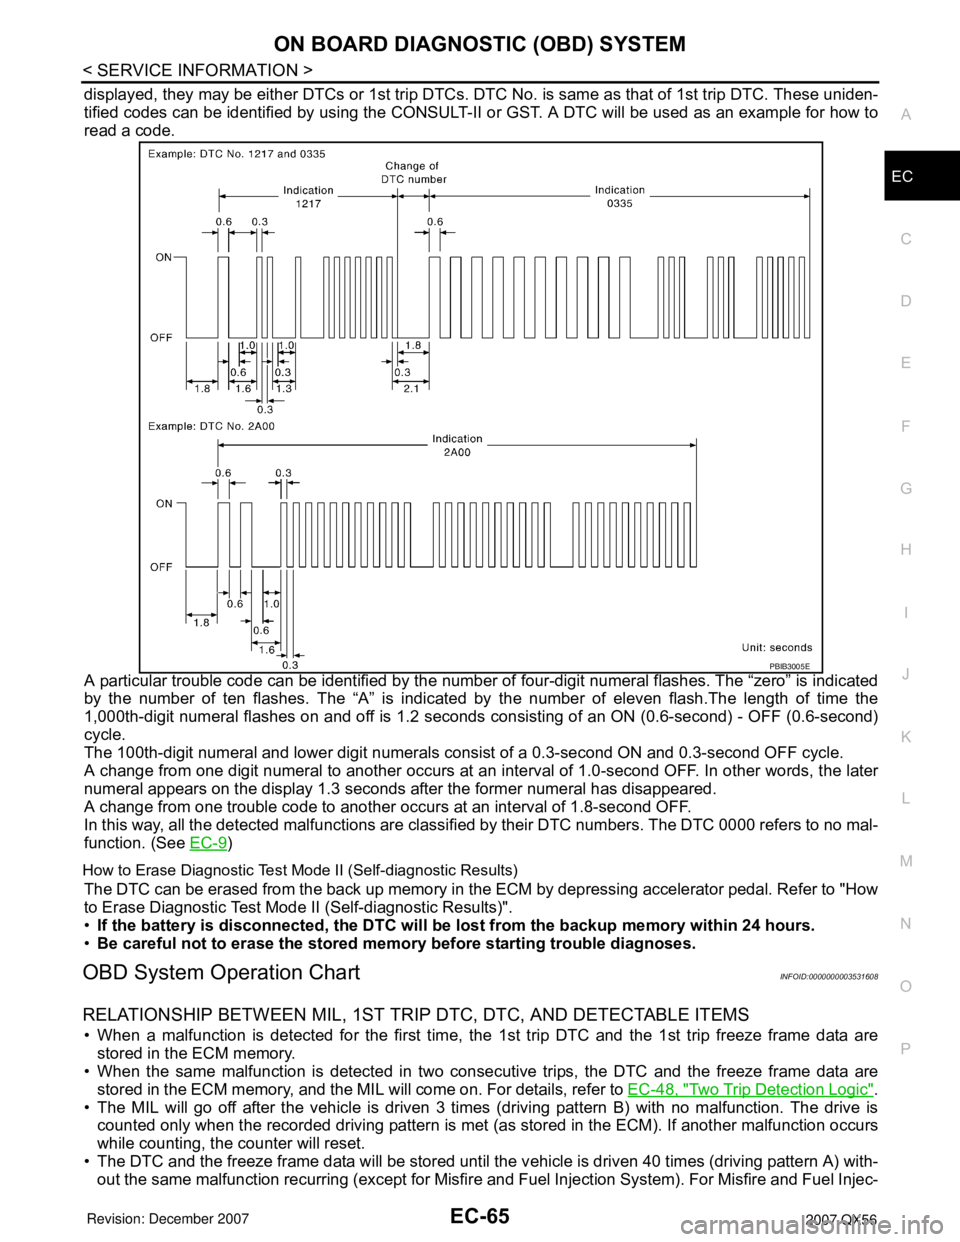
displayed, they may be either DTCs or 1st trip DTCs. DTC No. is same as that of 1st trip DTC. These uniden-
tified codes can be identified by using the CONSULT-II or GST. A DTC will be used as an example for how to
read a code.
A particular trouble code can be identified by the number of four-digit numeral flashes. The “zero” is indicated
by the number of ten flashes. The “A” is indicated by the number of eleven flash.The length of time the
1,000th-digit numeral flashes on and off is 1.2 seconds consisting of an ON (0.6-second) - OFF (0.6-second)
cycle.
The 100th-digit numeral and lower digit numerals consist of a 0.3-second ON and 0.3-second OFF cycle.
A change from one digit numeral to another occurs at an interval of 1.0-second OFF. In other words, the later
numeral appears on the display 1.3 seconds after the former numeral has disappeared.
A change from one trouble code to another occurs at an interval of 1.8-second OFF.
In this way, all the detected malfunctions are classified by their DTC numbers. The DTC 0000 refers to no mal-
function. (See EC-9
)
How to Erase Diagnostic Test Mode II (Self-diagnostic Results)
The DTC can be erased from the back up memory in the ECM by depressing accelerator pedal. Refer to "How
to Erase Diagnostic Test Mode II (Self-diagnostic Results)".
•If the battery is disconnected, the DTC will be lost from the backup memory within 24 hours.
•Be careful not to erase the stored memory before starting trouble diagnoses.
OBD System Operation ChartINFOID:0000000003531608
RELATIONSHIP BETWEEN MIL, 1ST TRIP DTC, DTC, AND DETECTABLE ITEMS
• When a malfunction is detected for the first time, the 1st trip DTC and the 1st trip freeze frame data are
stored in the ECM memory.
• When the same malfunction is detected in two consecutive trips, the DTC and the freeze frame data are
stored in the ECM memory, and the MIL will come on. For details, refer to EC-48, "
Two Trip Detection Logic".
• The MIL will go off after the vehicle is driven 3 times (driving pattern B) with no malfunction. The drive is
counted only when the recorded driving pattern is met (as stored in the ECM). If another malfunction occurs
while counting, the counter will reset.
• The DTC and the freeze frame data will be stored until the vehicle is driven 40 times (driving pattern A) with-
out the same malfunction recurring (except for Misfire and Fuel Injection System). For Misfire and Fuel Injec-
PBIB3005E
Page 1201 of 3061
![INFINITI QX56 2007 Factory Service Manual EC-118
< SERVICE INFORMATION >
TROUBLE DIAGNOSIS
A/F S1 HTR (B1)
[%]• A/F sensor 1 heater control value com-
puted by ECM according to the input sig-
nals.
• The current flow to the heater become INFINITI QX56 2007 Factory Service Manual EC-118
< SERVICE INFORMATION >
TROUBLE DIAGNOSIS
A/F S1 HTR (B1)
[%]• A/F sensor 1 heater control value com-
puted by ECM according to the input sig-
nals.
• The current flow to the heater become](/manual-img/42/57029/w960_57029-1200.png)
EC-118
< SERVICE INFORMATION >
TROUBLE DIAGNOSIS
A/F S1 HTR (B1)
[%]• A/F sensor 1 heater control value com-
puted by ECM according to the input sig-
nals.
• The current flow to the heater becomes
larger as the value increases. A/F S1 HTR (B2)
[%]
AC PRESS SEN [V]• The signal voltage from the refrigerant
pressure sensor is displayed.
VHCL SPEED SE
[km/h] or [mph]• The vehicle speed computed from the
vehicle speed signal sent from combina-
tion meter is displayed.
SET VHCL SPD
[km/h] or [mph]• The preset vehicle speed is displayed.
MAIN SW
[ON/OFF]• Indicates [ON/OFF] condition from MAIN
switch signal.
CANCEL SW
[ON/OFF]• Indicates [ON/OFF] condition from CAN-
CEL switch signal.
RESUME/ACC SW
[ON/OFF]• Indicates [ON/OFF] condition from RE-
SUME/ACCELERATE switch signal.
SET SW
[ON/OFF]• Indicates [ON/OFF] condition from SET/
COAST switch signal.
BRAKE SW1
[ON/OFF]• Indicates [ON/OFF] condition from
ASCD brake switch signal.
BRAKE SW2
[ON/OFF]• Indicates [ON/OFF] condition of stop
lamp switch signal.
DIST SW
[ON/OFF]• Indicates [ON/OFF] condition from DIS-
TANCE switch signal.
VHCL SPD CUT
[NON/CUT]• Indicates the vehicle cruise condition.
NON: Vehicle speed is maintained at the
ASCD set speed.
CUT: Vehicle speed increased to exces-
sively high compared with the ASCD set
speed, and ASCD operation is cut off.
LO SPEED CUT
[NON/CUT]• Indicates the vehicle cruise condition.
NON: Vehicle speed is maintained at the
ASCD set speed.
CUT: Vehicle speed decreased to exces-
sively low compared with the ASCD set
speed, and ASCD operation is cut off.
AT O D M O N I T O R
[ON/OFF]• Indicates [ON/OFF] condition of A/T O/D
according to the input signal from the
TCM.
AT O D C A N C E L
[ON/OFF]• Indicates [ON/OFF] condition of A/T O/D
cancel signal sent from the TCM.
CRUISE LAMP
[ON/OFF]• Indicates [ON/OFF] condition of CRUISE
lamp determined by the ECM according
to the input signals.
SET LAMP
[ON/OFF]• Indicates [ON/OFF] condition of SET
lamp determined by the ECM according
to the input signals.
ALT DUTY [%]• Indicates the duty ratio of the power gen-
eration command value. The ratio is cal-
culated by ECM based on the battery
current sensor signal.
BAT CUR SEN [mV]• The signal voltage of battery current sen-
sor is displayed. Monitored item
[Unit]ECM IN-
PUT SIG-
NALSMAIN
SIGNALSDescription Remarks
Page 1205 of 3061
EC-122
< SERVICE INFORMATION >
TROUBLE DIAGNOSIS
When you are inspecting the circuit by gently shaking (or twisting) the suspicious connectors, compo-
nents and harness in the DTC Confirmation Procedure, the moment a malfunction is found the DTC/1st
trip DTC will be displayed. (Refer to “INCIDENT SIMULATION TESTS” in GI-25, "
How to Perform Effi-
cient Diagnosis for an Electrical Incident".)
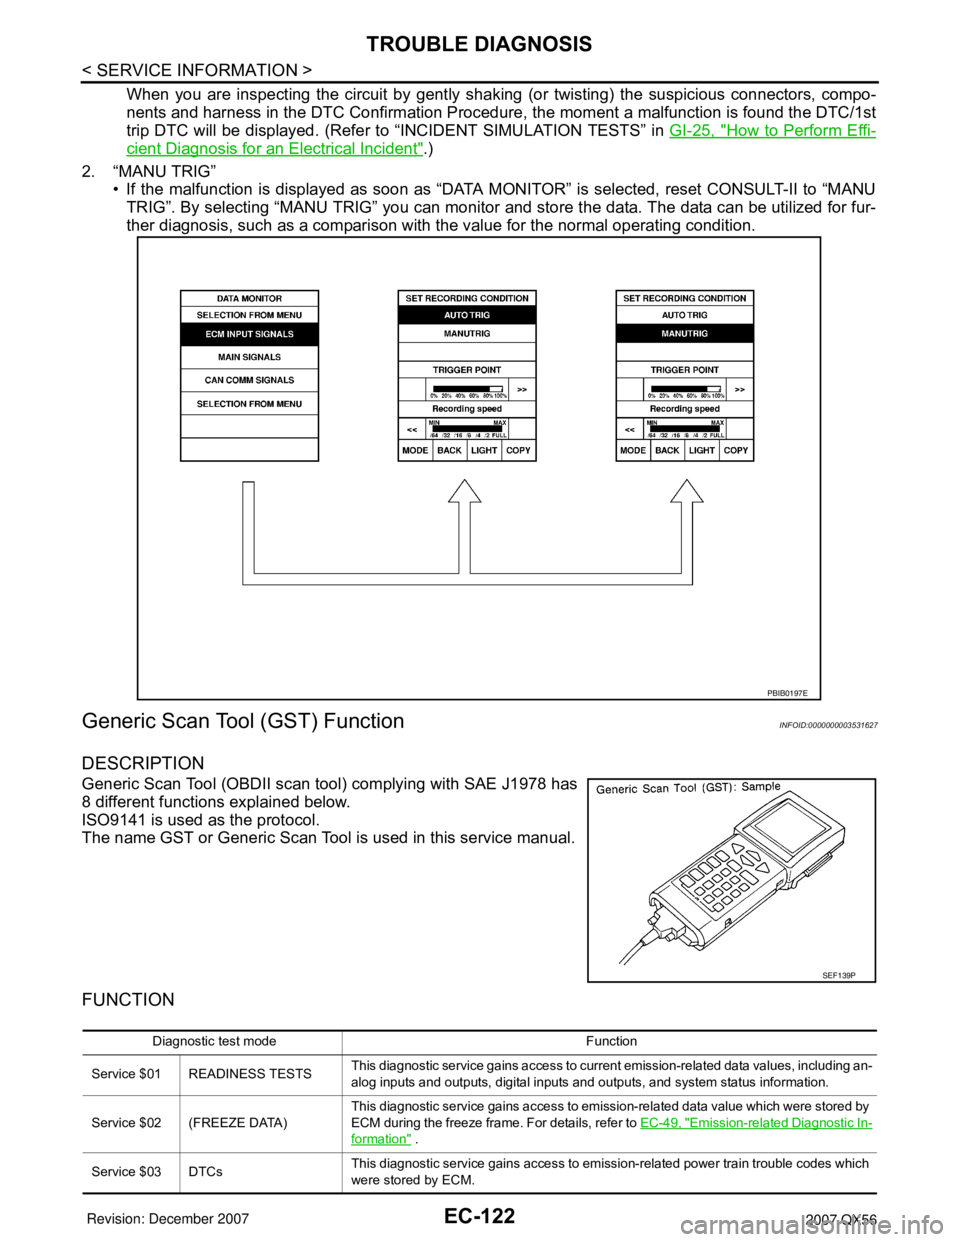
2. “MANU TRIG”
• If the malfunction is displayed as soon as “DATA MONITOR” is selected, reset CONSULT-II to “MANU
TRIG”. By selecting “MANU TRIG” you can monitor and store the data. The data can be utilized for fur-
ther diagnosis, such as a comparison with the value for the normal operating condition.
Generic Scan Tool (GST) FunctionINFOID:0000000003531627
DESCRIPTION
Generic Scan Tool (OBDII scan tool) complying with SAE J1978 has
8 different functions explained below.
ISO9141 is used as the protocol.
The name GST or Generic Scan Tool is used in this service manual.
FUNCTION
PBIB0197E
SEF139P
Diagnostic test mode Function
Service $01 READINESS TESTSThis diagnostic service gains access to current emission-related data values, including an-
alog inputs and outputs, digital inputs and outputs, and system status information.
Service $02 (FREEZE DATA)This diagnostic service gains access to emission-related data value which were stored by
ECM during the freeze frame. For details, refer to EC-49, "
Emission-related Diagnostic In-
formation" .
Service $03 DTCsThis diagnostic service gains access to emission-related power train trouble codes which
were stored by ECM.
Page 1206 of 3061
TROUBLE DIAGNOSIS
EC-123
< SERVICE INFORMATION >
C
D
E
F
G
H
I
J
K
L
MA
EC
N
P O
INSPECTION PROCEDURE
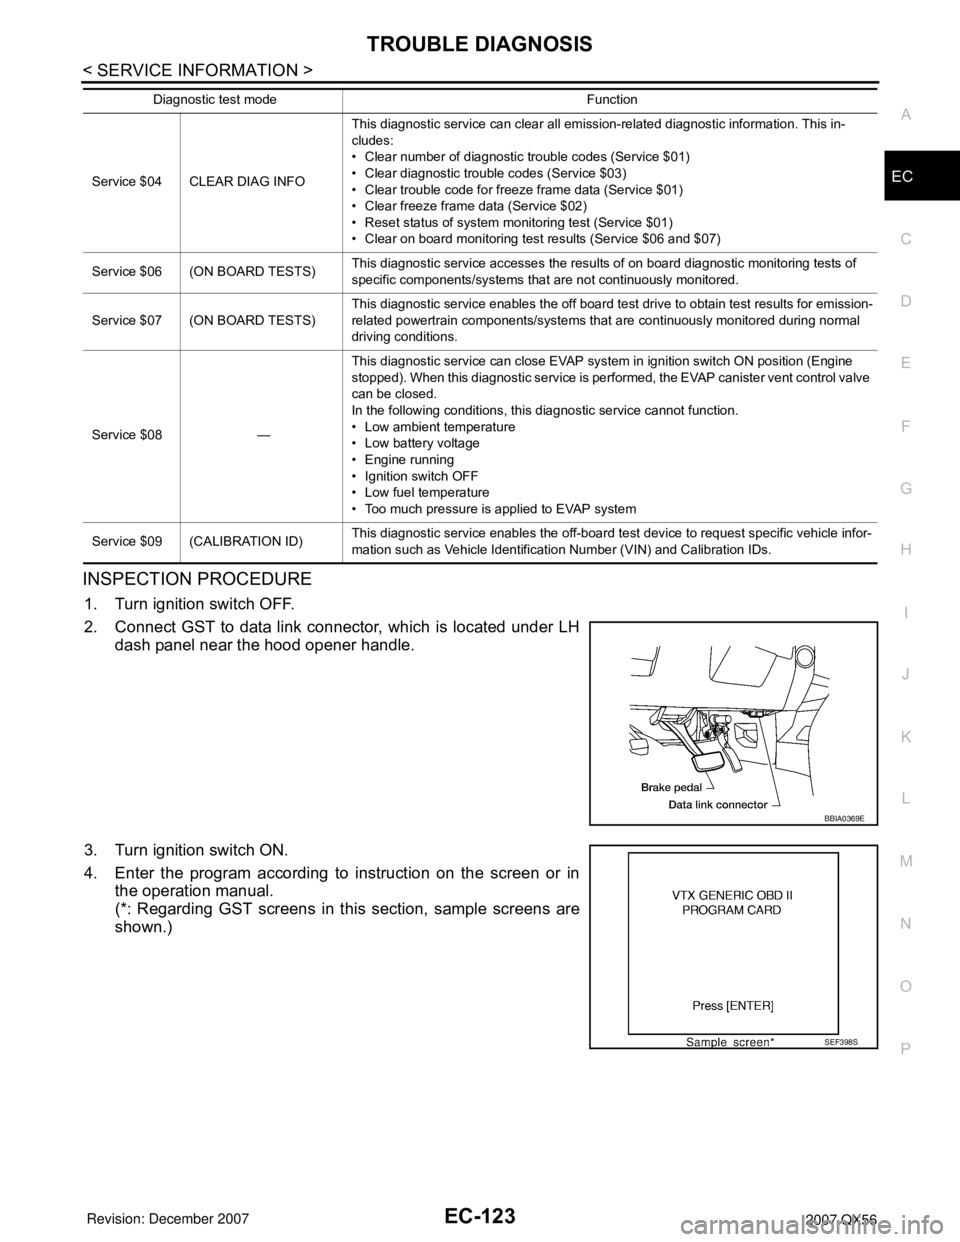
1. Turn ignition switch OFF.
2. Connect GST to data link connector, which is located under LH
dash panel near the hood opener handle.
3. Turn ignition switch ON.
4. Enter the program according to instruction on the screen or in
the operation manual.
(*: Regarding GST screens in this section, sample screens are
shown.)
Service $04 CLEAR DIAG INFOThis diagnostic service can clear all emission-related diagnostic information. This in-
cludes:
• Clear number of diagnostic trouble codes (Service $01)
• Clear diagnostic trouble codes (Service $03)
• Clear trouble code for freeze frame data (Service $01)
• Clear freeze frame data (Service $02)
• Reset status of system monitoring test (Service $01)
• Clear on board monitoring test results (Service $06 and $07)
Service $06 (ON BOARD TESTS)This diagnostic service accesses the results of on board diagnostic monitoring tests of
specific components/systems that are not continuously monitored.
Service $07 (ON BOARD TESTS)This diagnostic service enables the off board test drive to obtain test results for emission-
related powertrain components/systems that are continuously monitored during normal
driving conditions.
Service $08 —This diagnostic service can close EVAP system in ignition switch ON position (Engine
stopped). When this diagnostic service is performed, the EVAP canister vent control valve
can be closed.
In the following conditions, this diagnostic service cannot function.
• Low ambient temperature
• Low battery voltage
• Engine running
• Ignition switch OFF
• Low fuel temperature
• Too much pressure is applied to EVAP system
Service $09 (CALIBRATION ID)This diagnostic service enables the off-board test device to request specific vehicle infor-
mation such as Vehicle Identification Number (VIN) and Calibration IDs. Diagnostic test mode Function
BBIA0369E
SEF398S
Page 1209 of 3061

EC-126
< SERVICE INFORMATION >
TROUBLE DIAGNOSIS
COOLING FAN• Engine: After warming up, idle the
engine
• Air conditioner switch: OFFEngine coolant temperature: 99°C
(210°F) or lessOFF
Engine coolant temperature: 100°C
(212°F) or moreHI
HO2S2 HTR (B1)
HO2S2 HTR (B2)• Engine speed: Below 3,600 rpm after the following conditions are met.
- Engine: After warming up
- Keeping the engine speed between 3,500 and 4,000 rpm for 1 minute and
at idle for 1 minute under no loadON
• Engine speed: Above 3,600 rpm OFF
I/P PULLY SPD • Vehicle speed: More than 20 km/h (12 MPH)Almost the same speed as the
tachometer indication
VEHICLE SPEED• Turn drive wheels and compare CONSULT-II value with the speedometer
indication.Almost the same speed as the
speedometer indication
TRVL AFTER MIL • Ignition switch: ONVehicle has traveled after MIL has
turned ON.0 - 65,535 km
(0 - 40,723 mile)
A/F S1 HTR (B1)
A/F S1 HTR (B2)• Engine: After warming up, idle the engine 4 - 100%
AC PRESS SEN• Engine: Idle
• Both A/C switch and blower fan switch: ON (Compressor operates.)1.0 - 4.0V
VHCL SPEED SE• Turn drive wheels and compare CONSULT-II value with the speedometer
indication.Almost the same speed as the
speedometer indication
SET VHCL SPD • Engine: Running ASCD: Operating.The preset vehicle speed is dis-
played.
MAIN SW • Ignition switch: ONMAIN switch: Pressed ON
MAIN switch: Released OFF
CANCEL SW • Ignition switch: ONCANCEL switch: Pressed ON
CANCEL switch: Released OFF
RESUME/ACC SW • Ignition switch: ONRESUME/ACCELERATE switch:
PressedON
RESUME/ACCELERATE switch: Re-
leasedOFF
SET SW • Ignition switch: ONSET/COAST switch: Pressed ON
SET/COAST switch: Released OFF
DIST SW • Ignition switch: ONDISTANCE switch: Pressed ON
DISTANCE switch: Released OFF
BRAKE SW1 • Ignition switch: ONBrake pedal: Fully released ON
Brake pedal: Slightly depressed OFF
BRAKE SW2 • Ignition switch: ONBrake pedal: Fully released OFF
Brake pedal: Slightly depressed ON
CRUISE LAMP • Ignition switch: ONMAIN switch: Pressed at the 1st time
→ at the 2nd timeON → OFF
SET LAMP• MAIN switch: ON
• Vehicle speed: Between 40 km/h
(25 MPH) and 144 km/h (89
MPH)ASCD: Operating ON
ASCD: Not operating OFF
ALT DUTY • Engine: Idle 0 - 80%
BAT CUR SEN• Engine speed: Idle
• Battery: Fully charged*
2
• Selector lever: P or N
• Air conditioner switch: OFF
•No loadApprox. 2,600 - 3,500mV MONITOR ITEM CONDITION SPECIFICATION
Page 2079 of 3061
GW-60
< SERVICE INFORMATION >
FRONT DOOR GLASS AND REGULATOR
Fitting Inspection
• Check that the glass is securely fit into the glass run groove.
• Lower the glass slightly [approximately 10 to 20 mm (0.39 to 0.79 in)] and check that the clearance to the
sash is parallel. If the clearance between the glass and sash is not parallel, loosen the regulator bolts, guide
rail bolts, and glass and guide rail bolts to correct the glass position.
FRONT DOOR GLASS REGULATOR
Removal
1. Remove the front door speaker. Refer to AV-46, "Removal and Installation".
2. Remove the hole cover over rear glass bolt.
3. Temporarily reconnect the power window switch.
4. Operate the power window main switch to raise/lower the door window until the glass bolts can be seen.
5. Partially remove the inside seal.
6. Remove the glass bolts.
7. Raise the front door glass and hold it in place with suitable tool.
8. Disconnect the harness connector from the regulator assembly.
9. Remove the bolts and the regulator assembly.
Disassembly And Assembly
Remove the regulator motor from the regulator assembly.
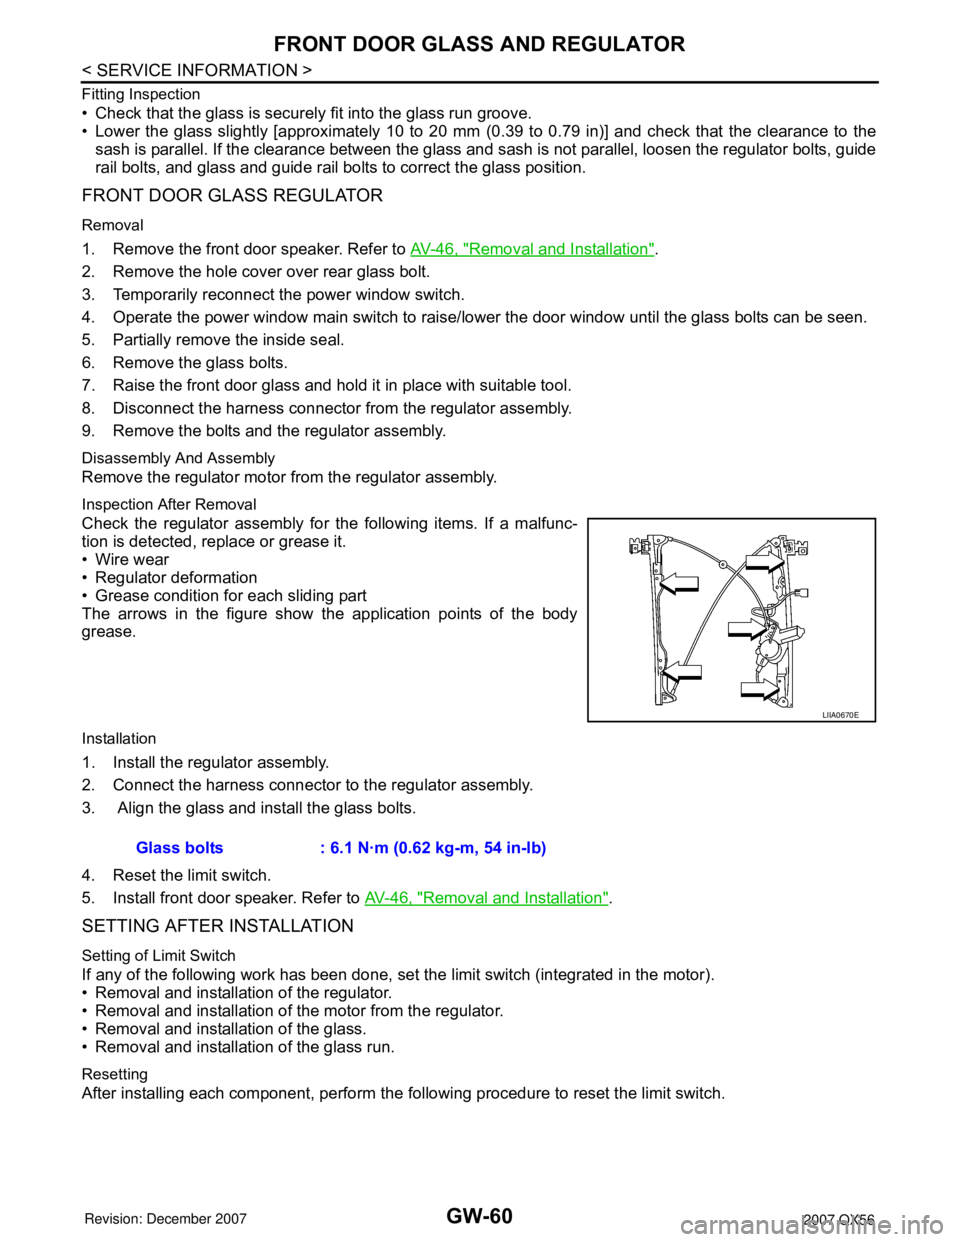
Inspection After Removal
Check the regulator assembly for the following items. If a malfunc-
tion is detected, replace or grease it.
• Wire wear
• Regulator deformation
• Grease condition for each sliding part
The arrows in the figure show the application points of the body
grease.
Installation
1. Install the regulator assembly.
2. Connect the harness connector to the regulator assembly.
3. Align the glass and install the glass bolts.
4. Reset the limit switch.
5. Install front door speaker. Refer to AV-46, "
Removal and Installation".
SETTING AFTER INSTALLATION
Setting of Limit Switch
If any of the following work has been done, set the limit switch (integrated in the motor).
• Removal and installation of the regulator.
• Removal and installation of the motor from the regulator.
• Removal and installation of the glass.
• Removal and installation of the glass run.
Resetting
After installing each component, perform the following procedure to reset the limit switch.
LIIA0670E
Glass bolts : 6.1 N·m (0.62 kg-m, 54 in-lb)
Page 2080 of 3061
FRONT DOOR GLASS AND REGULATOR
GW-61
< SERVICE INFORMATION >
C
D
E
F
G
H
J
K
L
MA
B
GW
N
O
P
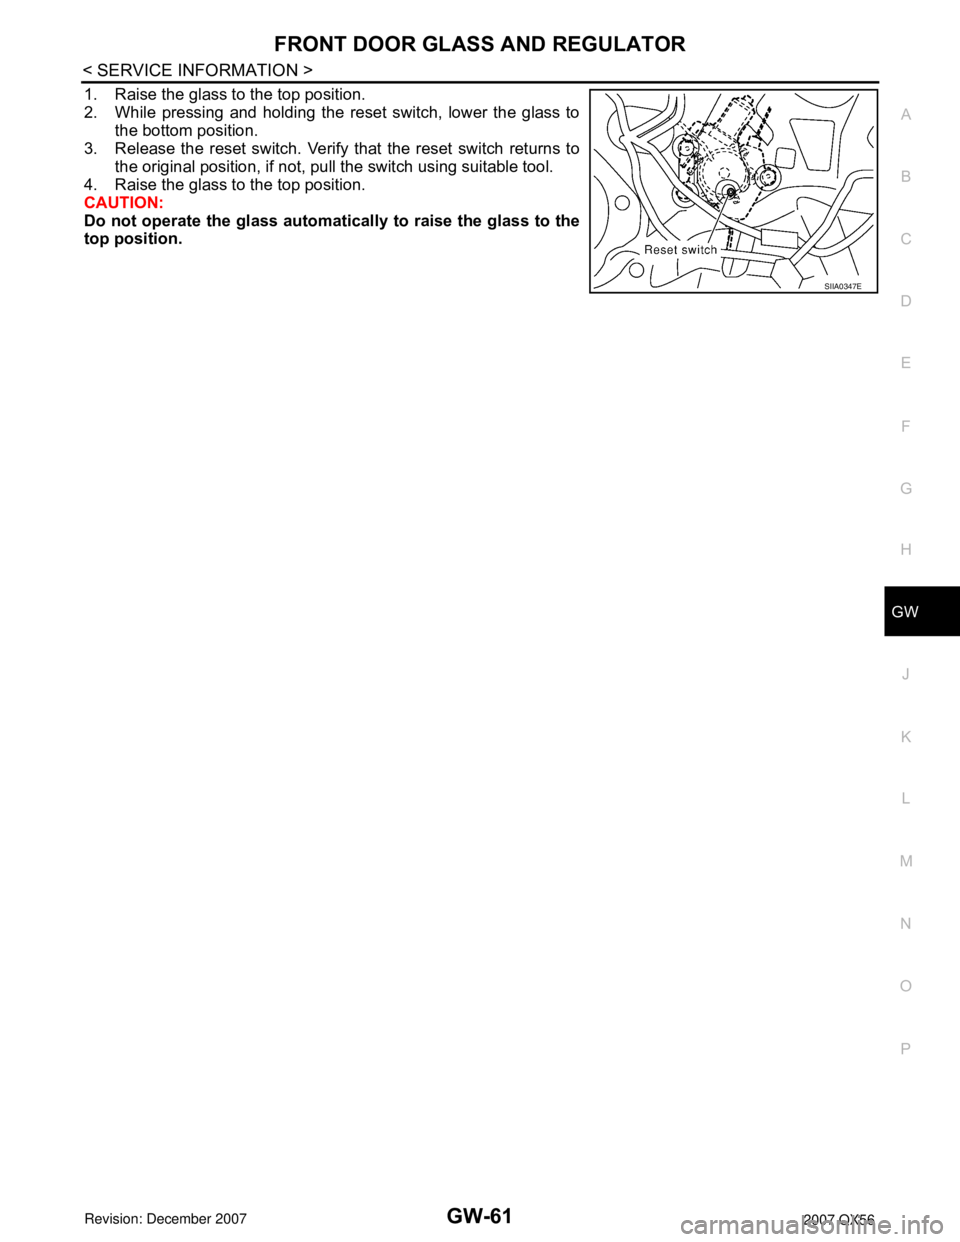
1. Raise the glass to the top position.
2. While pressing and holding the reset switch, lower the glass to
the bottom position.
3. Release the reset switch. Verify that the reset switch returns to
the original position, if not, pull the switch using suitable tool.
4. Raise the glass to the top position.
CAUTION:
Do not operate the glass automatically to raise the glass to the
top position.
SIIA0347E