2007 INFINITI QX56 service
[x] Cancel search: servicePage 1062 of 3061
REAR SONAR SYSTEM
DI-51
< SERVICE INFORMATION >
C
D
E
F
G
H
I
J
L
MA
B
DI
N
O
P
How to Proceed with Trouble DiagnosisINFOID:0000000003533529
1. Confirm the symptom or customer complaint.
2. Understand operation description and function description. Refer to DI-46, "
System Description".
3. Perform pre-diagnosis inspection. Refer to DI-51, "
Pre-diagnosis Inspection".
4. Perform self-diagnosis. Refer to DI-51, "
Self-Diagnosis Function".
5. Perform the preliminary check. Refer to DI-53, "
Preliminary Check".
6. Check symptom and repair or replace the cause of malfunction. Refer to DI-54, "
Symptom Chart".
7. Does the rear sonar system operate properly? If so, go to 8. If not, go to 3.
8. Clear fault codes. Refer to DI-51, "
Self-Diagnosis Function".
9. Inspection End.
Pre-diagnosis InspectionINFOID:0000000003533530
SENSOR STATUS CHECK
• Check that the rear sonar sensor is properly aligned (bumper is not misaligned, no deformation in sensor
mounting area.
• Check that snow, mud, or other foreign objects are not adhering to the rear sonar sensor.
• Check that there is no deformation, scratches, or other damage to the rear sonar sensor.
• Check that water has not accumulated in the rear sonar sensor.
CAUTION:
Use water, cotton swab, or other soft material for cleaning the sensor.
1. Check that there are no obstacles within each rear sonar sensor's detection range.
2. Check that there are no nearby ultrasound sources (such as the sounds of vehicle horns, motorcycle
engines, or truck air brakes).
3. Check that the vehicle is on a level surface.
Self-Diagnosis FunctionINFOID:0000000003533531
There are four modes of self-diagnosis; entering diagnostics, requesting number of fault codes, requesting
fault codes, and idling or clearing fault codes. These steps must be followed in order. Self-diagnosis can be
manually exited by turning the ignition switch OFF, or selecting reverse gear. Self-diagnosis will exit unless a
fault code request occurs before a message is repeated five times without acknowledgement.
ENTERING DIAGNOSTICS MODE
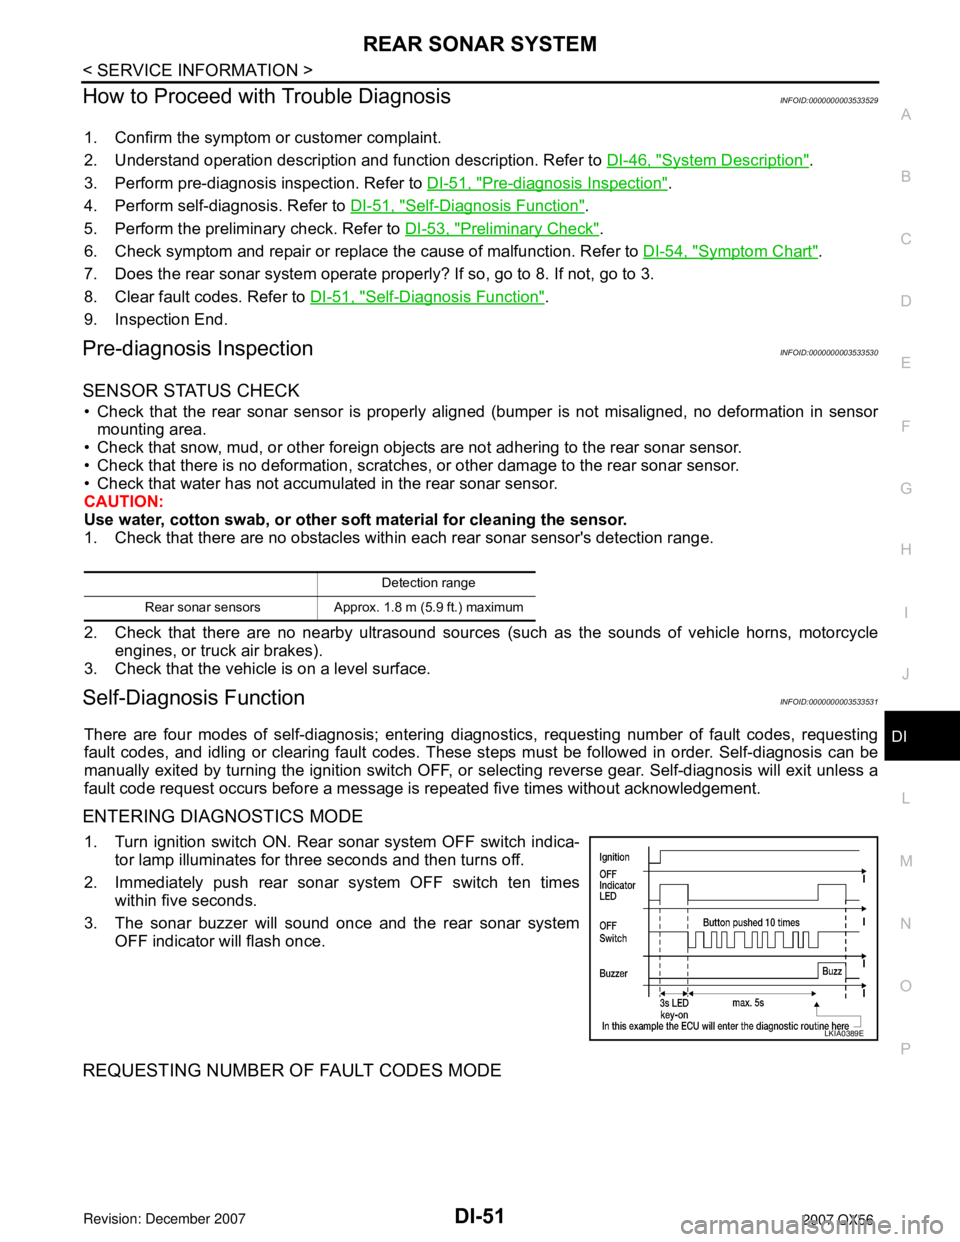
1. Turn ignition switch ON. Rear sonar system OFF switch indica-
tor lamp illuminates for three seconds and then turns off.
2. Immediately push rear sonar system OFF switch ten times
within five seconds.
3. The sonar buzzer will sound once and the rear sonar system
OFF indicator will flash once.
REQUESTING NUMBER OF FAULT CODES MODE
Detection range
Rear sonar sensors Approx. 1.8 m (5.9 ft.) maximum
LKIA0389E
Page 1063 of 3061
DI-52
< SERVICE INFORMATION >
REAR SONAR SYSTEM
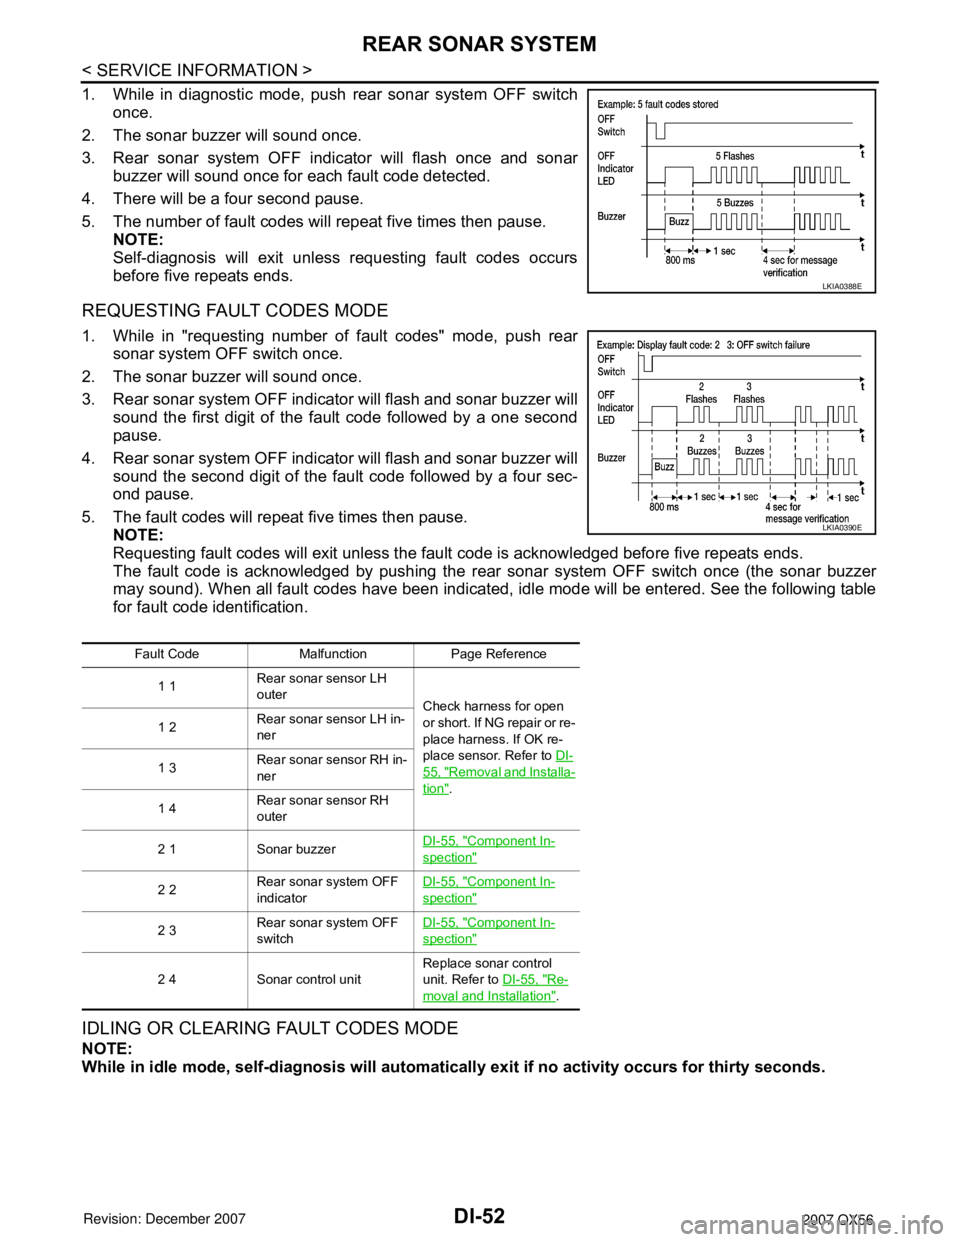
1. While in diagnostic mode, push rear sonar system OFF switch
once.
2. The sonar buzzer will sound once.
3. Rear sonar system OFF indicator will flash once and sonar
buzzer will sound once for each fault code detected.
4. There will be a four second pause.
5. The number of fault codes will repeat five times then pause.
NOTE:
Self-diagnosis will exit unless requesting fault codes occurs
before five repeats ends.
REQUESTING FAULT CODES MODE
1. While in "requesting number of fault codes" mode, push rear
sonar system OFF switch once.
2. The sonar buzzer will sound once.
3. Rear sonar system OFF indicator will flash and sonar buzzer will
sound the first digit of the fault code followed by a one second
pause.
4. Rear sonar system OFF indicator will flash and sonar buzzer will
sound the second digit of the fault code followed by a four sec-
ond pause.
5. The fault codes will repeat five times then pause.
NOTE:
Requesting fault codes will exit unless the fault code is acknowledged before five repeats ends.
The fault code is acknowledged by pushing the rear sonar system OFF switch once (the sonar buzzer
may sound). When all fault codes have been indicated, idle mode will be entered. See the following table
for fault code identification.
IDLING OR CLEARING FAULT CODES MODE
NOTE:
While in idle mode, self-diagnosis will automatically exit if no activity occurs for thirty seconds.
LKIA0388E
Fault Code Malfunction Page Reference
1 1Rear sonar sensor LH
outer
Check harness for open
or short. If NG repair or re-
place harness. If OK re-
place sensor. Refer to DI-
55, "Removal and Installa-
tion". 1 2Rear sonar sensor LH in-
ner
1 3Rear sonar sensor RH in-
ner
1 4Rear sonar sensor RH
outer
2 1 Sonar buzzerDI-55, "
Component In-
spection"
2 2Rear sonar system OFF
indicatorDI-55, "Component In-
spection"
2 3Rear sonar system OFF
switchDI-55, "Component In-
spection"
2 4 Sonar control unitReplace sonar control
unit. Refer to DI-55, "Re-
moval and Installation".
LKIA0390E
Page 1064 of 3061
REAR SONAR SYSTEM
DI-53
< SERVICE INFORMATION >
C
D
E
F
G
H
I
J
L
MA
B
DI
N
O
P
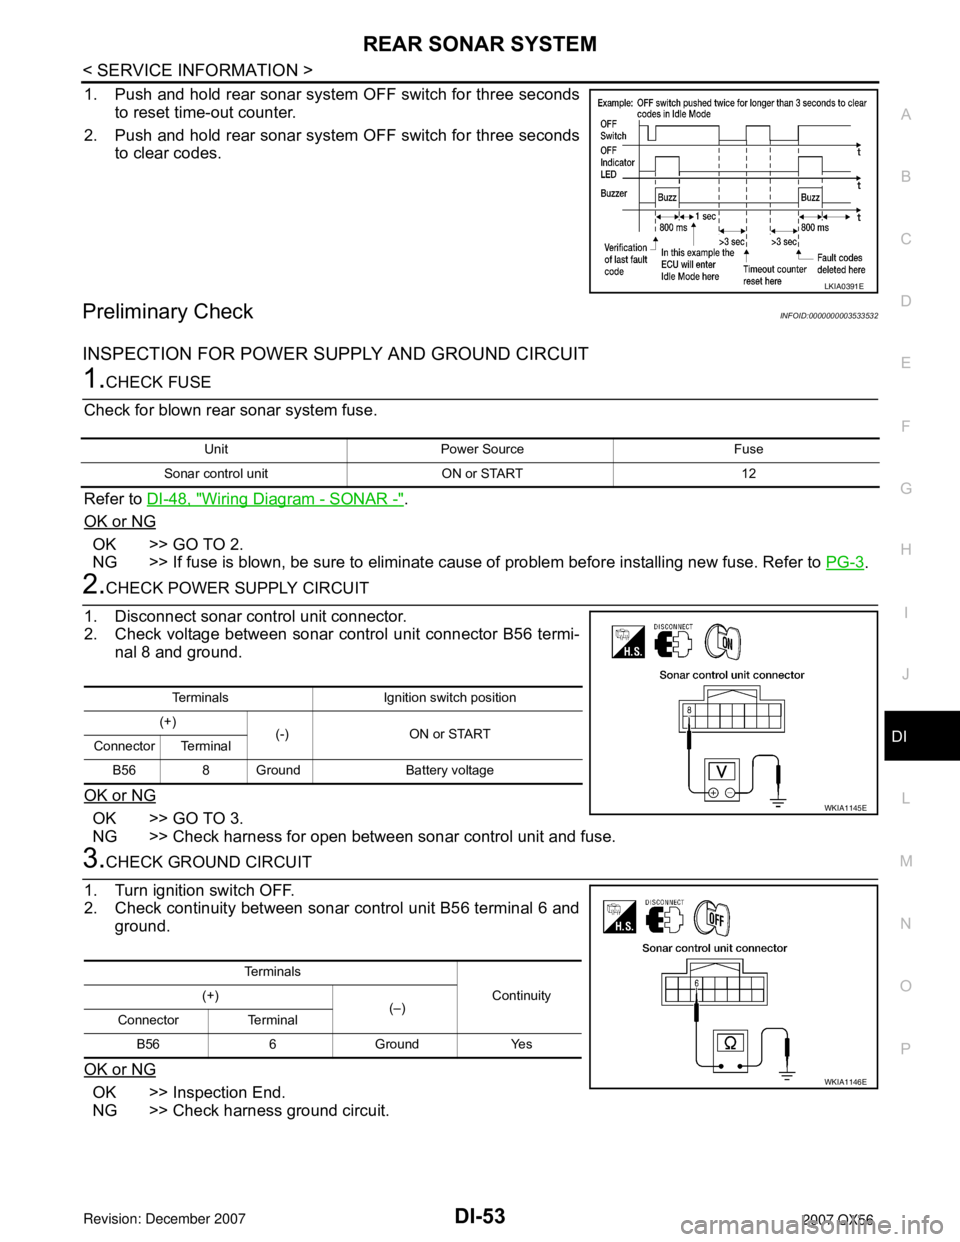
1. Push and hold rear sonar system OFF switch for three seconds
to reset time-out counter.
2. Push and hold rear sonar system OFF switch for three seconds
to clear codes.
Preliminary CheckINFOID:0000000003533532
INSPECTION FOR POWER SUPPLY AND GROUND CIRCUIT
1.CHECK FUSE
Check for blown rear sonar system fuse.
Refer to DI-48, "
Wiring Diagram - SONAR -".
OK or NG
OK >> GO TO 2.
NG >> If fuse is blown, be sure to eliminate cause of problem before installing new fuse. Refer to PG-3
.
2.CHECK POWER SUPPLY CIRCUIT
1. Disconnect sonar control unit connector.
2. Check voltage between sonar control unit connector B56 termi-
nal 8 and ground.
OK or NG
OK >> GO TO 3.
NG >> Check harness for open between sonar control unit and fuse.
3.CHECK GROUND CIRCUIT
1. Turn ignition switch OFF.
2. Check continuity between sonar control unit B56 terminal 6 and
ground.
OK or NG
OK >> Inspection End.
NG >> Check harness ground circuit.
LKIA0391E
Unit Power Source Fuse
Sonar control unit ON or START 12
Terminals Ignition switch position
(+)
(-) ON or START
Connector Terminal
B56 8 Ground Battery voltage
WKIA1145E
Te r m i n a l s
Continuity (+)
(–)
Connector Terminal
B56 6 Ground Yes
WKIA1146E
Page 1065 of 3061
DI-54
< SERVICE INFORMATION >
REAR SONAR SYSTEM
Symptom Chart
INFOID:0000000003533533
Symptom Repair order
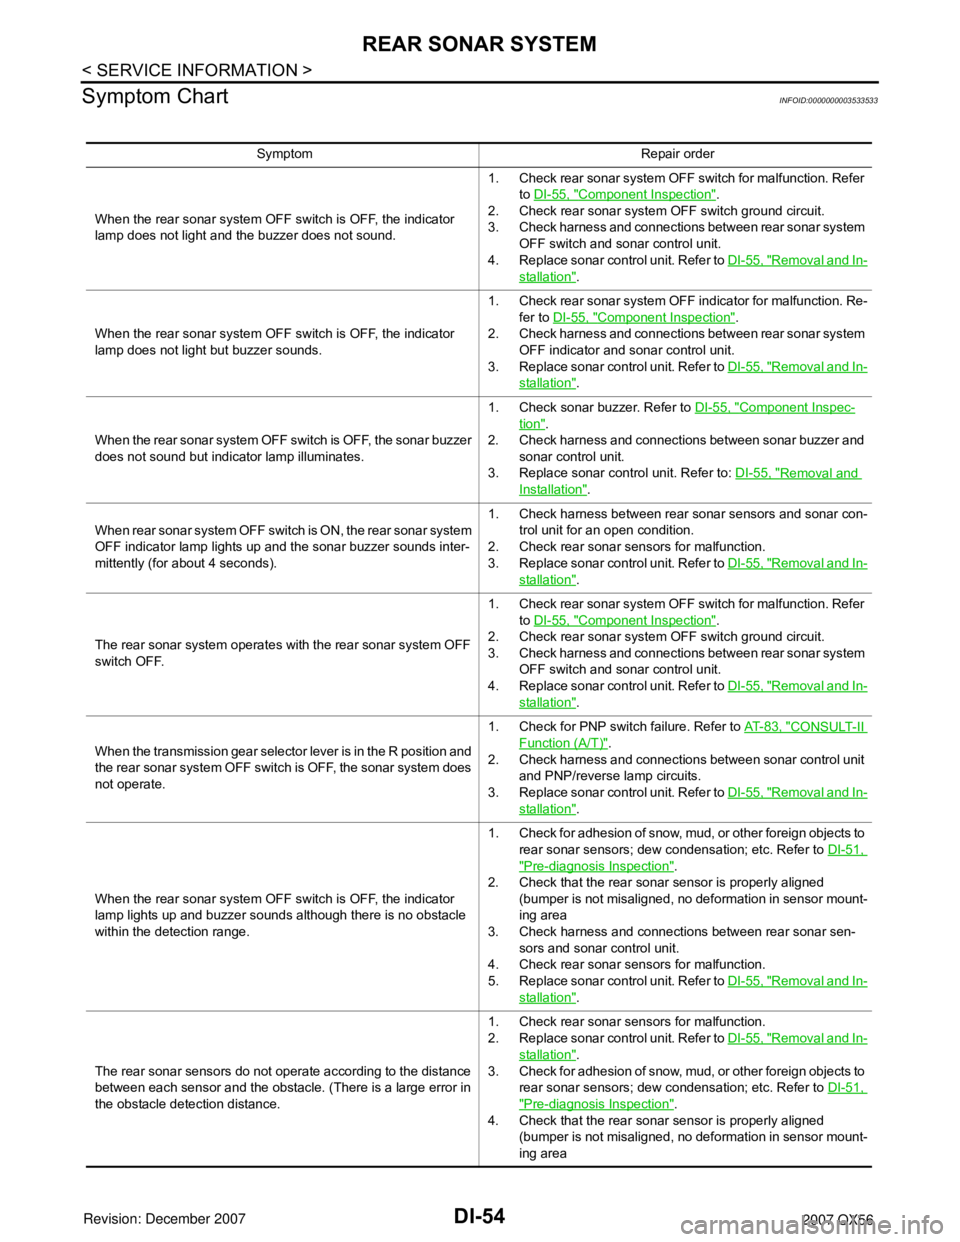
When the rear sonar system OFF switch is OFF, the indicator
lamp does not light and the buzzer does not sound.1. Check rear sonar system OFF switch for malfunction. Refer
to DI-55, "
Component Inspection".
2. Check rear sonar system OFF switch ground circuit.
3. Check harness and connections between rear sonar system
OFF switch and sonar control unit.
4. Replace sonar control unit. Refer to DI-55, "
Removal and In-
stallation".
When the rear sonar system OFF switch is OFF, the indicator
lamp does not light but buzzer sounds.1. Check rear sonar system OFF indicator for malfunction. Re-
fer to DI-55, "
Component Inspection".
2. Check harness and connections between rear sonar system
OFF indicator and sonar control unit.
3. Replace sonar control unit. Refer to DI-55, "
Removal and In-
stallation".
When the rear sonar system OFF switch is OFF, the sonar buzzer
does not sound but indicator lamp illuminates.1. Check sonar buzzer. Refer to DI-55, "
Component Inspec-
tion".
2. Check harness and connections between sonar buzzer and
sonar control unit.
3. Replace sonar control unit. Refer to: DI-55, "
Removal and
Installation".
When rear sonar system OFF switch is ON, the rear sonar system
OFF indicator lamp lights up and the sonar buzzer sounds inter-
mittently (for about 4 seconds).1. Check harness between rear sonar sensors and sonar con-
trol unit for an open condition.
2. Check rear sonar sensors for malfunction.
3. Replace sonar control unit. Refer to DI-55, "
Removal and In-
stallation".
The rear sonar system operates with the rear sonar system OFF
switch OFF.1. Check rear sonar system OFF switch for malfunction. Refer
to DI-55, "
Component Inspection".
2. Check rear sonar system OFF switch ground circuit.
3. Check harness and connections between rear sonar system
OFF switch and sonar control unit.
4. Replace sonar control unit. Refer to DI-55, "
Removal and In-
stallation".
When the transmission gear selector lever is in the R position and
the rear sonar system OFF switch is OFF, the sonar system does
not operate.1. Check for PNP switch failure. Refer to AT- 8 3 , "
CONSULT-II
Function (A/T)".
2. Check harness and connections between sonar control unit
and PNP/reverse lamp circuits.
3. Replace sonar control unit. Refer to DI-55, "
Removal and In-
stallation".
When the rear sonar system OFF switch is OFF, the indicator
lamp lights up and buzzer sounds although there is no obstacle
within the detection range.1. Check for adhesion of snow, mud, or other foreign objects to
rear sonar sensors; dew condensation; etc. Refer to DI-51,
"Pre-diagnosis Inspection".
2. Check that the rear sonar sensor is properly aligned
(bumper is not misaligned, no deformation in sensor mount-
ing area
3. Check harness and connections between rear sonar sen-
sors and sonar control unit.
4. Check rear sonar sensors for malfunction.
5. Replace sonar control unit. Refer to DI-55, "
Removal and In-
stallation".
The rear sonar sensors do not operate according to the distance
between each sensor and the obstacle. (There is a large error in
the obstacle detection distance.1. Check rear sonar sensors for malfunction.
2. Replace sonar control unit. Refer to DI-55, "
Removal and In-
stallation".
3. Check for adhesion of snow, mud, or other foreign objects to
rear sonar sensors; dew condensation; etc. Refer to DI-51,
"Pre-diagnosis Inspection".
4. Check that the rear sonar sensor is properly aligned
(bumper is not misaligned, no deformation in sensor mount-
ing area
Page 1066 of 3061
REAR SONAR SYSTEM
DI-55
< SERVICE INFORMATION >
C
D
E
F
G
H
I
J
L
MA
B
DI
N
O
P
Component InspectionINFOID:0000000003533534
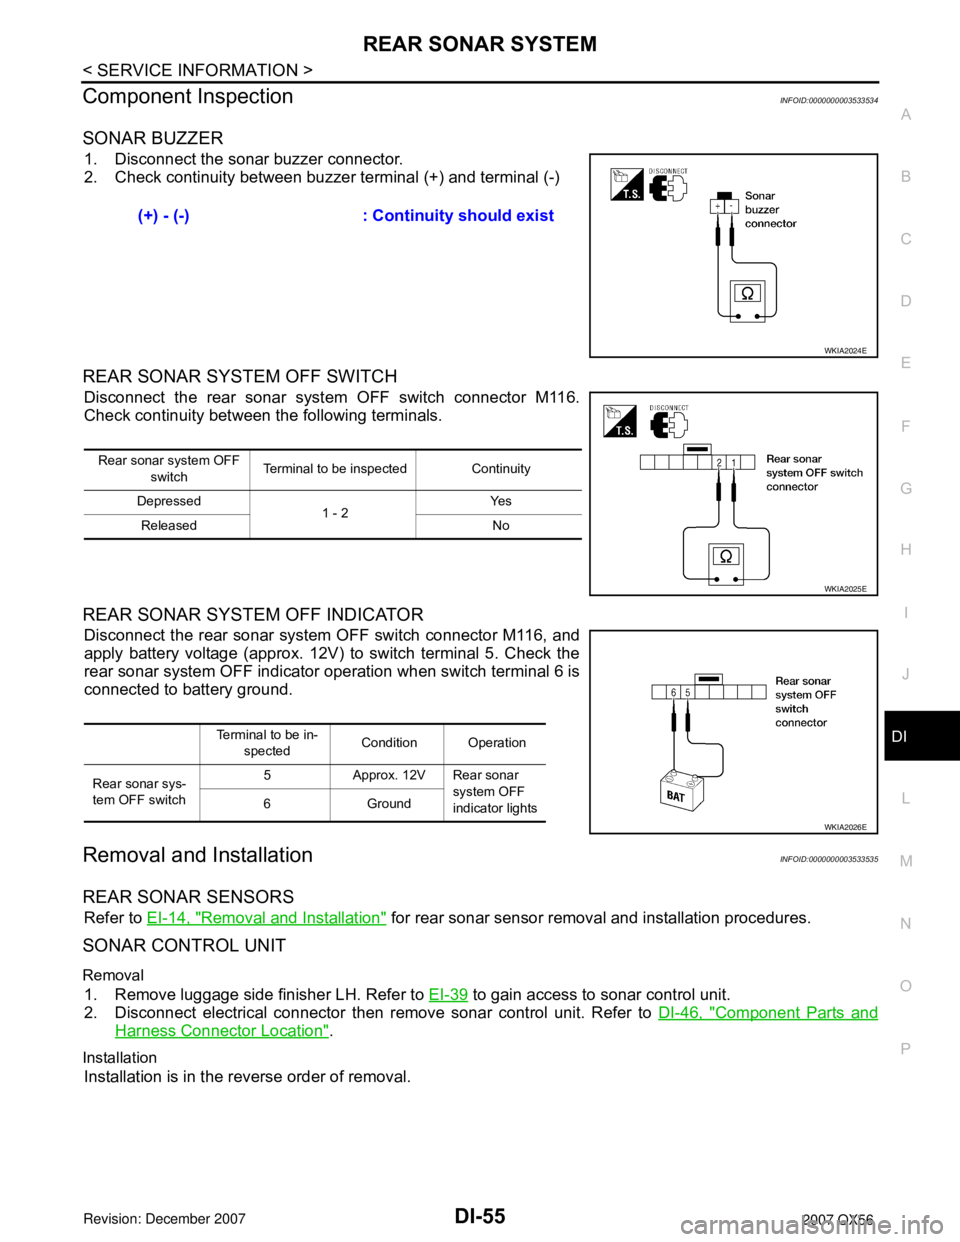
SONAR BUZZER
1. Disconnect the sonar buzzer connector.
2. Check continuity between buzzer terminal (+) and terminal (-)
REAR SONAR SYSTEM OFF SWITCH
Disconnect the rear sonar system OFF switch connector M116.
Check continuity between the following terminals.
REAR SONAR SYSTEM OFF INDICATOR
Disconnect the rear sonar system OFF switch connector M116, and
apply battery voltage (approx. 12V) to switch terminal 5. Check the
rear sonar system OFF indicator operation when switch terminal 6 is
connected to battery ground.
Removal and InstallationINFOID:0000000003533535
REAR SONAR SENSORS
Refer to EI-14, "Removal and Installation" for rear sonar sensor removal and installation procedures.
SONAR CONTROL UNIT
Removal
1. Remove luggage side finisher LH. Refer to EI-39 to gain access to sonar control unit.
2. Disconnect electrical connector then remove sonar control unit. Refer to DI-46, "
Component Parts and
Harness Connector Location".
Installation
Installation is in the reverse order of removal.(+) - (-) : Continuity should exist
WKIA2024E
Rear sonar system OFF
switch Terminal to be inspected Continuity
Depressed
1 - 2Ye s
Released No
WKIA2025E
Terminal to be in-
spectedCondition Operation
Rear sonar sys-
tem OFF switch5 Approx. 12V Rear sonar
system OFF
indicator lights 6Ground
WKIA2026E
Page 1067 of 3061
DI-56
< SERVICE INFORMATION >
CLOCK
CLOCK
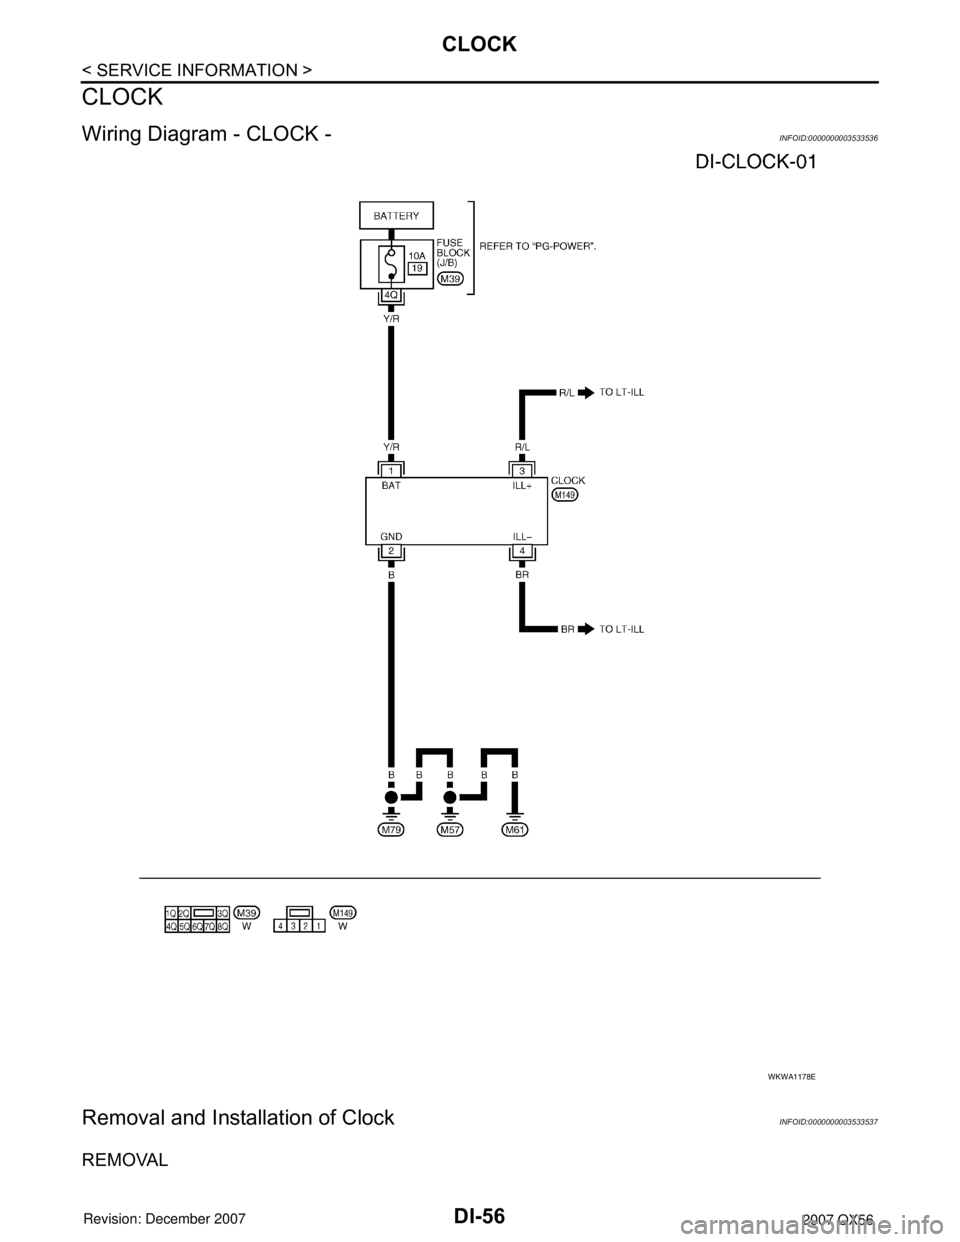
Wiring Diagram - CLOCK -INFOID:0000000003533536
Removal and Installation of ClockINFOID:0000000003533537
REMOVAL
WKWA1178E
Page 1068 of 3061
CLOCK
DI-57
< SERVICE INFORMATION >
C
D
E
F
G
H
I
J
L
MA
B
DI
N
O
P
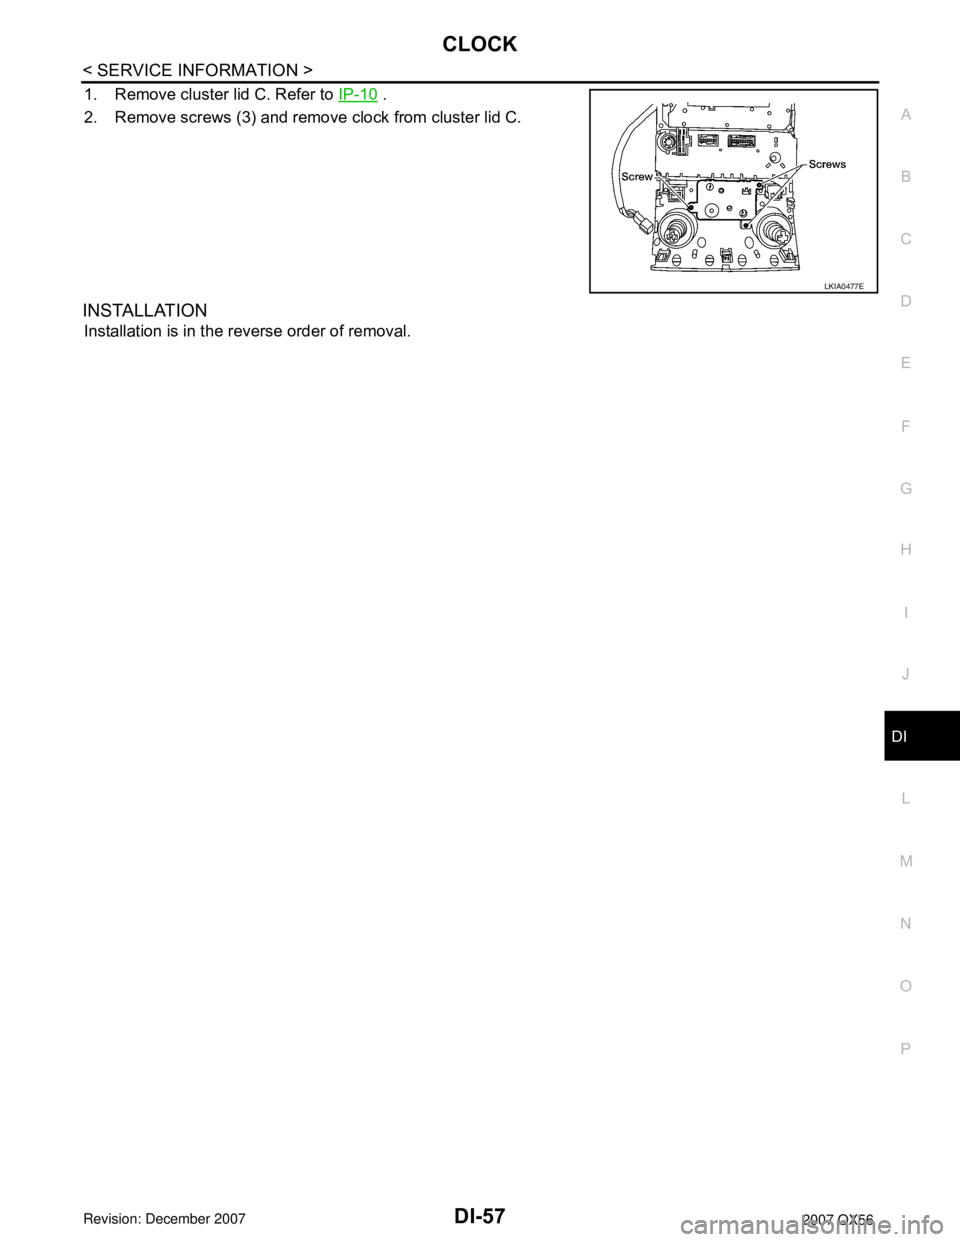
1. Remove cluster lid C. Refer to IP-10 .
2. Remove screws (3) and remove clock from cluster lid C.
INSTALLATION
Installation is in the reverse order of removal.
LKIA0477E
Page 1069 of 3061
DI-58
< SERVICE INFORMATION >
REAR VIEW MONITOR
REAR VIEW MONITOR
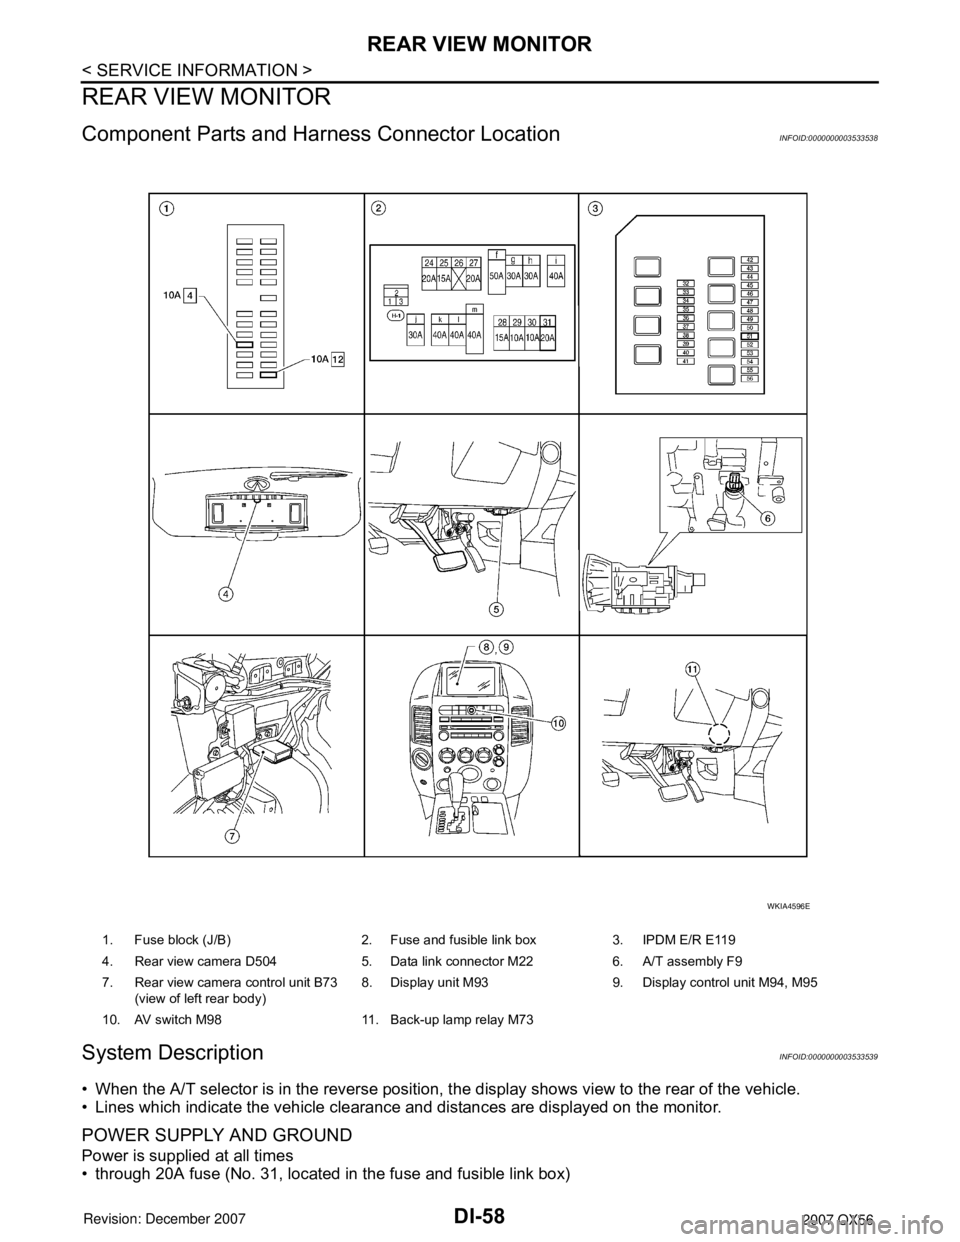
Component Parts and Harness Connector LocationINFOID:0000000003533538
System DescriptionINFOID:0000000003533539
• When the A/T selector is in the reverse position, the display shows view to the rear of the vehicle.
• Lines which indicate the vehicle clearance and distances are displayed on the monitor.
POWER SUPPLY AND GROUND
Power is supplied at all times
• through 20A fuse (No. 31, located in the fuse and fusible link box)
1. Fuse block (J/B) 2. Fuse and fusible link box 3. IPDM E/R E119
4. Rear view camera D504 5. Data link connector M22 6. A/T assembly F9
7. Rear view camera control unit B73
(view of left rear body)8. Display unit M93 9. Display control unit M94, M95
10. AV switch M98 11. Back-up lamp relay M73
WKIA4596E