Page 1070 of 1226

Manual Transmission/Transaxle and Clutch -
308-00-1 2 General Information 308-00-1 2
GENERAL PROCEDURES
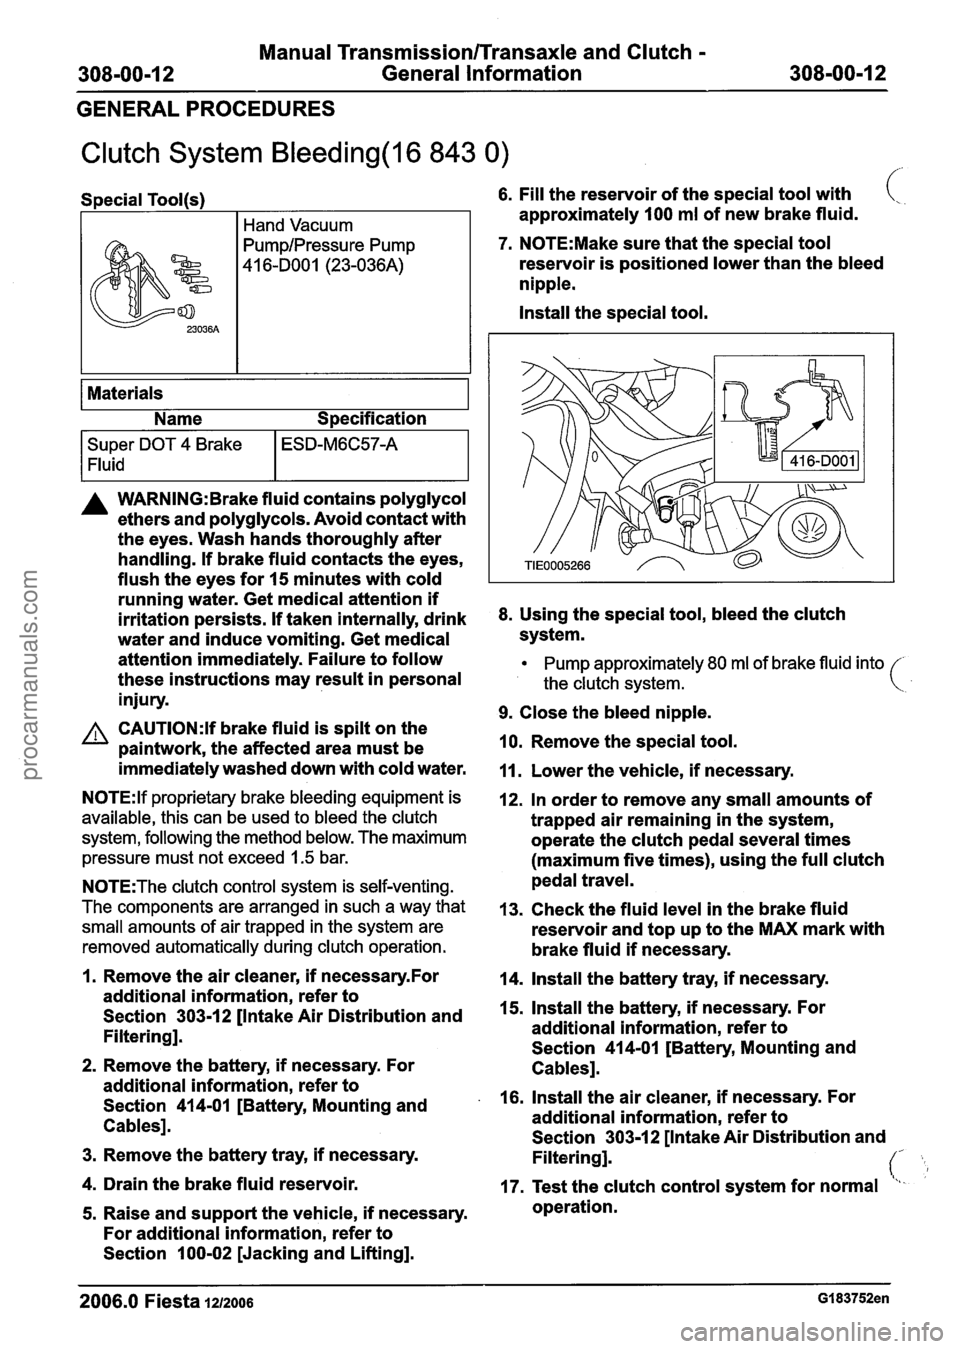
Clutch System Bleeding(l6 843 0)
Special Tool(s) 6. Fill the reservoir of the special tool with (,, .
I Hand Vacuum approximately 100 ml of new brake fluid.
7. N0TE:Make sure that the special tool
reservoir is positioned lower than the bleed
nipple.
Install the special tool.
Super DOT 4 Brake
1 Fluid
I
Materials
Name Specification
ESD-M6C57-A
A WARNING: Brake fluid contains polyglycol
ethers and polyglycols. Avoid contact with
the eyes. Wash hands thoroughly after
handling. If brake fluid contacts the eyes,
flush the eyes for 15 minutes with cold
running water. Get medical attention if
irritation persists. If taken internally, drink
8. Using the special tool, bleed the clutch
water and induce vomiting. Get medical system.
attention immediately. Failure to follow
Pump approximately 80 ml of brake fluid into
these instructions may result in personal the clutch svstem. (
injury. w
9. Close the bleed nipple. A CAUTI0N:Y brake fluid is spilt on the
paintwork, the affected area must be 10.
Remove the special tool.
immediately washed down with cold water.
11. Lower the vehicle, if necessary.
N0TE:lf proprietary brake bleeding equipment is
available, this can be used to bleed the clutch
system, following the method below. The maximum
pressure must not exceed
1.5 bar.
N0TE:The clutch control system is self-venting.
The components are arranged in such a way that
small amounts of air trapped in the system are
removed automatically during clutch operation.
12. In order to remove any small amounts of
trapped air remaining in the system,
operate the clutch pedal several times
(maximum five times), using the full clutch
pedal travel.
13. Check the fluid level in the brake fluid
reservoir and top up to the MAX mark with
brake fluid if necessary.
1. Remove the air cleaner, if necessaryfor 14. Install the battery tray, if necessary.
additional information, refer to
Section
303-12 [Intake Air Distribution and 15.
Install the battery, if necessary. For
Filtering]. additional
information, refer to
Section 414-01 [Battery, Mounting and
2. Remove the battery, if necessary. For
Cablesl.
additional information, refer to
Section
414-01 [Battery, Mounting and . 16. Install the air cleaner, if necessary. For
Cables]. additional
information, refer to
Section 303-1
2 [Intake Air Distribution and - 3. Remove the battery tray, if necessary.
Filtering]. (' L 4. Drain the brake fluid reservoir.
17. Test the clutch control system for normal "I-
5. Raise and support the vehicle, if necessary. operation.
For additional information, refer to
Section 100-02 [Jacking and Lifting].
2006.0 Fiesta 1212006 GI 83752en
procarmanuals.com
Page 1071 of 1226
Manual Transmission/Transaxle and Clutch -
308-00-1 3 General Information 308-00-1 3
GENERAL PROCEDURES
Start the engine, depress the clutch pedal,
wait two seconds, then carefully engage
reverse gear. If there are any abnormal
noises, or reverse gear is difficult to engage,
repeat the clutch system bleeding procedure.
18. Initialize the door window motors, if
necessary. For additional information, refer
to Section 501-11 [Glass, Frames and
Mechanisms].
2006.0 Fiesta 1212006 GI 83752en
procarmanuals.com
Page 1079 of 1226
308-01 -7 Clutch 308-01 -7
REMOVAL AND INSTALLATION
Clutch Disc and Pressure Plate(l6 724 4)
S~ecial Tool(s1 Installation
Removal
I. Remove the transaxle.For additional
information, refer to: (308-03A Manual
Transmission/Transaxle - Vehicles With:
5Speed Manual Transaxle (iB5))
Transaxle - I .6L Duratec-1 6V (Sigma)ll .6L
Duratec-16V Ti-VCT (sigma)- (~'m'val) 9 2. nCAUTION :Tighten the clutch pressure Transaxle - 1.8L Duratec-HE (M14) (Removal). plate retaining bolts finger tight and then
2m &AUTION:LOOS~~ the clutch pressure evenly
by two turns at a time in the sequence
plate retaining bolts by two turns at a time shown
to the specified torque.
in the
sequence shown. N0TE:lnstall new clutch pressure plate retaining I Remove the clutch disc and pressure plate. bolts.
Discard the bolts.
2006.0 Fiesta 121~0o6 G28811 en
procarmanuals.com
Page 1080 of 1226
308-01 -8 Clutch 308-01 -8
REMOVAL AND INSTALLATION
Using the special tool, install the clutch disc
and pressure
plate.
3. Remove the special tool.
4. Install the transaxle. For additional
information, refer to: (308-03A Manual
Transmission/Transaxle - Vehicles With:
5-Speed
Manual Transaxle (iB5))
Transaxle - 1.6L Duratec-1 6V (Sigma)ll.GL
Duratec-1 6V Ti-VCT (Sigma) (Installation),
Transaxle - 1.8L Duratec-HE (M14)
(Installation).
2006.0 Fiesta 1212006 ~28811 en
procarmanuals.com
Page 1084 of 1226

Clutch Controls
DESCRIPTION
AND OPERATION
Because of this separate chamber, the braking
system remains operational if a leak occurs in the
hydraulic clutch system.
Function
Pressure is created in the master cylinder when
the clutch pedal is operated.
The hydraulic fluid in the master cylinder is put
under pressure and fed through the pressure pipe
to the slave cylinder.
The displaced hydraulic fluid moves the piston in
the slave cylinder and this in turn slides the release
bearing axially.
The release bearing pushes the bearing inner ring
against the tongues of the diaphragm spring.
The spring induced grip between the clutch disc
and the flywheel is broken.
When the clutch pedal is released the diaphragm
spring presses the piston in the slave cylinder back
to its starting position. The spring induced grip
between the clutch disc and the flywheel is created
again.
A spring in the slave cylinder ensures preload on
the release bearing.
The release bearing is always touching the
pressure plate because of this preload. The extra
travel caused by clutch lining wear is compensated
for by the preload.
There is a choke assembly in the slave cylinder
which helps to increase smoothness when pulling
away.
Because of the choke assembly, the pressure drop
of the fluid leaving the slave cylinder and returning
to the reservoir is delayed.
Because of this, the clutch closing time is delayed
when the clutch pedal is released suddenly, and
a soft and comfortable clutch engagement is
achieved.
Choking does not occur during clutch
disengagement.
A CAUTI0N:Vehicles with an automated shift
manual (ASM) transmission have
a slave
cylinder without
a choke assembly. The
slave cylinders must not be exchanged for
one another.
N0TE:The clutch pedal travel cannot be adjusted.
The release bearing is an interference fit in the
slave cylinder and cannot be renewed separately.
2006.0 Fiesta 1212006 G281360en
procarmanuals.com
Page 1086 of 1226

308-02-6 Clutch Controls 308-02-6
REMOVAL AND INSTALLATION
Clutch Slave Cylinder(l6 862 4) /'
Materials Alf brake fluid is spilt on the paintwork, the
Name Specification affected
area must be
immediately washed
ESDM-1 C220-A down with cold water. High-temperature
grease
ADO not apply grease on any area of the
clutch slave cylinder.
Removal Install the clutch slave cylinder.
I. Remove the transaxle. For additional
information, refer to: (308-03 Manual
TransmissionlTransaxle)
Transaxle - 1.2 5L Duratec-1 6V (Sigma)ll.4L
Duratec-1 6V (Sigma)ll .6L Duratec-1 6V
(Sigma) (Removal),
Transaxle - 1.3L Duratec-8V (Rocam)
(Re m ova I),
Transaxle - 2.OL Duratec-HE (M14) (Removal),
Transaxle - 1.4L Duratorq-TDCi (DV)
Dieselll.6L Duratorq-TDCi (DV) Diesel
(Removal).
2. Clean any grease and foreign material from
the input shaft.
3. CAUTIONS:
Alf brake fluid is spilt on the paintwork, the
affected area must be
immediately washed
down with
cold water.
Ausing suitable adhesive tape, cover the
input shaft
splines to prevent damage to the
input shaft
oil seal.
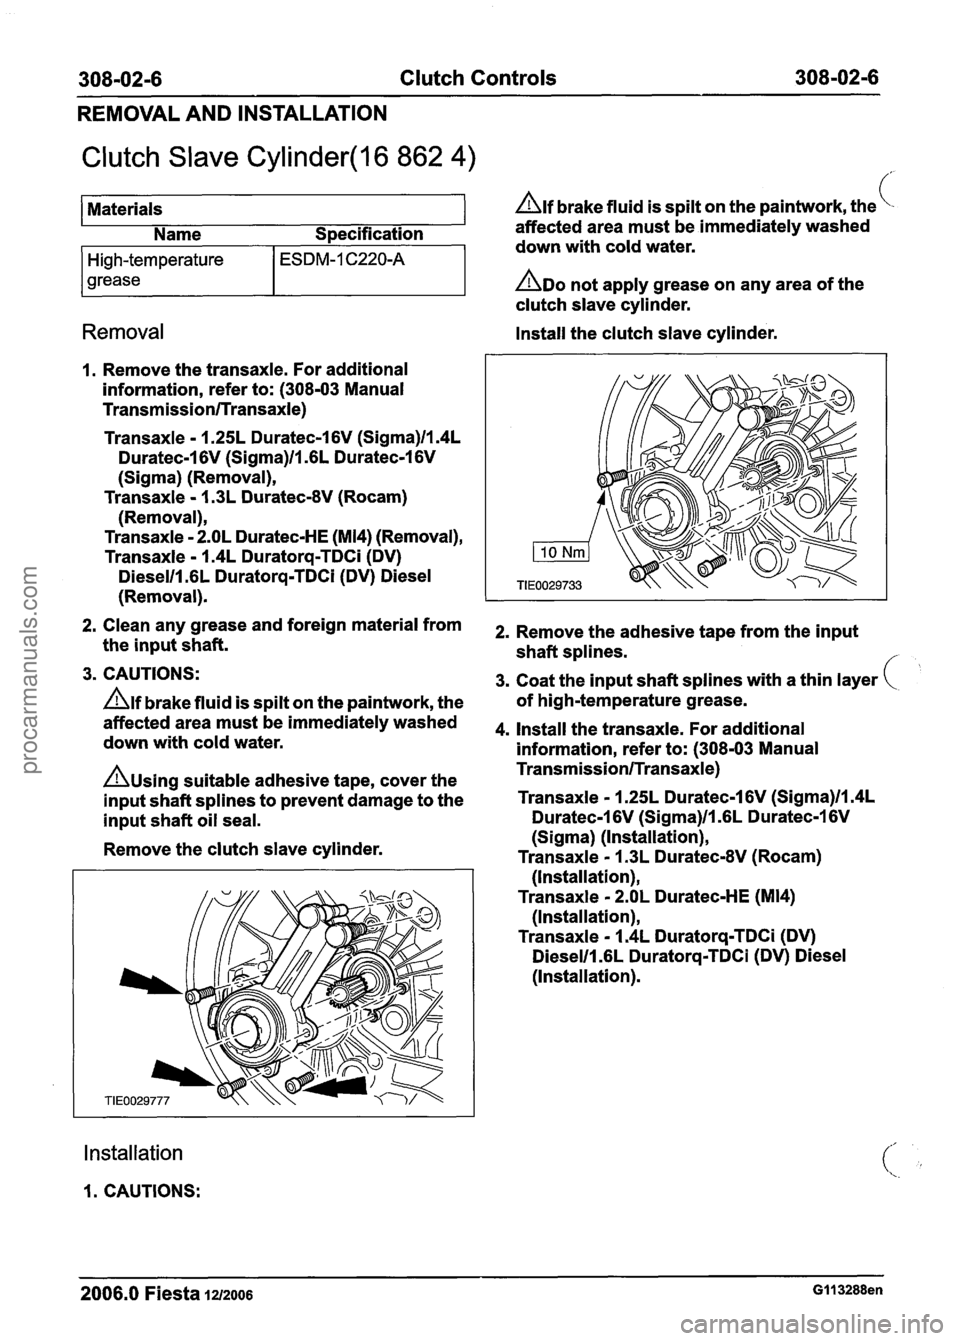
Remove the clutch slave cylinder.
Installation
1. CAUTIONS: 2.
Remove the adhesive tape from the input
shaft
splines.
3. Coat the input shaft splines with a thin layer
of high-temperature grease.
4.
Install the transaxle. For additional
information, refer to: (308-03 Manual
TransmissionlTransaxle)
Transaxle - 1.25L Duratec-1 6V (Sigma)ll.4L
Duratec-1 6V (Sigma)ll .6L Duratec-1 6V
(Sigma) (Installation),
Transaxle - 1.3L Duratec-8V (Rocam)
(Installation),
Transaxle - 2.OL Duratec-HE (M14)
(Installation),
Transaxle - 1.4L Duratorq-TDCi (DV)
Dieselll.6L Duratorq-TDCi (DV) Diesel
(Installation).
2006.0 Fiesta 1212006 GI1 3288en
procarmanuals.com
Page 1090 of 1226

308-02-1 0 Clutch Controls 308-02-1 0
REMOVAL AND INSTALLATION
7. Bleed the clutch system. For additional
information, refer to: (308-00 Manual
Transmission/Transaxle and Clutch - General
Information)
Clutch System Bleeding (General
Procedures),
Clutch System Bleeding - Vehicles With:
Automated Gearshift
(General Procedures).
Left-hand drive vehicles
8. Install the battery tray. For additional
information, refer to:
Battery Tray (414-01,
Removal and
Installation),
Battery Tray - 2.OL Duratec-HE (M14) (414-01
Battery, Mounting and
Cables, Removal
and Installation).
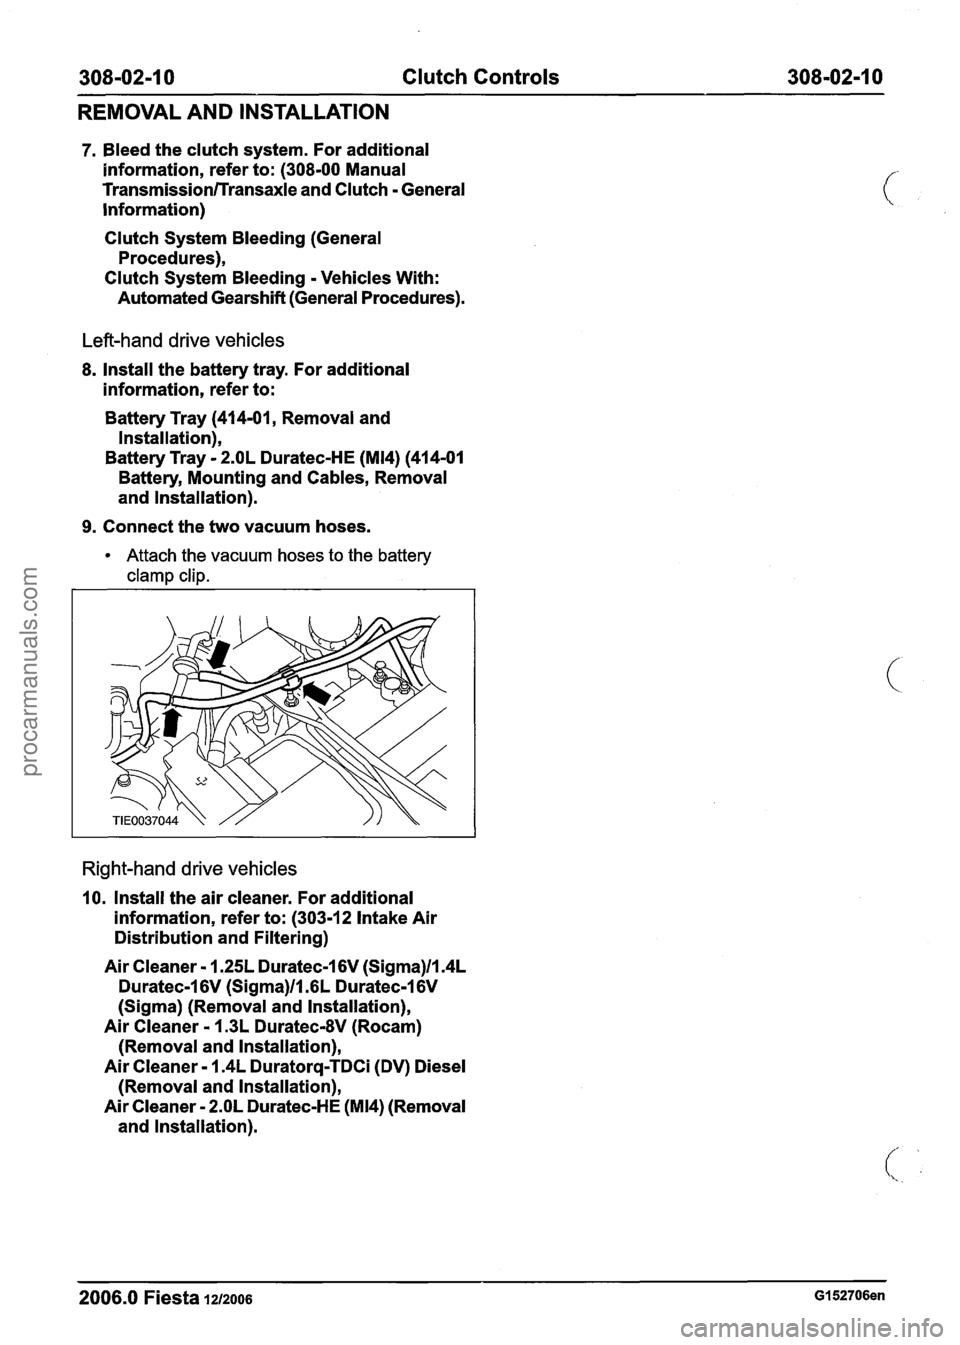
9. Connect the two vacuum hoses.
Attach the vacuum hoses to the battery
clamp clip.
Right-hand drive vehicles
10. Install the air cleaner. For additional
information, refer to: (303-12 Intake Air
Distribution and
Filtering)
Air Cleaner - 1.25L Duratec-1 6V (Sigma)/l.4L
Duratec-1 6V (Sigma)ll .6L Duratec-1 6V
(Sigma) (Removal and lnstallation),
Air Cleaner - 1.3L Duratec-8V (Rocam)
(Removal and lnstallation),
Air Cleaner - 1.4L Duratorq-TDCi (DV) Diesel
(Removal and lnstallation),
Air Cleaner - 2.OL Duratec-HE (M14) (Removal
and lnstallation).
2006.0 Fiesta 12/2006 GI 52706en
procarmanuals.com
Page 1092 of 1226
Manual Transmission/Transaxle
INSTALLATION ,/.
Transaxle - 1.25L Duratec-1 6V (Sigma)/l.4L Duratec-1 6V (Sigma)/l .6L (.. ;:
Duratec-1 6V (Sigma). . . . . . . . . . . . . . . . . . . . . . . . . . . . . . . . . . . . . . . . . . . . . . . . . . . . . . . . . . . . . . . . . . . . . . . . . . . . . . . . . . . . (1 6 1 1 4 0) 308-03-62
Transaxle - 2.OL Duratec-HE (M14). ..... .. . . .. .. . . .. .... .. .. .. . . .. .. . . . . ........ . . . . . (1
6 11 4 0) 308-03-69
procarmanuals.com