2006 TOYOTA RAV4 Abs
[x] Cancel search: AbsPage 52 of 2000

ENGINE - 2AZ-FE ENGINE
00REG22Y
To Intake Manifold
Purge VSV
Purge Air
Line
ECMFuel Tank
Canister Filter
Fresh Air LineRefueling Valve
Canister Pump Module
Ve n t
Va l v e
Leak Detection Pump
& Pump Motor
Canister
Pressure SensorCanisterP M
EG-55
System Diagram
Function of Main Components
ComponentFunction
CanisterContains activated charcoal to absorb the vapor gas that is created in the
fuel tank.
Refueling
Controls the flow rate of the vapor gas from the fuel tank to the canister
when the system is purging or during refueling.
Refueling
Va l v eRestrictor PassagePrevents a large amount of vacuum during purge operation or system
monitoring operation from affecting the pressure in the fuel tank.
Fresh Air LineFresh air goes into the canister and the cleaned drain air goes out into
the atmosphere.
Vent ValveOpens and closes the fresh air line in accordance with the signals from
the ECM.
Canister
Pump ModuleLeak Detection
PumpApplies vacuum pressure to the EVAP control system in accordance
with the signals from the ECM.
p
Canister
Pressure SensorDetects the pressure in the EVAP control system and sends the signals
to the ECM.
Purge VSV
Opens in accordance with the signals from the ECM when the system
is purging, in order to send the vapor gas that was absorbed by the
canister into the intake manifold. In system monitoring mode, this valve
controls the introduction of the vacuum into the fuel tank.
Canister FilterPrevents dust and debris in the fresh air from entering the system.
ECM
Controls the canister pump module and purge VSV in accordance with
the signals from various sensors, in order to achieve a purge volume that
suits the driving conditions. In addition, the ECM monitors the system
for any leakage and outputs a DTC if a malfunction is found.
Page 88 of 2000

ENGINE - 2GR-FE ENGINE
285EG33
Intake Air
Control Valve
ACIS ActuatorLaser-welding
285EG34GasketsRubber Coating
Outer SideIntake
Port Side
A
A
A - A Cross Section EG-92
4. Intake Air Chamber
The intake air chamber is made of plastic to realize lightweight.
The intake air chamber contains an intake air control valve. This valve is activated by ACIS (Acoustic
Control Induction System) and is used to alter the intake pipe length to improve the engine performance
in all speed range. For details, see page EG-126.
The ACIS actuator uses an electric actuator and is laser-welded onto the intake air chamber. Many of the
components are made of plastic for weight reduction.
— REFERENCE —
Laser-welding:
In laser-welding, a laser-absorbing material (for the intake air chamber) is joined to a laser-transmitting
material (for the ACIS actuator). Laser beams are then irradiated from the laser-transmitting side. The
beams penetrate the laser-transmitting material to heat and melt the surface of the laser-absorbing material.
Then, the heat of the laser-absorbing material melts the laser-transmitting material and causes both
materials to become welded.
5. Intake Manifold
Lightweight aluminum alloy is used for the intake manifold.
The intake manifold gaskets have rubber coating applied onto surface, and provide superior durability.
Page 221 of 2000

INTRODUCTION – TERMSIN–49
IN
IAT Intake Air Temperature Intake or Inlet Air Temperature
ICM Ignition Control Module -
IFI Indirect Fuel Injection Indirect Injection (IDL)
IFS Inertia Fuel-Shutoff -
ISC Idle Speed Control -
KS Knock Sensor Knock Sensor
MAF Mass Airflow Air Flow Meter
MAP Manifold Absolute Pressure Manifold Pressure Intake Vacuum
MC Mixture ControlElectric Bleed Air Control Valve (EBCV)
Mixture Control Valve (MCV)
Electric Air Control Valve (EACV)
MDP Manifold Differential Pressure -
MFI Multiport Fuel Injection Electronic Fuel Injection (EFI)
MIL Malfunction Indicator Lamp Check Engine Lamp
MST Manifold Surface Temperature -
MVZ Manifold Vacuum Zone -
NVRAM Non-Volatile Random Access Memory -
O2S Oxygen Sensor Oxygen Sensor, O2 Sensor (O2S)
OBD On-Board Diagnostic On-Board Diagnostic System (OBD)
OC Oxidation Catalytic Converter Oxidation Catalyst Converter (OC), CCo
OL Open Loop Open Loop
PAIR Pulsed Secondary Air Injection Air Suction (AS)
PCM Powertrain Control Module -
PNP Park/Neutral Position -
PROM Programmable Read Only Memory -
PSP Power Steering Pressure -
PTOX Periodic Trap OxidizerDiesel Particulate Filter (DPF)
Diesel Particulate Trap (DPT)
RAM Random Access Memory Random Access Memory (RAM)
RM Relay Module -
ROM Read Only Memory Read Only Memory (ROM)
RPM Engine Speed Engine Speed
SC Supercharger Supercharger
SCB Supercharger Bypass E-ABV
SFI Sequential Multiport Fuel Injection Electronic Fuel Injection (EFI), Sequential Injection
SPL Smoke Puff Limiter -
SRI Service Reminder Indicator -
SRT System Readiness Test -
ST Scan Tool -
TB Throttle Body Throttle Body
TBI Throttle Body Fuel InjectionSingle Point Injection
Central Fuel Injection (Ci)
TC Turbocharger Turbocharger
TCC Torque Converter Clutch Torque Converter
TCM Transmission Control Module Transmission ECU, ECT ECU
TP Throttle Position Throttle Position
TR Transmission Range -
TVV Thermal Vacuum ValveBimetallic Vacuum Switching Valve (BVSV)
Thermostatic Vacuum Switching Valve (TVSV) SAE
ABBREVIATIONSSAE TERMS TOYOTA TERMS ( )-ABBREVIATIONS
Page 405 of 2000

AH–8AXLE – FRONT AXLE HUB
AH
10. REMOVE STEERING KNUCKLE WITH AXLE HUB
(a) Remove the 2 bolts and 2 nuts, and disconnect the
shock absorber from the steering knuckle.
HINT:
While fixing the nuts in place, loosen and remove
the bolts.
(b) Put matchmarks on the drive shaft and the axle hub.
(c) Using a plastic-faced hammer, remove the steering
knuckle with axle hub.
NOTICE:
Be careful not to damage the boot and speed
sensor rotor. Do not excessively push out the
drive shaft from the axle assembly.
11. REMOVE FRONT LOWER BALL JOINT ASSEMBLY
LH (See page SP-27)
12. REMOVE FRONT AXLE HUB SUB-ASSEMBLY LH
(a) Remove the 4 bolts and axle hub from the steering
knuckle.
NOTICE:
Do not place the hub and bearing's magnet rotor
side so that it is facing downward, and do not
allow the magnet rotor side to become damaged
or contact foreign matter.
(b) Remove the dust cover from the steering knuckle.
C127533
C129488E01
C127536
Page 406 of 2000

SP–10SUSPENSION – FRONT SHOCK ABSORBER WITH COIL SPRING
SP
DISASSEMBLY
HINT:
• Use the same procedures for the RH side and LH side.
• The procedures listed below are for the LH side.
1. REMOVE FRONT SUSPENSION SUPPORT PLATE LH
(a) Remove the plate from the shock absorber.
2. REMOVE FRONT SUSPENSION SUPPORT DUST
COVER LH
(a) Using a screwdriver, remove the dust cover from the
suspension support.
HINT:
Tape the screwdriver tip before use.
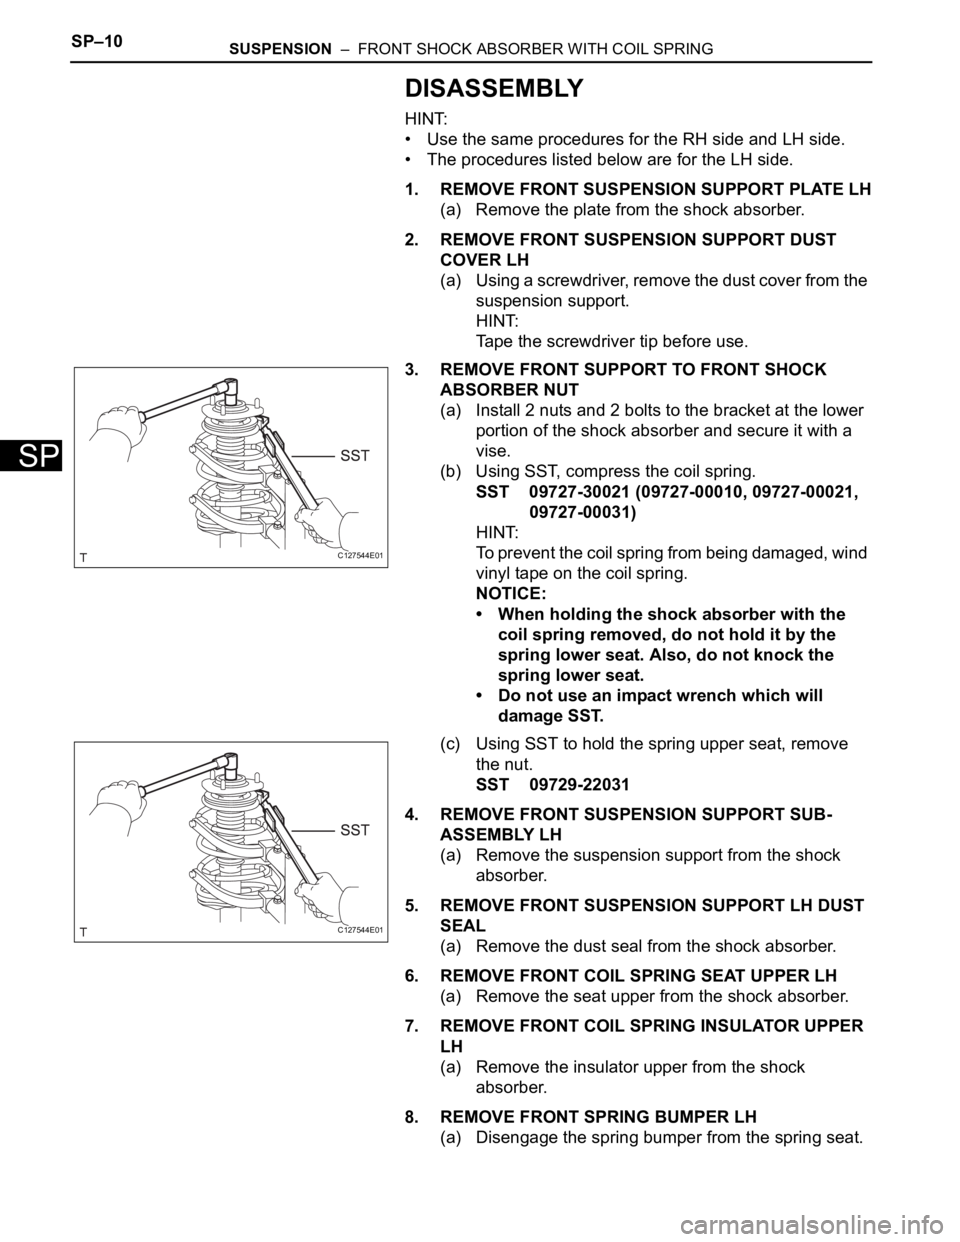
3. REMOVE FRONT SUPPORT TO FRONT SHOCK
ABSORBER NUT
(a) Install 2 nuts and 2 bolts to the bracket at the lower
portion of the shock absorber and secure it with a
vise.
(b) Using SST, compress the coil spring.
SST 09727-30021 (09727-00010, 09727-00021,
09727-00031)
HINT:
To prevent the coil spring from being damaged, wind
vinyl tape on the coil spring.
NOTICE:
• When holding the shock absorber with the
coil spring removed, do not hold it by the
spring lower seat. Also, do not knock the
spring lower seat.
• Do not use an impact wrench which will
damage SST.
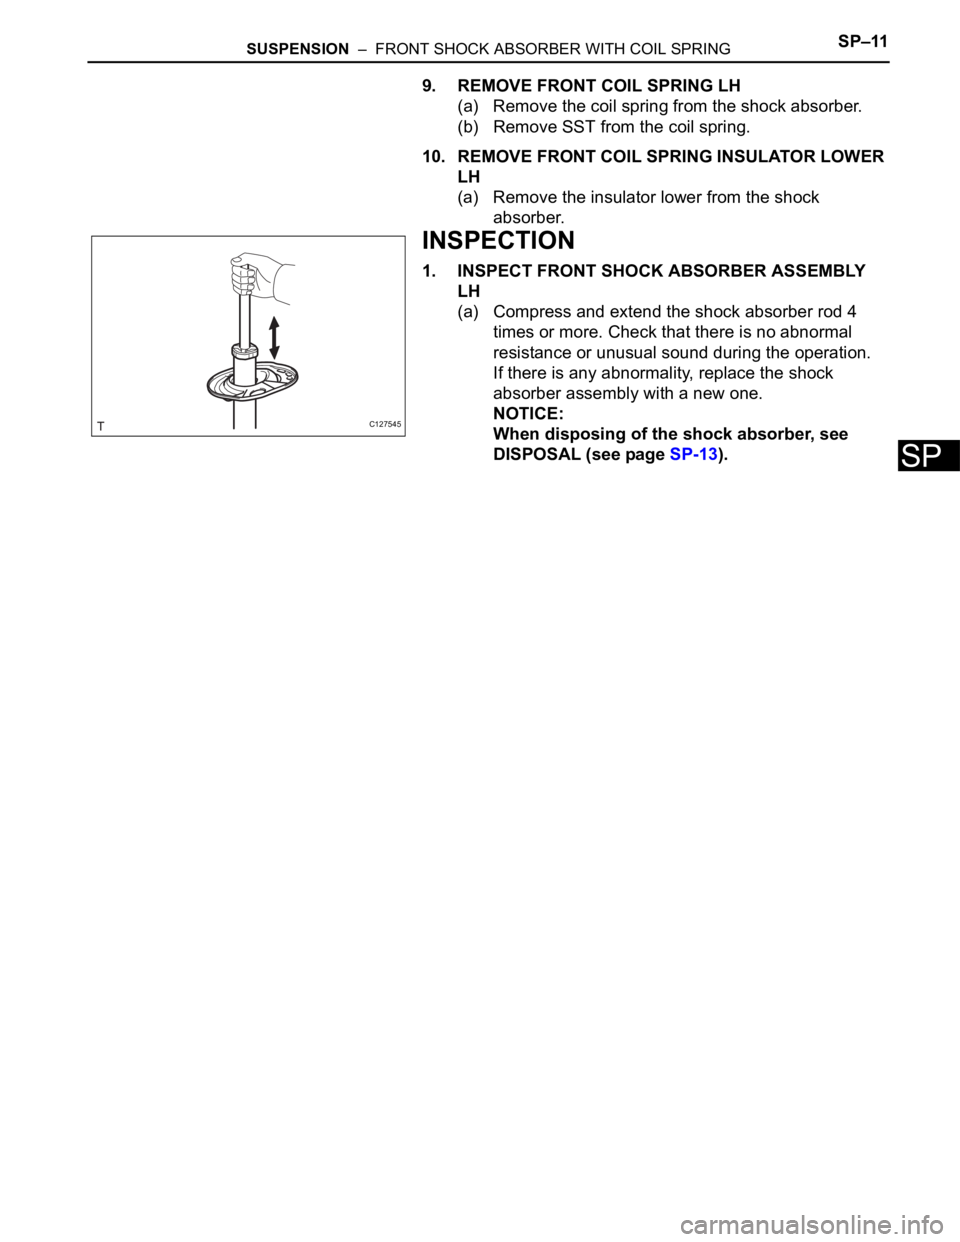
(c) Using SST to hold the spring upper seat, remove
the nut.
SST 09729-22031
4. REMOVE FRONT SUSPENSION SUPPORT SUB-
ASSEMBLY LH
(a) Remove the suspension support from the shock
absorber.
5. REMOVE FRONT SUSPENSION SUPPORT LH DUST
SEAL
(a) Remove the dust seal from the shock absorber.
6. REMOVE FRONT COIL SPRING SEAT UPPER LH
(a) Remove the seat upper from the shock absorber.
7. REMOVE FRONT COIL SPRING INSULATOR UPPER
LH
(a) Remove the insulator upper from the shock
absorber.
8. REMOVE FRONT SPRING BUMPER LH
(a) Disengage the spring bumper from the spring seat.
C127544E01
C127544E01
Page 407 of 2000

SUSPENSION – FRONT SHOCK ABSORBER WITH COIL SPRINGSP–11
SP
9. REMOVE FRONT COIL SPRING LH
(a) Remove the coil spring from the shock absorber.
(b) Remove SST from the coil spring.
10. REMOVE FRONT COIL SPRING INSULATOR LOWER
LH
(a) Remove the insulator lower from the shock
absorber.
INSPECTION
1. INSPECT FRONT SHOCK ABSORBER ASSEMBLY
LH
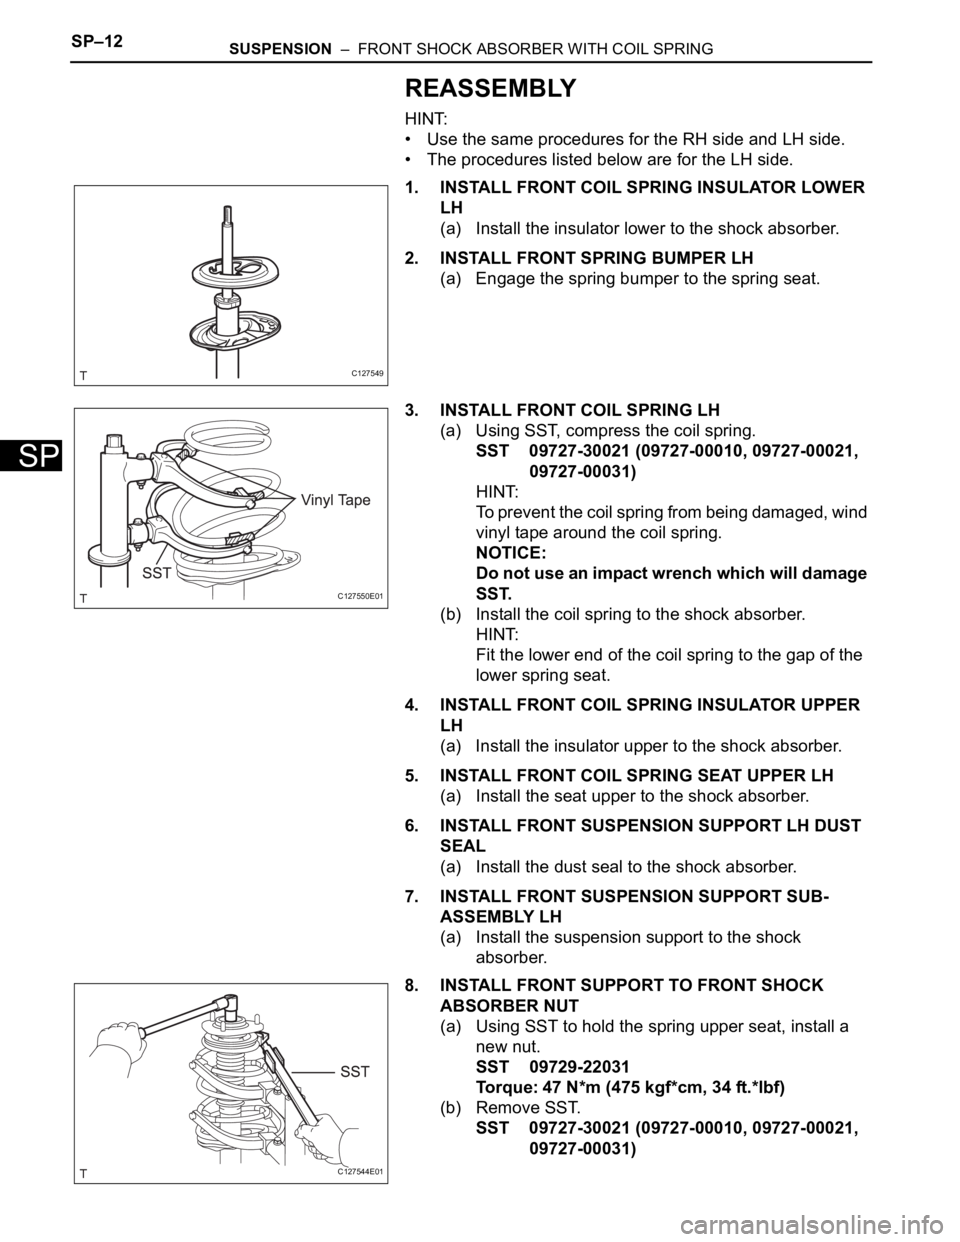
(a) Compress and extend the shock absorber rod 4
times or more. Check that there is no abnormal
resistance or unusual sound during the operation.
If there is any abnormality, replace the shock
absorber assembly with a new one.
NOTICE:
When disposing of the shock absorber, see
DISPOSAL (see page SP-13).
C127545
Page 408 of 2000

SP–12SUSPENSION – FRONT SHOCK ABSORBER WITH COIL SPRING
SP
REASSEMBLY
HINT:
• Use the same procedures for the RH side and LH side.
• The procedures listed below are for the LH side.
1. INSTALL FRONT COIL SPRING INSULATOR LOWER
LH
(a) Install the insulator lower to the shock absorber.
2. INSTALL FRONT SPRING BUMPER LH
(a) Engage the spring bumper to the spring seat.
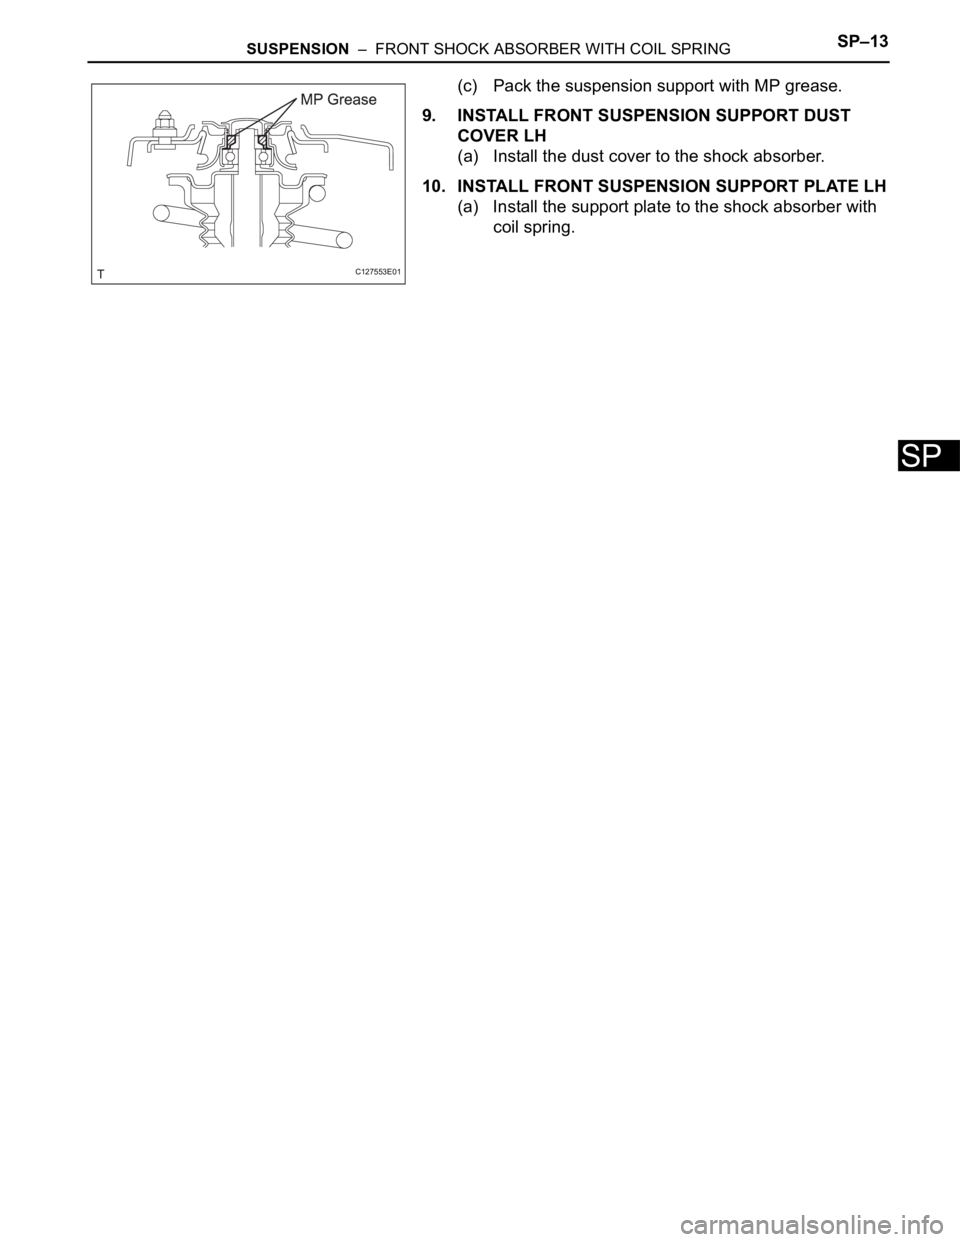
3. INSTALL FRONT COIL SPRING LH
(a) Using SST, compress the coil spring.
SST 09727-30021 (09727-00010, 09727-00021,
09727-00031)
HINT:
To prevent the coil spring from being damaged, wind
vinyl tape around the coil spring.
NOTICE:
Do not use an impact wrench which will damage
SST.
(b) Install the coil spring to the shock absorber.
HINT:
Fit the lower end of the coil spring to the gap of the
lower spring seat.
4. INSTALL FRONT COIL SPRING INSULATOR UPPER
LH
(a) Install the insulator upper to the shock absorber.
5. INSTALL FRONT COIL SPRING SEAT UPPER LH
(a) Install the seat upper to the shock absorber.
6. INSTALL FRONT SUSPENSION SUPPORT LH DUST
SEAL
(a) Install the dust seal to the shock absorber.
7. INSTALL FRONT SUSPENSION SUPPORT SUB-
ASSEMBLY LH
(a) Install the suspension support to the shock
absorber.
8. INSTALL FRONT SUPPORT TO FRONT SHOCK
ABSORBER NUT
(a) Using SST to hold the spring upper seat, install a
new nut.
SST 09729-22031
Torque: 47 N*m (475 kgf*cm, 34 ft.*lbf)
(b) Remove SST.
SST 09727-30021 (09727-00010, 09727-00021,
09727-00031)
C127549
C127550E01
C127544E01
Page 409 of 2000

SUSPENSION – FRONT SHOCK ABSORBER WITH COIL SPRINGSP–13
SP
(c) Pack the suspension support with MP grease.
9. INSTALL FRONT SUSPENSION SUPPORT DUST
COVER LH
(a) Install the dust cover to the shock absorber.
10. INSTALL FRONT SUSPENSION SUPPORT PLATE LH
(a) Install the support plate to the shock absorber with
coil spring.
C127553E01