2006 MERCEDES-BENZ SPRINTER length
[x] Cancel search: lengthPage 1622 of 2305
Distance between middle
connecting rod bore to
connecting rod bushing
bore148.970 mm to 149.030
mm
Allowable out-of-round-
ness and taper of basic
bore.020 mm
Allowable twist of con-
necting rod bearing bore
to connecting rod bush-
ing bore over a length of
100 mm.100 mm
Allowable variation of
axial parallelism of con-
necting rod bearing bore
to connecting rod bush-
ing bore over a length of
100 mm.045 mm
Allowable difference in
weight of complete con-
necting rod of an engine2g
Connecting rod inner
bushing30.018 to 30.024 mm
Connecting rod outer
bushing32.575 mm to 32.600
mm
Connecting rod basic
bore32.500 mm to 32.525
mm
Piston pin play in con-
necting rod.018 mm to.024 mm
Peak-to-Valley height
(Rz) of connecting rod
bushing on inside5
Connecting rod bolt
threadM8x1
STANDARD PROCEDURE - MEASURING PIS-
TON PROTRUSION
After replacing the pistons/connecting rods or
machining the engine block contact surface, it is then
necessary to measure the piston protrusion.
Measure protrusion between piston crown and cyl-
inder head contact surface without the head gasket
installed. The measurment must be carried out in
the direction of the piston pin in order to eliminate
piston rock.
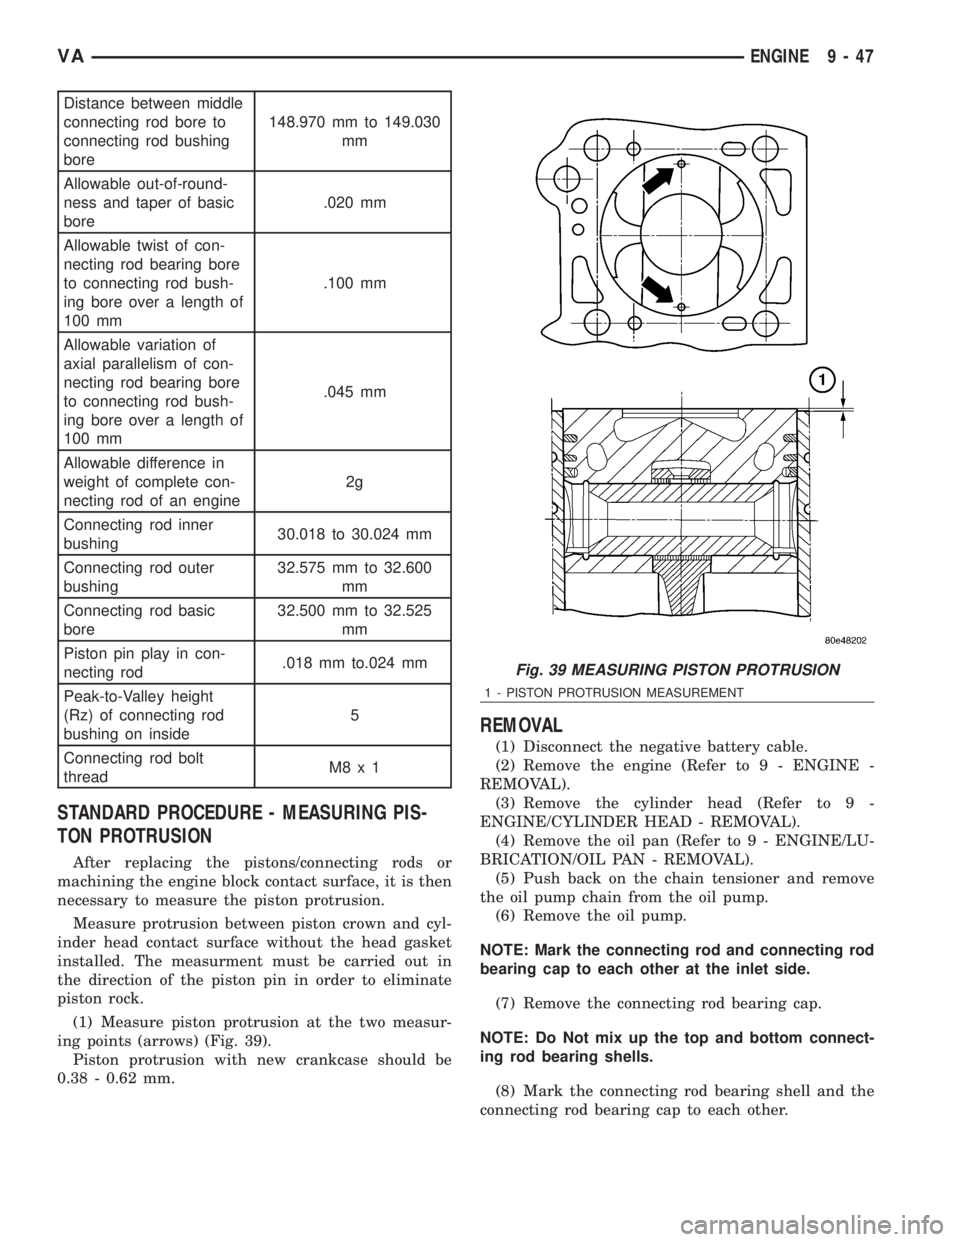
(1) Measure piston protrusion at the two measur-
ing points (arrows) (Fig. 39).
Piston protrusion with new crankcase should be
0.38 - 0.62 mm.
REMOVAL
(1) Disconnect the negative battery cable.
(2) Remove the engine (Refer to 9 - ENGINE -
REMOVAL).
(3) Remove the cylinder head (Refer to 9 -
ENGINE/CYLINDER HEAD - REMOVAL).
(4) Remove the oil pan (Refer to 9 - ENGINE/LU-
BRICATION/OIL PAN - REMOVAL).
(5) Push back on the chain tensioner and remove
the oil pump chain from the oil pump.
(6) Remove the oil pump.
NOTE: Mark the connecting rod and connecting rod
bearing cap to each other at the inlet side.
(7) Remove the connecting rod bearing cap.
NOTE: Do Not mix up the top and bottom connect-
ing rod bearing shells.
(8) Mark the connecting rod bearing shell and the
connecting rod bearing cap to each other.
Fig. 39 MEASURING PISTON PROTRUSION
1 - PISTON PROTRUSION MEASUREMENT
VAENGINE 9 - 47
Page 1635 of 2305
INSTALLATION
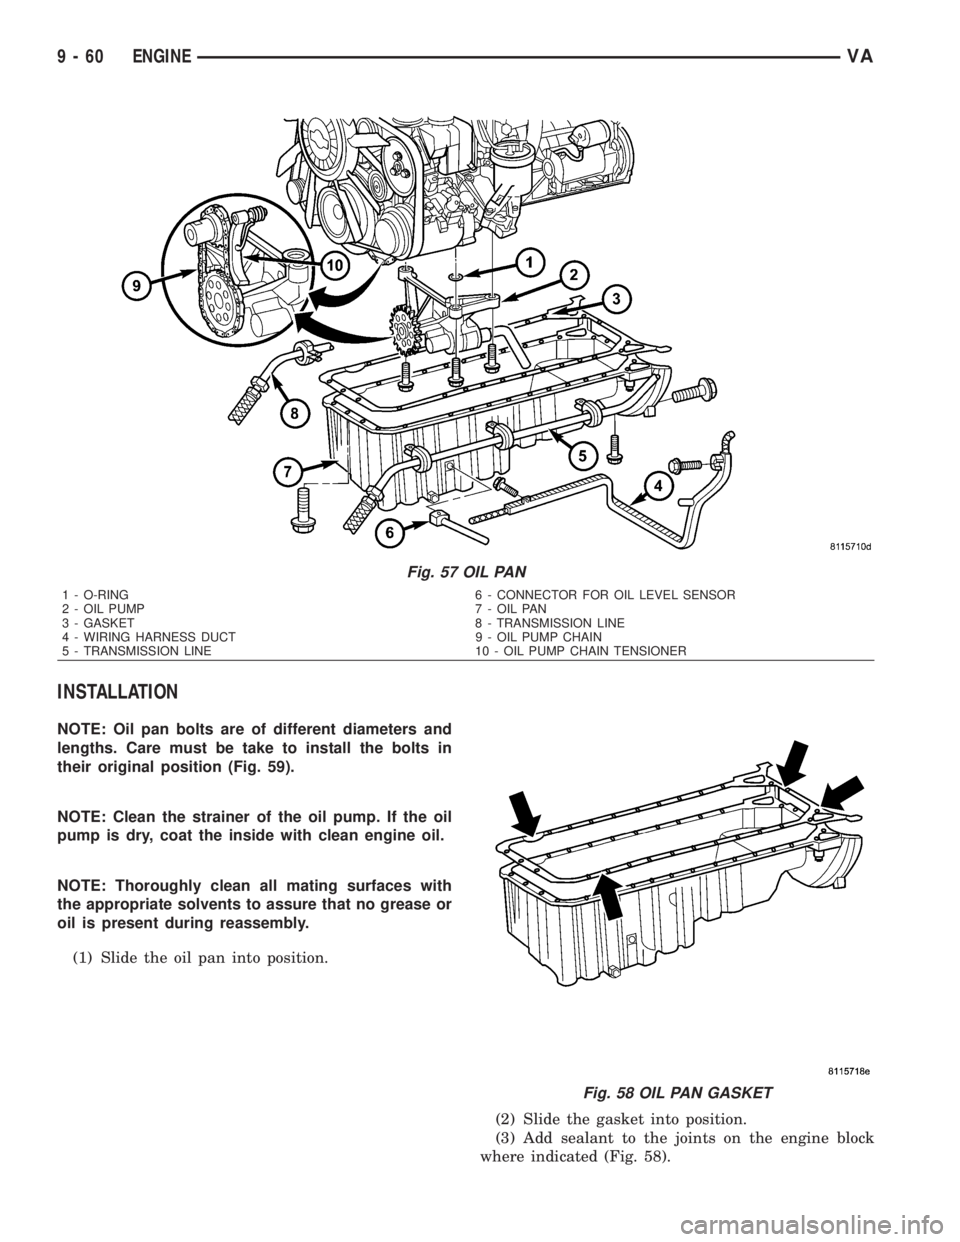
NOTE: Oil pan bolts are of different diameters and
lengths. Care must be take to install the bolts in
their original position (Fig. 59).
NOTE: Clean the strainer of the oil pump. If the oil
pump is dry, coat the inside with clean engine oil.
NOTE: Thoroughly clean all mating surfaces with
the appropriate solvents to assure that no grease or
oil is present during reassembly.
(1) Slide the oil pan into position.
(2) Slide the gasket into position.
(3) Add sealant to the joints on the engine block
where indicated (Fig. 58).
Fig. 57 OIL PAN
1 - O-RING 6 - CONNECTOR FOR OIL LEVEL SENSOR
2 - OIL PUMP 7 - OIL PAN
3 - GASKET 8 - TRANSMISSION LINE
4 - WIRING HARNESS DUCT 9 - OIL PUMP CHAIN
5 - TRANSMISSION LINE 10 - OIL PUMP CHAIN TENSIONER
Fig. 58 OIL PAN GASKET
9 - 60 ENGINEVA
Page 1644 of 2305
(8) Position the front exhaust pipe aside.
(9) Lower the vehicle.
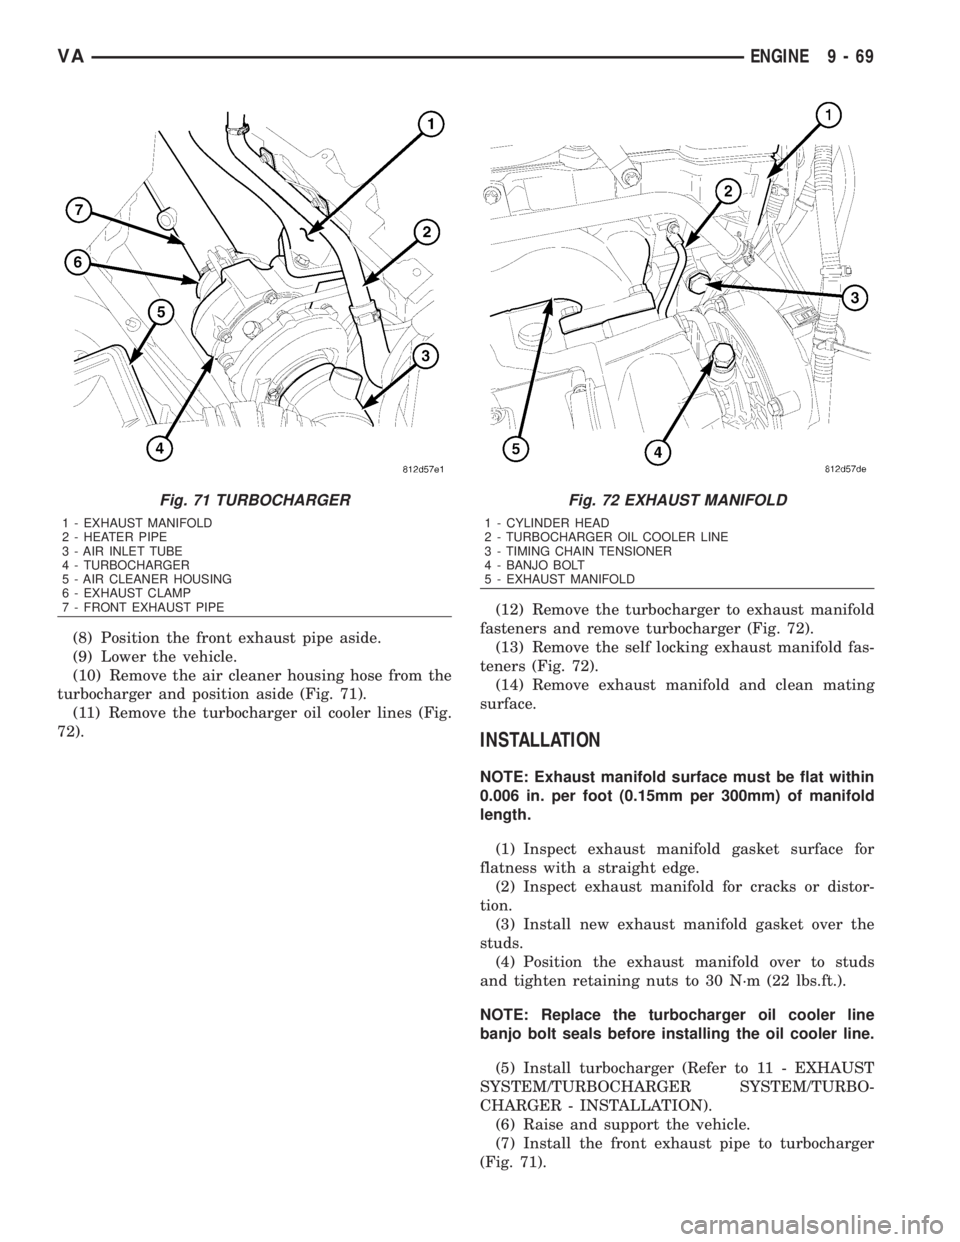
(10) Remove the air cleaner housing hose from the
turbocharger and position aside (Fig. 71).
(11) Remove the turbocharger oil cooler lines (Fig.
72).(12) Remove the turbocharger to exhaust manifold
fasteners and remove turbocharger (Fig. 72).
(13) Remove the self locking exhaust manifold fas-
teners (Fig. 72).
(14) Remove exhaust manifold and clean mating
surface.
INSTALLATION
NOTE: Exhaust manifold surface must be flat within
0.006 in. per foot (0.15mm per 300mm) of manifold
length.
(1) Inspect exhaust manifold gasket surface for
flatness with a straight edge.
(2) Inspect exhaust manifold for cracks or distor-
tion.
(3) Install new exhaust manifold gasket over the
studs.
(4) Position the exhaust manifold over to studs
and tighten retaining nuts to 30 N´m (22 lbs.ft.).
NOTE: Replace the turbocharger oil cooler line
banjo bolt seals before installing the oil cooler line.
(5) Install turbocharger (Refer to 11 - EXHAUST
SYSTEM/TURBOCHARGER SYSTEM/TURBO-
CHARGER - INSTALLATION).
(6) Raise and support the vehicle.
(7) Install the front exhaust pipe to turbocharger
(Fig. 71).
Fig. 71 TURBOCHARGER
1 - EXHAUST MANIFOLD
2 - HEATER PIPE
3 - AIR INLET TUBE
4 - TURBOCHARGER
5 - AIR CLEANER HOUSING
6 - EXHAUST CLAMP
7 - FRONT EXHAUST PIPE
Fig. 72 EXHAUST MANIFOLD
1 - CYLINDER HEAD
2 - TURBOCHARGER OIL COOLER LINE
3 - TIMING CHAIN TENSIONER
4 - BANJO BOLT
5 - EXHAUST MANIFOLD
VAENGINE 9 - 69
Page 1726 of 2305
INSTALLATION
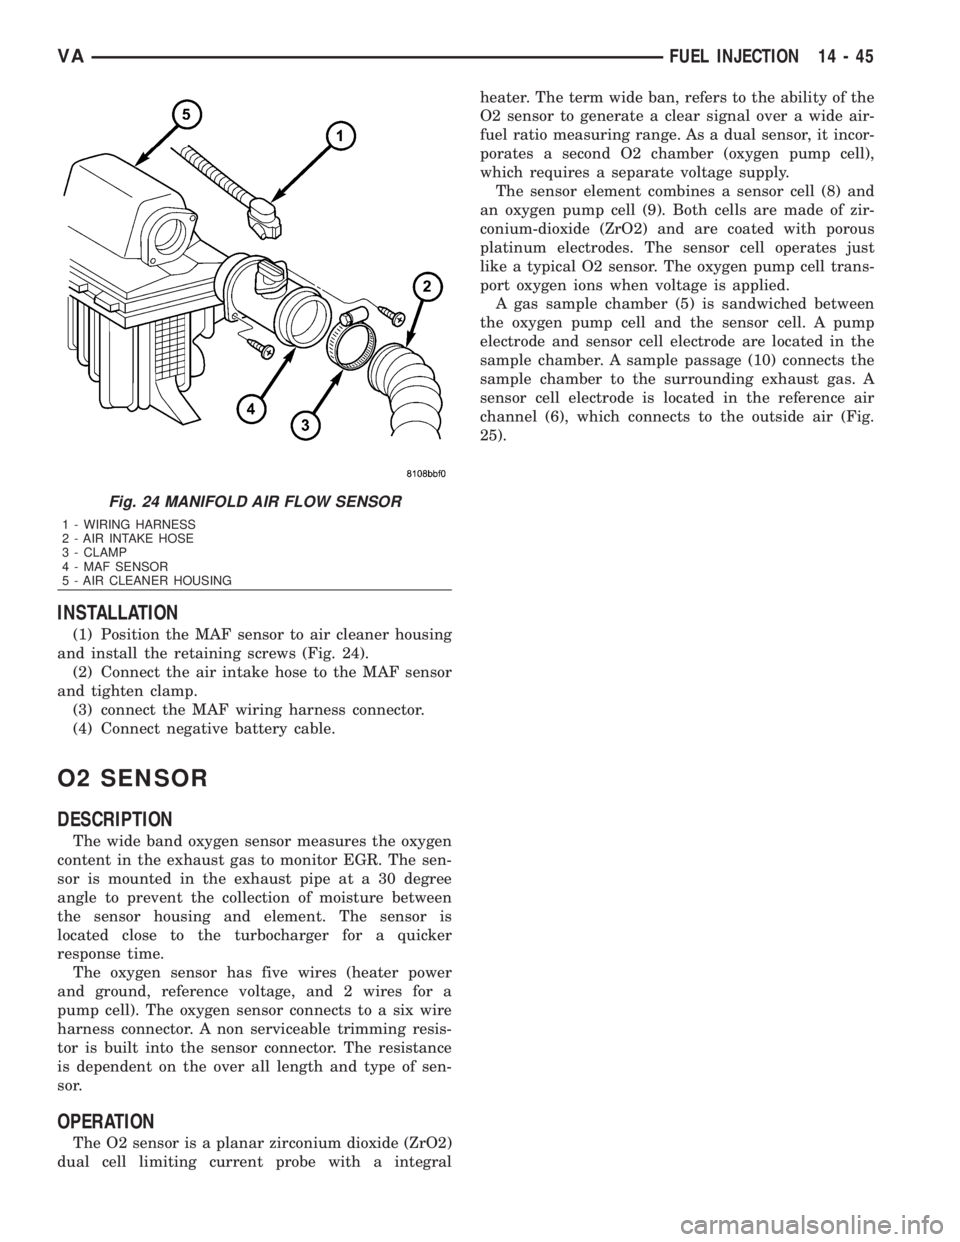
(1) Position the MAF sensor to air cleaner housing
and install the retaining screws (Fig. 24).
(2) Connect the air intake hose to the MAF sensor
and tighten clamp.
(3) connect the MAF wiring harness connector.
(4) Connect negative battery cable.
O2 SENSOR
DESCRIPTION
The wide band oxygen sensor measures the oxygen
content in the exhaust gas to monitor EGR. The sen-
sor is mounted in the exhaust pipe at a 30 degree
angle to prevent the collection of moisture between
the sensor housing and element. The sensor is
located close to the turbocharger for a quicker
response time.
The oxygen sensor has five wires (heater power
and ground, reference voltage, and 2 wires for a
pump cell). The oxygen sensor connects to a six wire
harness connector. A non serviceable trimming resis-
tor is built into the sensor connector. The resistance
is dependent on the over all length and type of sen-
sor.
OPERATION
The O2 sensor is a planar zirconium dioxide (ZrO2)
dual cell limiting current probe with a integralheater. The term wide ban, refers to the ability of the
O2 sensor to generate a clear signal over a wide air-
fuel ratio measuring range. As a dual sensor, it incor-
porates a second O2 chamber (oxygen pump cell),
which requires a separate voltage supply.
The sensor element combines a sensor cell (8) and
an oxygen pump cell (9). Both cells are made of zir-
conium-dioxide (ZrO2) and are coated with porous
platinum electrodes. The sensor cell operates just
like a typical O2 sensor. The oxygen pump cell trans-
port oxygen ions when voltage is applied.
A gas sample chamber (5) is sandwiched between
the oxygen pump cell and the sensor cell. A pump
electrode and sensor cell electrode are located in the
sample chamber. A sample passage (10) connects the
sample chamber to the surrounding exhaust gas. A
sensor cell electrode is located in the reference air
channel (6), which connects to the outside air (Fig.
25).
Fig. 24 MANIFOLD AIR FLOW SENSOR
1 - WIRING HARNESS
2 - AIR INTAKE HOSE
3 - CLAMP
4 - MAF SENSOR
5 - AIR CLEANER HOUSING
VAFUEL INJECTION 14 - 45
Page 1864 of 2305
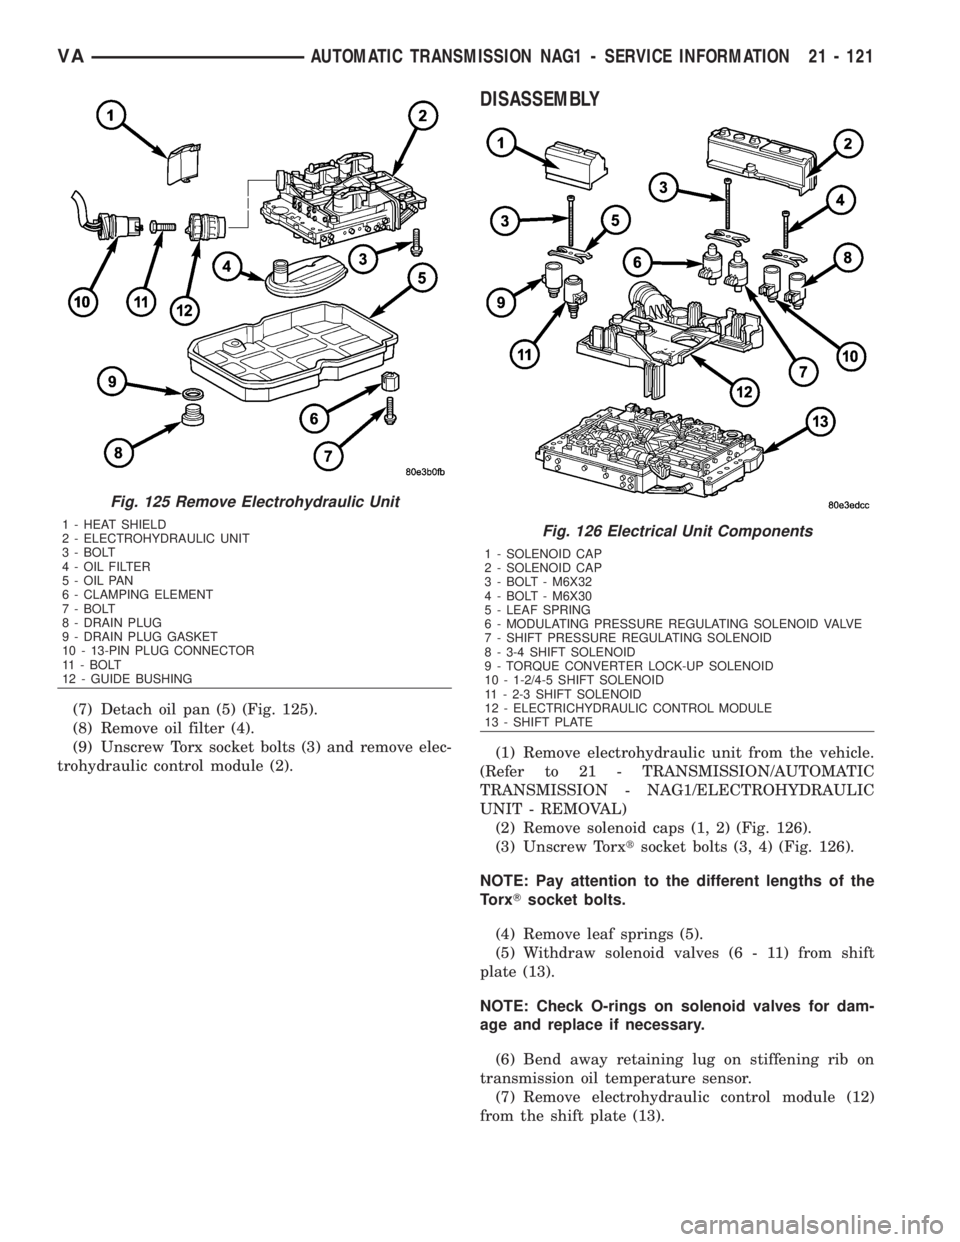
(7) Detach oil pan (5) (Fig. 125).
(8) Remove oil filter (4).
(9) Unscrew Torx socket bolts (3) and remove elec-
trohydraulic control module (2).
DISASSEMBLY
(1) Remove electrohydraulic unit from the vehicle.
(Refer to 21 - TRANSMISSION/AUTOMATIC
TRANSMISSION - NAG1/ELECTROHYDRAULIC
UNIT - REMOVAL)
(2) Remove solenoid caps (1, 2) (Fig. 126).
(3) Unscrew Torxtsocket bolts (3, 4) (Fig. 126).
NOTE: Pay attention to the different lengths of the
TorxTsocket bolts.
(4) Remove leaf springs (5).
(5) Withdraw solenoid valves (6 - 11) from shift
plate (13).
NOTE: Check O-rings on solenoid valves for dam-
age and replace if necessary.
(6) Bend away retaining lug on stiffening rib on
transmission oil temperature sensor.
(7) Remove electrohydraulic control module (12)
from the shift plate (13).
Fig. 125 Remove Electrohydraulic Unit
1 - HEAT SHIELD
2 - ELECTROHYDRAULIC UNIT
3 - BOLT
4 - OIL FILTER
5 - OIL PAN
6 - CLAMPING ELEMENT
7 - BOLT
8 - DRAIN PLUG
9 - DRAIN PLUG GASKET
10 - 13-PIN PLUG CONNECTOR
11 - BOLT
12 - GUIDE BUSHINGFig. 126 Electrical Unit Components
1 - SOLENOID CAP
2 - SOLENOID CAP
3 - BOLT - M6X32
4 - BOLT - M6X30
5 - LEAF SPRING
6 - MODULATING PRESSURE REGULATING SOLENOID VALVE
7 - SHIFT PRESSURE REGULATING SOLENOID
8 - 3-4 SHIFT SOLENOID
9 - TORQUE CONVERTER LOCK-UP SOLENOID
10 - 1-2/4-5 SHIFT SOLENOID
11 - 2-3 SHIFT SOLENOID
12 - ELECTRICHYDRAULIC CONTROL MODULE
13 - SHIFT PLATE
VAAUTOMATIC TRANSMISSION NAG1 - SERVICE INFORMATION 21 - 121
Page 1872 of 2305
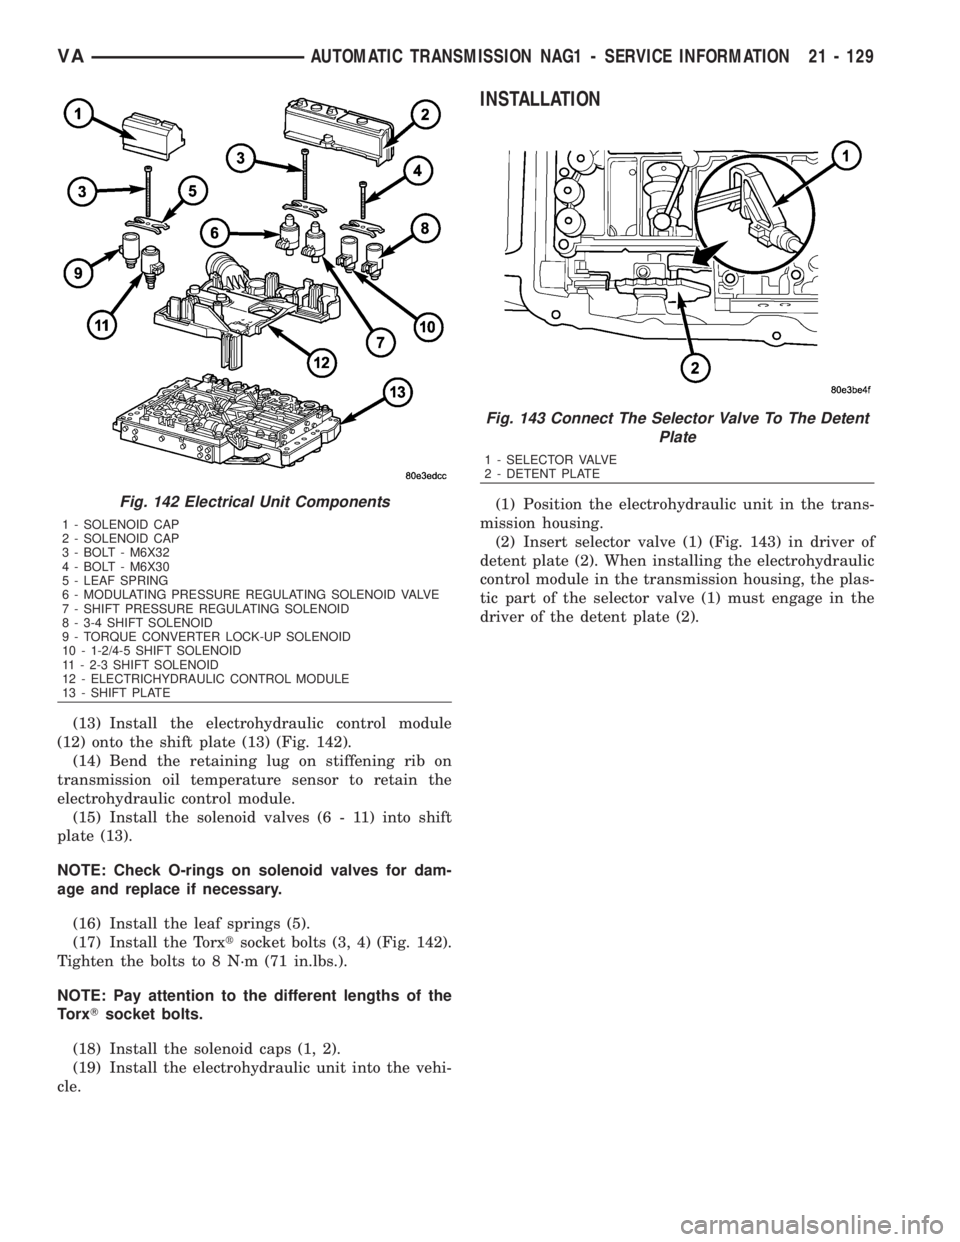
(13) Install the electrohydraulic control module
(12) onto the shift plate (13) (Fig. 142).
(14) Bend the retaining lug on stiffening rib on
transmission oil temperature sensor to retain the
electrohydraulic control module.
(15) Install the solenoid valves (6 - 11) into shift
plate (13).
NOTE: Check O-rings on solenoid valves for dam-
age and replace if necessary.
(16) Install the leaf springs (5).
(17) Install the Torxtsocket bolts (3, 4) (Fig. 142).
Tighten the bolts to 8 N´m (71 in.lbs.).
NOTE: Pay attention to the different lengths of the
TorxTsocket bolts.
(18) Install the solenoid caps (1, 2).
(19) Install the electrohydraulic unit into the vehi-
cle.
INSTALLATION
(1) Position the electrohydraulic unit in the trans-
mission housing.
(2) Insert selector valve (1) (Fig. 143) in driver of
detent plate (2). When installing the electrohydraulic
control module in the transmission housing, the plas-
tic part of the selector valve (1) must engage in the
driver of the detent plate (2).Fig. 142 Electrical Unit Components
1 - SOLENOID CAP
2 - SOLENOID CAP
3 - BOLT - M6X32
4 - BOLT - M6X30
5 - LEAF SPRING
6 - MODULATING PRESSURE REGULATING SOLENOID VALVE
7 - SHIFT PRESSURE REGULATING SOLENOID
8 - 3-4 SHIFT SOLENOID
9 - TORQUE CONVERTER LOCK-UP SOLENOID
10 - 1-2/4-5 SHIFT SOLENOID
11 - 2-3 SHIFT SOLENOID
12 - ELECTRICHYDRAULIC CONTROL MODULE
13 - SHIFT PLATE
Fig. 143 Connect The Selector Valve To The Detent
Plate
1 - SELECTOR VALVE
2 - DETENT PLATE
VAAUTOMATIC TRANSMISSION NAG1 - SERVICE INFORMATION 21 - 129
Page 1915 of 2305
directly, which means that the solenoids must have
very high outputs to close the valves against the siz-
able flow areas and line pressures found in current
transmissions. Fast response time is also necessary
to ensure accurate control of the transmission.
The strength of the magnetic field is the primary
force that determines the speed of operation in a par-
ticular solenoid design. A stronger magnetic field will
cause the plunger to move at a greater speed than a
weaker one. There are basically two ways to increase
the force of the magnetic field:
1. Increase the amount of current applied to the
coil or
2. Increase the number of turns of wire in the coil.
The most common practice is to increase the num-
ber of turns by using thin wire that can completely
fill the available space within the solenoid housing.
The strength of the spring and the length of the
plunger also contribute to the response speed possi-
ble by a particular solenoid design.
A solenoid can also be described by the method by
which it is controlled. Some of the possibilities
include variable force, pulse-width modulated, con-
stant ON, or duty cycle. The variable force and pulse-
width modulated versions utilize similar methods to
control the current flow through the solenoid to posi-
tion the solenoid plunger at a desired position some-
where between full ON and full OFF. The constant
ON and duty cycled versions control the voltage
across the solenoid to allow either full flow or no flow
through the solenoid's valve.UPSHIFT / DOWNSHIFT SOLENOID VALVES
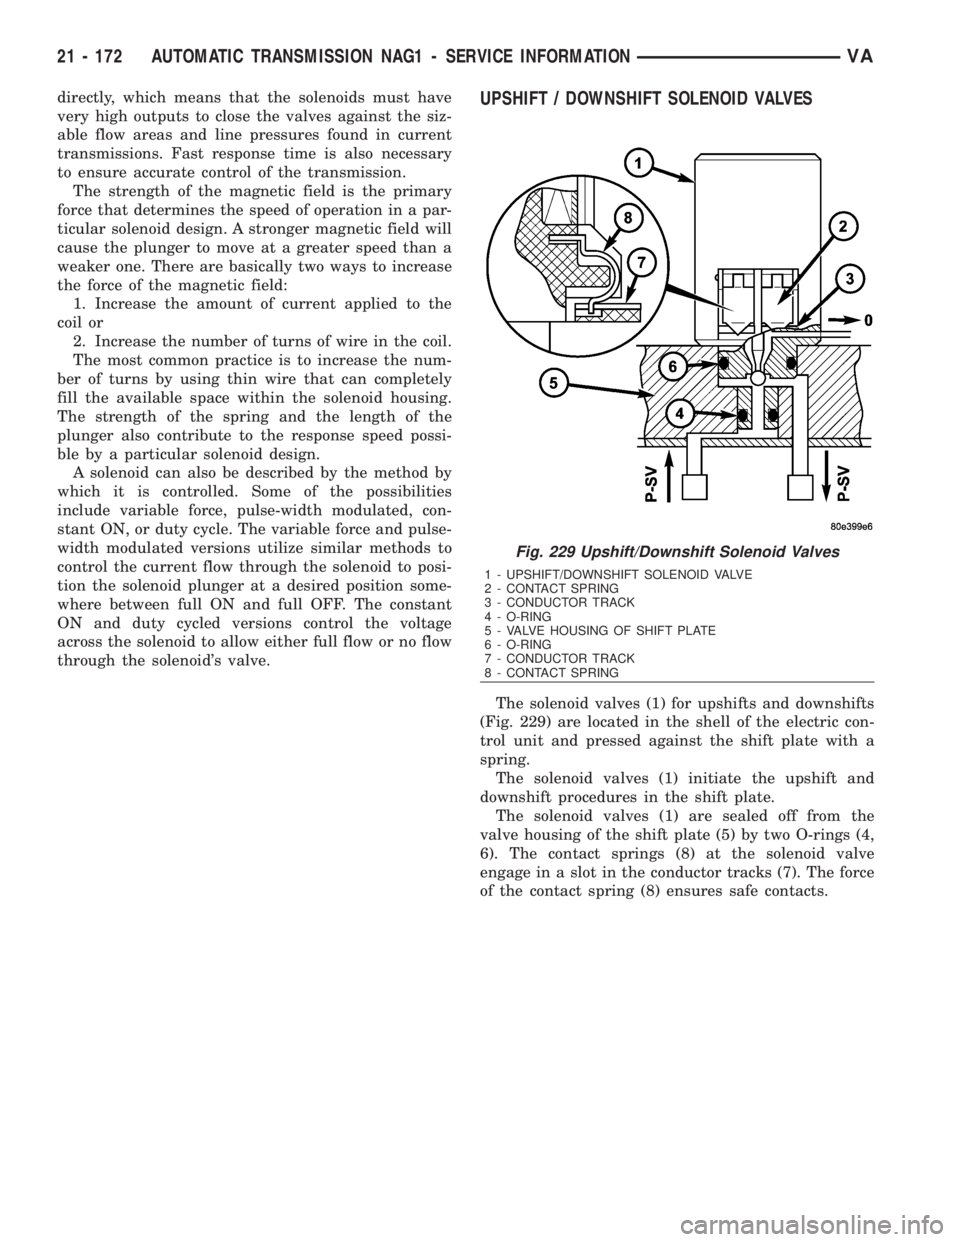
The solenoid valves (1) for upshifts and downshifts
(Fig. 229) are located in the shell of the electric con-
trol unit and pressed against the shift plate with a
spring.
The solenoid valves (1) initiate the upshift and
downshift procedures in the shift plate.
The solenoid valves (1) are sealed off from the
valve housing of the shift plate (5) by two O-rings (4,
6). The contact springs (8) at the solenoid valve
engage in a slot in the conductor tracks (7). The force
of the contact spring (8) ensures safe contacts.
Fig. 229 Upshift/Downshift Solenoid Valves
1 - UPSHIFT/DOWNSHIFT SOLENOID VALVE
2 - CONTACT SPRING
3 - CONDUCTOR TRACK
4 - O-RING
5 - VALVE HOUSING OF SHIFT PLATE
6 - O-RING
7 - CONDUCTOR TRACK
8 - CONTACT SPRING
21 - 172 AUTOMATIC TRANSMISSION NAG1 - SERVICE INFORMATIONVA
Page 1945 of 2305
aligned and sealed. If component alignment or seal-
ing is necessary, refer to the appropriate section of
this group for proper procedures.
WATER LEAK TESTS
WARNING: DO NOT USE ELECTRIC SHOP LIGHTS
OR TOOLS IN WATER TEST AREA. PERSONAL
INJURY CAN RESULT.
When the conditions causing a water leak have
been determined, simulate the conditions as closely
as possible.
²If a leak occurs with the vehicle parked in a
steady light rain, flood the leak area with an open-
ended garden hose.
²If a leak occurs while driving at highway speeds
in a steady rain, test the leak area with a reasonable
velocity stream or fan spray of water. Direct the
spray in a direction comparable to actual conditions.
²If a leak occurs when the vehicle is parked on an
incline, hoist the end or side of the vehicle to simu-
late this condition. This method can be used when
the leak occurs when the vehicle accelerates, stops or
turns. If the leak occurs on acceleration, hoist the
front of the vehicle. If the leak occurs when braking,
hoist the back of the vehicle. If the leak occurs on left
turns, hoist the left side of the vehicle. If the leak
occurs on right turns, hoist the right side of the vehi-
cle. For hoisting recommendations (Refer to LUBRI-
CATION & MAINTENANCE/HOISTING -
STANDARD PROCEDURE).
WATER LEAK DETECTION
To detect a water leak point-of-entry, do a water
test and watch for water tracks or droplets forming
on the inside of the vehicle. If necessary, remove inte-
rior trim covers or panels to gain visual access to the
leak area. If the hose cannot be positioned without
being held, have someone help do the water test.
Some water leaks must be tested for a considerable
length of time to become apparent. When a leak
appears, find the highest point of the water track or
drop. The highest point usually will show the point of
entry. After leak point has been found, repair the
leak and water test to verify that the leak has
stopped.
Locating the entry point of water that is leaking
into a cavity between panels can be difficult. The
trapped water may splash or run from the cavity,
often at a distance from the entry point. Most water
leaks of this type become apparent after accelerating,
stopping, turning, or when on an incline.
MIRROR INSPECTION METHOD
When a leak point area is visually obstructed, use
a suitable mirror to gain visual access. A mirror canalso be used to deflect light to a limited-access area
to assist in locating a leak point.
BRIGHT LIGHT LEAK TEST METHOD
Some water leaks in the luggage compartment can
be detected without water testing. Position the vehi-
cle in a brightly lit area. From inside the darkened
luggage compartment inspect around seals and body
seams. If necessary, have a helper direct a drop light
over the suspected leak areas around the luggage
compartment. If light is visible through a normally
sealed location, water could enter through the open-
ing.
PRESSURIZED LEAK TEST METHOD
When a water leak into the passenger compart-
ment cannot be detected by water testing, pressurize
the passenger compartment and soap test exterior of
the vehicle. To pressurize the passenger compart-
ment, close all doors and windows, start engine, and
set heater control to high blower in HEAT position. If
engine can not be started, connect a charger to the
battery to ensure adequate voltage to the blower.
With interior pressurized, apply dish detergent solu-
tion to suspected leak area on the exterior of the
vehicle. Apply detergent solution with spray device or
soft bristle brush. If soap bubbles occur at a body
seam, joint, seal or gasket, the leak entry point could
be at that location.
DIAGNOSIS AND TESTING - WIND NOISE
Wind noise is the result of most air leaks. Air leaks
can be caused by poor sealing, improper body compo-
nent alignment, body seam porosity, or missing plugs
in the engine compartment or door hinge pillar areas.
All body sealing points should be airtight in normal
driving conditions. Moving sealing surfaces will not
always seal airtight under all conditions. At times,
side glass or door seals will allow wind noise to be
noticed in the passenger compartment during high
cross winds. Over compensating on door or glass
adjustments to stop wind noise that occurs under
severe conditions can cause premature seal wear and
excessive closing or latching effort. After a repair pro-
cedure has been performed, test vehicle to verify
noise has stopped before returning vehicle to use.
VISUAL INSPECTION BEFORE TESTS
Verify that floor and body plugs are in place and
body components are aligned and sealed. If compo-
nent alignment or sealing is necessary, refer to the
appropriate section of this group for proper proce-
dures.
ROAD TESTING WIND NOISE
(1) Drive the vehicle to verify the general location
of the wind noise.
23 - 2 BODYVA