2006 LAND ROVER FRELANDER 2 child seat
[x] Cancel search: child seatPage 2785 of 3229

65
Child safety
R
Child restraint check list
Every time a child travels in the vehicle observe
the following :-
• Use appropriate child restraints.
• Carefully follow the restraint system
manufacturers instructions.
• Adjust the harnesses for every child on
every trip.
• Ensure that all slack is removed from the
adult seatbelt.
• Always attach the top tether when
installing an ISOFIX seat.
• Always check the security of the child
restraint. See ISOFIX ANCHOR POINTS
(page 67).
• Do not dress a child in bulky clothing, or
place any objects/padding between the
child and the restraint.
• Regularly check the fit and condition of
child restraints. If the fit is poor, or
wear/damage is visible replace the
restraint immediately.
• Set a good example - al ways wear your
seat belt.
Page 2786 of 3229
Child safety
66
L
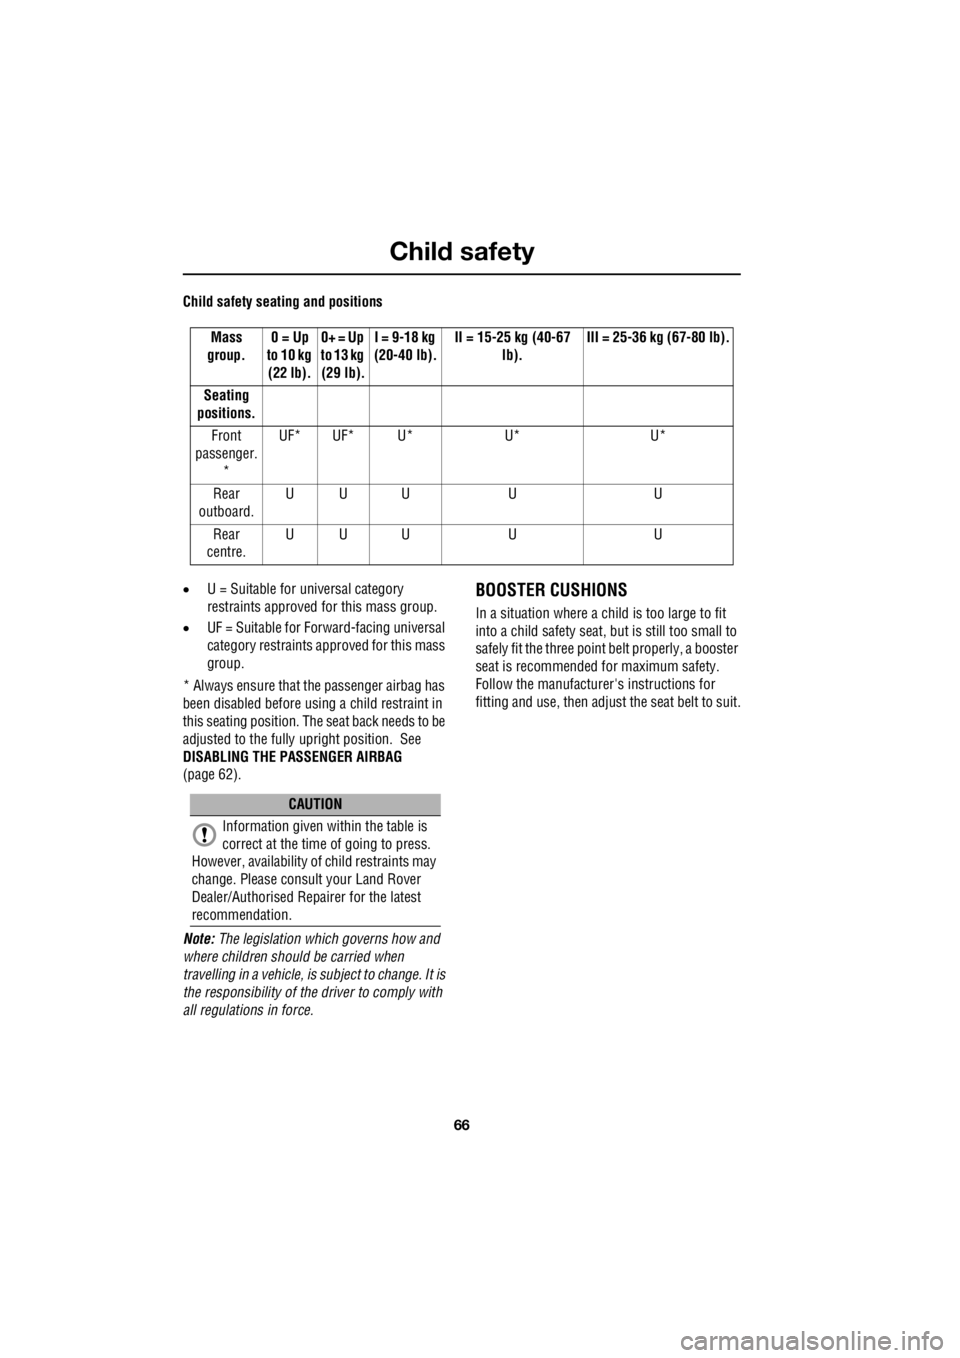
Child safety seating and positions
• U = Suitable for universal category
restraints approved for this mass group.
• UF = Suitable for Forward-facing universal
category restraints approved for this mass
group.
* Always ensure that the passenger airbag has
been disabled before us ing a child restraint in
this seating position. The seat back needs to be
adjusted to the fully upright position. See
DISABLING THE PASSENGER AIRBAG
(page 62).
Note: The legislation whic h governs how and
where children should be carried when
travelling in a vehicle, is subject to change. It is
the responsibility of the driver to comply with
all regulations in force.
BOOSTER CUSHIONS
In a situation where a child is too large to fit
into a child safety seat, but is still too small to
safely fit the three point belt properly, a booster
seat is recommended for maximum safety.
Follow the manufacturer's instructions for
fitting and use, then adjust the seat belt to suit.
Mass
group. 0 = Up
to 10 kg
(22 lb). 0+ = Up
to 13 kg
(29 lb). I = 9-18 kg
(20-40 lb). II = 15-25 kg (40-67
lb). III = 25-36 kg (67-80 lb).
Seating
positions.
Front
passenger.
* UF* UF* U* U* U*
Rear
outboard. UU U U U
Rear
centre. UU U U U
CAUTION
Information given within the table is
correct at the time of going to press.
However, availability of child restraints may
change. Please cons ult your Land Rover
Dealer/Authorised Repairer for the latest
recommendation.
Page 2787 of 3229
67
Child safety
R
ISOFIX ANCHOR POINTS
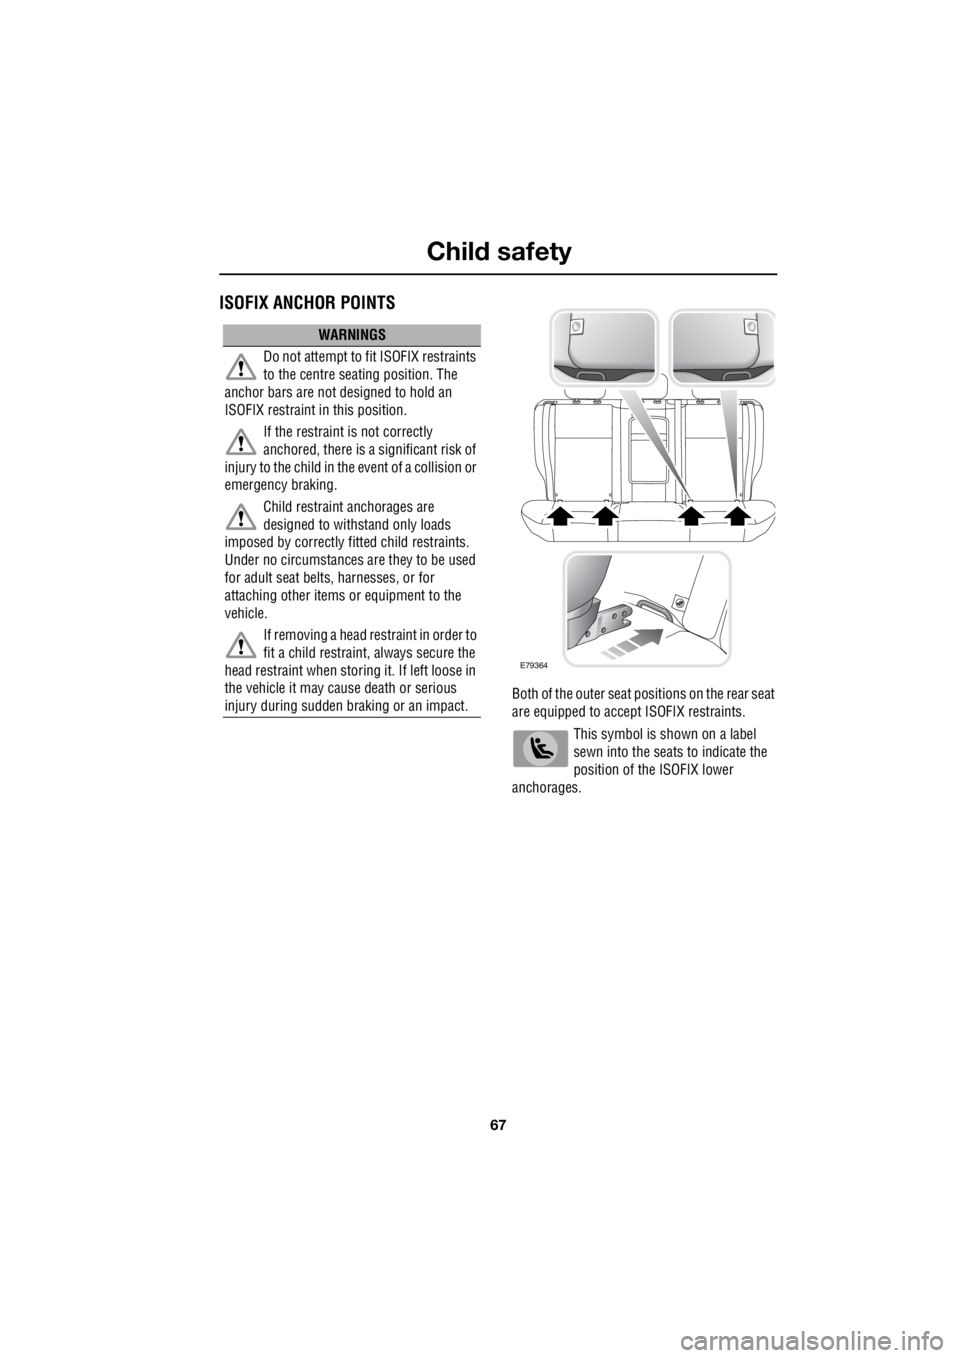
Both of the outer seat pos itions on the rear seat
are equipped to accept ISOFIX restraints.
This symbol is shown on a label
sewn into the seats to indicate the
position of the ISOFIX lower
anchorages.
WARNINGS
Do not attempt to fit ISOFIX restraints
to the centre seating position. The
anchor bars are not designed to hold an
ISOFIX restraint in this position.
If the restraint is not correctly
anchored, there is a significant risk of
injury to the child in the event of a collision or
emergency braking.
Child restraint anchorages are
designed to withstand only loads
imposed by correctly fi tted child restraints.
Under no circumstances are they to be used
for adult seat belts, harnesses, or for
attaching other items or equipment to the
vehicle.
If removing a head restraint in order to
fit a child restraint, always secure the
head restraint when stor ing it. If left loose in
the vehicle it may cause death or serious
injury during sudden braking or an impact.
E79364
Page 2788 of 3229
Child safety
68
L
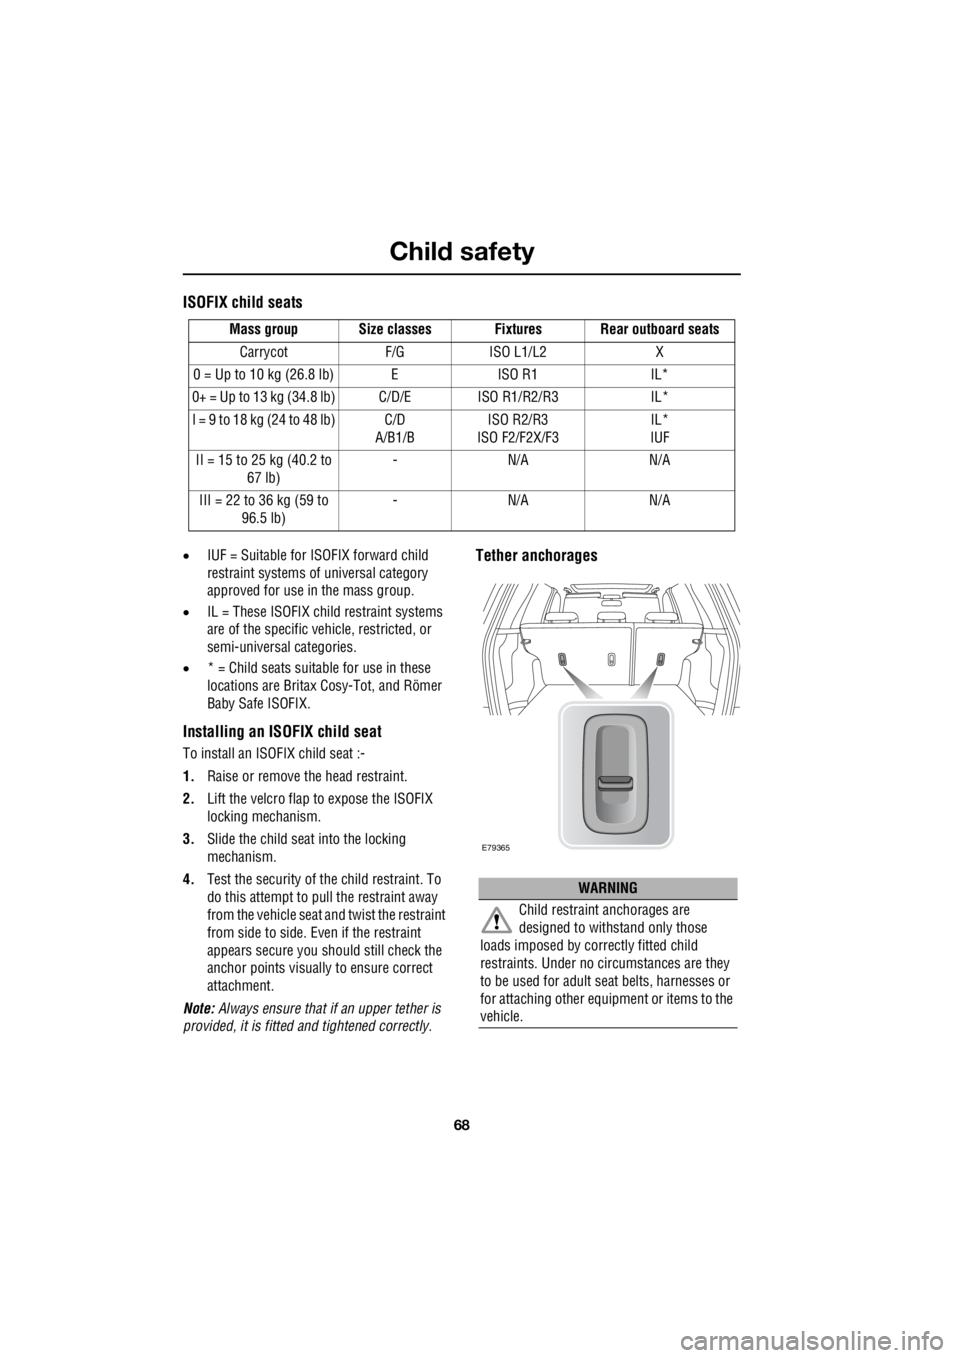
ISOFIX child seats
• IUF = Suitable for ISOFIX forward child
restraint systems of universal category
approved for use in the mass group.
• IL = These ISOFIX child restraint systems
are of the specific vehicle, restricted, or
semi-universal categories.
• * = Child seats suitable for use in these
locations are Britax Cosy-Tot, and Römer
Baby Safe ISOFIX.
Installing an ISOFIX child seat
To install an ISOFIX child seat :-
1. Raise or remove the head restraint.
2. Lift the velcro flap to expose the ISOFIX
locking mechanism.
3. Slide the child seat into the locking
mechanism.
4. Test the security of the child restraint. To
do this attempt to pull the restraint away
from the vehicle seat and twist the restraint
from side to side. Even if the restraint
appears secure you should still check the
anchor points visually to ensure correct
attachment.
Note: Always ensure that if an upper tether is
provided, it is fitted and tightened correctly.
Tether anchorages
Mass group Size classes Fixtures Rear outboard seats
Carrycot F/G ISO L1/L2 X
0 = Up to 10 kg (26.8 lb) E ISO R1 IL*
0+ = Up to 13 kg (34.8 lb) C/D/E ISO R1/R2/R3 IL*
I = 9 to 18 kg (24 to 48 lb) C/D A/B1/B ISO R2/R3
ISO F2/F2X/F3 IL*
IUF
II = 15 to 25 kg (40.2 to 67 lb) -N/A N/A
III = 22 to 36 kg (59 to 96.5 lb) -N/A N/A
WARNING
Child restraint anchorages are
designed to withstand only those
loads imposed by correctly fitted child
restraints. Under no circumstances are they
to be used for adult se at belts, harnesses or
for attaching other equipment or items to the
vehicle.
E79365
Page 2789 of 3229
69
Child safety
R
Tether anchorages are provided at each rear
outboard seating position.
Note: A tether anchorage is provided for the
centre seat position, but should only be used
when a non- ISOFIX child seat with a tether is
used in this seating position.
CHILD SAFETY LOCKS
Child safety locks are fitted to the rear doors to
allow you to prevent accidental opening of the
doors when the vehicle is in motion.
If children are to be carried in the rear seat
positions, it is recomme nded that the rear door
interior handles are disabled.
Note: For convenience the rear door interior
handles should be re-e nabled when carrying
adult passengers in th e rear seat positions.
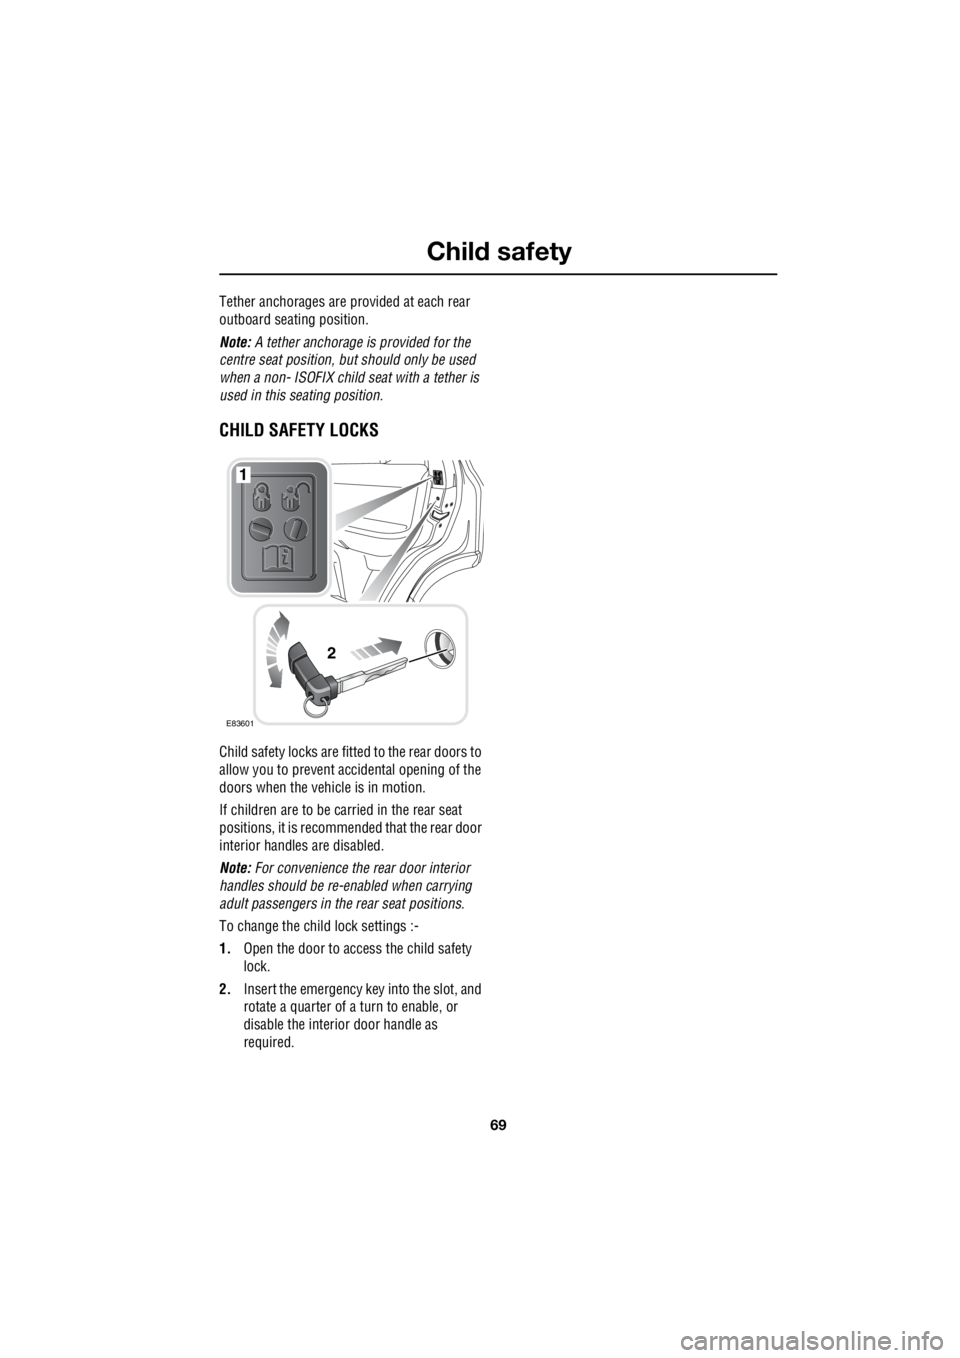
To change the child lock settings :-
1. Open the door to access the child safety
lock.
2. Insert the emergency key into the slot, and
rotate a quarter of a turn to enable, or
disable the interior door handle as
required.
E83601
1
2
Page 2814 of 3229
Windows and mirrors
94
L
Window reset
The windows will need to be reset if the battery
is disconnected, beco mes discharged, or
power supply is interrupted.
Reset as follows :-
1. Close the window fully.
2. Release the switch, then lift it to the close
position and hold for two seconds.
3. Open the window fully.
4. Release the switch, then push it to the
open position and hold for two seconds.
5. Lift and release the switch to operate the
one touch function.
6. Repeat the procedure on each window.
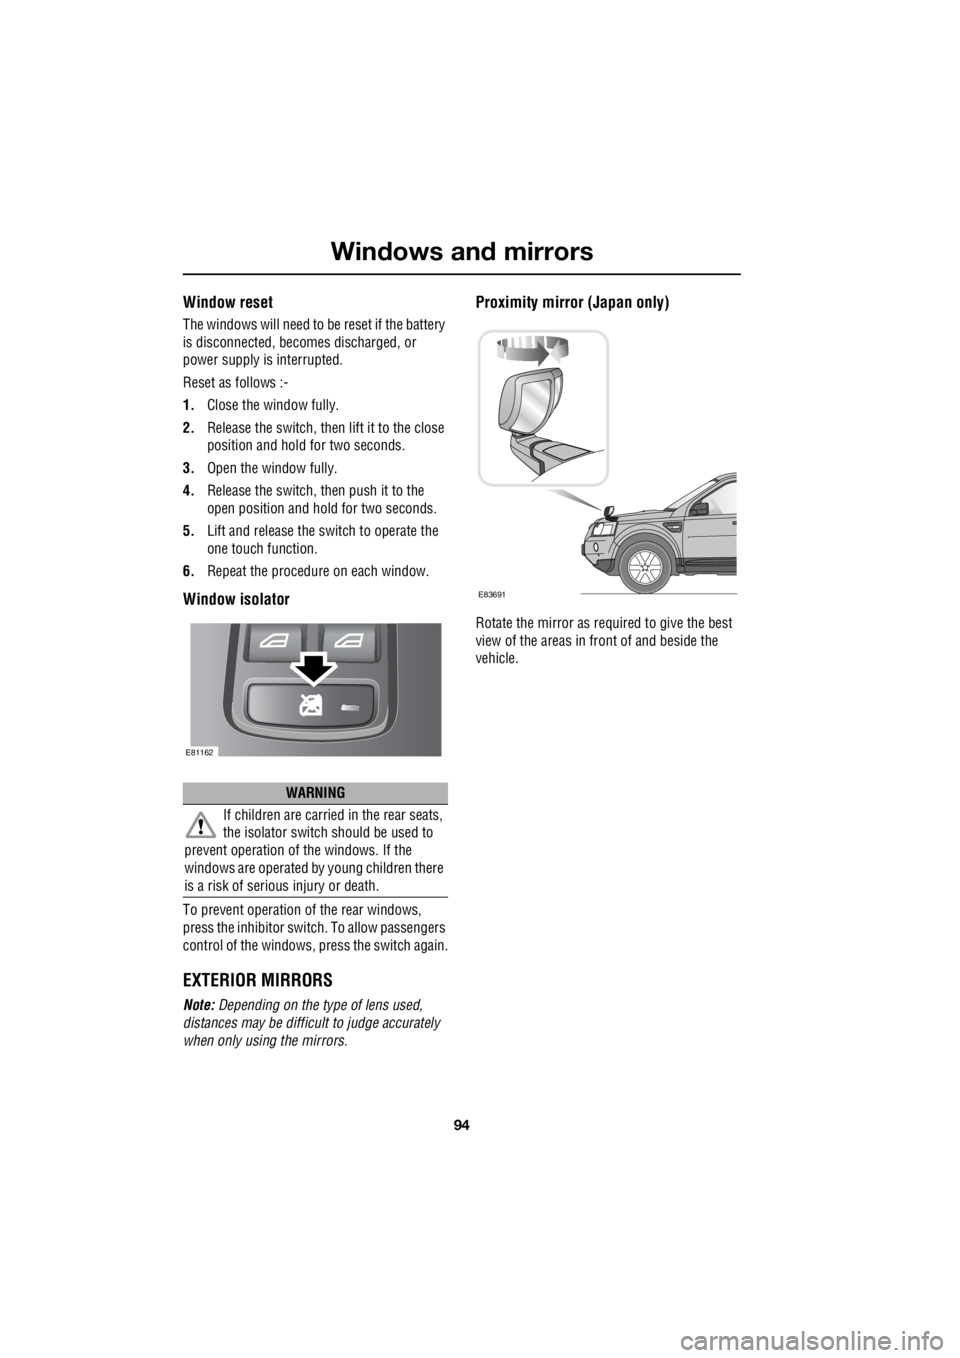
Window isolator
To prevent operation of the rear windows,
press the inhibitor switch. To allow passengers
control of the windows, press the switch again.
EXTERIOR MIRRORS
Note: Depending on the type of lens used,
distances may be difficu lt to judge accurately
when only using the mirrors.
Proximity mirror (Japan only)
Rotate the mirror as required to give the best
view of the areas in front of and beside the
vehicle.
WARNING
If children are carried in the rear seats,
the isolator switch should be used to
prevent operation of the windows. If the
windows are operated by young children there
is a risk of serious injury or death.
E81162
E83691
Page 2926 of 3229
Status after a collision
206
L
INSPECTING SAFETY SYSTEM
COMPONENTS
Following a collision the seat belt and
Supplementary Restrain t System components
should be inspected for damage and/or
deformity. The inspection and any subsequent
repair work should only be carried out by a
Land Rover Dealer/Authorised Repairer, or
other suitably qualified persons.
Components which require inspection include
:-
• Seat belt webbing and mechanisms.
• Seat belt pr e-tensioners.
• Airbag covers and modules.
• Seat frames and mounting points.
• Child seats.
• Child seat anchor points.
Note: This list is not exhaustive.
In addition to the physical items checked the
electronic control system and it's associated
wiring should also be checked thoroughly. This
process will include a diagnostic check which
can only be carried out by a Land Rover
Dealer/Authorised repairer or suitably qualified
and equipped persons.
WARNING
It is not recommended that the vehicle
be driven or used until all of the
occupant protecti on systems have
been checked.
Page 2992 of 3229

Index
272
L
Changing a bulb . . . . . . . . . . . . . . . . . . . . 77 Front fog lamp . . . . . . . . . . . . . . . . . . . 81
General information . . . . . . . . . . . . . . . 77
Headlamp unit bulbs . . . . . . . . . . . . . . . 79
High level brake lamp . . . . . . . . . . . . . . 83
Interior lamp bulbs . . . . . . . . . . . . . . . . 85
Number plate lamp bulb . . . . . . . . . . . . 84
Rear lamp bulbs . . . . . . . . . . . . . . . . . . 82
Removing the headlamp unit . . . . . . . . 78
Removing the rear lamp unit . . . . . . . . . 82
Side repeater lamp . . . . . . . . . . . . . . . . 84
Changing a fuse. . . . . . . . . . . . . . . . . . . . 195
Changing a road wheel . . . . . . . . . . . . . . 183 Locking wheel nuts . . . . . . . . . . . . . . . 187
Positioning the jack. . . . . . . . . . . . . . . 185
Temporary spare wheel . . . . . . . . . . . . 186
Tool kit . . . . . . . . . . . . . . . . . . . . . . . . 186
Wheel changing safety . . . . . . . . . . . . 184
Wheel nut tightening sequence . . . . . . 186
Changing the vehicle battery . . . . . . . . . . 174
Battery disposal . . . . . . . . . . . . . . . . . 175
Disconnecting . . . . . . . . . . . . . . . . . . . 174
Effects of disconnecting . . . . . . . . . . . 175
Refitting . . . . . . . . . . . . . . . . . . . . . . . 175
Replacement batteries. . . . . . . . . . . . . 175
Changing the wiper blades . . . . . . . . . . . . 90 Changing the front wiper blades . . . . . . 91
Changing the rear wiper blades. . . . . . . 92
Service position . . . . . . . . . . . . . . . . . . 90
Channel automatic tuning . . . . . . . . . . . . 236
Channel options. . . . . . . . . . . . . . . . . . . . 236 Scanning channels . . . . . . . . . . . . . . . 238
Selecting a channel . . . . . . . . . . . . . . . 237
Selecting a subchannel . . . . . . . . . . . . 237
Selecting an ensemble . . . . . . . . . . . . 237
Signal availability . . . . . . . . . . . . . . . . 238
Charging the vehicle battery . . . . . . . . . . 174
Checking the wiper blades . . . . . . . . . . . . . 90
Child safety locks . . . . . . . . . . . . . . . . . . . 69
Child seats . . . . . . . . . . . . . . . . . . . . . . . . . 64 Child restraint check list . . . . . . . . . . . . 65
Cigar lighter . . . . . . . . . . . . . . . . . . . . . . . 109
Cleaning the alloy wheels . . . . . . . . . . . . 154 Cleaning the exterior . . . . . . . . . . . . . . . . . 154
Cleaning after off-road driving . . . . . . . 155
Washing the vehicle . . . . . . . . . . . . . . . 154
Cleaning the interior . . . . . . . . . . . . . . . . . 155
Airbag module covers . . . . . . . . . . . . . 156
Carpets and fabrics . . . . . . . . . . . . . . . 156
Instrument pack, clock, and audio equipment . . . . . . . . . . . . . . . . . . . . 156
Leather . . . . . . . . . . . . . . . . . . . . . . . . . 155
Plastic and cloth . . . . . . . . . . . . . . . . . . 155
Seat belts . . . . . . . . . . . . . . . . . . . . . . . 156
Clock. . . . . . . . . . . . . . . . . . . . . . . . . . . . . 107
Setting the clock - Premium audio . . . . 107
Setting the clock - Standard audio . . . . 108
Compact disc display options . . . . . . . . . . 247
Compact disc function menu . . . . . . . . . . 247
Compact disc pause . . . . . . . . . . . . . . . . . 246
Compact disc playback . . . . . . . . . . . . . . . 246
Compact disc selection . . . . . . . . . . . . . . . 246
Compact disc track scanning . . . . . . . . . . 248 CD scan - Premium audio . . . . . . . . . . 248
CD Scan - Standard audio . . . . . . . . . . 249
Coolant check . . . . . . . . . . . . . . . . . . . . . . 163
Cruise control . . . . . . . . . . . . . . . . . . . . . . 130
Principle of operation . . . . . . . . . . . . . . 130
Cup holders . . . . . . . . . . . . . . . . . . . . . . . 111
D
Diesel particulate filter (DPF) . . . . . . . . . . 116 Regeneration . . . . . . . . . . . . . . . . . . . . 116
Warning indicators and messages . . . . 117
Digital audio broadcasting General information . . . . . . . . . . . . . . . 234
Dimensions. . . . . . . . . . . . . . . . . . . . . . . . 213
Clutch and brake pedal travel (China only) .
214
Wheel alignment data (China only). . . . 214
Direction indicators. . . . . . . . . . . . . . . . . . . 75
Disabling the passenger airbag . . . . . . . . . . 62 Operational status indicator . . . . . . . . . . 63
Disarming the alarm . . . . . . . . . . . . . . . . . . 46 Deactivating the alarm when triggered . . 46
Disarming when the unlock button fails to
work. . . . . . . . . . . . . . . . . . . . . . . . . . 46
Display options . . . . . . . . . . . . . . . . . . . . . 236
DPF . . . . . . . . . . . . . . . . . . . . . . . . . . . . . . 116