2006 LAND ROVER FRELANDER 2 change time
[x] Cancel search: change timePage 2786 of 3229

Child safety
66
L
Child safety seating and positions
• U = Suitable for universal category
restraints approved for this mass group.
• UF = Suitable for Forward-facing universal
category restraints approved for this mass
group.
* Always ensure that the passenger airbag has
been disabled before us ing a child restraint in
this seating position. The seat back needs to be
adjusted to the fully upright position. See
DISABLING THE PASSENGER AIRBAG
(page 62).
Note: The legislation whic h governs how and
where children should be carried when
travelling in a vehicle, is subject to change. It is
the responsibility of the driver to comply with
all regulations in force.
BOOSTER CUSHIONS
In a situation where a child is too large to fit
into a child safety seat, but is still too small to
safely fit the three point belt properly, a booster
seat is recommended for maximum safety.
Follow the manufacturer's instructions for
fitting and use, then adjust the seat belt to suit.
Mass
group. 0 = Up
to 10 kg
(22 lb). 0+ = Up
to 13 kg
(29 lb). I = 9-18 kg
(20-40 lb). II = 15-25 kg (40-67
lb). III = 25-36 kg (67-80 lb).
Seating
positions.
Front
passenger.
* UF* UF* U* U* U*
Rear
outboard. UU U U U
Rear
centre. UU U U U
CAUTION
Information given within the table is
correct at the time of going to press.
However, availability of child restraints may
change. Please cons ult your Land Rover
Dealer/Authorised Repairer for the latest
recommendation.
Page 2792 of 3229
Lighting
72
L
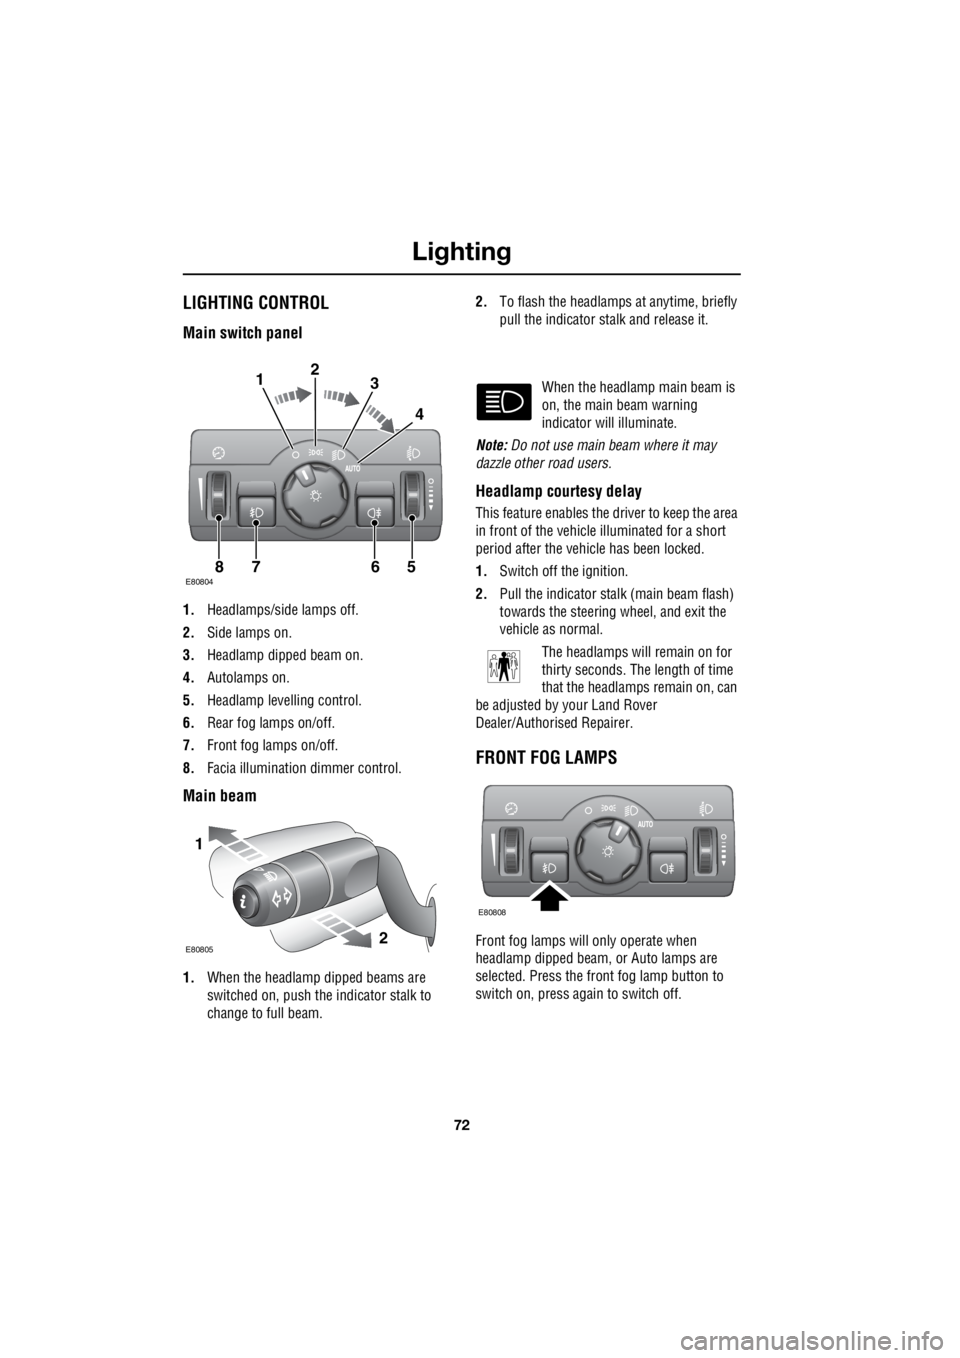
LightingLIGHTING CONTROL
Main switch panel
1. Headlamps/side lamps off.
2. Side lamps on.
3. Headlamp dipped beam on.
4. Autolamps on.
5. Headlamp levelling control.
6. Rear fog lamps on/off.
7. Front fog lamps on/off.
8. Facia illumination dimmer control.
Main beam
1.When the headlamp dipped beams are
switched on, push the indicator stalk to
change to full beam. 2.
To flash the headlamps at anytime, briefly
pull the indicator stalk and release it.
When the headlamp main beam is
on, the main beam warning
indicator will illuminate.
Note: Do not use main beam where it may
dazzle other road users.
Headlamp courtesy delay
This feature enables the driver to keep the area
in front of the vehicle illuminated for a short
period after the vehicle has been locked.
1. Switch off the ignition.
2. Pull the indicator stalk (main beam flash)
towards the steering wheel, and exit the
vehicle as normal.
The headlamps will remain on for
thirty seconds. The length of time
that the headlamps remain on, can
be adjusted by your Land Rover
Dealer/Authorised Repairer.
FRONT FOG LAMPS
Front fog lamps will only operate when
headlamp dipped beam, or Auto lamps are
selected. Press the front fog lamp button to
switch on, press again to switch off.
E808047865
123
4
1
2E80805
E80808
Page 2822 of 3229
Climate control
102
L
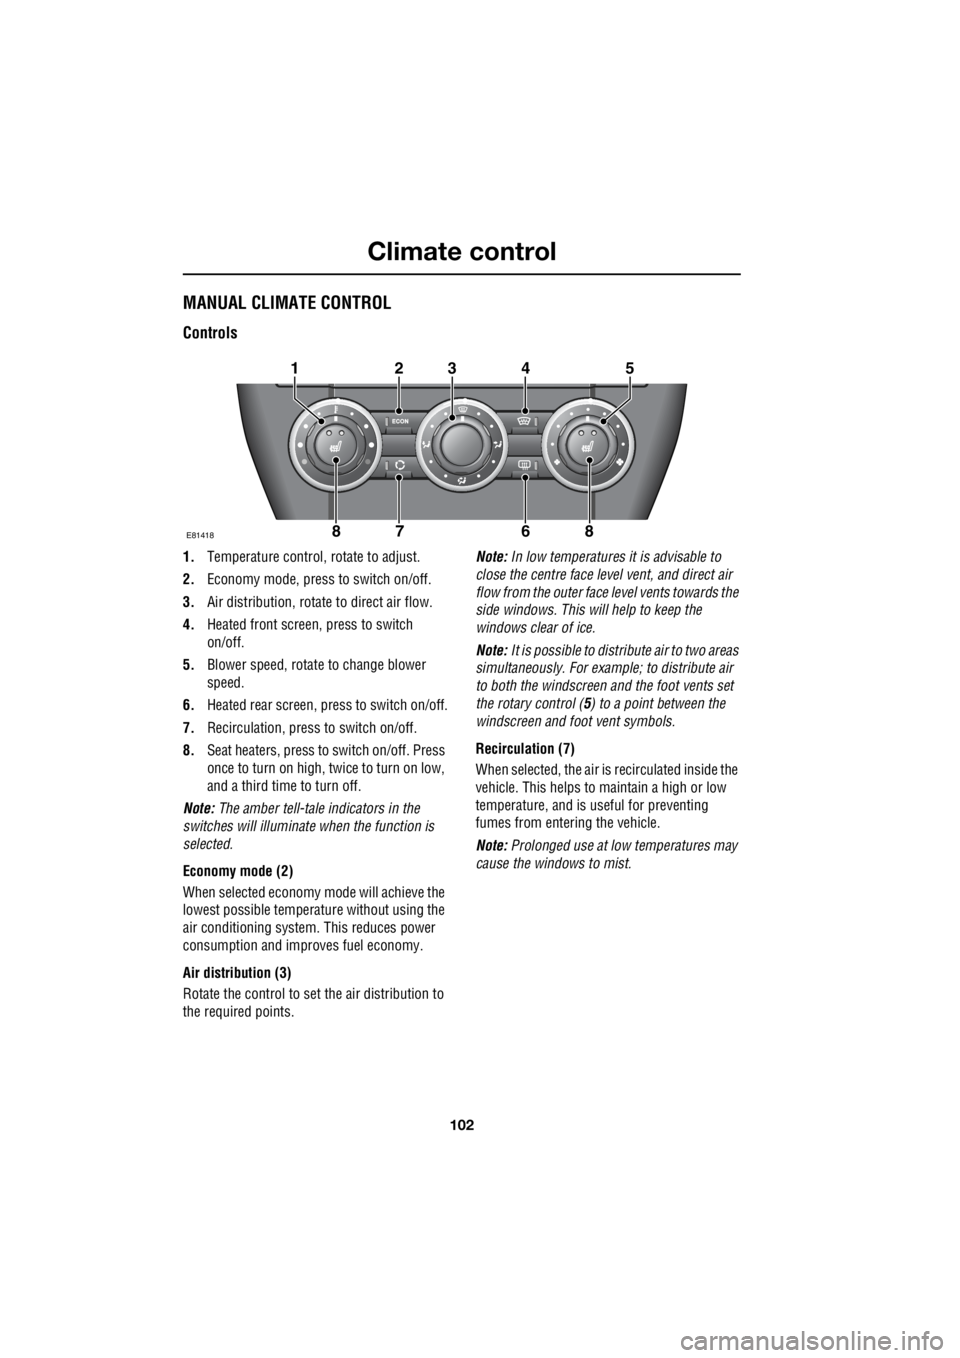
MANUAL CLIMATE CONTROL
Controls
1. Temperature control, rotate to adjust.
2. Economy mode, press to switch on/off.
3. Air distribution, rotate to direct air flow.
4. Heated front screen, press to switch
on/off.
5. Blower speed, rotate to change blower
speed.
6. Heated rear screen, press to switch on/off.
7. Recirculation, pres s to switch on/off.
8. Seat heaters, press to switch on/off. Press
once to turn on high, twice to turn on low,
and a third time to turn off.
Note: The amber tell-tale indicators in the
switches will illuminate when the function is
selected.
Economy mode (2)
When selected economy mo de will achieve the
lowest possible temperature without using the
air conditioning system . This reduces power
consumption and impr oves fuel economy.
Air distribution (3)
Rotate the control to set the air distribution to
the required points. Note:
In low temperatures it is advisable to
close the centre face le vel vent, and direct air
flow from the outer face level vents towards the
side windows. This will help to keep the
windows clear of ice.
Note: It is possible to distribute air to two areas
simultaneously. For example; to distribute air
to both the windscreen a nd the foot vents set
the rotary control ( 5) to a point between the
windscreen and foot vent symbols.
Recirculation (7)
When selected, the air is recirculated inside the
vehicle. This helps to maintain a high or low
temperature, and is useful for preventing
fumes from entering the vehicle.
Note: Prolonged use at low temperatures may
cause the windows to mist.
E81418
12345
8678
Page 2823 of 3229
103
Climate control
R
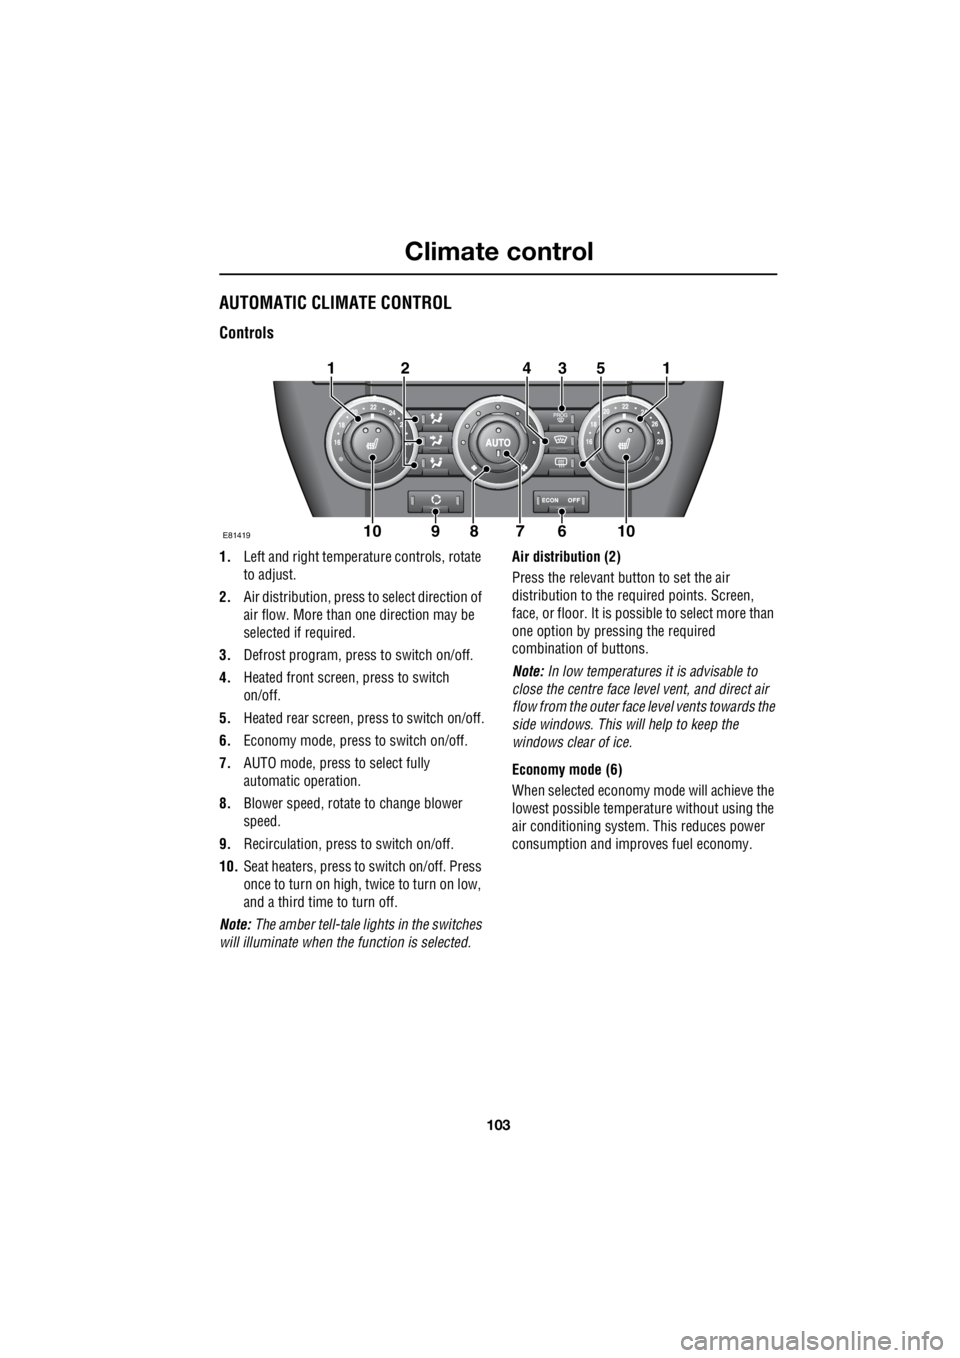
AUTOMATIC CLIMATE CONTROL
Controls
1. Left and right temperat ure controls, rotate
to adjust.
2. Air distribution, press to select direction of
air flow. More than one direction may be
selected if required.
3. Defrost program, press to switch on/off.
4. Heated front screen, press to switch
on/off.
5. Heated rear screen, press to switch on/off.
6. Economy mode, press to switch on/off.
7. AUTO mode, press to select fully
automatic operation.
8. Blower speed, rotate to change blower
speed.
9. Recirculation, press to switch on/off.
10. Seat heaters, press to switch on/off. Press
once to turn on high, twice to turn on low,
and a third time to turn off.
Note: The amber tell-tale lights in the switches
will illuminate when the function is selected. Air distribution (2)
Press the relevant button to set the air
distribution to the required points. Screen,
face, or floor. It is possible to select more than
one option by pressing the required
combination of buttons.
Note: In low temperatures it is advisable to
close the centre face leve l vent, and direct air
flow from the outer face level vents towards the
side windows. This will help to keep the
windows clear of ice.
Economy mode (6)
When selected economy mode will achieve the
lowest possible temperat ure without using the
air conditioning system . This reduces power
consumption and impr oves fuel economy.
E81419
131
6910
254
1078
Page 2824 of 3229
Climate control
104
L
Auto mode (7)
When the Auto function is selected, you have
the opportunity to select a fully automatic
operation, or manually adjust the fan speed and
the direction of air flow. All other adjustments
which are necessary to maintain the
temperature that you have selected are made
automatically by the climate control system.
There are two tell-tale indicators on the Auto
button. The round indicator represents the
blower control, and th e rectangular indicator
the air distribution control. In fully automatic
mode both indicators illuminate, the round
indicator will extinguish if the blower speed is
changed manually, and the rectangular
indicator extinguishes if the air distribution is
changed manually.
To resume fully automatic operation at any
time, press the Auto button.
Recirculation (9)
When selected, the air is recirculated inside the
vehicle. This helps to ma intain a high or low
temperature, and is useful for preventing
fumes from entering the vehicle.
A single brief press will se lect recirculation for
four minutes. The system will then revert to
fresh air intake to prevent misting.
Pressing and holding the button will select
recirculation until it is switched off. This state
is indicated by three flashes of the tell-tale lamp
in the switch.
Note: Prolonged use at low temperatures may
cause the windows to mist.HEATED WINDOWS AND MIRRORS
The heated windscreen is switched on by
briefly pressing the switch (4).
Note: The operation of the heated mirrors is
fully automatic, and requires no driver
intervention.
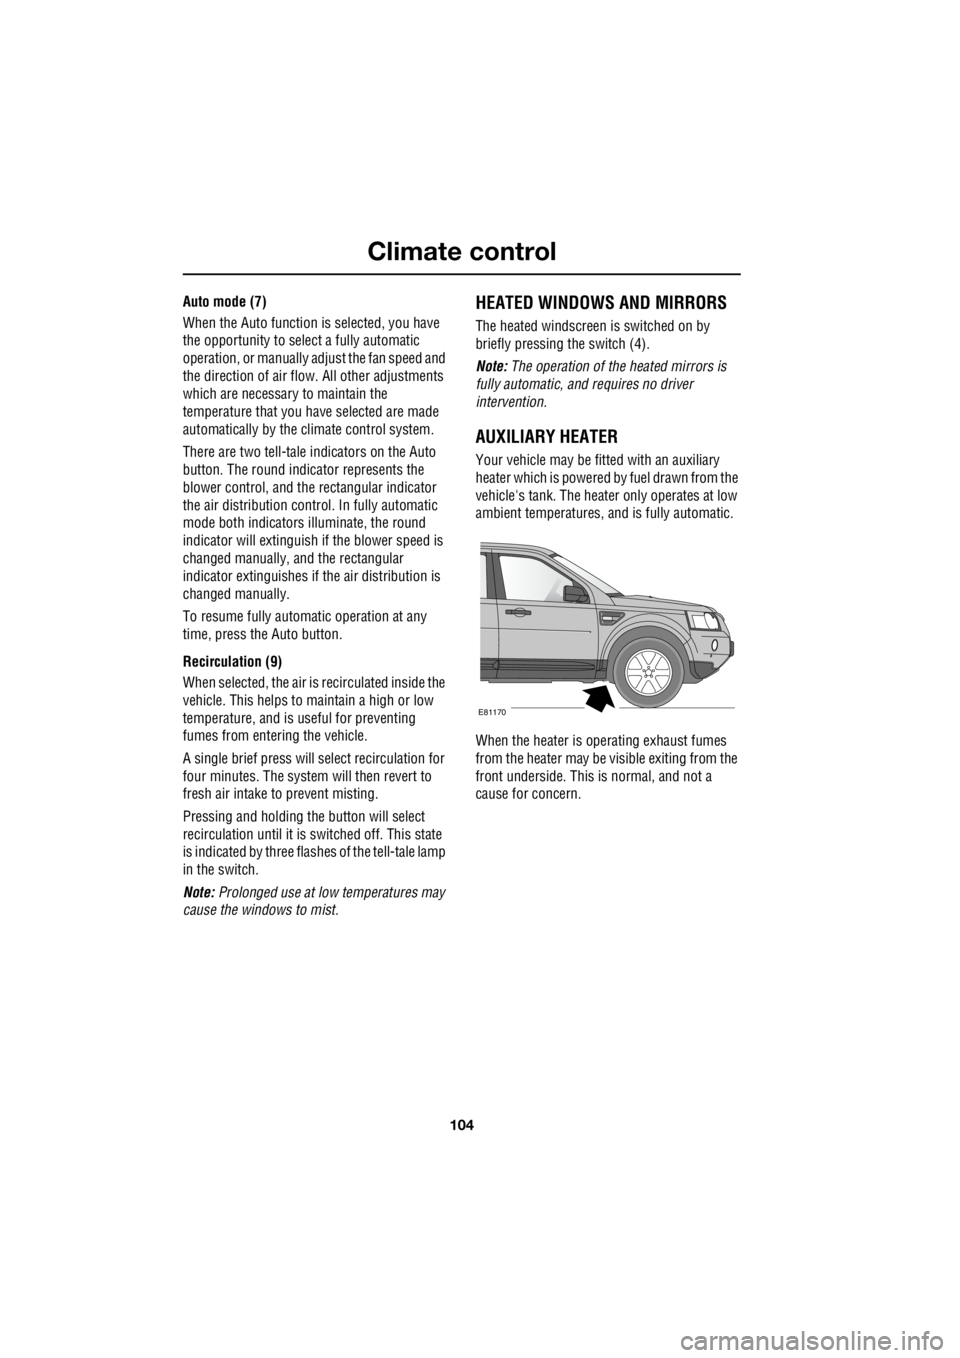
AUXILIARY HEATER
Your vehicle may be fitted with an auxiliary
heater which is powered by fuel drawn from the
vehicle's tank. The heater only operates at low
ambient temperatures, and is fully automatic.
When the heater is operating exhaust fumes
from the heater may be visible exiting from the
front underside. This is normal, and not a
cause for concern.
E81170
Page 2877 of 3229
157
Maintenance
R
MaintenanceGENERAL INFORMATION
Regular systematic maintenance is the key to
ensuring the continued re liability and efficiency
of your vehicle.
Maintenance is the owne r's responsibility and
you must ensure that owner maintenance
operations, oil services, inspections and brake
fluid and coolant changes are carried out when
required and according to the manufacturer's
recommendations.
The routine maintenance requirements for your
vehicle are shown in the Service Portfolio book.
Most of this necessar y workshop maintenance
requires specialised knowledge and
equipment, and should preferably be entrusted
to a Land Rover Dealer/Authorised Repairer.
Service intervals
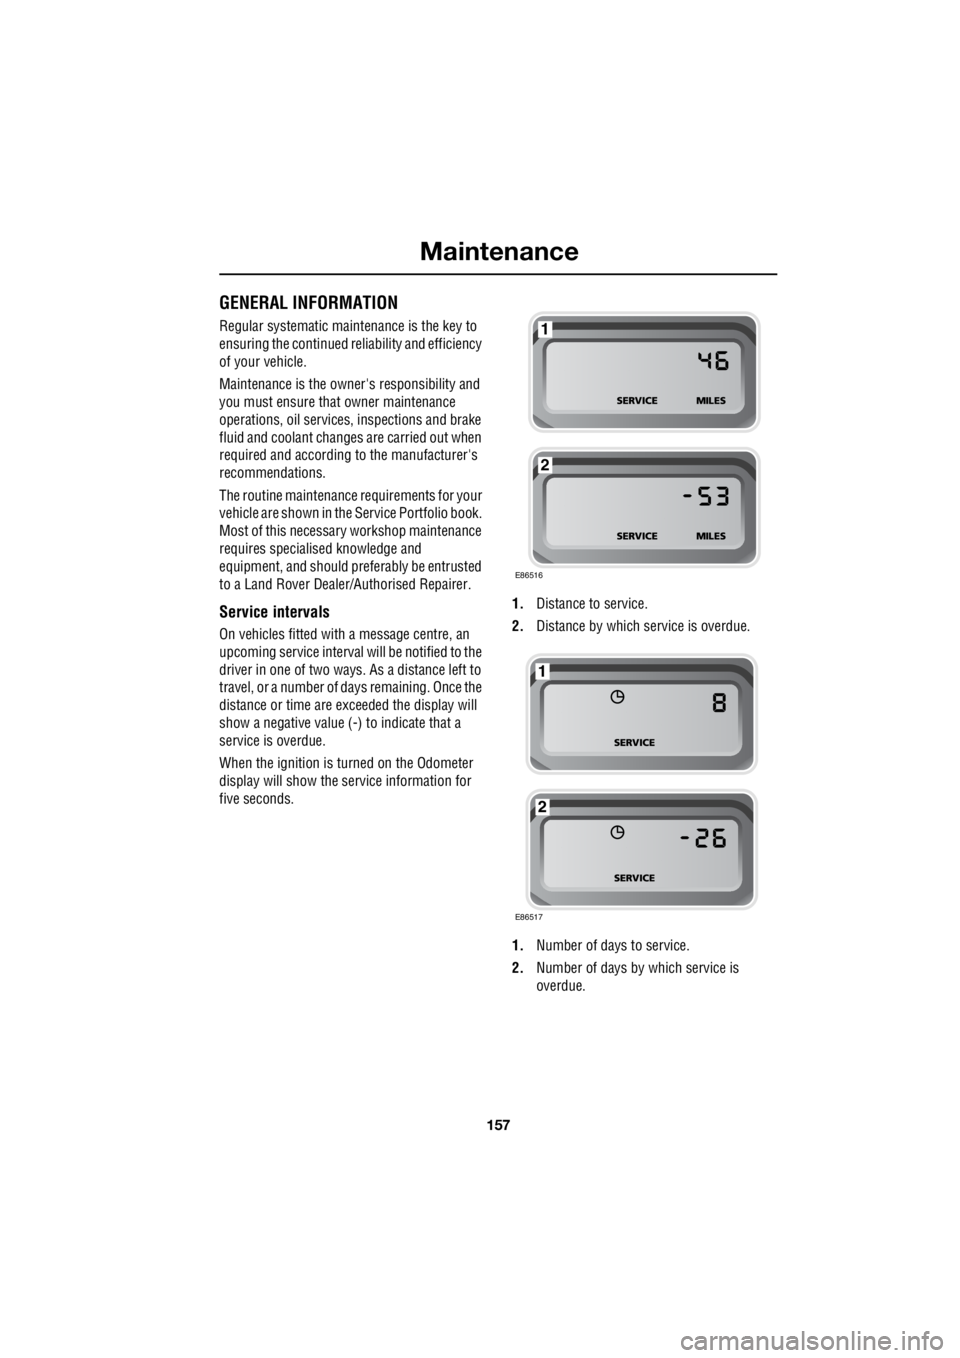
On vehicles fitted with a message centre, an
upcoming service interval will be notified to the
driver in one of two ways. As a distance left to
travel, or a number of da ys remaining. Once the
distance or time are ex ceeded the display will
show a negative value (-) to indicate that a
service is overdue.
When the ignition is turned on the Odometer
display will show the service information for
five seconds. 1.
Distance to service.
2. Distance by which service is overdue.
1. Number of days to service.
2. Number of days by which service is
overdue.
E86516
1
2
E86517
1
2
Page 2878 of 3229
Maintenance
158
L
One or both types of serv ice interval (distance
and time) may be displayed. For example, if an
engine oil service is du e based on mileage, and
a brake fluid change is due based on time, both
distance and time c ountdowns will display.
Service Portfolio
The Service Portfolio book includes a Service
Record section, which enables a record to be
kept of all the servicing and inspections that are
carried out on the vehicle. This section of the
book also has an area for brake fluid changes
to be recorded.
Ensure your service provider signs and stamps
the book after each se rvice and inspection.
Owner Maintenance
In addition to the routine maintenance, a
number of simple checks must be carried out
more frequently. Advice is given on the pages
that follow.
Daily checks
• Operation of lamps, horn, direction
indicators, wipers, washers and warning
indicators.
• Operation of seat belts and brakes.
• Look for fluid deposits underneath the
vehicle that might indicate a leak.
Weekly checks
• Engine oil level. See ENGINE OIL CHECK
(page 162).
• Engine coolant check. See ENGINE
COOLANT CHECK (page 163).
• Brake/clutch fluid level. See BRAKE AND
CLUTCH FLUID CHECK (page 165). •
Power steering fluid level. See POWER
STEERING FLUID CHECK (page 166).
• Screen washer fluid level. See WASHER
FLUID CHECK (page 167).
• Tyre pressure s and condition.
• Operate air conditioning.
Note: The engine oil leve l should be checked
more frequently if the vehicle is driven for
prolonged periods at high speeds.
Driving in arduous conditions
When a vehicle is operated in extremely
arduous conditions, more frequent attention
must be paid to servicing requirements.
For example, if your vehicle experiences deep
wading conditions, even daily servicing could
be necessary to ensure the continued safe and
reliable operation of the vehicle.
Arduous driving conditions include:
• Driving in dusty and/or sandy conditions.
• Driving on rough and/or muddy roads
and/or wading.
• Driving in extremely hot conditions.
• Towing a trailer or driving in mountainous
conditions.
Contact a Land Rover Dealer/Authorised
Repairer for advice.
Emission control
Your vehicle is fitted with various items of
emission and evaporative control equipment,
designed to meet sp ecific territorial
requirements. You should be aware that
unauthorised replacemen t, modification or
tampering with this equipment by an owner or
repair shop, may be unlawful and subject to
legal penalties.
CAUTION
Any significant or sudden drop in fluid
levels, or uneven tyre wear, should be
reported to a qualified technician without
delay.
Page 2938 of 3229
Audio introduction
218
L
Audio introductionRADIO RECEPTION
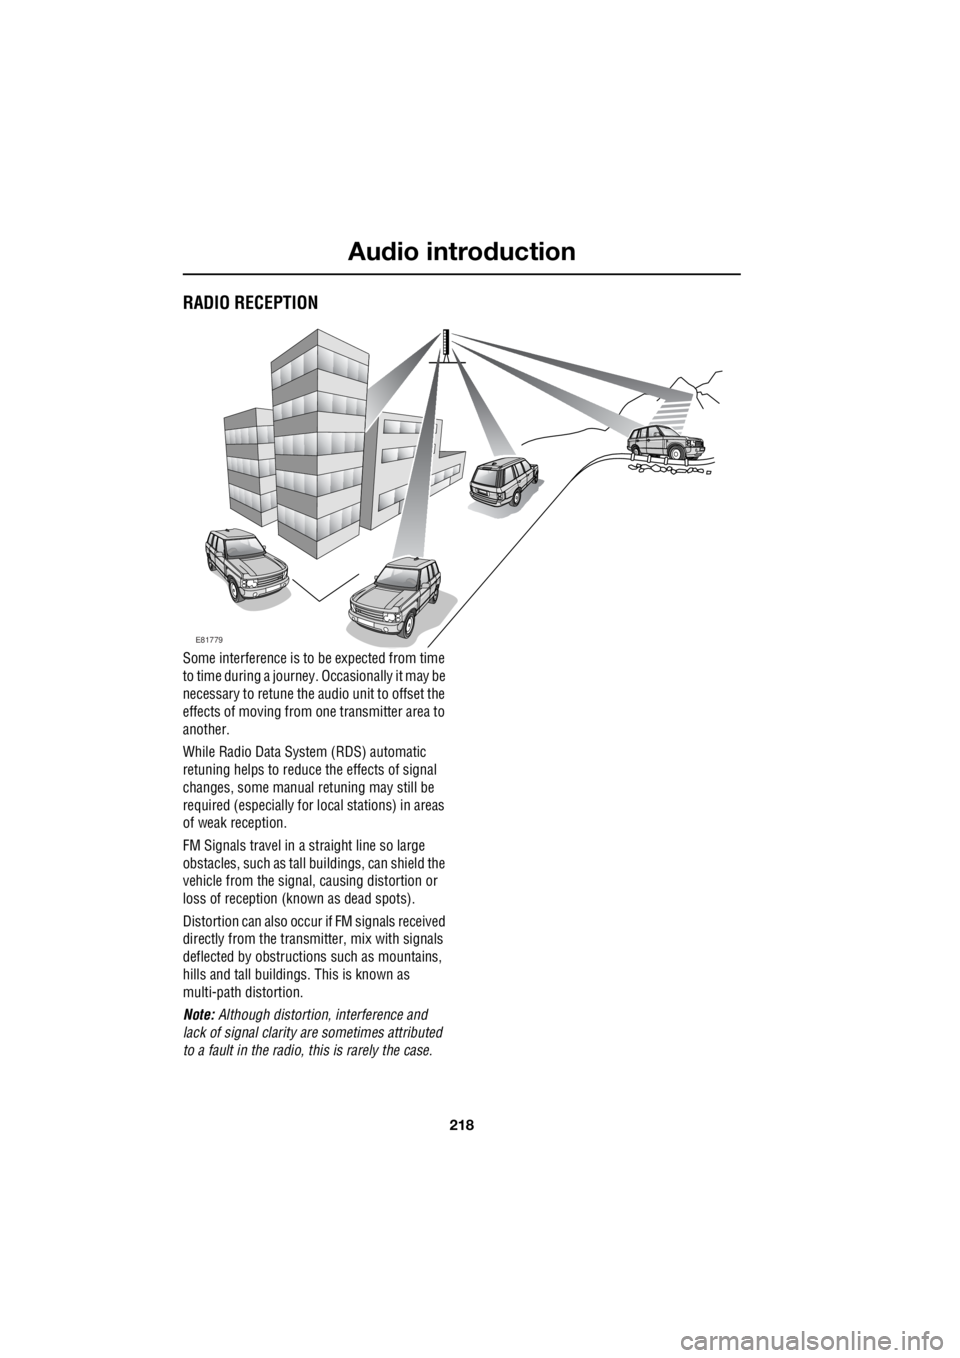
Some interference is to be expected from time
to time during a journey. Occasionally it may be
necessary to retune the audio unit to offset the
effects of moving from one transmitter area to
another.
While Radio Data System (RDS) automatic
retuning helps to reduce the effects of signal
changes, some manual retuning may still be
required (especially for lo cal stations) in areas
of weak reception.
FM Signals travel in a straight line so large
obstacles, such as tall buildings, can shield the
vehicle from the signal, causing distortion or
loss of reception (known as dead spots).
Distortion can also occur if FM signals received
directly from the transmitter, mix with signals
deflected by obstructions such as mountains,
hills and tall buildin gs. This is known as
multi-path distortion.
Note: Although distortion, interference and
lack of signal clarity are sometimes attributed
to a fault in the radio, this is rarely the case.
E81779