2006 INFINITI M35 ground
[x] Cancel search: groundPage 5096 of 5621
FRONT LOWER LINK
RSU-15
C
D
F
G
H
I
J
K
L
MA
B
RSU
Revision: 2006 January2006 M35/M45
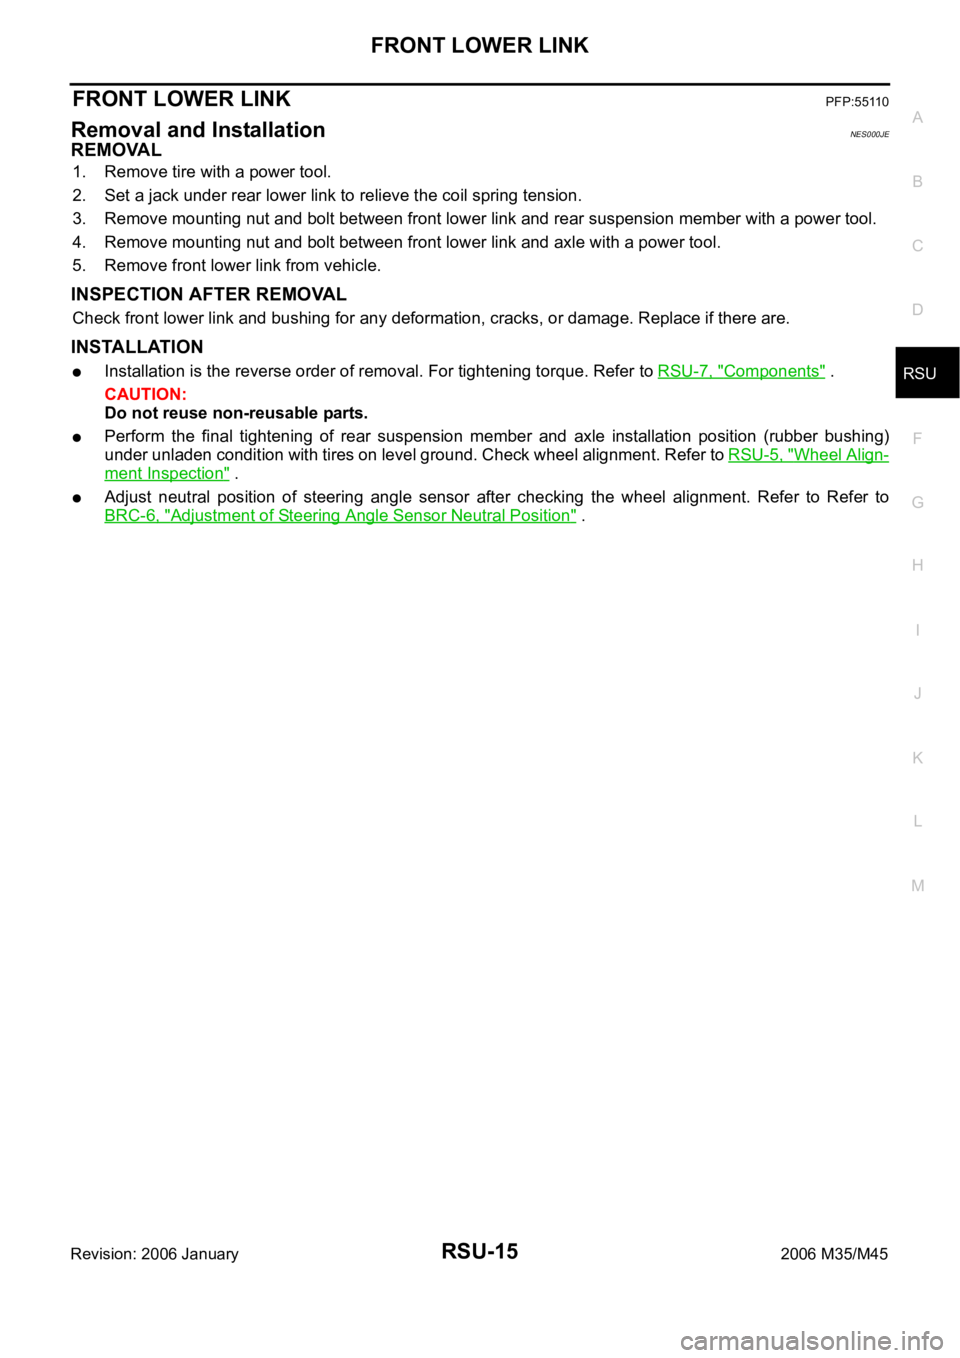
FRONT LOWER LINKPFP:55110
Removal and InstallationNES000JE
REMOVAL
1. Remove tire with a power tool.
2. Set a jack under rear lower link to relieve the coil spring tension.
3. Remove mounting nut and bolt between front lower link and rear suspension member with a power tool.
4. Remove mounting nut and bolt between front lower link and axle with a power tool.
5. Remove front lower link from vehicle.
INSPECTION AFTER REMOVAL
Check front lower link and bushing for any deformation, cracks, or damage. Replace if there are.
INSTALLATION
Installation is the reverse order of removal. For tightening torque. Refer to RSU-7, "Components" .
CAUTION:
Do not reuse non-reusable parts.
Perform the final tightening of rear suspension member and axle installation position (rubber bushing)
under unladen condition with tires on level ground. Check wheel alignment. Refer to RSU-5, "
Wheel Align-
ment Inspection" .
Adjust neutral position of steering angle sensor after checking the wheel alignment. Refer to Refer to
BRC-6, "
Adjustment of Steering Angle Sensor Neutral Position" .
Page 5097 of 5621
RSU-16
REAR LOWER LINK & COIL SPRING
Revision: 2006 January2006 M35/M45
REAR LOWER LINK & COIL SPRINGPFP:551B0
Removal and InstallationNES000JF
REMOVAL
1. Remove tire with a power tool.
2. Set a jack under rear lower link to relieve the coil spring tension.
3. Loosen mounting bolt and nut of rear lower link inside of suspension member, and then remove mounting
bolt and nut inside of axle with a power tool.
4. Slowly lower jack, then remove upper seat, coil spring and rubber sheet from rear lower link.
5. Remove mounting bolt and nut inside of suspension member to remove rear lower link with a power tool.
INSPECTION AFTER REMOVAL
Check rear lower link, bushing and coil spring for deformation, cracks, and damage. Replace rear lower link
and coil spring if there are.
INSTALLATION
Installation is the reverse order of removal. For tightening torque. Refer to RSU-7, "Components" .
CAUTION:
Do not reuse non-reusable parts.
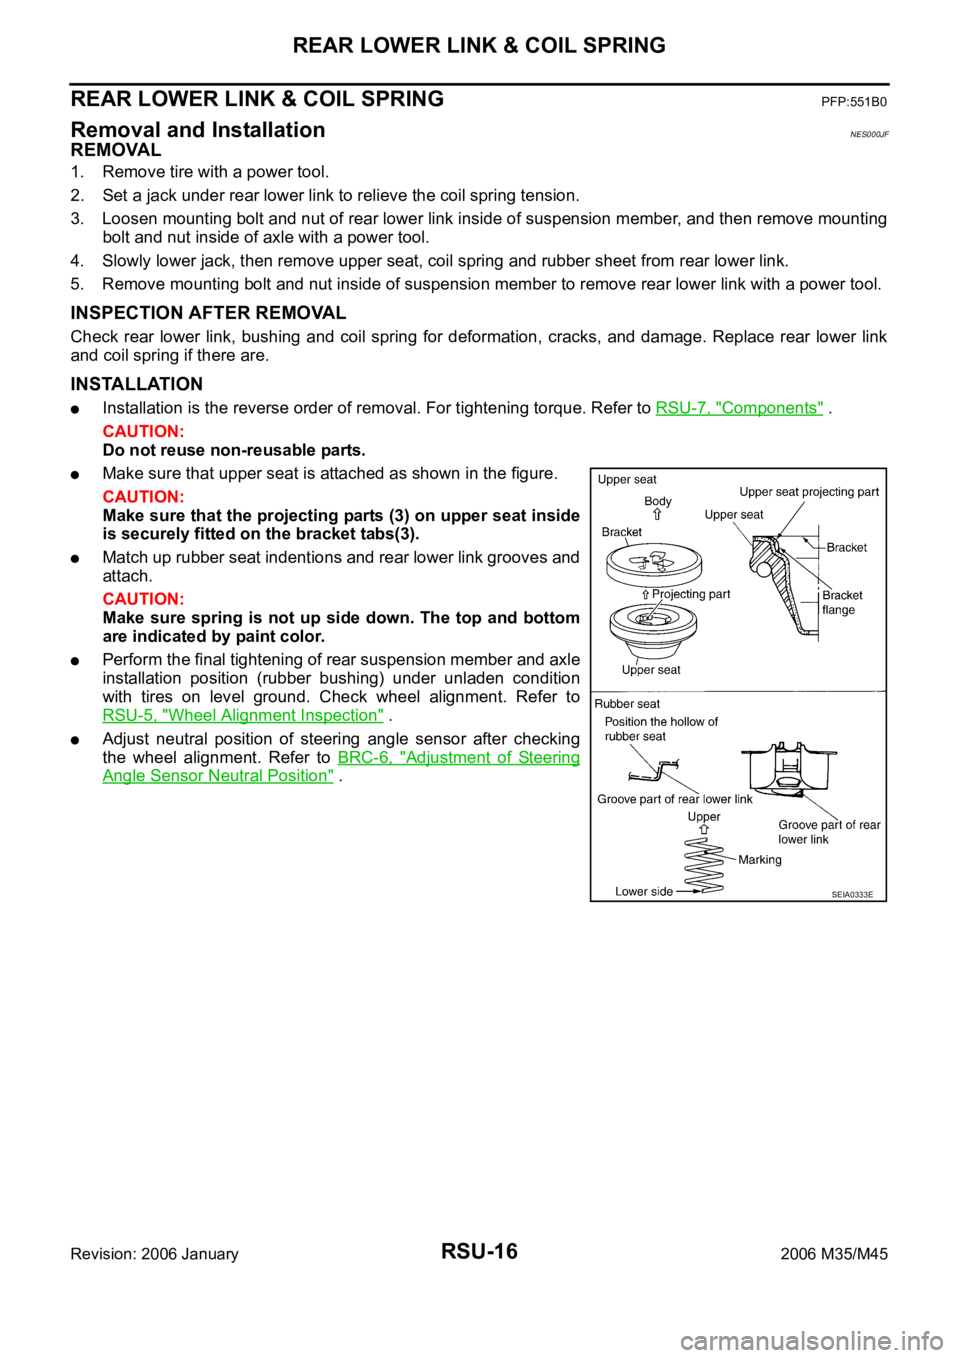
Make sure that upper seat is attached as shown in the figure.
CAUTION:
Make sure that the projecting parts (3) on upper seat inside
is securely fitted on the bracket tabs(3).
Match up rubber seat indentions and rear lower link grooves and
attach.
CAUTION:
Make sure spring is not up side down. The top and bottom
are indicated by paint color.
Perform the final tightening of rear suspension member and axle
installation position (rubber bushing) under unladen condition
with tires on level ground. Check wheel alignment. Refer to
RSU-5, "
Wheel Alignment Inspection" .
Adjust neutral position of steering angle sensor after checking
the wheel alignment. Refer to BRC-6, "
Adjustment of Steering
Angle Sensor Neutral Position" .
SEIA0333E
Page 5100 of 5621

SB-1
SEAT BELTS
H RESTRAINTS
CONTENTS
C
D
E
F
G
I
J
K
L
M
SECTION SB
A
B
SB
Revision: 2006 January2006 M35/M45
SEAT BELTS
PRECAUTIONS .......................................................... 2
Precautions for Supplemental Restraint System
(SRS) “AIR BAG” and “SEAT BELT PRE-TEN-
SIONER” .................................................................. 2
Precaution for Seat Belt Service .............................. 2
AFTER A COLLISION ........................................... 2
PRE-CRASH SEAT BELT .......................................... 3
Component Parts and Harness Connector Location ..... 3
System Description .................................................. 3
FUNCTION DESCRIPTION .................................. 4
FAIL-SAFE MODE ................................................ 4
CAN Communication System Description ................ 5
CAN Communication Unit ........................................ 5
Schematic ................................................................ 6
Wiring Diagram — PSB — ....................................... 7
Terminals and Reference Value for Pre-Crash Seat
Belt Control Unit ..................................................... 13
Work Flow .............................................................. 13
CONSULT-II Function (PRECRASH SEATBELT) ... 14
CONSULT-II INSPECTION PROCEDURE ......... 14
HOW TO READ SELF-DIAGNOSTIC RESULTS ... 15
SELF-DIAGNOSTIC RESULTS ITEM CHART ... 15
DATA MONITOR ITEM CHART .......................... 15
Preliminary Check .................................................. 16
PRE-CRASH SEAT BELT OPERATION
INSPECTION ...................................................... 16
Diagnoses Symptom Chart .................................... 16
Check CAN Communication System Inspection
[U1000] ................................................................... 16
Ignition Power Supply Circuit Check ...................... 17
Motor Power Supply and Ground Circuit Check
[B2454] ................................................................... 17
Seat Belt Buckle Switch (Driver Side) Circuit Check ... 19
Seat Belt Buckle Switch (Passenger Side) Circuit
Check ..................................................................... 21
Brake Pedal Stroke Sensor Circuit Check [B2453] ... 22
Pre-Crash Seat Belt Motor LH Circuit Check [B2452]
... 25
Pre-Crash Seat Belt Motor RH Circuit Check [B2451] ................................................................... 27
Brake Pedal Stroke Sensor Shield Wire Circuit
Check ..................................................................... 28
Removal and Installation of Pre-Crash Seat Belt
Control Unit ............................................................. 29
REMOVAL ........................................................
... 29
INSTALLATION ................................................... 29
SEAT BELTS ............................................................. 30
System Description ................................................. 30
SEAT BELT WARNING CHIME ........................... 30
SEAT BELT WARNING LAMP ............................. 30
Removal and Installation of Front Seat Belt ........... 30
REMOVAL OF SEAT BELT RETRACTOR .......... 30
INSTALLATION OF SEAT BELT RETRACTOR ... 31
REMOVAL OF SEAT BELT BUCKLE .................. 31
INSTALLATION OF SEAT BELT BUCKLE .......
... 31
Removal and Installation of Rear Seat Belt ............ 32
REMOVAL OF SEAT BELT RETRACTOR .......... 32
INSTALLATION OF SEAT BELT RETRACTOR ... 32
REMOVAL OF SEAT BELT BUCKLE .................. 32
INSTALLATION OF SEAT BELT BUCKLE .......... 33
Seat Belt Inspection ................................................ 33
AFTER A COLLISION ......................................... 33
PRELIMINARY CHECKS .................................... 33
SEAT BELT RETRACTOR ON-VEHICLE
CHECK ................................................................ 34
SEAT BELT RETRACTOR OFF-VEHICLE
CHECK (FRONT SEAT BELT) ............................ 35
SEAT BELT RETRACTOR OFF-VEHICLE
CHECK (REAR SEAT BELT) ............................... 35
LATCH (LOWER ANCHORS AND TETHER FOR
CHILDREN) SYSTEM ............................................... 36
Removal and Installation ........................................ 36
REMOVAL ........................................................
... 36
INSTALLATION ................................................... 36
TOP TETHER STRAP CHILD RESTRAINT ............. 37
Removal and Installation ........................................ 37
REMOVAL ........................................................
... 37
INSTALLATION ................................................... 37
Page 5112 of 5621
PRE-CRASH SEAT BELT
SB-13
C
D
E
F
G
I
J
K
L
MA
B
SB
Revision: 2006 January2006 M35/M45
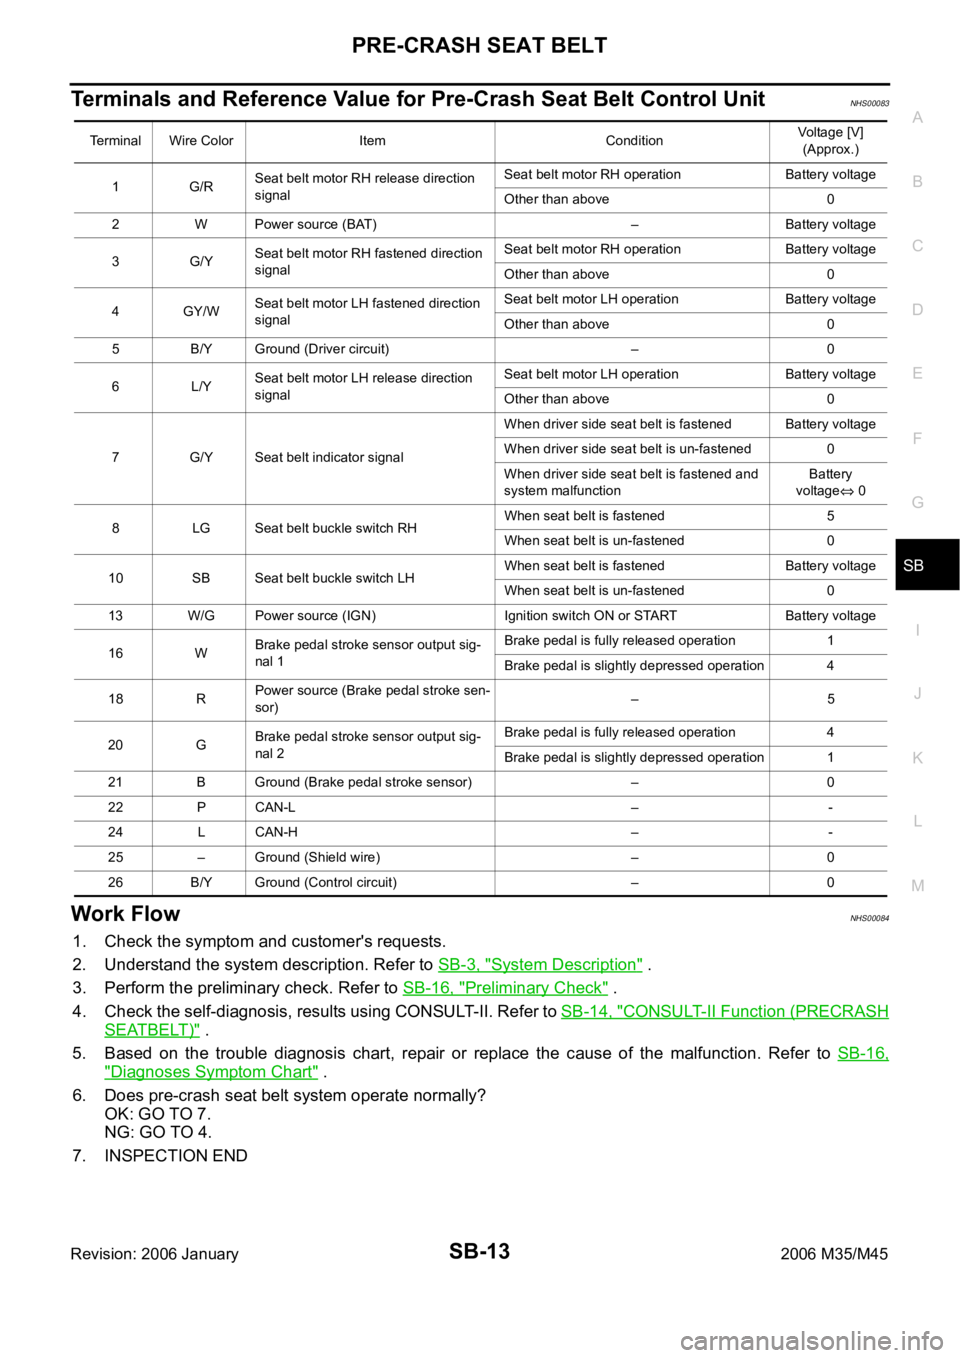
Terminals and Reference Value for Pre-Crash Seat Belt Control UnitNHS00083
Work FlowNHS00084
1. Check the symptom and customer's requests.
2. Understand the system description. Refer to SB-3, "
System Description" .
3. Perform the preliminary check. Refer to SB-16, "
Preliminary Check" .
4. Check the self-diagnosis, results using CONSULT-II. Refer to SB-14, "
CONSULT-II Function (PRECRASH
SEATBELT)" .
5. Based on the trouble diagnosis chart, repair or replace the cause of the malfunction. Refer to SB-16,
"Diagnoses Symptom Chart" .
6. Does pre-crash seat belt system operate normally?
OK: GO TO 7.
NG: GO TO 4.
7. INSPECTION END
Terminal Wire Color Item ConditionVoltage [V]
(Approx.)
1G/RSeat belt motor RH release direction
signalSeat belt motor RH operation Battery voltage
Other than above 0
2 W Power source (BAT) – Battery voltage
3G/YSeat belt motor RH fastened direction
signalSeat belt motor RH operation Battery voltage
Other than above 0
4GY/WSeat belt motor LH fastened direction
signalSeat belt motor LH operation Battery voltage
Other than above 0
5 B/Y Ground (Driver circuit) – 0
6L/YSeat belt motor LH release direction
signalSeat belt motor LH operation Battery voltage
Other than above 0
7 G/Y Seat belt indicator signalWhen driver side seat belt is fastened Battery voltage
When driver side seat belt is un-fastened 0
When driver side seat belt is fastened and
system malfunctionBattery
voltage
0
8 LG Seat belt buckle switch RHWhen seat belt is fastened 5
When seat belt is un-fastened 0
10 SB Seat belt buckle switch LHWhen seat belt is fastened Battery voltage
When seat belt is un-fastened 0
13 W/G Power source (IGN) Ignition switch ON or START Battery voltage
16 WBrake pedal stroke sensor output sig-
nal 1Brake pedal is fully released operation 1
Brake pedal is slightly depressed operation 4
18 RPower source (Brake pedal stroke sen-
sor)
–5
20 GBrake pedal stroke sensor output sig-
nal 2Brake pedal is fully released operation 4
Brake pedal is slightly depressed operation 1
21 B Ground (Brake pedal stroke sensor) – 0
22 P CAN-L – -
24 L CAN-H – -
25 – Ground (Shield wire) – 0
26 B/Y Ground (Control circuit) – 0
Page 5115 of 5621
SB-16
PRE-CRASH SEAT BELT
Revision: 2006 January2006 M35/M45
Preliminary CheckNHS00086
PRE-CRASH SEAT BELT OPERATION INSPECTION
WAR NING :
The following tests should be performed in a safe, open place that is free of traffic and obstacles.
The tests should be performed on a dry, paved road. Do not attempt the tests on wet or unpaved
road, open road, or highway. (This may cause an accident or personal injury.)
Driver and passenger assume it will not operate and prepare themselves accordingly.
1. Tighten driver and passenger seat belts.
2. Drive at approximately 25 km/h (16 MPH).
3. Notify passenger of a sudden stop. Driver and passenger prepare themselves for the possibility of
system not operating. Then, driver fully depresses the brake pedal to stop suddenly.
4. Make sure that the shoulder of the seat belt is pulled while braking.
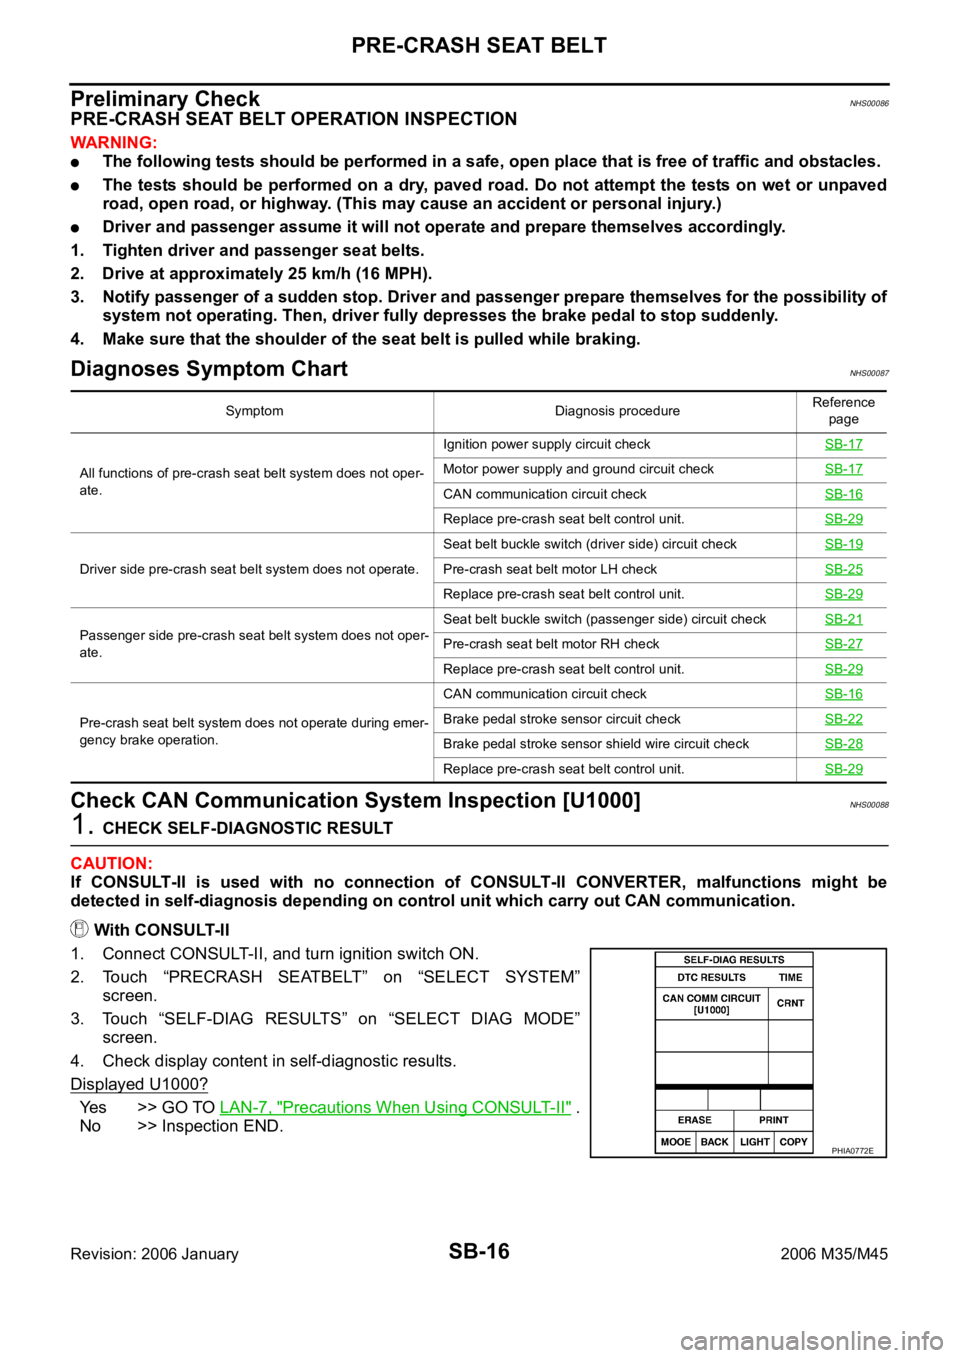
Diagnoses Symptom ChartNHS00087
Check CAN Communication System Inspection [U1000]NHS00088
1. CHECK SELF-DIAGNOSTIC RESULT
CAUTION:
If CONSULT-II is used with no connection of CONSULT-II CONVERTER, malfunctions might be
detected in self-diagnosis depending on control unit which carry out CAN communication.
With CONSULT-II
1. Connect CONSULT-II, and turn ignition switch ON.
2. Touch “PRECRASH SEATBELT” on “SELECT SYSTEM”
screen.
3. Touch “SELF-DIAG RESULTS” on “SELECT DIAG MODE”
screen.
4. Check display content in self-diagnostic results.
Displayed U1000?
Yes >> GO TO LAN-7, "Precautions When Using CONSULT-II" .
No >> Inspection END.
Symptom Diagnosis procedureReference
page
All functions of pre-crash seat belt system does not oper-
ate.Ignition power supply circuit checkSB-17
Motor power supply and ground circuit checkSB-17
CAN communication circuit checkSB-16
Replace pre-crash seat belt control unit.SB-29
Driver side pre-crash seat belt system does not operate.Seat belt buckle switch (driver side) circuit checkSB-19Pre-crash seat belt motor LH checkSB-25
Replace pre-crash seat belt control unit.SB-29
Passenger side pre-crash seat belt system does not oper-
ate.Seat belt buckle switch (passenger side) circuit checkSB-21Pre-crash seat belt motor RH checkSB-27
Replace pre-crash seat belt control unit.SB-29
Pre-crash seat belt system does not operate during emer-
gency brake operation.CAN communication circuit checkSB-16Brake pedal stroke sensor circuit checkSB-22
Brake pedal stroke sensor shield wire circuit checkSB-28
Replace pre-crash seat belt control unit.SB-29
PHIA0772E
Page 5116 of 5621
![INFINITI M35 2006 Factory Service Manual PRE-CRASH SEAT BELT
SB-17
C
D
E
F
G
I
J
K
L
MA
B
SB
Revision: 2006 January2006 M35/M45
Ignition Power Supply Circuit CheckNHS00089
1. CHECK FUSE
Check 10A fuse [No.15, located in fuse block (J/B)].
NO INFINITI M35 2006 Factory Service Manual PRE-CRASH SEAT BELT
SB-17
C
D
E
F
G
I
J
K
L
MA
B
SB
Revision: 2006 January2006 M35/M45
Ignition Power Supply Circuit CheckNHS00089
1. CHECK FUSE
Check 10A fuse [No.15, located in fuse block (J/B)].
NO](/manual-img/42/57023/w960_57023-5115.png)
PRE-CRASH SEAT BELT
SB-17
C
D
E
F
G
I
J
K
L
MA
B
SB
Revision: 2006 January2006 M35/M45
Ignition Power Supply Circuit CheckNHS00089
1. CHECK FUSE
Check 10A fuse [No.15, located in fuse block (J/B)].
NOTE:
Refer to SB-3, "
Component Parts and Harness Connector Location" .
OK or NG
OK >> GO TO 2.
NG >> If fuse is blown out, be sure to eliminate cause of malfunction before installing new fuse. Refer to
PG-3, "
POWER SUPPLY ROUTING CIRCUIT" .
2. CHECK IGNITION POWER SUPPLY CIRCUIT
1. Disconnect pre-crash seat belt control unit connector.
2. Turn ignition switch ON.
3. Check voltage between pre-crash seat belt control unit harness
connector and ground.
OK or NG
OK >> Ignition power supply circuit is OK.
NG >> Check pre-crash seat belt control unit ignition power supply circuit harness.
Motor Power Supply and Ground Circuit Check [B2454]NHS0008A
1. CHECK FUSE
Check 30A fusible link (letter G , located in the fuse and fusible link box).
NOTE:
Refer to SB-3, "
Component Parts and Harness Connector Location" .
OK or NG
OK >> GO TO 2.
NG >> If fuse is blown out, be sure to eliminate cause of malfunction before installing new fuse. Refer to
PG-3, "
POWER SUPPLY ROUTING CIRCUIT" .
Terminal
Voltage (V)
(Approx.) (+)
(–) Pre-crash seat
belt control unit
connectorTerminal
B142 13 Ground Battery voltage
PHIA1126E
Page 5117 of 5621
SB-18
PRE-CRASH SEAT BELT
Revision: 2006 January2006 M35/M45
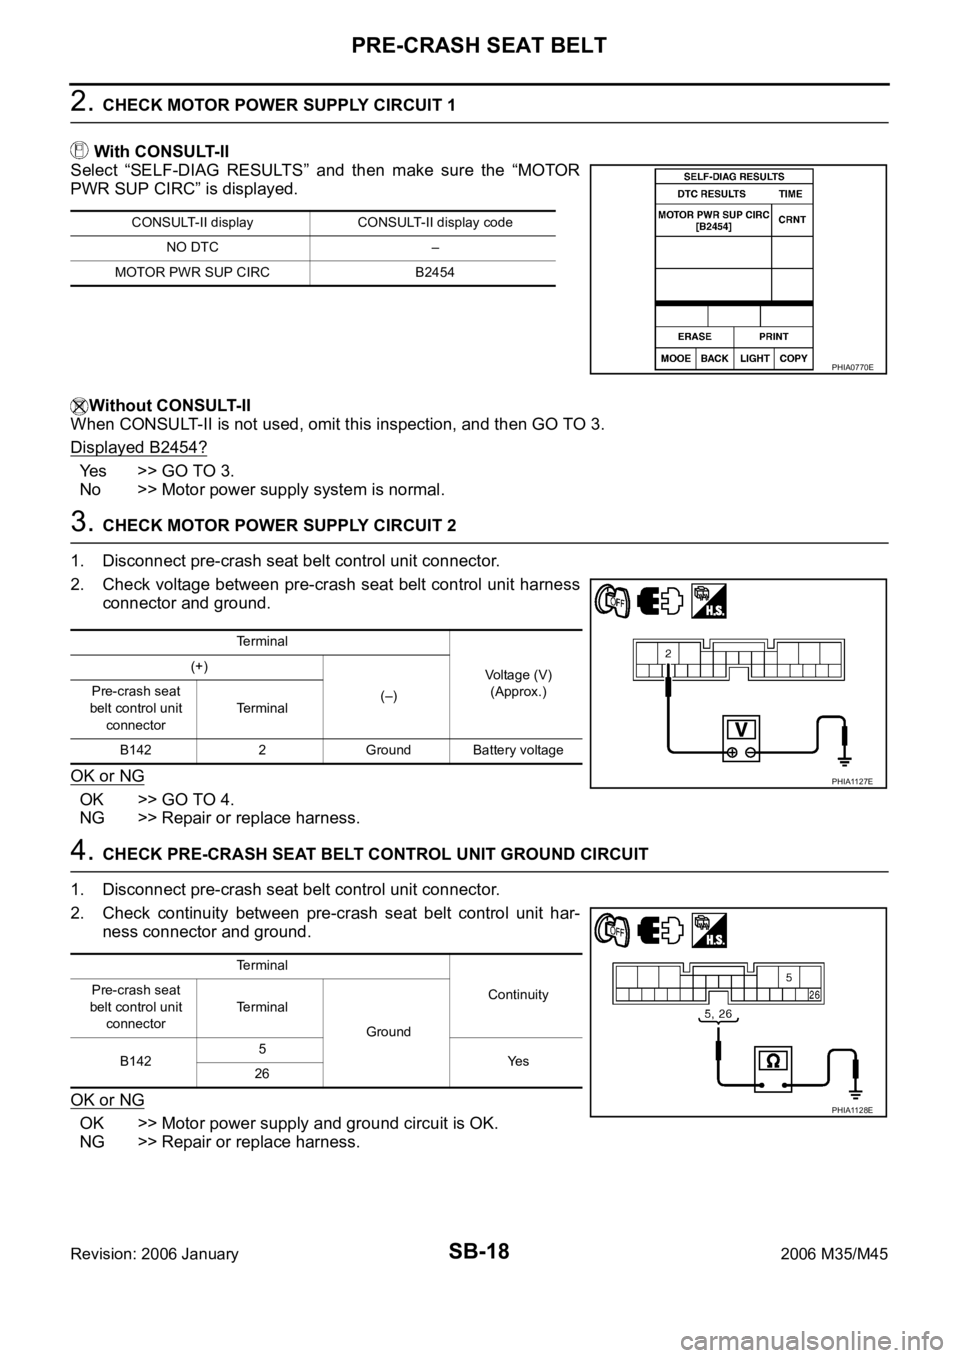
2. CHECK MOTOR POWER SUPPLY CIRCUIT 1
With CONSULT-II
Select “SELF-DIAG RESULTS” and then make sure the “MOTOR
PWR SUP CIRC” is displayed.
Without CONSULT-II
When CONSULT-II is not used, omit this inspection, and then GO TO 3.
Displayed B2454?
Yes >> GO TO 3.
No >> Motor power supply system is normal.
3. CHECK MOTOR POWER SUPPLY CIRCUIT 2
1. Disconnect pre-crash seat belt control unit connector.
2. Check voltage between pre-crash seat belt control unit harness
connector and ground.
OK or NG
OK >> GO TO 4.
NG >> Repair or replace harness.
4. CHECK PRE-CRASH SEAT BELT CONTROL UNIT GROUND CIRCUIT
1. Disconnect pre-crash seat belt control unit connector.
2. Check continuity between pre-crash seat belt control unit har-
ness connector and ground.
OK or NG
OK >> Motor power supply and ground circuit is OK.
NG >> Repair or replace harness.
CONSULT-II display CONSULT-II display code
NO DTC –
MOTOR PWR SUP CIRC B2454
PHIA0770E
Terminal
Voltage (V)
(Approx.) (+)
(–) Pre-crash seat
belt control unit
connectorTerminal
B142 2 Ground Battery voltage
PHIA1127E
Terminal
Continuity Pre-crash seat
belt control unit
connectorTerminal
Ground
B1425
Ye s
26
PHIA1128E
Page 5118 of 5621
PRE-CRASH SEAT BELT
SB-19
C
D
E
F
G
I
J
K
L
MA
B
SB
Revision: 2006 January2006 M35/M45
Seat Belt Buckle Switch (Driver Side) Circuit CheckNHS0008B
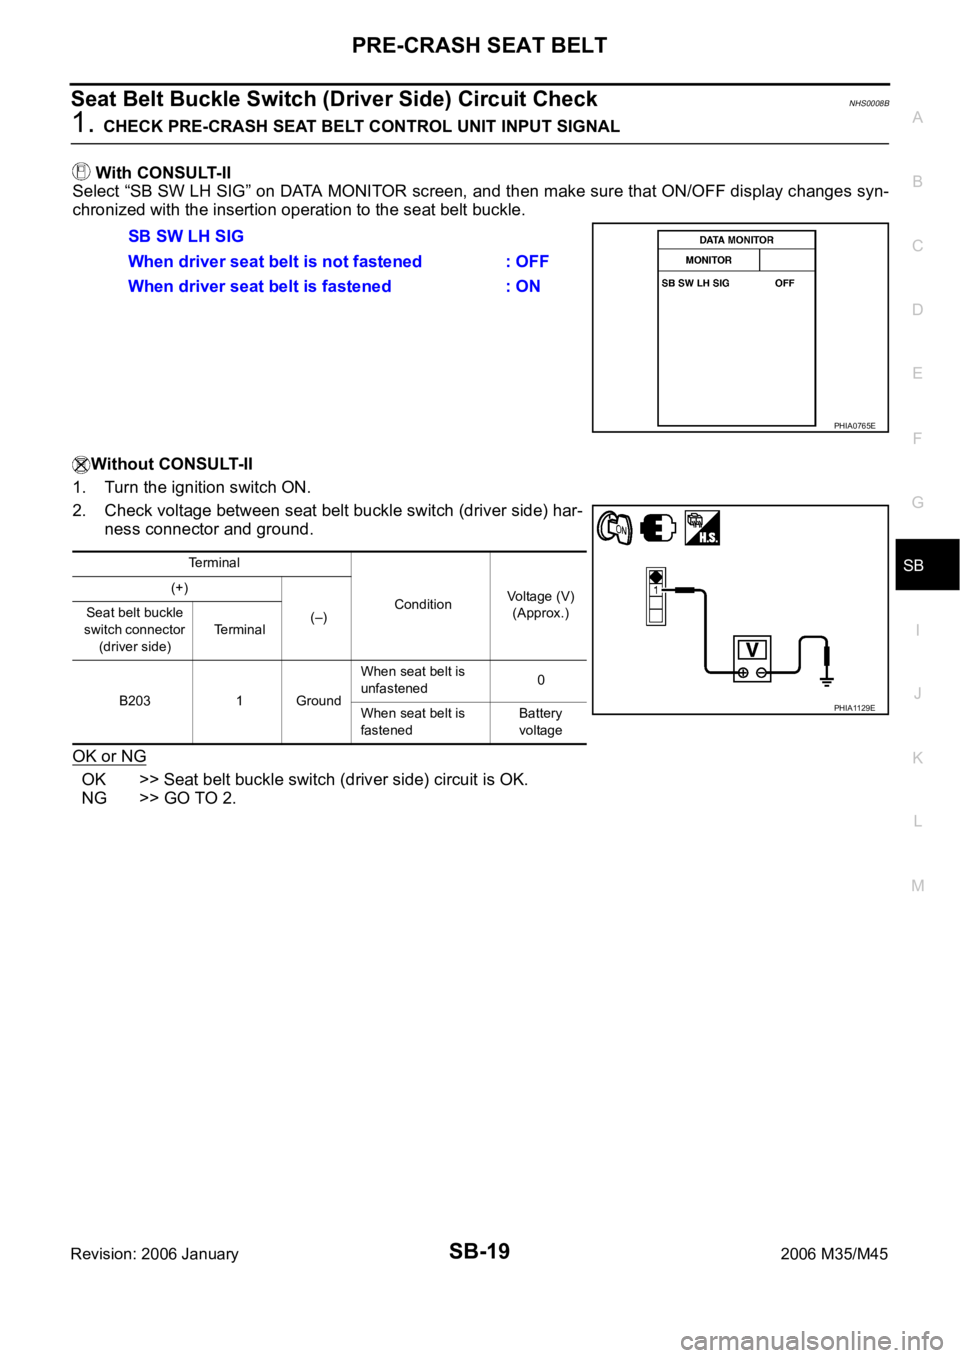
1. CHECK PRE-CRASH SEAT BELT CONTROL UNIT INPUT SIGNAL
With CONSULT-II
Select “SB SW LH SIG” on DATA MONITOR screen, and then make sure that ON/OFF display changes syn-
chronized with the insertion operation to the seat belt buckle.
Without CONSULT-II
1. Turn the ignition switch ON.
2. Check voltage between seat belt buckle switch (driver side) har-
ness connector and ground.
OK or NG
OK >> Seat belt buckle switch (driver side) circuit is OK.
NG >> GO TO 2.SB SW LH SIG
When driver seat belt is not fastened : OFF
When driver seat belt is fastened : ON
PHIA0765E
Terminal
ConditionVoltage (V)
(Approx.) (+)
(–) Seat belt buckle
switch connector
(driver side)Te r m i n a l
B203 1 GroundWhen seat belt is
unfastened0
When seat belt is
fastenedBattery
voltage
PHIA1129E