2006 INFINITI M35 ground
[x] Cancel search: groundPage 5214 of 5621
AUTOMATIC DRIVE POSITIONER
SE-33
C
D
E
F
G
H
J
K
L
MA
B
SE
Revision: 2006 January2006 M35/M45
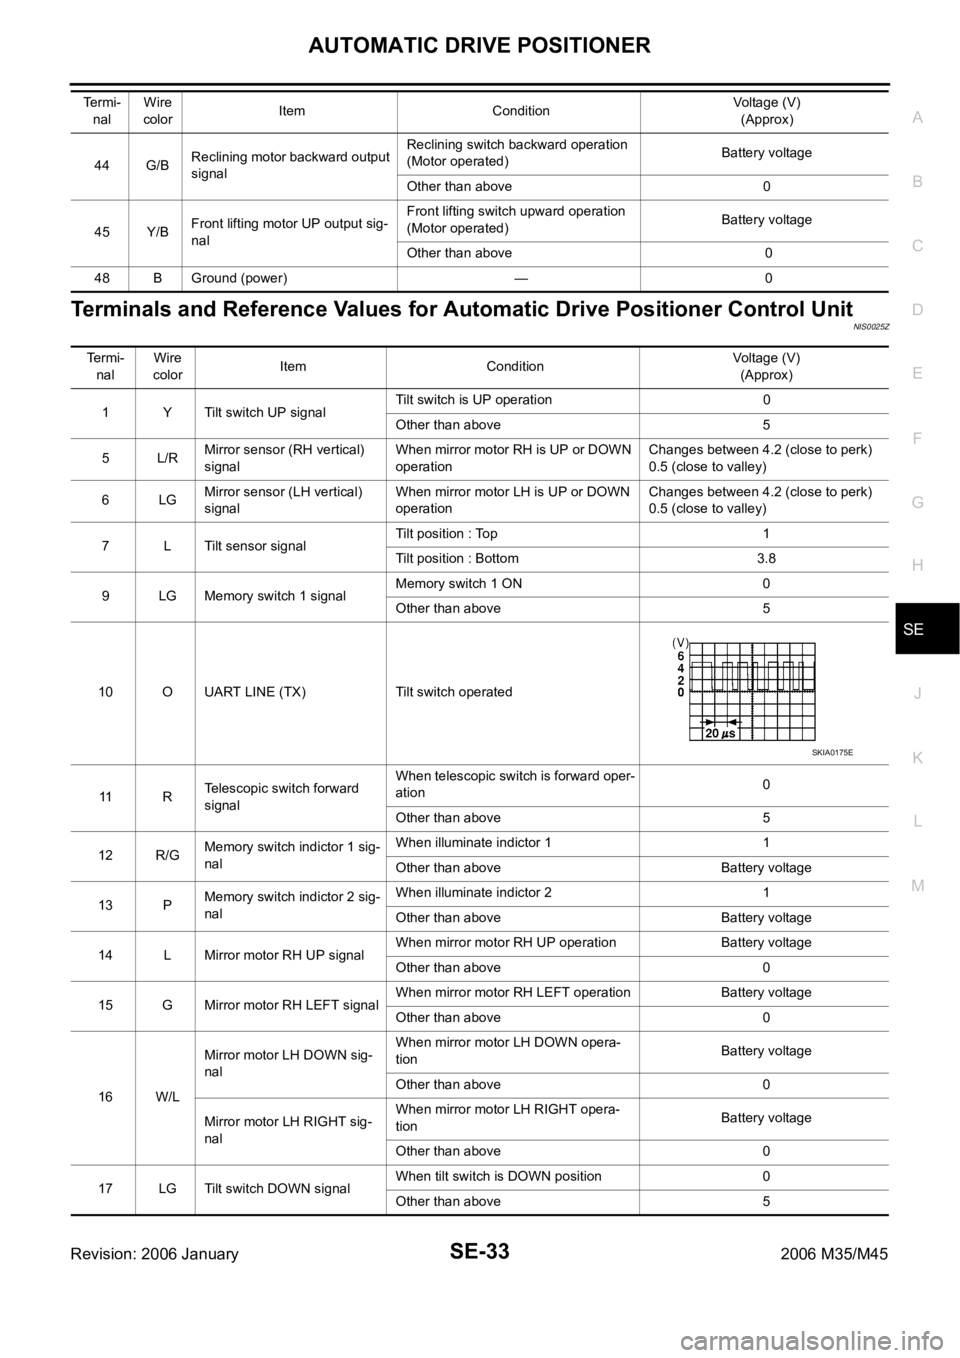
Terminals and Reference Values for Automatic Drive Positioner Control UnitNIS0025Z
44 G/BReclining motor backward output
signalReclining switch backward operation
(Motor operated)Battery voltage
Other than above 0
45 Y/BFront lifting motor UP output sig-
nalFront lifting switch upward operation
(Motor operated)Battery voltage
Other than above 0
48 B Ground (power) — 0 Te r m i -
nalWire
colorItem ConditionVoltage (V)
(Approx)
Te r m i -
nal Wire
colorItem ConditionVoltage (V)
(Approx)
1 Y Tilt switch UP signalTilt switch is UP operation 0
Other than above 5
5L/RMirror sensor (RH vertical)
signalWhen mirror motor RH is UP or DOWN
operationChanges between 4.2 (close to perk)
0.5 (close to valley)
6LGMirror sensor (LH vertical)
signalWhen mirror motor LH is UP or DOWN
operationChanges between 4.2 (close to perk)
0.5 (close to valley)
7 L Tilt sensor signalTilt position : Top 1
Tilt position : Bottom 3.8
9 LG Memory switch 1 signalMemory switch 1 ON 0
Other than above 5
10 O UART LINE (TX) Tilt switch operated
11 RTelescopic switch forward
signalWhen telescopic switch is forward oper-
ation0
Other than above 5
12 R/GMemory switch indictor 1 sig-
nalWhen illuminate indictor 1 1
Other than above Battery voltage
13 PMemory switch indictor 2 sig-
nalWhen illuminate indictor 2 1
Other than above Battery voltage
14 L Mirror motor RH UP signalWhen mirror motor RH UP operation Battery voltage
Other than above 0
15 G Mirror motor RH LEFT signalWhen mirror motor RH LEFT operation Battery voltage
Other than above 0
16 W/LMirror motor LH DOWN sig-
nalWhen mirror motor LH DOWN opera-
tionBattery voltage
Other than above 0
Mirror motor LH RIGHT sig-
nalWhen mirror motor LH RIGHT opera-
tionBattery voltage
Other than above 0
17 LG Tilt switch DOWN signalWhen tilt switch is DOWN position 0
Other than above 5
SKIA0175E
Page 5215 of 5621
SE-34
AUTOMATIC DRIVE POSITIONER
Revision: 2006 January2006 M35/M45
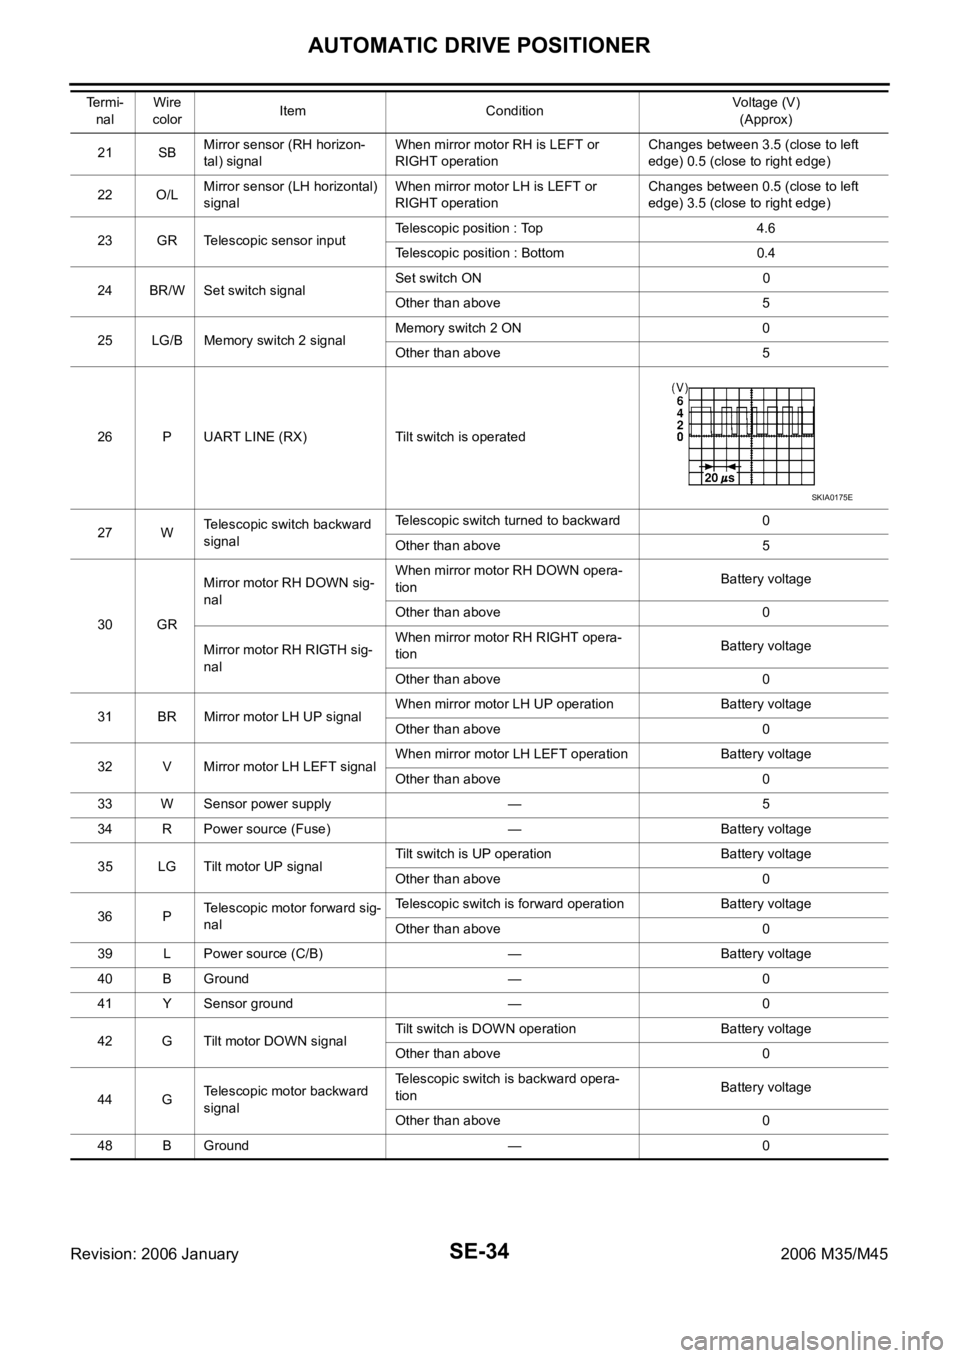
21 SBMirror sensor (RH horizon-
tal) signalWhen mirror motor RH is LEFT or
RIGHT operationChanges between 3.5 (close to left
edge) 0.5 (close to right edge)
22 O/LMirror sensor (LH horizontal)
signalWhen mirror motor LH is LEFT or
RIGHT operationChanges between 0.5 (close to left
edge) 3.5 (close to right edge)
23 GR Telescopic sensor inputTelescopic position : Top 4.6
Telescopic position : Bottom 0.4
24 BR/W Set switch signalSet switch ON 0
Other than above 5
25 LG/B Memory switch 2 signalMemory switch 2 ON 0
Other than above 5
26 P UART LINE (RX) Tilt switch is operated
27 WTelescopic switch backward
signalTelescopic switch turned to backward 0
Other than above 5
30 GRMirror motor RH DOWN sig-
nalWhen mirror motor RH DOWN opera-
tionBattery voltage
Other than above 0
Mirror motor RH RIGTH sig-
nalWhen mirror motor RH RIGHT opera-
tionBattery voltage
Other than above 0
31 BR Mirror motor LH UP signalWhen mirror motor LH UP operation Battery voltage
Other than above 0
32 V Mirror motor LH LEFT signalWhen mirror motor LH LEFT operation Battery voltage
Other than above 0
33 W Sensor power supply — 5
34 R Power source (Fuse) — Battery voltage
35 LG Tilt motor UP signalTilt switch is UP operation Battery voltage
Other than above 0
36 PTelescopic motor forward sig-
nalTelescopic switch is forward operation Battery voltage
Other than above 0
39 L Power source (C/B) — Battery voltage
40 B Ground — 0
41 Y Sensor ground — 0
42 G Tilt motor DOWN signalTilt switch is DOWN operation Battery voltage
Other than above 0
44 GTelescopic motor backward
signalTelescopic switch is backward opera-
tionBattery voltage
Other than above 0
48 B Ground — 0 Termi-
nal Wire
colorItem ConditionVoltage (V)
(Approx)
SKIA0175E
Page 5220 of 5621
AUTOMATIC DRIVE POSITIONER
SE-39
C
D
E
F
G
H
J
K
L
MA
B
SE
Revision: 2006 January2006 M35/M45
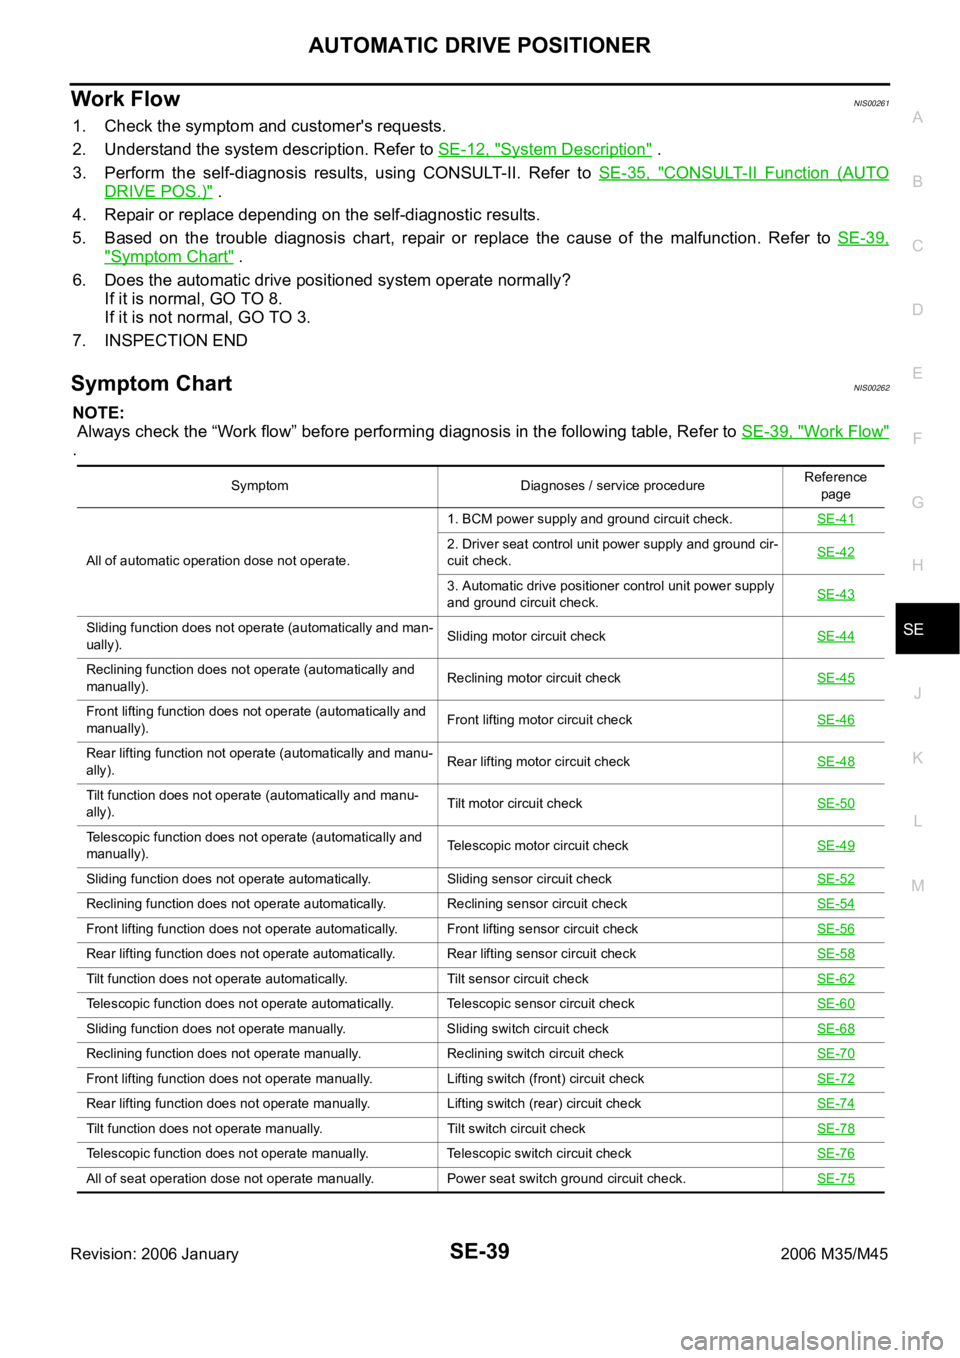
Work Flow NIS00261
1. Check the symptom and customer's requests.
2. Understand the system description. Refer to SE-12, "
System Description" .
3. Perform the self-diagnosis results, using CONSULT-II. Refer to SE-35, "
CONSULT-II Function (AUTO
DRIVE POS.)" .
4. Repair or replace depending on the self-diagnostic results.
5. Based on the trouble diagnosis chart, repair or replace the cause of the malfunction. Refer to SE-39,
"Symptom Chart" .
6. Does the automatic drive positioned system operate normally?
If it is normal, GO TO 8.
If it is not normal, GO TO 3.
7. INSPECTION END
Symptom ChartNIS00262
NOTE:
Always check the “Work flow” before performing diagnosis in the following table, Refer to SE-39, "
Work Flow"
.
Symptom Diagnoses / service procedureReference
page
All of automatic operation dose not operate.1. BCM power supply and ground circuit check.SE-41
2. Driver seat control unit power supply and ground cir-
cuit check.SE-42
3. Automatic drive positioner control unit power supply
and ground circuit check.SE-43
Sliding function does not operate (automatically and man-
ually).Sliding motor circuit check SE-44
Reclining function does not operate (automatically and
manually).Reclining motor circuit check SE-45
Front lifting function does not operate (automatically and
manually).Front lifting motor circuit checkSE-46
Rear lifting function not operate (automatically and manu-
ally).Rear lifting motor circuit checkSE-48
Tilt function does not operate (automatically and manu-
ally).Tilt motor circuit checkSE-50
Telescopic function does not operate (automatically and
manually).Telescopic motor circuit checkSE-49
Sliding function does not operate automatically. Sliding sensor circuit checkSE-52
Reclining function does not operate automatically. Reclining sensor circuit checkSE-54
Front lifting function does not operate automatically. Front lifting sensor circuit checkSE-56
Rear lifting function does not operate automatically. Rear lifting sensor circuit checkSE-58
Tilt function does not operate automatically. Tilt sensor circuit checkSE-62
Telescopic function does not operate automatically. Telescopic sensor circuit checkSE-60
Sliding function does not operate manually. Sliding switch circuit checkSE-68
Reclining function does not operate manually. Reclining switch circuit checkSE-70
Front lifting function does not operate manually. Lifting switch (front) circuit checkSE-72
Rear lifting function does not operate manually. Lifting switch (rear) circuit checkSE-74
Tilt function does not operate manually. Tilt switch circuit checkSE-78
Telescopic function does not operate manually. Telescopic switch circuit checkSE-76
All of seat operation dose not operate manually. Power seat switch ground circuit check.SE-75
Page 5221 of 5621
SE-40
AUTOMATIC DRIVE POSITIONER
Revision: 2006 January2006 M35/M45
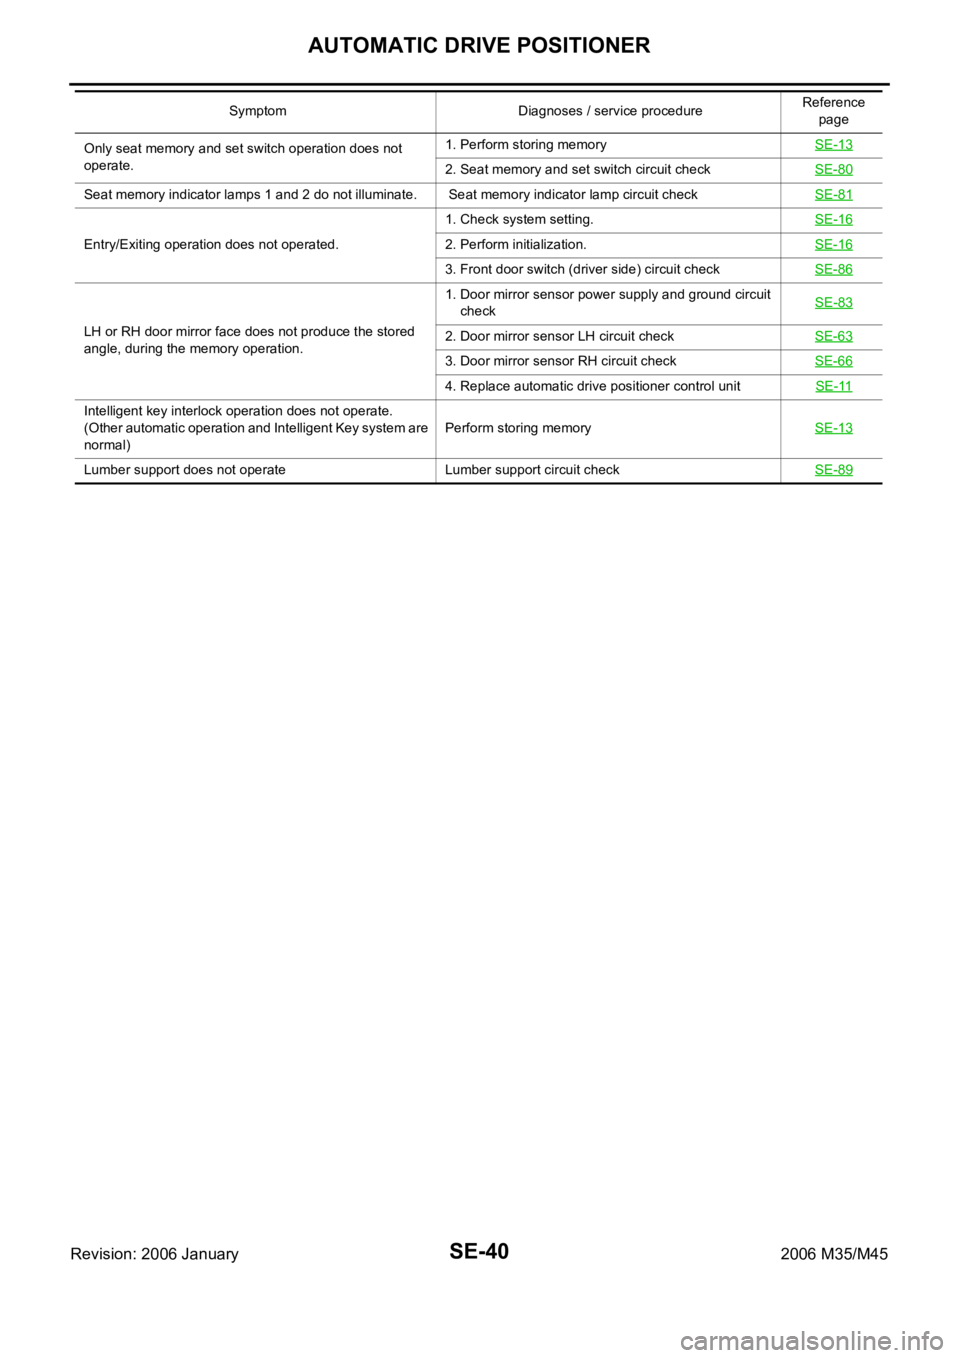
Only seat memory and set switch operation does not
operate.1. Perform storing memorySE-13
2. Seat memory and set switch circuit checkSE-80
Seat memory indicator lamps 1 and 2 do not illuminate. Seat memory indicator lamp circuit checkSE-81
Entry/Exiting operation does not operated.1. Check system setting.SE-162. Perform initialization.SE-16
3. Front door switch (driver side) circuit checkSE-86
LH or RH door mirror face does not produce the stored
angle, during the memory operation.1. Door mirror sensor power supply and ground circuit
checkSE-832. Door mirror sensor LH circuit checkSE-63
3. Door mirror sensor RH circuit checkSE-66
4. Replace automatic drive positioner control unitSE-11
Intelligent key interlock operation does not operate.
(Other automatic operation and Intelligent Key system are
normal)Perform storing memorySE-13
Lumber support does not operate Lumber support circuit checkSE-89
Symptom Diagnoses / service procedureReference
page
Page 5222 of 5621
AUTOMATIC DRIVE POSITIONER
SE-41
C
D
E
F
G
H
J
K
L
MA
B
SE
Revision: 2006 January2006 M35/M45
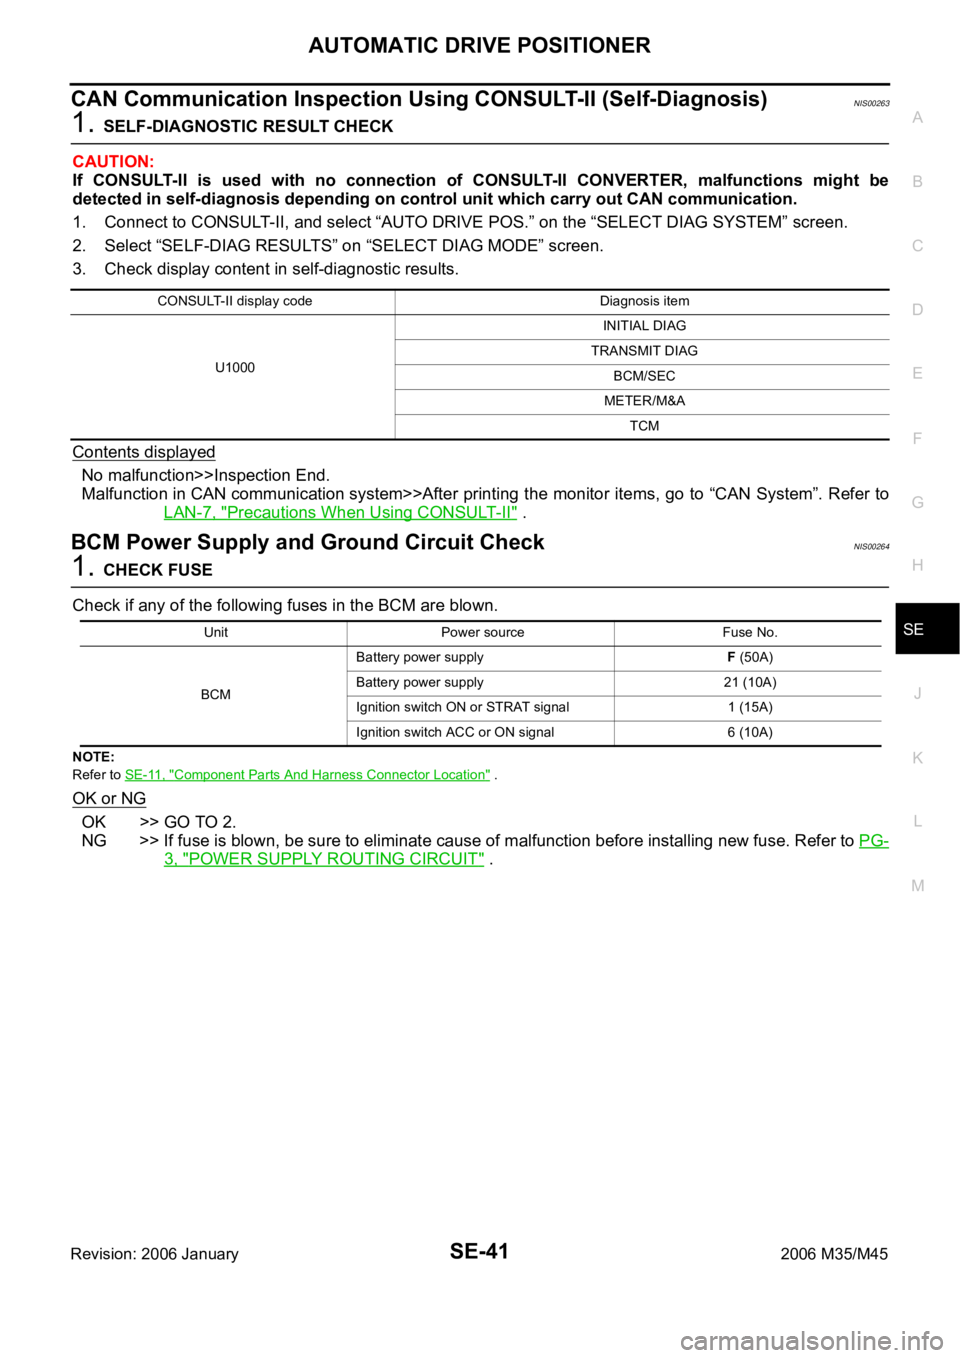
CAN Communication Inspection Using CONSULT-II (Self-Diagnosis)NIS00263
1. SELF-DIAGNOSTIC RESULT CHECK
CAUTION:
If CONSULT-II is used with no connection of CONSULT-II CONVERTER, malfunctions might be
detected in self-diagnosis depending on control unit which carry out CAN communication.
1. Connect to CONSULT-II, and select “AUTO DRIVE POS.” on the “SELECT DIAG SYSTEM” screen.
2. Select “SELF-DIAG RESULTS” on “SELECT DIAG MODE” screen.
3. Check display content in self-diagnostic results.
Contents displayed
No malfunction>>Inspection End.
Malfunction in CAN communication system>>After printing the monitor items, go to “CAN System”. Refer to
LAN-7, "
Precautions When Using CONSULT-II" .
BCM Power Supply and Ground Circuit CheckNIS00264
1. CHECK FUSE
Check if any of the following fuses in the BCM are blown.
NOTE:
Refer to SE-11, "
Component Parts And Harness Connector Location" .
OK or NG
OK >> GO TO 2.
NG >> If fuse is blown, be sure to eliminate cause of malfunction before installing new fuse. Refer to PG-
3, "POWER SUPPLY ROUTING CIRCUIT" .
CONSULT-II display code Diagnosis item
U1000INITIAL DIAG
TRANSMIT DIAG
BCM/SEC
METER/M&A
TCM
Unit Power source Fuse No.
BCMBattery power supplyF (50A)
Battery power supply 21 (10A)
Ignition switch ON or STRAT signal 1 (15A)
Ignition switch ACC or ON signal 6 (10A)
Page 5223 of 5621
SE-42
AUTOMATIC DRIVE POSITIONER
Revision: 2006 January2006 M35/M45
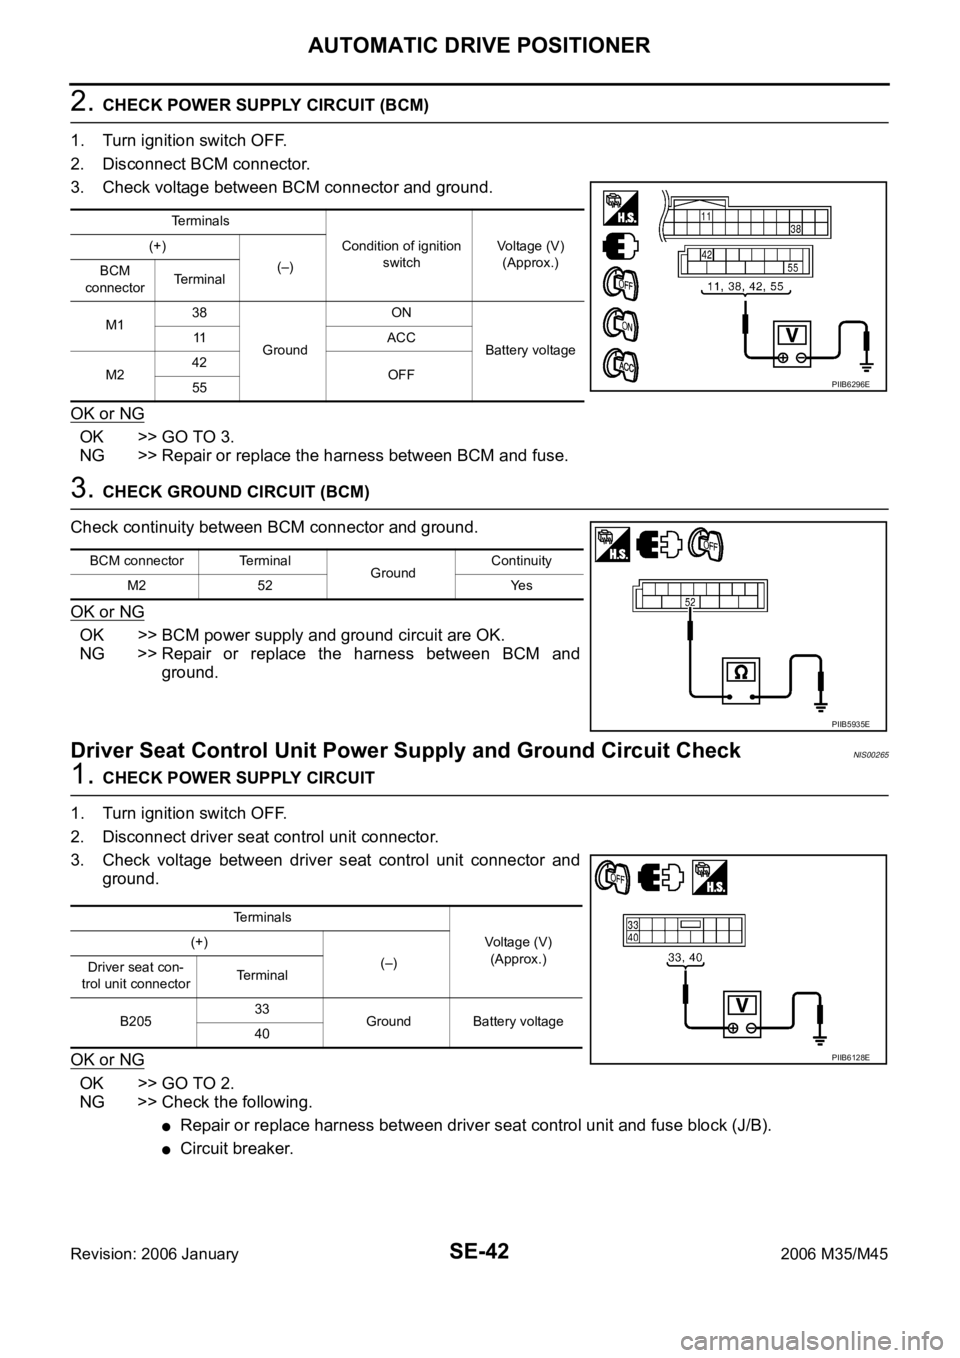
2. CHECK POWER SUPPLY CIRCUIT (BCM)
1. Turn ignition switch OFF.
2. Disconnect BCM connector.
3. Check voltage between BCM connector and ground.
OK or NG
OK >> GO TO 3.
NG >> Repair or replace the harness between BCM and fuse.
3. CHECK GROUND CIRCUIT (BCM)
Check continuity between BCM connector and ground.
OK or NG
OK >> BCM power supply and ground circuit are OK.
NG >> Repair or replace the harness between BCM and
ground.
Driver Seat Control Unit Power Supply and Ground Circuit CheckNIS00265
1. CHECK POWER SUPPLY CIRCUIT
1. Turn ignition switch OFF.
2. Disconnect driver seat control unit connector.
3. Check voltage between driver seat control unit connector and
ground.
OK or NG
OK >> GO TO 2.
NG >> Check the following.
Repair or replace harness between driver seat control unit and fuse block (J/B).
Circuit breaker.
Terminals
Condition of ignition
switchVoltage (V)
(Approx.) (+)
(–)
BCM
connectorTerminal
M138
GroundON
Battery voltage 11 A C C
M242
OFF
55
PIIB6296E
BCM connector Terminal
GroundContinuity
M2 52 Yes
PIIB5935E
Terminals
Voltage (V)
(Approx.) (+)
(–)
Driver seat con-
trol unit connectorTerminal
B20533
Ground Battery voltage
40
PIIB6128E
Page 5224 of 5621
AUTOMATIC DRIVE POSITIONER
SE-43
C
D
E
F
G
H
J
K
L
MA
B
SE
Revision: 2006 January2006 M35/M45
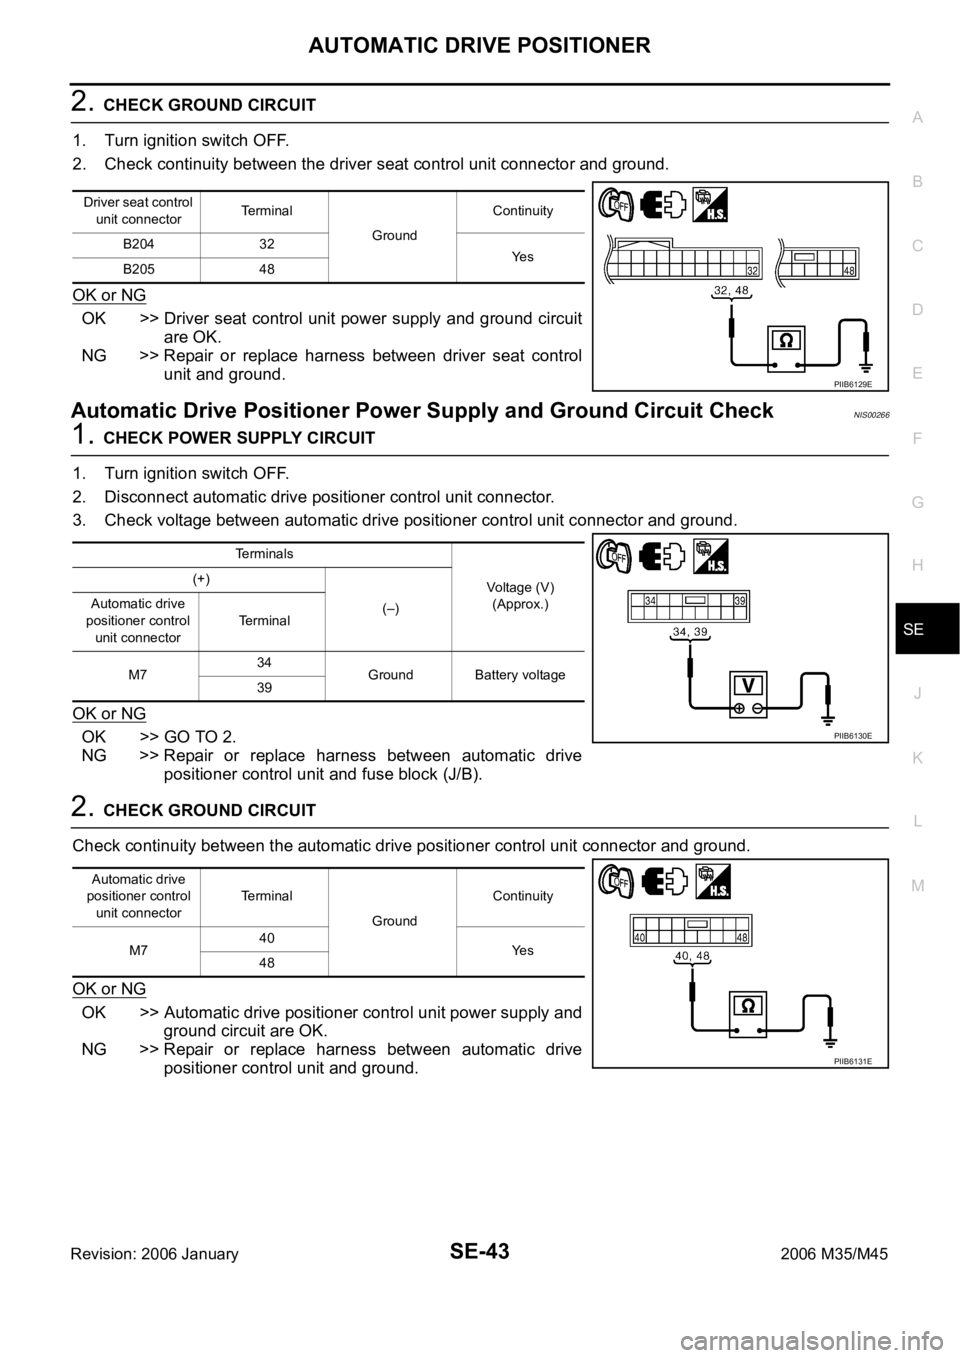
2. CHECK GROUND CIRCUIT
1. Turn ignition switch OFF.
2. Check continuity between the driver seat control unit connector and ground.
OK or NG
OK >> Driver seat control unit power supply and ground circuit
are OK.
NG >> Repair or replace harness between driver seat control
unit and ground.
Automatic Drive Positioner Power Supply and Ground Circuit CheckNIS00266
1. CHECK POWER SUPPLY CIRCUIT
1. Turn ignition switch OFF.
2. Disconnect automatic drive positioner control unit connector.
3. Check voltage between automatic drive positioner control unit connector and ground.
OK or NG
OK >> GO TO 2.
NG >> Repair or replace harness between automatic drive
positioner control unit and fuse block (J/B).
2. CHECK GROUND CIRCUIT
Check continuity between the automatic drive positioner control unit connector and ground.
OK or NG
OK >> Automatic drive positioner control unit power supply and
ground circuit are OK.
NG >> Repair or replace harness between automatic drive
positioner control unit and ground.
Driver seat control
unit connectorTerminal
GroundContinuity
B204 32
Ye s
B205 48
PIIB6129E
Terminals
Voltage (V)
(Approx.) (+)
(–) Automatic drive
positioner control
unit connectorTerminal
M734
Ground Battery voltage
39
PIIB6130E
Automatic drive
positioner control
unit connectorTerminal
GroundContinuity
M740
Ye s
48
PIIB6131E
Page 5225 of 5621
SE-44
AUTOMATIC DRIVE POSITIONER
Revision: 2006 January2006 M35/M45
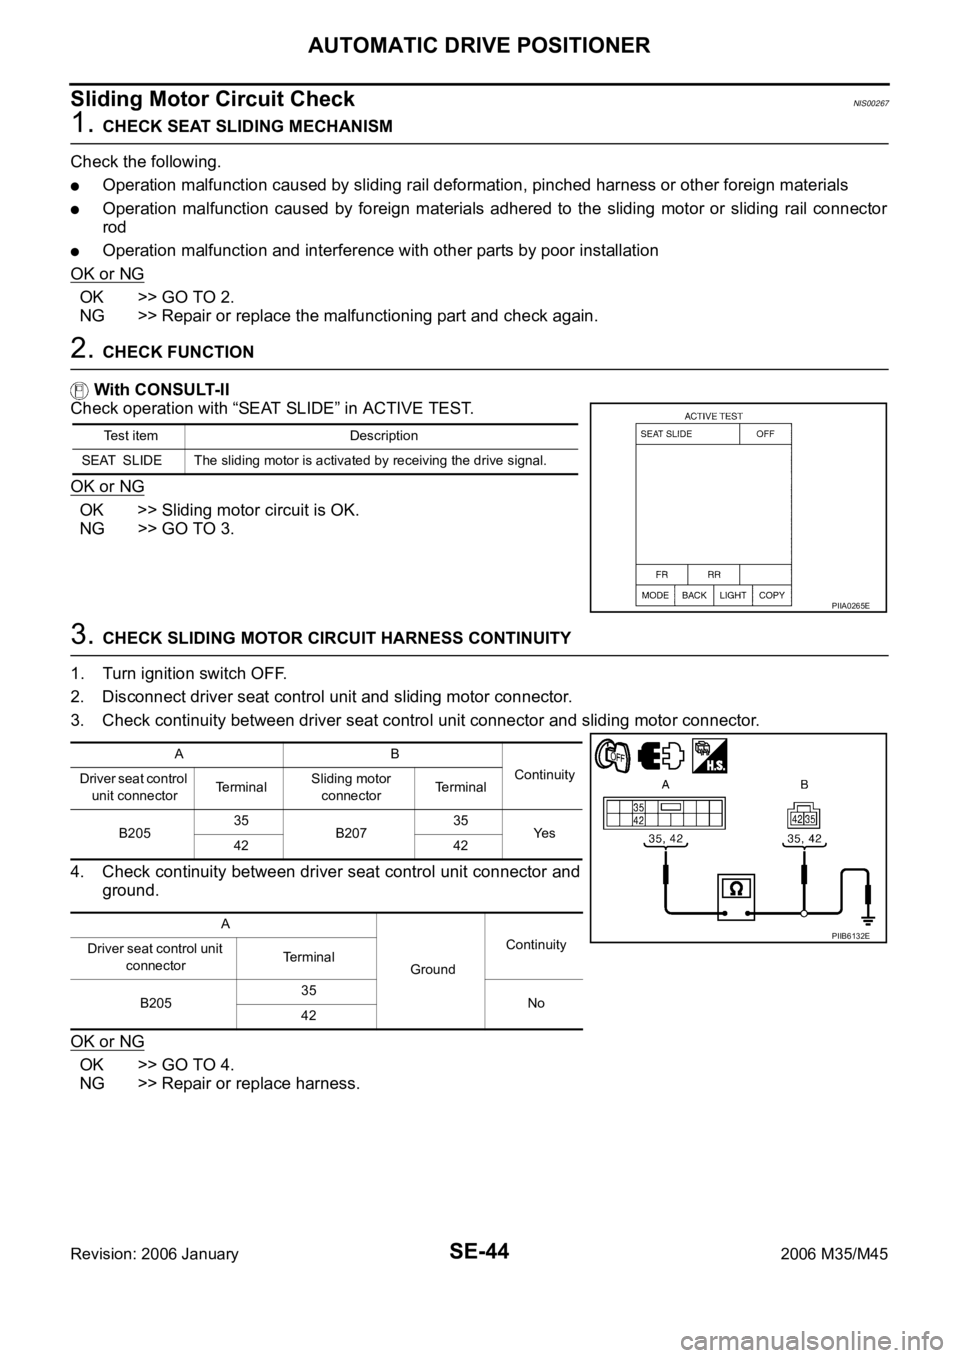
Sliding Motor Circuit CheckNIS00267
1. CHECK SEAT SLIDING MECHANISM
Check the following.
Operation malfunction caused by sliding rail deformation, pinched harness or other foreign materials
Operation malfunction caused by foreign materials adhered to the sliding motor or sliding rail connector
rod
Operation malfunction and interference with other parts by poor installation
OK or NG
OK >> GO TO 2.
NG >> Repair or replace the malfunctioning part and check again.
2. CHECK FUNCTION
With CONSULT-II
Check operation with “SEAT SLIDE” in ACTIVE TEST.
OK or NG
OK >> Sliding motor circuit is OK.
NG >> GO TO 3.
3. CHECK SLIDING MOTOR CIRCUIT HARNESS CONTINUITY
1. Turn ignition switch OFF.
2. Disconnect driver seat control unit and sliding motor connector.
3. Check continuity between driver seat control unit connector and sliding motor connector.
4. Check continuity between driver seat control unit connector and
ground.
OK or NG
OK >> GO TO 4.
NG >> Repair or replace harness.
Test item Description
SEAT SLIDE The sliding motor is activated by receiving the drive signal.
PIIA0265E
AB
Continuity
Driver seat control
unit connectorTe r m i n a lSliding motor
connectorTerminal
B20535
B20735
Ye s
42 42
A
GroundContinuity
Driver seat control unit
connectorTerminal
B20535
No
42
PIIB6132E