2006 DODGE RAM SRT-10 diagram
[x] Cancel search: diagramPage 5041 of 5267
When Monitored:
With the ignition on.
Set Condition:
If the A/C Heater Control looses communication with the Vehicle Entertainment System (VES).
(Refer to 8 - ELECTRICAL/ELECTRONIC CONTROL MODULES - DIAGNOSIS AND TESTING)for the diagnostic
test procedure.
U0197–LOST COMMUNICATION WITH HANDS FREE PHONE MODULE
For a complete wiring diagramRefer to Section 8W.
When Monitored:
With the ignition on.
Set Condition:
If the A/C Heater Control looses communication with the Hands Free Phone Module (HFM).
(Refer to 8 - ELECTRICAL/ELECTRONIC CONTROL MODULES - DIAGNOSIS AND TESTING)for the diagnostic
test procedure.
DTC SET DURING ROUTINE - TEST NOT PASSED
For a complete wiring diagramRefer to Section 8W.
When Monitored:
When the Cooldown Test is executed.
Set Condition:
If the A/C system is unable to lower the evaporator temperature 11.11°C (20°F) within one minute.
For dual-zone HVAC systems,refer to B10B2-A/C COOL DOWN TEST PERFORMANCEfor the diagnostic test
procedure. For single-zone HVAC systems,refer to B1079–CLIMATE CONTROL COOL DOWN TEST EXCESSIVE
TIMEfor the diagnostic test procedure.
BLOWERS NOT ON HIGH - TEST NOT RUN
For a complete wiring diagramRefer to Section 8W.
When Monitored:
When the Cooldown Test is executed.
Set Condition:
If either the blower speed was not set to high speed prior to starting the Cooldown Test or the blower speed
was changed from high speed to another setting after starting the Cooldowntest.
For dual-zone HVAC systems,refer to B10B2-A/C COOL DOWN TEST PERFORMANCEfor the diagnostic test
procedure. For single-zone HVAC systems,refer to B1079–CLIMATE CONTROL COOL DOWN TEST EXCESSIVE
TIMEfor the diagnostic test procedure.
REFRIGERANT TEMPERATURE SENSOR ERROR
For a complete wiring diagramRefer to Section 8W.
When Monitored:
When the Cooldown Test is executed.
Set Condition:
If a fault occurred with the Evaporator Temperature Sensor/sensor circuits.
For dual-zone HVAC systems,refer to B10B2-A/C COOL DOWN TEST PERFORMANCEfor the diagnostic test
procedure. For single-zone HVAC systems,refer to B1079–CLIMATE CONTROL COOL DOWN TEST EXCESSIVE
TIMEfor the diagnostic test procedure.
Page 5042 of 5267
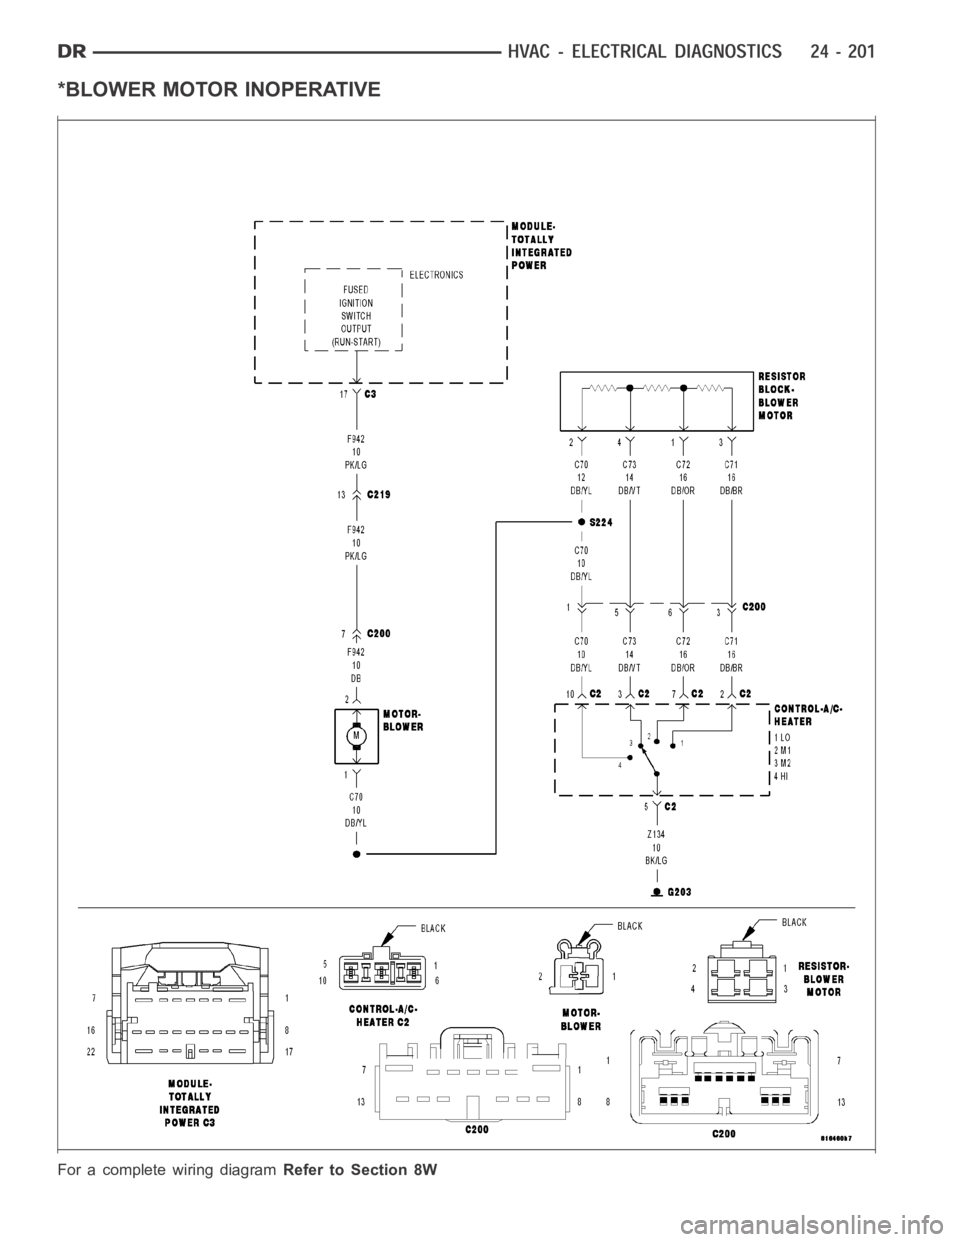
*BLOWER MOTOR INOPERATIVE
For a complete wiring diagramRefer to Section 8W
Page 5046 of 5267
*HVAC SYSTEM TEST
For a complete wiring diagramRefer to Section 8W.
Theory of Operation
The HVAC System Test provides a starting point in the diagnostic process byidentifying the appropriate diagnostic
procedure or system test to perform when diagnosing a given symptom, condition, or DTC. It also provides a means
for testing the entire HVAC system byutilizing the A/C-heater control’s On-Board System Tests. The On-Board Sys-
tem Tests can also assist in diagnosing stored DTCs. (Refer to 24 - HEATING &AIR CONDITIONING - DIAGNOSIS
AND TESTING) for additional information about on-board diagnostics.
Diagnostic Test
1.HVAC SYSTEM TEST
NOTE: Diagnose and repair all active DTCs before diagnosing and repairingstored DTCs.
Make a selection based on the symptom, condition, or DTC that you want to diagnose.
For Any Active DTC
Refer to the Table of Contents in this Section for a complete list of HVAC related symptoms.
Scan Tool Indicates HVAC Not Active On Bus
(Refer to 8 - ELECTRICAL/ELECTRONIC CONTROL MODULES - DIAGNOSIS AND TESTING) for no
response related diagnostic procedures.
Blower Motor Inoperative
Refer to *Blower Motor Inoperative in this Section.
Complete HVAC System Test
Go To 2
A/C System Performance Test
Go To 2
Mode Switch & Door Actuator Ckt Test
Go To 3
Actuator DTC Detection Test
Go To 4
Actuator Calibration Test
Go To 5
2.A/C SYSTEM PERFORMANCE TEST
NOTE: The following are prerequisites of the Cooldown Test. Verify each ofthe following before running the
test:
If active, diagnose and repair Evaporator Temperature Sensor related DTCs before proceeding. Refer to
the Table of Contents in this Section for a complete list of HVAC related symptoms.
Verify that the refrigerant system has an adequate charge. Check and repair as necessary before pro-
ceeding. (Refer to 24 - HEATING & AIR CONDITIONING/PLUMBING - DIAGNOSIS ANDTESTING).
Verify that the blower motor operates correctly in all speeds. Diagnose and repair all blower related faults
before proceeding.
Verify that the work area ambient temperature is above 15.6°C (60°F) before proceeding. Move the vehicle
to a warmer work area if necessary.
Verify that the evaporator temperature is above 13°C (55°F) before proceeding.
Verify that the Mode Select control is set to the panel position.
Verify that the A/C compressor is not running. If the compressor is running, turn the A/C off and allow the
evaporator to warm up before proceeding.
NOTE: Running the AC Cooldown test will cause the A/C status indicator to flash.
NOTE: One or more status messages will display on the scan tool after running the Cooldown Test. These
messages will clear after paging back out of this test function. Therefore, it is important to note all mes-
sages before doing so.
Start the engine.
Turn the Blower control to the high speed position.
Page 5086 of 5267
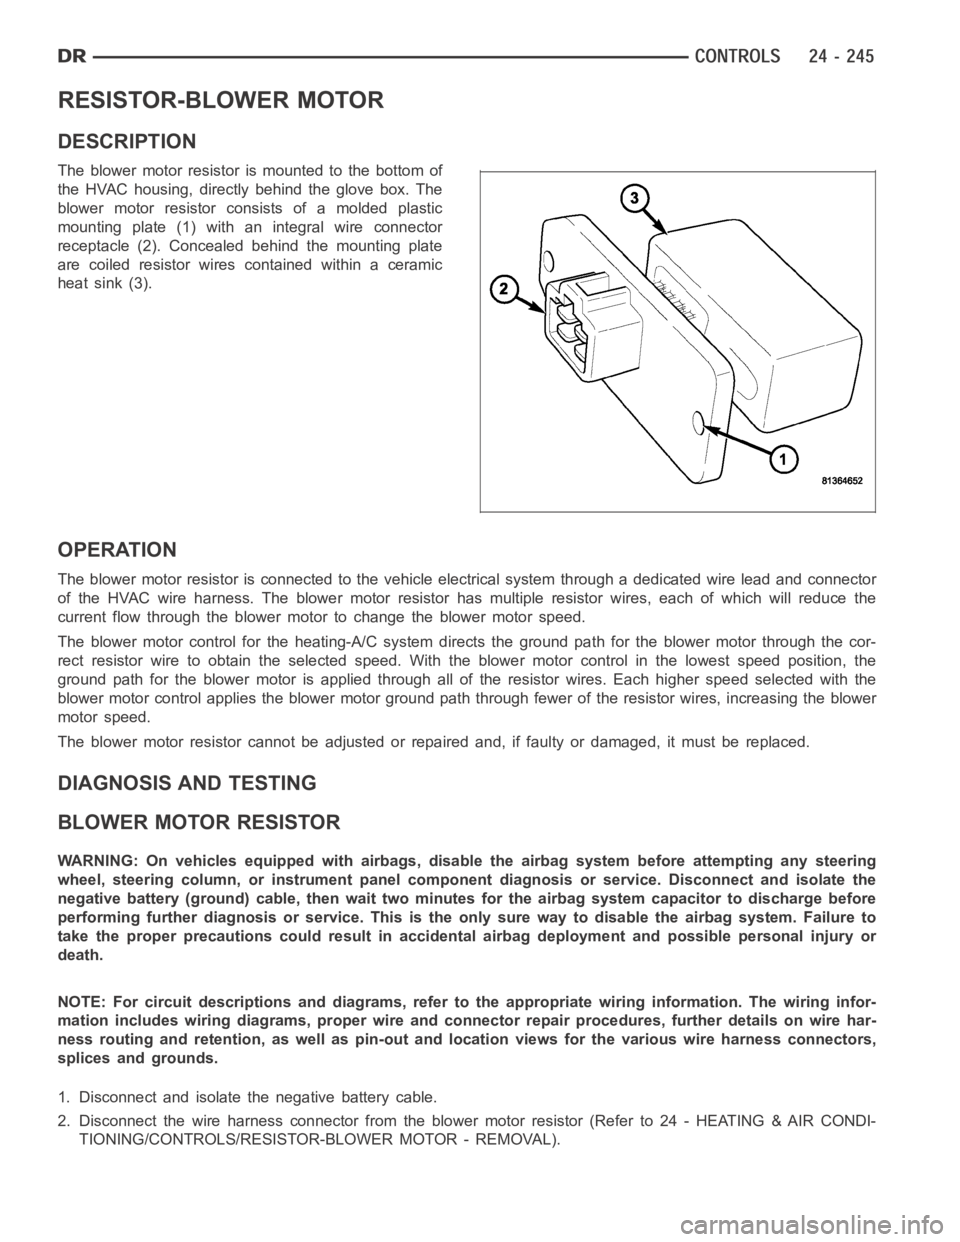
RESISTOR-BLOWER MOTOR
DESCRIPTION
The blower motor resistor is mounted to the bottom of
the HVAC housing, directly behind the glove box. The
blower motor resistor consists of a molded plastic
mounting plate (1) with an integral wire connector
receptacle (2). Concealed behind the mounting plate
are coiled resistor wires contained within a ceramic
heat sink (3).
OPERATION
The blower motor resistor is connected to the vehicle electrical system through a dedicated wire lead and connector
of the HVAC wire harness. The blower motor resistor has multiple resistor wires, each of which will reduce the
current flow through the blower motor to change the blower motor speed.
The blower motor control for the heating-A/C system directs the ground path for the blower motor through the cor-
rect resistor wire to obtain the selected speed. With the blower motor control in the lowest speed position, the
ground path for the blower motor is applied through all of the resistor wires. Each higher speed selected with the
blower motor control applies the blower motor ground path through fewer ofthe resistor wires, increasing the blower
motor speed.
The blower motor resistor cannot be adjusted or repaired and, if faulty or damaged, it must be replaced.
DIAGNOSIS AND TESTING
BLOWER MOTOR RESISTOR
WARNING: On vehicles equipped with airbags, disable the airbag system before attempting any steering
wheel, steering column, or instrument panel component diagnosis or service. Disconnect and isolate the
negative battery (ground) cable, then wait two minutes for the airbag system capacitor to discharge before
performing further diagnosis or service. This is the only sure way to disable the airbag system. Failure to
take the proper precautions could result in accidental airbag deploymentand possible personal injury or
death.
NOTE: For circuit descriptions and diagrams, refer to the appropriate wiring information. The wiring infor-
mation includes wiring diagrams, proper wire and connector repair procedures, further details on wire har-
ness routing and retention, as well as pin-out and location views for the various wire harness connectors,
splices and grounds.
1. Disconnect and isolate the negative battery cable.
2. Disconnect the wire harness connector from the blower motor resistor (Refer to 24 - HEATING & AIR CONDI-
TIONING/CONTROLS/RESISTOR-BLOWER MOTOR - REMOVAL).
Page 5122 of 5267
NOTE: The blower motor is supplied with a 12V feed from the TIPM, through theresistor block, whenever
the ignition switch is in the RUN position. Due to an open circuit conditionwithin the blower motor control
switch the TIPM is UNABLE to detect an OPEN circuit for the blower motor.
To determine if an open condition exists within the blower motor circuit wiring, it is necessary to disconnect the
negative battery cable and check for continuity within the blower motor circuits using an ohmmeter. For circuit
descriptions and diagrams, refer to Air Conditioning/Heater in Group 8W -Wiring Diagrams.
OPERATION
Possible causes of the blower motor not operating include:
Faulty blower motor
Faulty blower motor circuit wiring or wire harness connectors
Faulty blower motor control
Possible causes of the blower motor not operating in one or more speeds include:
Faulty blower motor resistor
Faulty blower motor circuit wiring or wire harness connectors
Faulty blower motor control
VIBRATION
Possible causes of blower motor vibration include:
Improper blower motor mounting
Improper blower wheel mounting
Deformed blower wheel
Out of balance blower wheel due to foreign material in the wheel
Faulty blower motor
NOISE
To determine if the blower motor is the source of the noise, simply switch the blower motor from Off to On. To verify
that the blower motor is the source of the noise, unplug the blower motor wire harness connector and operate the
heating-A/C system. If the noise goes away, possible causes include:
Foreign material in the HVAC air inlet housing
Improper blower motor mounting
Improper blower wheel mounting
Faulty blower motor