2006 DODGE RAM SRT-10 check oil
[x] Cancel search: check oilPage 1262 of 5267
Theory of Operation
The upstream O2 sensor is used to detect the amount of oxygen in the exhaust gas before the gas enters the
catalytic converter. During the catalyst/O2 monitor test, the response rate (cycles/second) of the upstream O2 sen-
sor determines the sensor’s ability to achieve the tailpipe emissions limits. The response rate of the downstream O2
sensor relative to the upstream O2 sensor response rate measures the catalyst’s ability to store oxygen and is used
to infer the catalyst’s ability to achieve the tailpipe emissions limits.
When Monitored:
After engine warm up to 70°C (158°F), 180 seconds of open throttle operation, at a speed greater than 18 mph
and less than 55 mph, with the engine at 1200-1700 rpm and MAP vacuum between15.0 and 21.0 inches of
mercury (Hg).
Set Condition:
As catalyst efficiency deteriorates, the switch rate of the downstream O2sensor approaches that of the
upstream O2 sensor. If at any point during the test the switch ratio reachesa predetermined value a counter
is incremented by one. Three good trips to turn off the MIL.
Possible Causes
EXHAUST LEAK
ENGINE MECHANICAL
AGING O2 SENSOR
CATALYTIC CONVERTER
Always perform the Pre-Diagnostic Troubleshooting procedure before proceeding. (Refer to 9 - ENGINE -
DIAGNOSIS AND TESTING).
Diagnostic Test
1.ACTIVE DTC
NOTE: A new rear O2 Sensor along with an aging front O2 Sensor may cause the DTCtoset.Reviewthe
repair history of the vehicle before continuing.
NOTE: If an O2 Sensor DTC set along with the Catalytic Converter EfficiencyDTC diagnose the O2 Sensor
DTC(s) before continuing.
NOTE: Check for contaminants that may have damaged the O2 Sensor and Catalytic Converter: contami-
nated fuel, unapproved silicone, oil and coolant, repair necessary.
Ignition on, engine not running.
With a scan tool, read DTCs.
Is the DTC active at this time?
Ye s>>
Go To 2
No>>
Refer to the INTERMITTENT CONDITION Diagnostic Procedure.
Perform the POWERTRAIN VERIFICATION TEST. (Refer to 9 - ENGINE - STANDARD PROCEDURE)
Page 1265 of 5267

Theory of Operation
The upstream O2 sensor is used to detect the amount of oxygen in the exhaust gas before the gas enters the
catalytic converter. During the catalyst/O2 monitor test, the response rate (cycles/second) of the upstream O2 sen-
sor determines the sensor’s ability to achieve the tailpipe emissions limits. The response rate of the downstream O2
sensor relative to the upstream O2 sensor response rate measures the catalyst’s ability to store oxygen and is used
to infer the catalyst’s ability to achieve the tailpipe emissions limits.
When Monitored:
After engine warm up to 147 deg. F, 180 seconds of open throttle operation, at a speed greater than 20 mph,
with the engine at 1200-1700 rpm and MAP vacuum between 15.0 and 21.0 inchesof mercury (Hg).
Set Condition:
As catalyst efficiency deteriorates, the switch rate of the downstream O2sensor approaches that of the
upstream O2 sensor. If at any point during the test the switch ratio reachesa predetermined value a counter
is incremented by one. Three good trips to turn off the MIL.
Possible Causes
EXHAUST LEAK
ENGINE MECHANICAL
AGING O2 SENSOR
CATALYTIC CONVERTER
Always perform the Pre-Diagnostic Troubleshooting procedure before proceeding. (Refer to 9 - ENGINE -
DIAGNOSIS AND TESTING).
Diagnostic Test
1.ACTIVE DTC
NOTE: A new rear O2 Sensor along with an aging front O2 Sensor may cause the DTCtoset.Reviewthe
repair history of the vehicle before continuing.
NOTE: If an O2 Sensor DTC set along with the Catalytic Converter EfficiencyDTC diagnose the O2 Sensor
DTC(s) before continuing.
NOTE: Check for contaminants that may have damaged the O2 Sensor and Catalytic Converter: contami-
nated fuel, unapproved silicone, oil and coolant, repair necessary.
Ignition on, engine not running.
With a scan tool, read DTCs.
Is the DTC active at this time?
Ye s>>
Go To 2
No>>
Refer to the INTERMITTENT CONDITION Diagnostic Procedure.
Perform the POWERTRAIN VERIFICATION TEST. (Refer to 9 - ENGINE - STANDARD PROCEDURE)
2.VISUALLY INSPECT CATALYTIC CONVERTER
Inspect the Catalytic Converter for the following damage.
Damaged Catalytic Converter, dents or holes.
Severe discoloration caused by overheating the Catalytic Converter.
Catalytic Converter broken internally.
Leaking Catalytic Converter.
Were any problems found?
Ye s>>
Replace the Catalytic Converter. Repair the condition that may have caused the failure.
Perform the POWERTRAIN VERIFICATION TEST. (Refer to 9 - ENGINE - STANDARD PROCEDURE)
No>>
Go To 3
Page 1308 of 5267
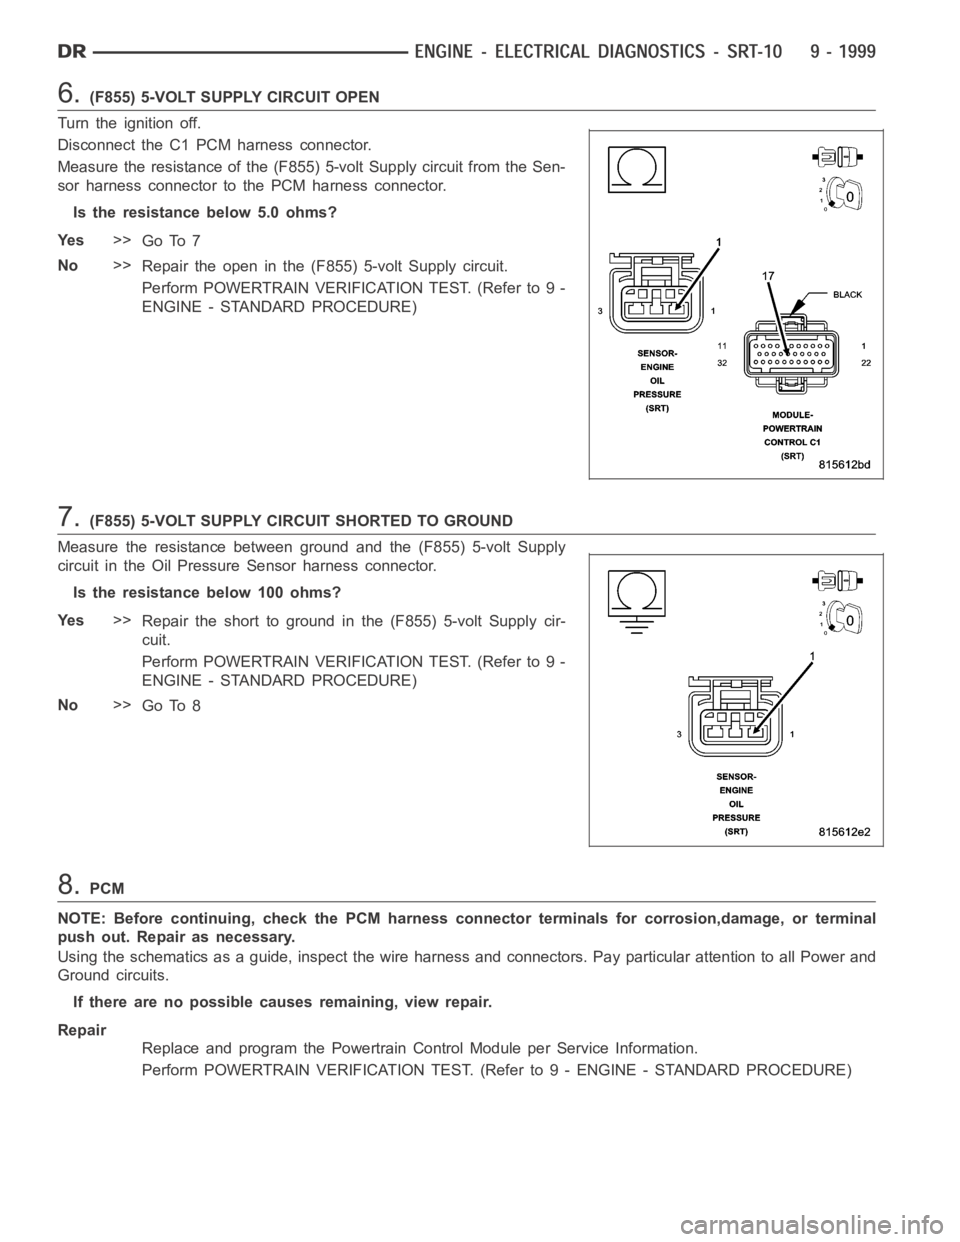
6.(F855) 5-VOLT SUPPLY CIRCUIT OPEN
Turn the ignition off.
Disconnect the C1 PCM harness connector.
Measure the resistance of the (F855) 5-volt Supply circuit from the Sen-
sor harness connector to the PCM harness connector.
Is the resistance below 5.0 ohms?
Ye s>>
Go To 7
No>>
Repair the open in the (F855) 5-volt Supply circuit.
Perform POWERTRAIN VERIFICATION TEST. (Refer to 9 -
ENGINE - STANDARD PROCEDURE)
7.(F855) 5-VOLT SUPPLY CIRCUIT SHORTED TO GROUND
Measure the resistance between ground and the (F855) 5-volt Supply
circuit in the Oil Pressure Sensor harness connector.
Istheresistancebelow100ohms?
Ye s>>
Repair the short to ground in the (F855) 5-volt Supply cir-
cuit.
Perform POWERTRAIN VERIFICATION TEST. (Refer to 9 -
ENGINE - STANDARD PROCEDURE)
No>>
Go To 8
8.PCM
NOTE: Before continuing, check the PCM harness connector terminals for corrosion,damage, or terminal
push out. Repair as necessary.
Using the schematics as a guide, inspect the wire harness and connectors. Pay particular attention to all Power and
Ground circuits.
If there are no possible causes remaining, view repair.
Repair
Replace and program the Powertrain Control Module per Service Information.
Perform POWERTRAIN VERIFICATION TEST. (Refer to 9 - ENGINE - STANDARD PROCEDURE)
Page 1311 of 5267
4.(G6) OIL PRESSURE SIGNAL CIRCUIT OPEN
Turn the ignition off.
Measure the resistance of the (G6) Oil Pressure Signal circuit from the OilPressure Sensor harness connector to
the PCM harness connector.
Is the resistance below 5.0 ohms?
Ye s>>
Go To 5
No>>
Repair the open in the (G6) Oil Pressure Signal circuit.
Perform POWERTRAIN VERIFICATION TEST. (Refer to 9 - ENGINE - STANDARD PROCEDURE) Per-
form POWERTRAIN VERIFICATION TEST.
5.(K900) SENSOR GROUND CIRCUIT OPEN
Measure the resistance of the (K900) Sensor ground circuit from the Oil Pressure Sensor harness connector to the
PCM harness connector.
Is the resistance below 5.0 ohms?
Ye s>>
Go To 6
No>>
Repair the open in the (K900) Sensor ground circuit.
Perform POWERTRAIN VERIFICATION TEST. (Refer to 9 - ENGINE - STANDARD PROCEDURE)
6.PCM
NOTE: Before continuing, check the PCM harness connector terminals for corrosion, damage, or terminal
push out. Repair as necessary.
Using the schematics as a guide, inspect the wire harness and connectors. Pay particular attention to all Power and
Ground circuits.
If there are no possible causes remaining, view repair.
Repair
Replace and program the Powertrain Control Module per Service Information.
Perform POWERTRAIN VERIFICATION TEST. (Refer to 9 - ENGINE - STANDARD PROCEDURE)
Page 1333 of 5267
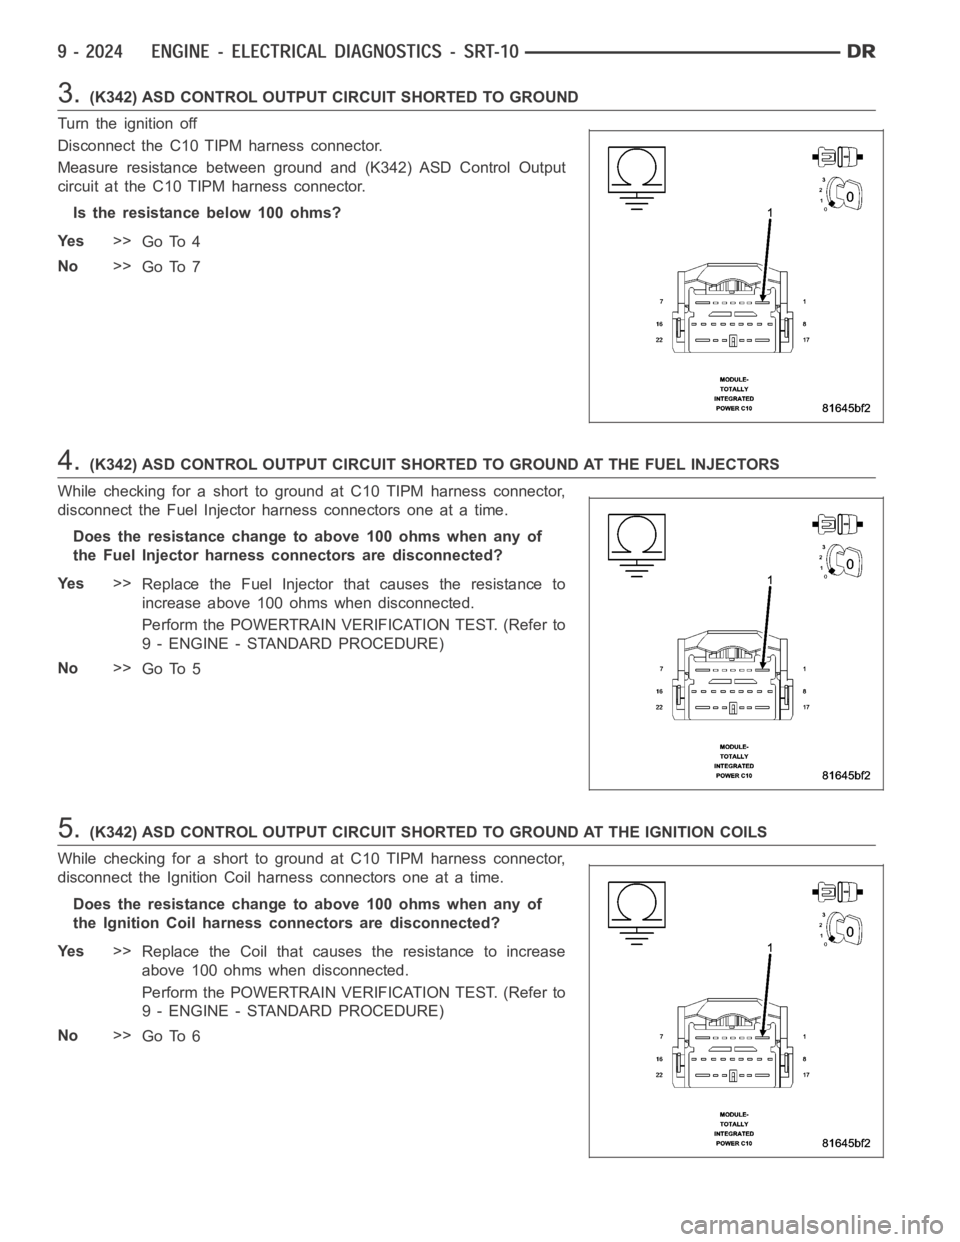
3.(K342) ASD CONTROL OUTPUT CIRCUIT SHORTED TO GROUND
Turn the ignition off
Disconnect the C10 TIPM harness connector.
Measure resistance between ground and (K342) ASD Control Output
circuit at the C10 TIPM harness connector.
Istheresistancebelow100ohms?
Ye s>>
Go To 4
No>>
Go To 7
4.(K342) ASD CONTROL OUTPUT CIRCUIT SHORTED TO GROUND AT THE FUEL INJECTORS
While checking for a short to ground at C10 TIPM harness connector,
disconnect the Fuel Injector harness connectors one at a time.
Does the resistance change to above 100 ohms when any of
the Fuel Injector harness connectors are disconnected?
Ye s>>
Replace the Fuel Injector that causes the resistance to
increase above 100 ohms when disconnected.
Perform the POWERTRAIN VERIFICATION TEST. (Refer to
9 - ENGINE - STANDARD PROCEDURE)
No>>
Go To 5
5.(K342) ASD CONTROL OUTPUT CIRCUIT SHORTED TO GROUND AT THE IGNITION COILS
While checking for a short to ground at C10 TIPM harness connector,
disconnect the Ignition Coil harness connectors one at a time.
Does the resistance change to above 100 ohms when any of
the Ignition Coil harness connectors are disconnected?
Ye s>>
Replace the Coil that causes the resistance to increase
above 100 ohms when disconnected.
Perform the POWERTRAIN VERIFICATION TEST. (Refer to
9 - ENGINE - STANDARD PROCEDURE)
No>>
Go To 6
Page 1337 of 5267
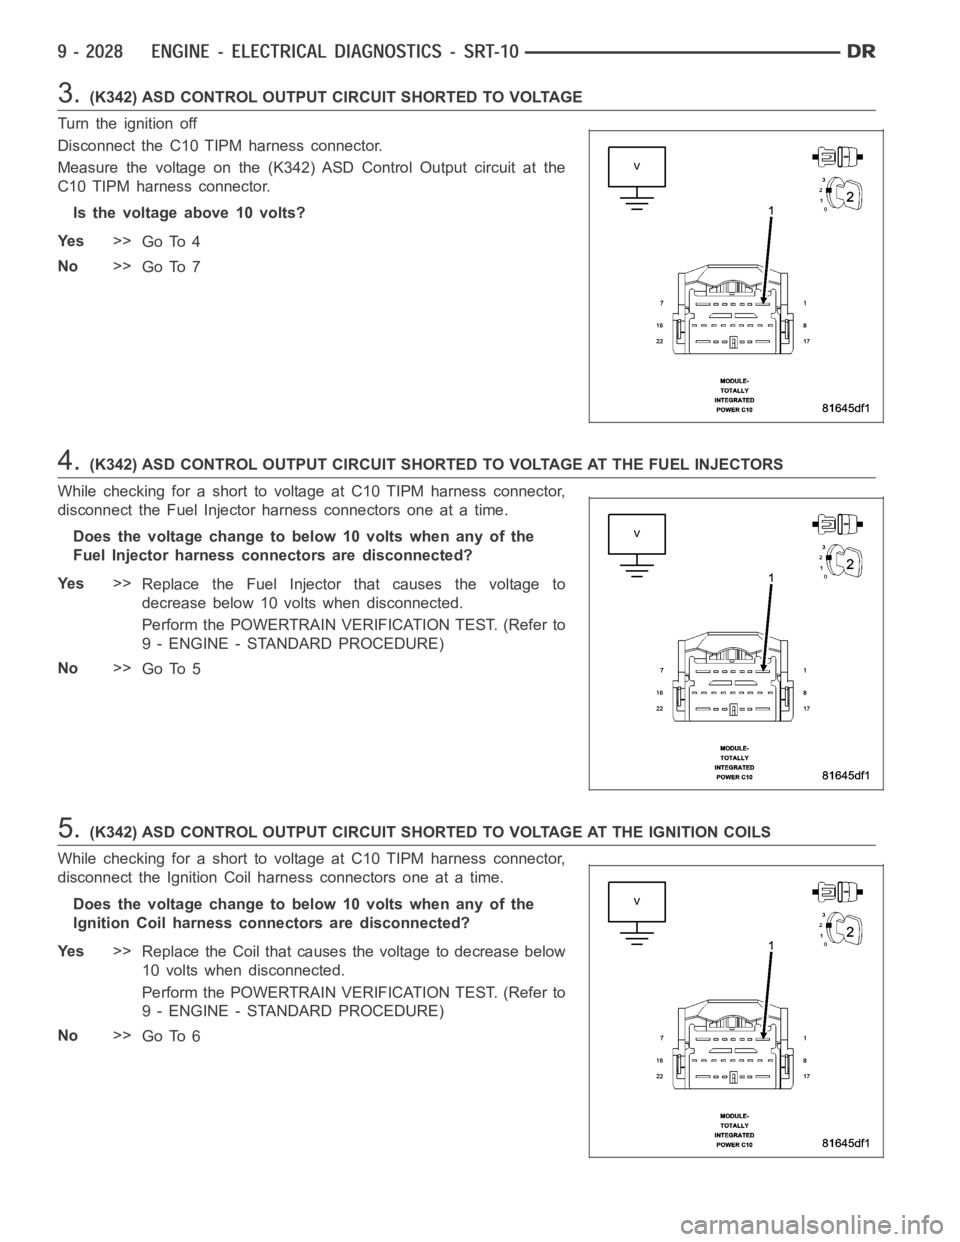
3.(K342) ASD CONTROL OUTPUT CIRCUIT SHORTED TO VOLTAGE
Turn the ignition off
Disconnect the C10 TIPM harness connector.
Measure the voltage on the (K342) ASD Control Output circuit at the
C10 TIPM harness connector.
Is the voltage above 10 volts?
Ye s>>
Go To 4
No>>
Go To 7
4.(K342) ASD CONTROL OUTPUT CIRCUIT SHORTED TO VOLTAGE AT THE FUEL INJECTORS
While checking for a short to voltage at C10 TIPM harness connector,
disconnect the Fuel Injector harness connectors one at a time.
Does the voltage change to below 10 volts when any of the
Fuel Injector harness connectors are disconnected?
Ye s>>
Replace the Fuel Injector that causes the voltage to
decrease below 10 volts when disconnected.
Perform the POWERTRAIN VERIFICATION TEST. (Refer to
9 - ENGINE - STANDARD PROCEDURE)
No>>
Go To 5
5.(K342) ASD CONTROL OUTPUT CIRCUIT SHORTED TO VOLTAGE AT THE IGNITION COILS
While checking for a short to voltage at C10 TIPM harness connector,
disconnect the Ignition Coil harness connectors one at a time.
Does the voltage change to below 10 volts when any of the
Ignition Coil harness connectors are disconnected?
Ye s>>
Replace the Coil that causes the voltage to decrease below
10 volts when disconnected.
Perform the POWERTRAIN VERIFICATION TEST. (Refer to
9 - ENGINE - STANDARD PROCEDURE)
No>>
Go To 6
Page 1346 of 5267
6.PCM Turn the ignition off.
Disconnect C3 NGC harness connector.
CAUTION: Do not probe the PCM harness connectors. Probing the PCM harness connectors will damage
the PCM terminals resulting in poor terminal to pin connection. Install Miller Special Tool #8815 and #8815-1
to perform diagnosis.
With a voltmeter, use Negative lead of the voltmeter along with terminal probe tool #6801, probe the (K342) ASD
Control Output circuit at the appropriate terminals of special tool #8815.
With the Positive lead of the voltmeter along with terminal probe tool #6801, back probe the (K342) ASD Control
Output circuit at the C10 TIPM harness connector.
Start the engine and allow it to idle.
WARNING: When the engine is operating, do not stand in direct line with the fan. Do not put your hands
near the pulleys, belts, or fan. Do notwear loose clothing. Failure to follow these instructions can result in
personal injury or death.
Measure the voltage of the (K342) ASD Control Output circuit.
Is the voltage above 0.001 of a volt (1.0mV) for any of the Ignition Coil ASD Control Output circuits?
Ye s>>
Repair the excessive resistance in the (K342) ASD Control Output circuit tothePCM.
Perform the POWERTRAIN VERIFICATION TEST. (Refer to 9 - ENGINE - STANDARD PROCEDURE)
No>>
Replace and program the Powertrain Control Module in accordance with Service Information.
Perform the POWERTRAIN VERIFICATION TEST. (Refer to 9 - ENGINE - STANDARD PROCEDURE)
7.TOTALLY INTEGRATED POWER MODULE
NOTE: Before continuing, check the TIPM harness connector terminals for corrosion, damage, or terminal
push out. Repair as necessary.
Using the schematics as a guide, inspect the wire harness and connectors.
Pay particular attention to allPower and voltage circuits.
Were any problems found?
Ye s>>
Repair as necessary.
Perform the POWERTRAIN VERIFICATION TEST. (Refer to 9 - ENGINE - STANDARD PROCEDURE)
No>>
Replace the Totally Integrated Power Module per Service Information.
Perform the POWERTRAIN VERIFICATION TEST. (Refer to 9 - ENGINE - STANDARD PROCEDURE)
Page 1389 of 5267
When Monitored:
With the ignition on and battery voltage above 10.4 volts.
Set Condition:
An open or shorted condition is detected in the Fuel Pump Relay Control circuit.
Possible Causes
FUEL PUMP RELAY OPERATION
FUEL PUMP RELAY
FUSED IGNITION SWITCH OUTPUT CIRCUIT
(K31) FUEL PUMP RELAY CONTROL CIRCUIT OPEN
(K31) FUEL PUMP RELAY CONTROL CIRCUIT SHORTED TO GROUND
PCM
Always perform the Pre-Diagnostic Troubleshooting procedure before proceeding. (Refer to 9 - ENGINE -
DIAGNOSIS AND TESTING)
1.FUEL PUMP RELAY OPERATION
Ignition on, engine not running.
With the scan tool, read DTCs and record the related Freeze Frame data.
With the scan tool, actuate the Fuel Pump Relay.
Is the Fuel Pump Relay clicking?
Ye s>>
Refer to the INTERMITTENT CONDITIONSymptom (Diagnostic Procedure).
Perform POWERTRAIN VERIFICATION TEST. (Refer to 9 - ENGINE - STANDARD PROCEDURE)
No>>
Go To 2
2.FUEL PUMP RELAY
Turn the ignition off.
Remove the Fuel Pump Relay.
NOTE: Check connectors - Clean/repair as necessary.
Measure the resistance between the coil terminals of the Fuel Pump Relay.
Is the resistance between 50 and 90 ohms?
Ye s>>
Go To 3
No>>
Replace the Fuel Pump Relay.
Perform POWERTRAIN VERIFICATION TEST. (Refer to 9 - ENGINE - STANDARD PROCEDURE)
3.FUSED IGNITION SWITCH CIRCUIT OPEN
Ignition on, engine not running.
Using a 12-volt test light connected to ground, probe the Fused Ignition Switch Output circuit in the Fuel Pump
Relay connector.
Does the test light illuminate brightly?
Ye s>>
Go To 4
No>>
Repair the open or short to ground in the Fused Ignition Switch Output circuit. Inspect the related fuse
and repair as necessary.
Perform POWERTRAIN VERIFICATION TEST. (Refer to 9 - ENGINE - STANDARD PROCEDURE)