Page 3372 of 5267
Some suspected converter housing fluid leaks may not be leaks at all. They may only be the result of residual fluid
in the converter housing, or excess fluid spilled during factory fill or fill after repair. Converter housing leaks have
several potential sources. Through careful observation, a leak source can be identified before removing the trans-
mission for repair. Torque converter seal leaks tend to move along the drive hub and onto the rear of the converter.
Pump cover seal leaks tend to run down the cover and the inside surface of thebellhousing.
Some leaks, or suspected leaks, may be particularly difficult to locate. If necessary, a Mopar
approved dye should
be used to locate and confirm a leak.
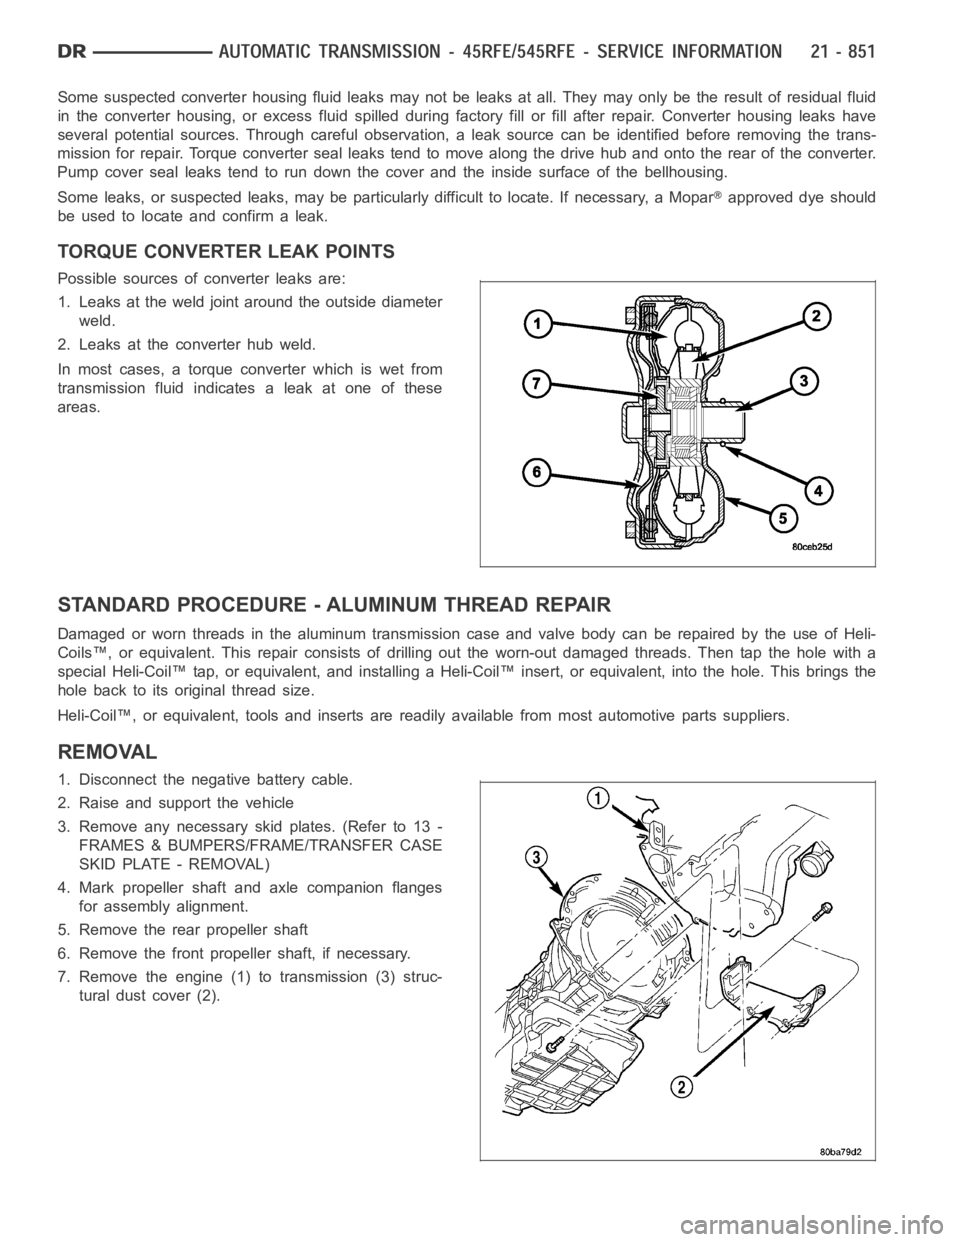
TORQUE CONVERTER LEAK POINTS
Possible sources of converter leaks are:
1. Leaks at the weld joint around the outside diameter
weld.
2. Leaks at the converter hub weld.
In most cases, a torque converter which is wet from
transmission fluid indicates a leak at one of these
areas.
STANDARD PROCEDURE - ALUMINUM THREAD REPAIR
DamagedorwornthreadsinthealuminumtransmissioncaseandvalvebodycanberepairedbytheuseofHeli-
Coils™, or equivalent. This repair consists of drilling out the worn-out damaged threads. Then tap the hole with a
special Heli-Coil™ tap, or equivalent, and installing a Heli-Coil™ insert, or equivalent, into the hole. This brings the
hole back to its original thread size.
Heli-Coil™, or equivalent, tools and inserts are readily available from most automotive parts suppliers.
REMOVAL
1. Disconnect the negative battery cable.
2. Raise and support the vehicle
3. Remove any necessary skid plates. (Refer to 13 -
FRAMES & BUMPERS/FRAME/TRANSFER CASE
SKID PLATE - REMOVAL)
4. Mark propeller shaft and axle companion flanges
for assembly alignment.
5. Remove the rear propeller shaft
6. Remove the front propeller shaft, if necessary.
7. Remove the engine (1) to transmission (3) struc-
tural dust cover (2).
Page 3374 of 5267
15. Disengage the line pressure sensor connector
from the line pressure sensor (2).
16. Disconnect gearshift cable (1) from transmission
manual valve lever (3).
17. Disconnect the transmission vent hose from the
transmission.
18. Support rear of engine with safety stand or jack.
19. Raise transmission slightly with service jack to
relieve load on crossmember and supports.
20. Remove bolts securing rear support and cushion
to transmission and crossmember.
21. Remove transfer case, if necessary.
22. Disconnect transmission fluid cooler lines at trans-
mission fittings and clips.
23. Remove all remaining converter housing bolts.
24. Carefully work transmission and torque converter
assembly rearward off engine block dowels.
25. Hold torque converter in place during transmission
removal.
26. Lower transmission (2) and remove assembly from under the vehicle.
27. To remove torque converter, carefully slide torque converter out of the transmission.
Page 3375 of 5267
DISASSEMBLY
1. Drain fluid from transmission.
2. Clean exterior of transmission with suitable solvent
or pressure washer.
3. Remove the torque converter from the transmis-
sion.
4. Remove the manual shift lever (1) from the
transmission.
5. Remove the input (3), output (1), and line pressure
sensors (2) from the transmission case.
6. Inspect the ends of the sensors for debris, which
may indicate the nature of the transmission failure.
7. Install Support Stand 8257 (1) onto the transmis-
sion case.
Page 3381 of 5267
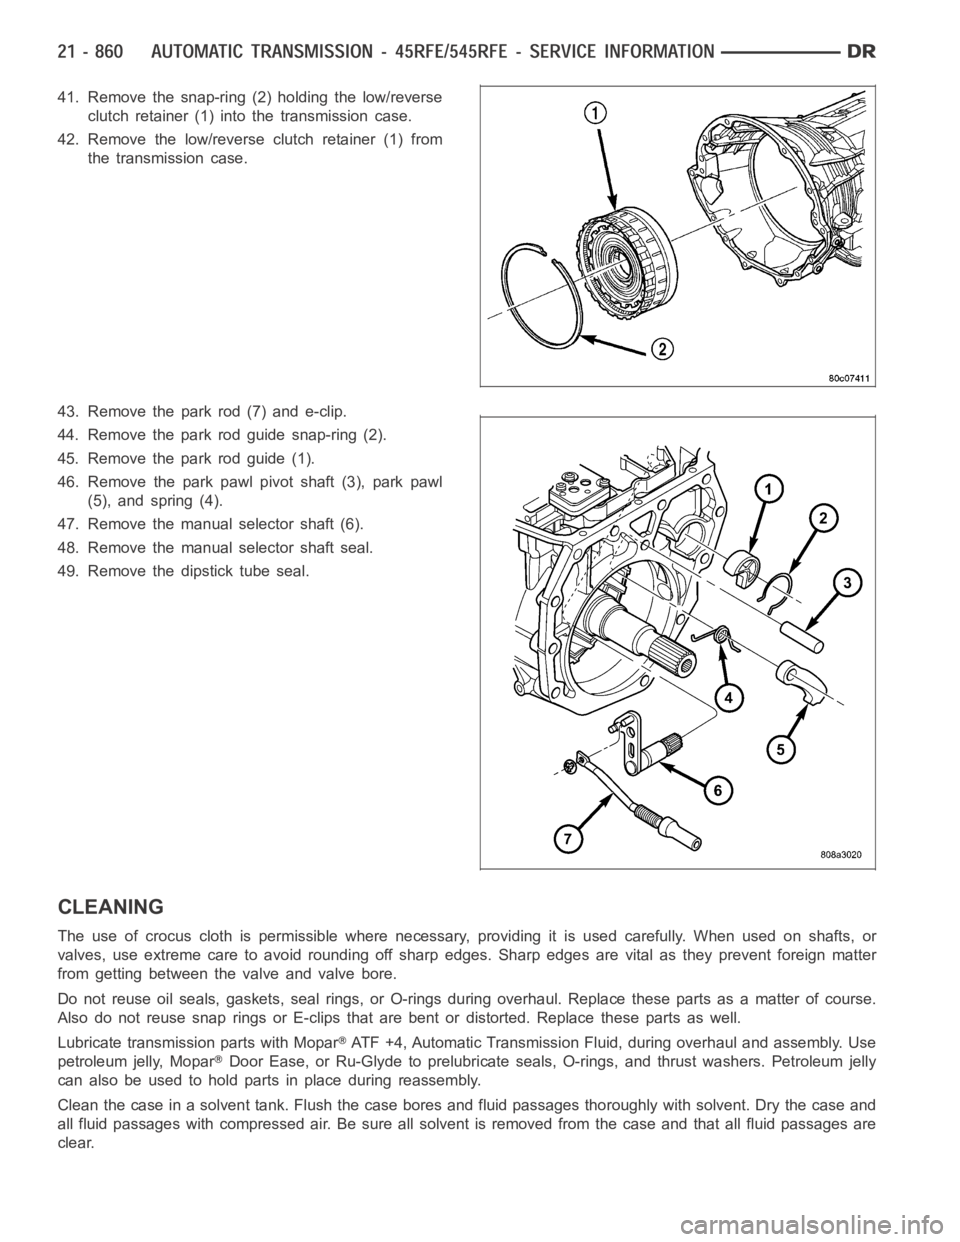
41. Remove the snap-ring (2) holding the low/reverse
clutch retainer (1) into the transmission case.
42. Remove the low/reverse clutch retainer (1) from
the transmission case.
43. Remove the park rod (7) and e-clip.
44. Remove the park rod guide snap-ring (2).
45. Remove the park rod guide (1).
46. Remove the park pawl pivot shaft (3), park pawl
(5), and spring (4).
47. Remove the manual selector shaft (6).
48. Remove the manual selector shaft seal.
49. Remove the dipstick tube seal.
CLEANING
The use of crocus cloth is permissible where necessary, providing it is usedcarefully.Whenusedonshafts,or
valves, use extreme care to avoid rounding off sharp edges. Sharp edges arevital as they prevent foreign matter
from getting between the valve and valve bore.
Do not reuse oil seals, gaskets, seal rings, or O-rings during overhaul. Replace these parts as a matter of course.
Also do not reuse snap rings or E-clips that are bent or distorted. Replace these parts as well.
Lubricate transmission parts with Mopar
ATF +4, Automatic Transmission Fluid, during overhaul and assembly. Use
petroleum jelly, Mopar
Door Ease, or Ru-Glyde to prelubricate seals, O-rings, and thrust washers. Petroleum jelly
canalsobeusedtoholdpartsinplaceduringreassembly.
Clean the case in a solvent tank. Flush the case bores and fluid passages thoroughly with solvent. Dry the case and
all fluid passages with compressed air. Be sure all solvent is removed fromthe case and that all fluid passages are
clear.
Page 3382 of 5267
NOTE: Do not use shop towels or rags to dry the case (or any other transmission component) unless they
aremadefromlint-freematerials.Lintwillsticktocasesurfacesandtransmission components and circu-
late throughout the transmission after assembly. A sufficient quantity of lint can block fluid passages and
interfere with valve body operation.
INSPECTION
Inspect the case for cracks, porous spots, worn bores, or damaged threads.Damaged threads can be repaired with
Helicoil
thread inserts. However, the case will have to be replaced if it exhibits any type of damage or wear.
ASSEMBLY
NOTE: Clean and inspect all components. Replace any components which showevidence of excessive wear
or scoring.
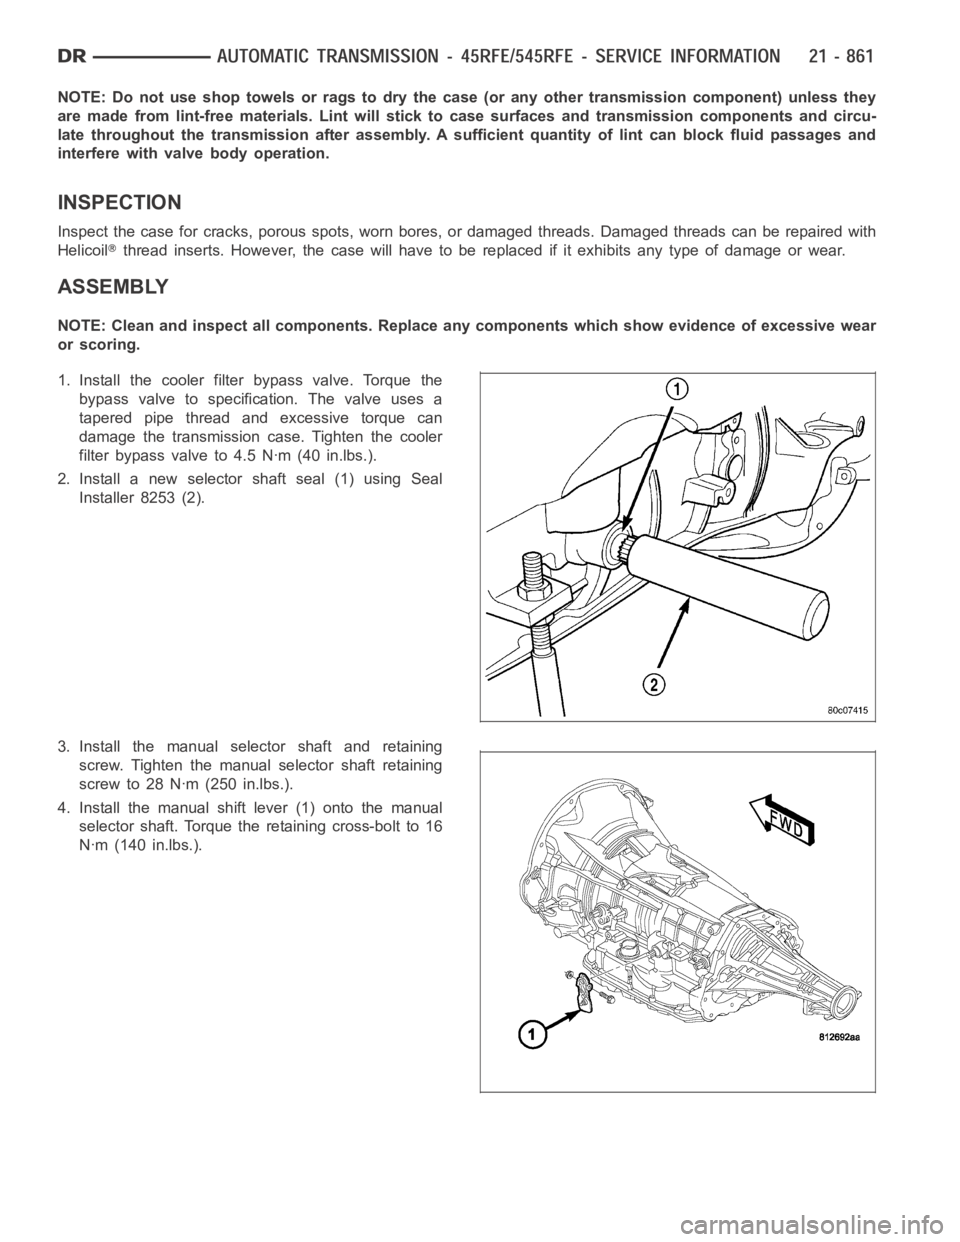
1. Install the cooler filter bypass valve. Torque the
bypass valve to specification. The valve uses a
tapered pipe thread and excessive torque can
damage the transmission case. Tighten the cooler
filter bypass valve to 4.5 Nꞏm (40 in.lbs.).
2. Install a new selector shaft seal (1) using Seal
Installer 8253 (2).
3. Install the manual selector shaft and retaining
screw. Tighten the manual selector shaft retaining
screw to 28 Nꞏm (250 in.lbs.).
4. Install the manual shift lever (1) onto the manual
selector shaft. Torque the retaining cross-bolt to 16
Nꞏm (140 in.lbs.).
Page 3392 of 5267
INSTALLATION
1. Check torque converter hub and hub drive flats for
sharp edges burrs, scratches, or nicks. Polish the
hub and flats with 320/400 grit paper and crocus
cloth if necessary. Verify that the converter hub
o-ring is properly installed and is free of any debris.
The hub must be smooth to avoid damaging pump
seal at installation.
2. If a replacement transmission is being installed,
transfer any components necessary, such as the
manual shift lever and shift cable bracket, from the
original transmission onto the replacement trans-
mission.
3. Lubricate oil pump seal lip with transmission fluid.
4. Align converter and oil pump.
5. Carefully insert converter in oil pump. Then rotate
converter back and forth until fully seated in pump
gears.
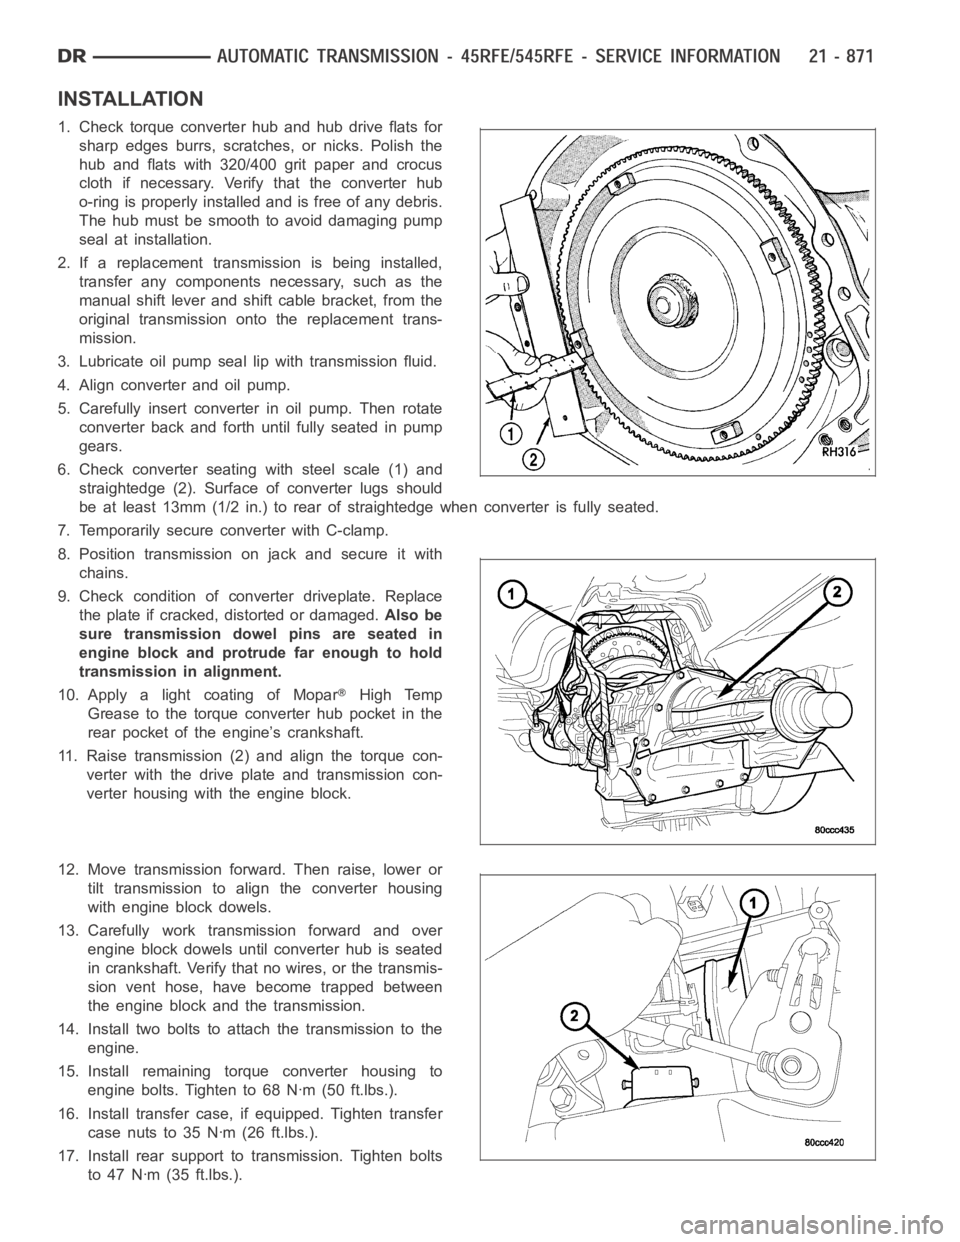
6. Check converter seating with steel scale (1) and
straightedge (2). Surface of converter lugs should
be at least 13mm (1/2 in.) to rear of straightedge when converter is fully seated.
7. Temporarily secure converter with C-clamp.
8. Position transmission on jack and secure it with
chains.
9. Check condition of converter driveplate. Replace
the plate if cracked, distorted or damaged.Also be
sure transmission dowel pins are seated in
engine block and protrude far enough to hold
transmission in alignment.
10. Apply a light coating of Mopar
High Temp
Grease to the torque converter hub pocket in the
rear pocket of the engine’s crankshaft.
11. Raise transmission (2) and align the torque con-
verter with the drive plate and transmission con-
verter housing with the engine block.
12. Move transmission forward. Then raise, lower or
tilt transmission to align the converter housing
with engine block dowels.
13. Carefully work transmission forward and over
engine block dowels until converter hub is seated
in crankshaft. Verify that no wires, or the transmis-
sion vent hose, have become trapped between
theengineblockandthetransmission.
14. Install two bolts to attach the transmission to the
engine.
15. Install remaining torque converter housing to
engine bolts. Tighten to 68 Nꞏm (50 ft.lbs.).
16. Install transfer case, if equipped. Tighten transfer
case nuts to 35 Nꞏm (26 ft.lbs.).
17. Install rear support to transmission. Tighten bolts
to 47 Nꞏm (35 ft.lbs.).
Page 3394 of 5267
CAUTION: It is essential that correct length bolts
be used to attach the converter to the driveplate.
Bolts that are too long will damage the clutch sur-
face inside the converter.
25. Install torque converter-to-driveplate bolts. Tighten
boltsto31Nꞏm(270in.lbs.).
26. Install starter motor and cooler line bracket.
27. Connect cooler lines to transmission.
28. Install transmission fill tube.
29. Install exhaust components, if necessary.
30. Install the structural dust cover (2) (Refer to 9 -
ENGINE/ENGINE BLOCK/STRUCTURAL COVER
- INSTALLATION) onto the transmission and the
engine.
31. Align and connect propeller shaft(s).
32. Adjust gearshift cable if necessary.
33. Install any skid plates removed previously. (Refer
to 13 - FRAMES & BUMPERS/FRAME/TRANS-
FER CASE SKID PLATE - INSTALLATION)
34. Lower vehicle.
35. Fill transmission with Mopar
ATF +4, Automatic Transmission Fluid.
Page 3417 of 5267
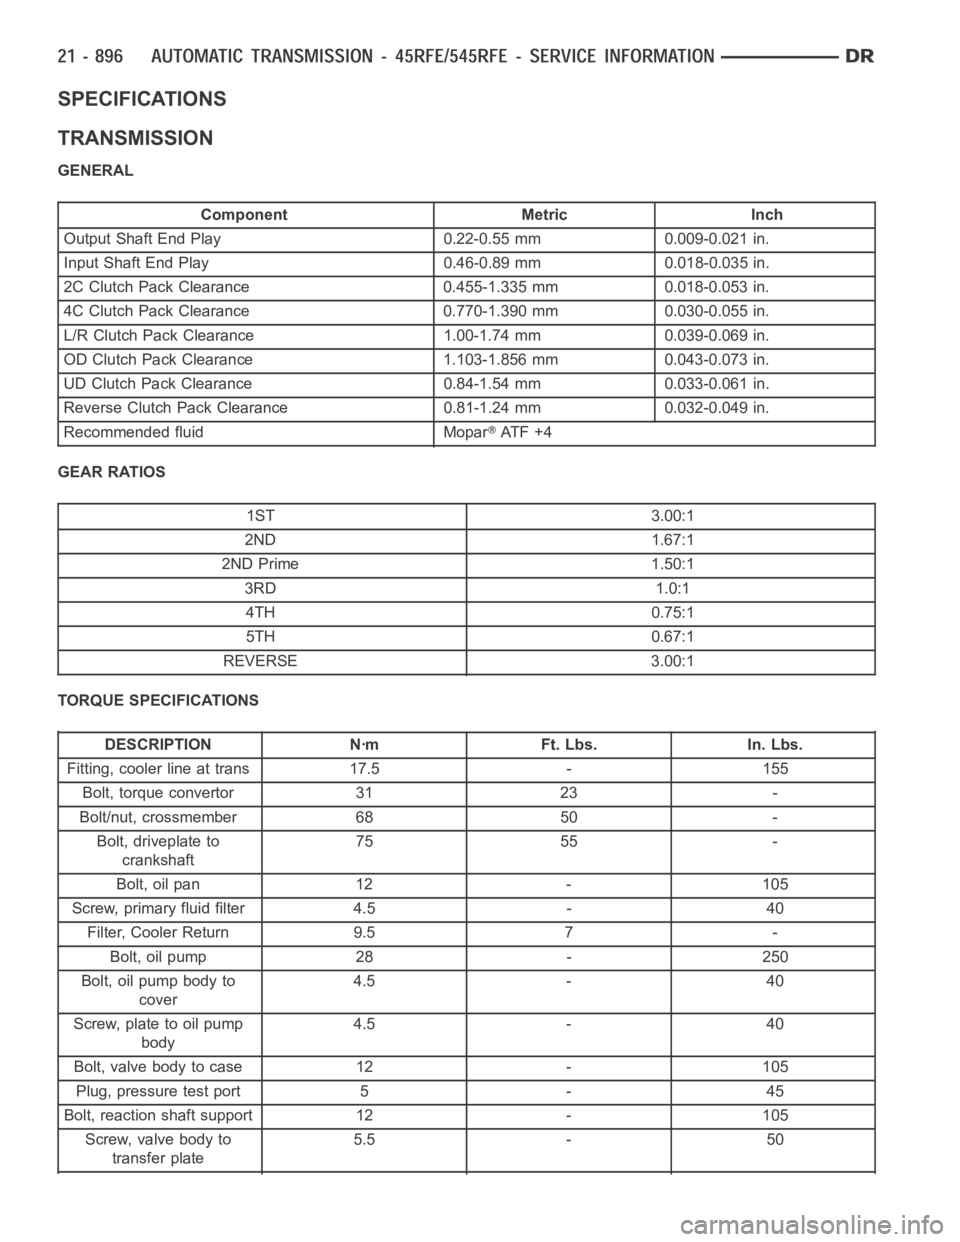
SPECIFICATIONS
TRANSMISSION
GENERAL
Component Metric Inch
Output Shaft End Play 0.22-0.55 mm 0.009-0.021 in.
Input Shaft End Play 0.46-0.89 mm 0.018-0.035 in.
2C Clutch Pack Clearance 0.455-1.335 mm 0.018-0.053 in.
4C Clutch Pack Clearance 0.770-1.390 mm 0.030-0.055 in.
L/R Clutch Pack Clearance 1.00-1.74 mm 0.039-0.069 in.
OD Clutch Pack Clearance 1.103-1.856 mm 0.043-0.073 in.
UD Clutch Pack Clearance 0.84-1.54 mm 0.033-0.061 in.
Reverse Clutch Pack Clearance 0.81-1.24 mm 0.032-0.049 in.
Recommended fluid Mopar
AT F + 4
GEAR RATIOS
1ST 3.00:1
2ND 1.67:1
2ND Prime 1.50:1
3RD 1.0:1
4TH 0.75:1
5TH 0.67:1
REVERSE 3.00:1
TORQUE SPECIFICATIONS
DESCRIPTION Nꞏm Ft. Lbs. In. Lbs.
Fitting, cooler line at trans 17.5 - 155
Bolt, torque convertor 31 23 -
Bolt/nut, crossmember 68 50 -
Bolt, driveplate to
crankshaft75 55 -
Bolt, oil pan 12 - 105
Screw, primary fluid filter 4.5 - 40
Filter, Cooler Return 9.5 7 -
Bolt, oil pump 28 - 250
Bolt, oil pump body to
cover4.5 - 40
Screw, plate to oil pump
body4.5 - 40
Bolt, valve body to case 12 - 105
Plug, pressure test port 5 - 45
Bolt, reaction shaft support 12 - 105
Screw, valve body to
transfer plate5.5 - 50