Page 1787 of 2893
��������
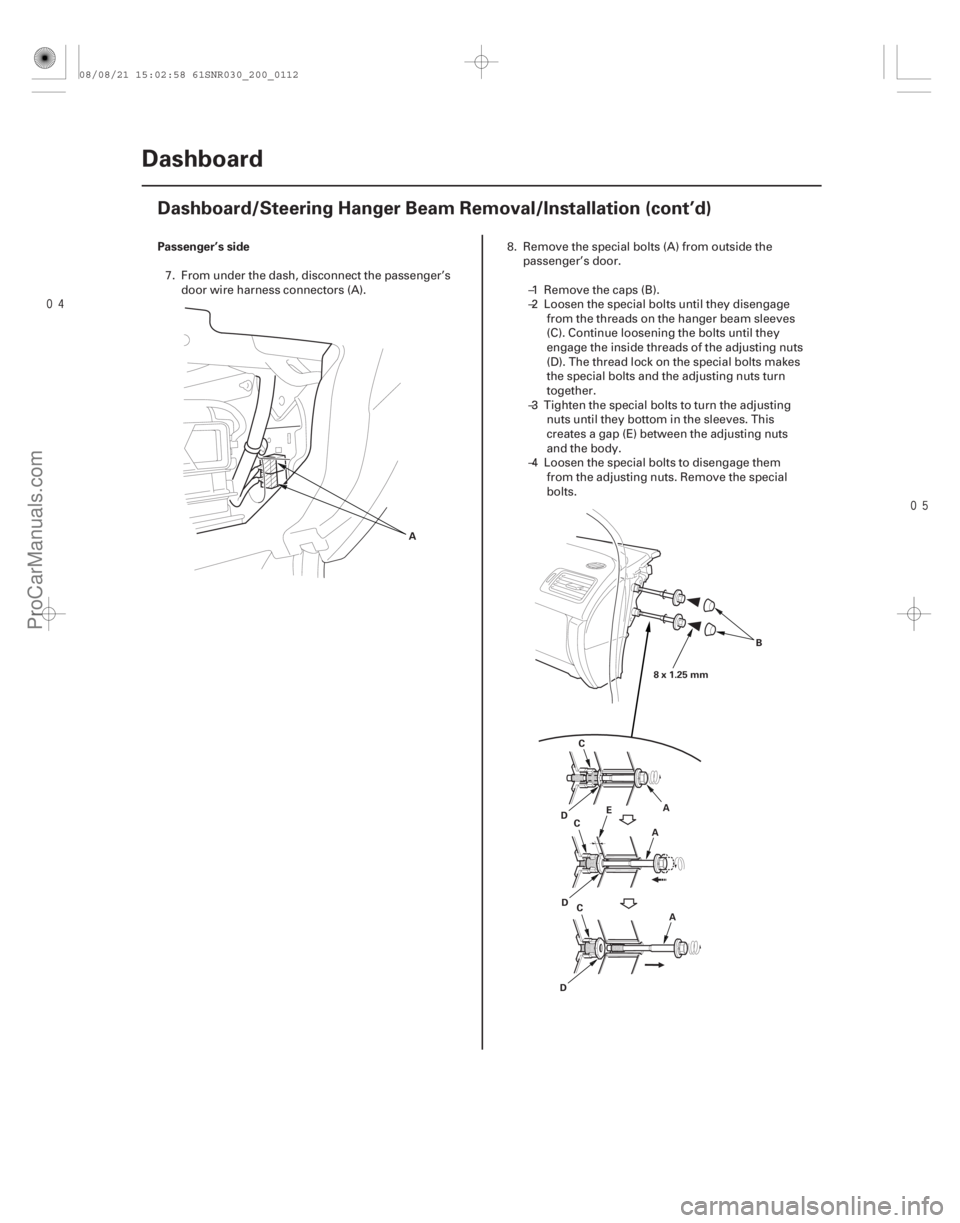
Passenger’s side
20-110 Dashboard
Dashboard/Steering Hanger Beam Removal/Installation (cont’d)
A
A
B
C
D E
A
C
A
C
D
D 8x1.25mm
7. From under the dash, disconnect the passenger’s
door wire harness connectors (A). 8. Remove the special bolts (A) from outside the
passenger’s door.
–1 Remove the caps (B).
–2 Loosen the special bolts until they disengage from the threads on the hanger beam sleeves
(C). Continue loosening the bolts until they
engage the inside threads of the adjusting nuts
(D). The thread lock on the special bolts makes
the special bolts and the adjusting nuts turn
together.
–3 Tighten the special bolts to turn the adjusting nuts until they bottom in the sleeves. This
creates a gap (E) between the adjusting nuts
and the body.
–4 Loosen the special bolts to disengage them from the adjusting nuts. Remove the special
bolts.
08/08/21 15:02:58 61SNR030_200_0112
ProCarManuals.com
DYNOMITE -2009-
Page 1788 of 2893
����
��������
20-111
A
B
C
BC
A
21 mm (0.83 in.) 6x1.0mm
9.8 N·m
(1.0 kgf·m,
7.2 lbf·ft)
A
B
D
D
8x1.25mm
22 N·m
(2.2 kgf·m, 16 lbf·ft)
BB
D
D
6x1.0mm
9.8 N·m
(1.0 kgf·m,
7.2 lbf·ft)
C
8x1.25mm
22 N·m
(2.2 kgf·m, 16 lbf·ft)
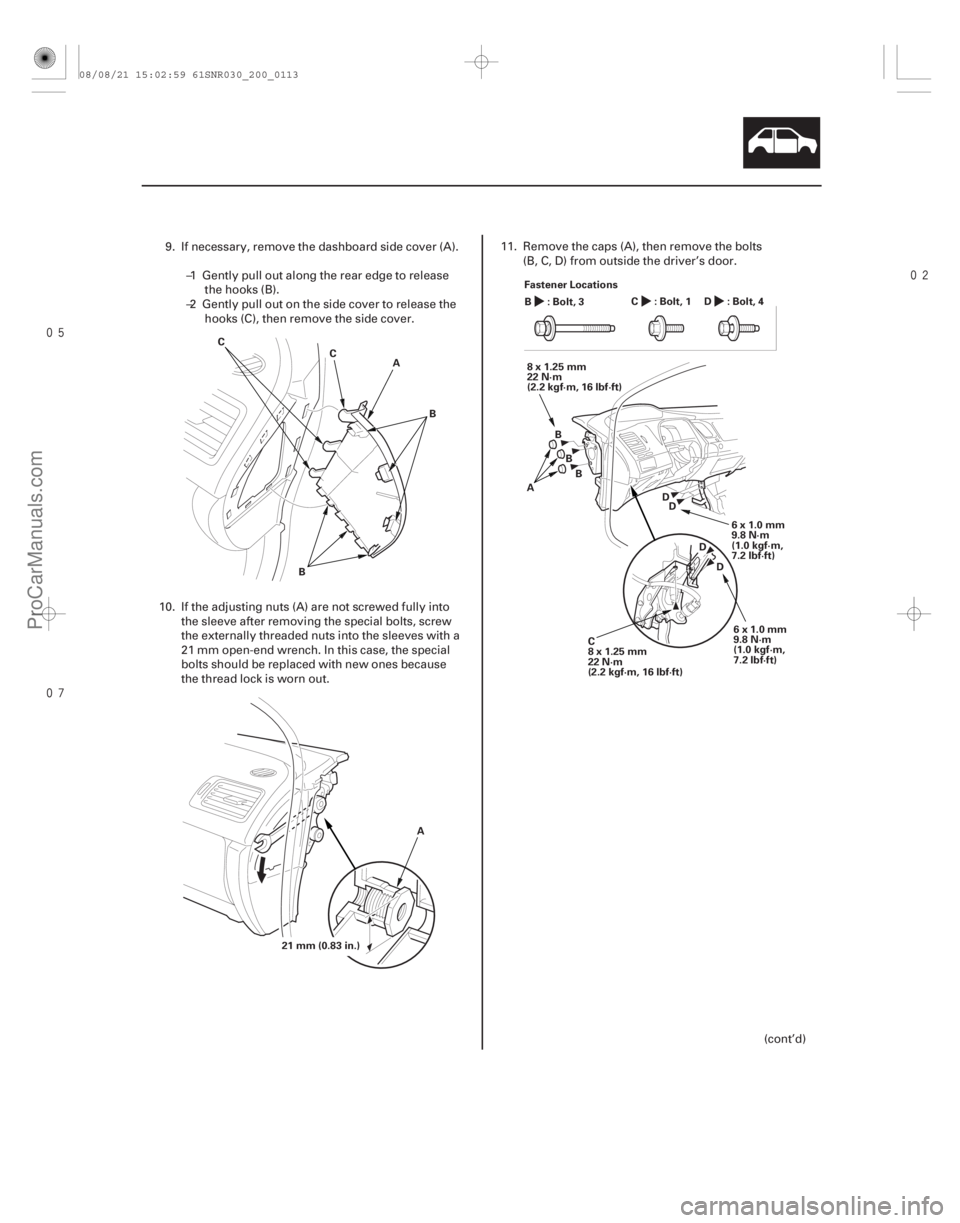
Fastener Locations
:Bolt,3 :Bolt,1 :Bolt,4
B CD
9. If necessary, remove the dashboard side cover (A).
–1 Gently pull out along the rear edge to releasethe hooks (B).
–2 Gently pull out on the side cover to release the hooks (C), then remove the side cover.
10. If the adjusting nuts (A) are not screwed fully into the sleeve after removing the special bolts, screw
the externally threaded nuts into the sleeves with a
21 mm open-end wrench. In this case, the special
bolts should be replaced with new ones because
the thread lock is worn out. 11. Remove the caps (A), then remove the bolts
(B, C, D) from outside the driver’s door.
(cont’d)
08/08/21 15:02:59 61SNR030_200_0113
ProCarManuals.com
DYNOMITE -2009-
Page 1797 of 2893
�
��
Passenger’s Seat
20-12020-120 Seats
Front Seat Removal/Installation
(cont’d)
Front Seat Frame Replacement
Fastener Locations
:Bolt,4
10x")
���
���
�(�#�'���������������
����������������� �����)�
��
Passenger’s Seat
20-12020-120 Seats
Front Seat Removal/Installation
(cont’d)
Front Seat Frame Replacement
Fastener Locations
:Bolt,4
10x1.25mm
34 N·m
(3.5 kgf·m, 25 lbf·ft) A
A
B
C
Fastener Locations
:Clip,4
A
9. With the help of an assistant, carefully remove thefront seat through the front door opening.
10. Install the seat in the reverse order of removal, and note these items:
Apply medium strength liquid thread lock to the seat mounting bolts before reinstallation.
Tighten the seat mounting bolts to the specified torque in the sequence shown. Slide the seat (A)
all the way back and tighten and , then slide
it forward and tighten and . The driver’s seat
is shown; the passenger’s seat is similar.
Tighten the bolts by hand first, then tighten them to specification with a torque wrench.
Make sure each connector is plugged in properly.
Check for any DTCs that may have been set during repairs, and clear them.
Do the battery terminal reconnection procedure (see page 22-68). Calibrate the ODS unit after any of these actions
(see page 24-27):
Front passenger’s seat replacement (including any seat components)
Replacement of the front seat weight sensors
After a vehicle collision
NOTE: Put on gloves to protect your hands.
Apply oil to the pivot portions of the slide locks.
Apply multipurpose grease to the sliding portions of the seat tracks.
If the side airbag has deployed, replace the seat frame and related pieces with new ones (see page
24-185).
1. Remove the front seat (see page 20-118).
2. Remove these items: Front seat-back cover (see page 20-123)
Front seat cushion cover (see page 20-127)
ODS unit (see page 24-209)
Front seat belt buckle (see page 24-6)
3. Remove the clips, then remove the recline inner covers (A) and module holder (B) from the seat
frame (C).
08/08/21 15:03:55 61SNR030_200_0122
ProCarManuals.com
DYNOMITE -2009-
Page 1798 of 2893
�
��
Passenger’s Seat
20-12020-120 Seats
Front Seat Removal/Installation
(cont’d)
Front Seat Frame Replacement
Fastener Locations
:Bolt,4
10x")
���
���
�(�#�'���������������
����������������� �����)�
��
Passenger’s Seat
20-12020-120 Seats
Front Seat Removal/Installation
(cont’d)
Front Seat Frame Replacement
Fastener Locations
:Bolt,4
10x1.25mm
34 N·m
(3.5 kgf·m, 25 lbf·ft) A
A
B
C
Fastener Locations
:Clip,4
A
9. With the help of an assistant, carefully remove thefront seat through the front door opening.
10. Install the seat in the reverse order of removal, and note these items:
Apply medium strength liquid thread lock to the seat mounting bolts before reinstallation.
Tighten the seat mounting bolts to the specified torque in the sequence shown. Slide the seat (A)
all the way back and tighten and , then slide
it forward and tighten and . The driver’s seat
is shown; the passenger’s seat is similar.
Tighten the bolts by hand first, then tighten them to specification with a torque wrench.
Make sure each connector is plugged in properly.
Check for any DTCs that may have been set during repairs, and clear them.
Do the battery terminal reconnection procedure (see page 22-68). Calibrate the ODS unit after any of these actions
(see page 24-27):
Front passenger’s seat replacement (including any seat components)
Replacement of the front seat weight sensors
After a vehicle collision
NOTE: Put on gloves to protect your hands.
Apply oil to the pivot portions of the slide locks.
Apply multipurpose grease to the sliding portions of the seat tracks.
If the side airbag has deployed, replace the seat frame and related pieces with new ones (see page
24-185).
1. Remove the front seat (see page 20-118).
2. Remove these items: Front seat-back cover (see page 20-123)
Front seat cushion cover (see page 20-127)
ODS unit (see page 24-209)
Front seat belt buckle (see page 24-6)
3. Remove the clips, then remove the recline inner covers (A) and module holder (B) from the seat
frame (C).
08/08/21 15:03:55 61SNR030_200_0122
ProCarManuals.com
DYNOMITE -2009-
Page 1843 of 2893
���
����
�(�#�'�����������
���������������������"�����)����
20-158 Fuel Fill Door
Fuel Fill Door Adjustment
B
A
6x1.0mm
9.8 N·m
(1.0 kgf·m,
7.2 lbf·ft)
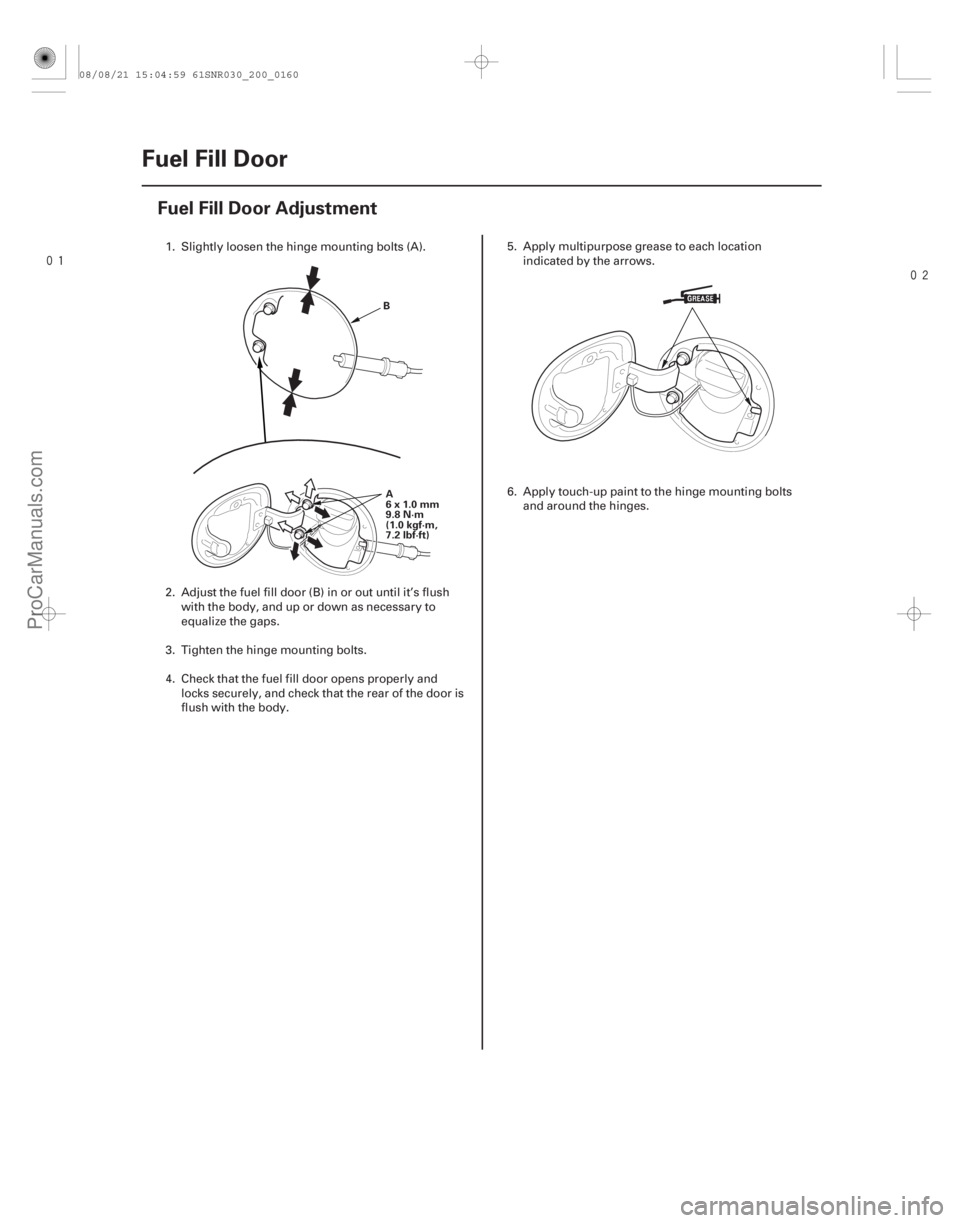
1. Slightly loosen the hinge mounting bolts (A).
2. Adjust the fuel fill door (B) in or out until it’s flush with the body, and up or down as necessary to
equalize the gaps.
3. Tighten the hinge mounting bolts.
4. Check that the fuel fill door opens properly and locks securely, and check that the rear of the door is
flush with the body. 5. Apply multipurpose grease to each location
indicated by the arrows.
6. Apply touch-up paint to the hinge mounting bolts and around the hinges.
08/08/21 15:04:59 61SNR030_200_0160
ProCarManuals.com
DYNOMITE -2009-
Page 1864 of 2893
����
�(�#�'�����������
�������������������
�������)����
20-177
Openers
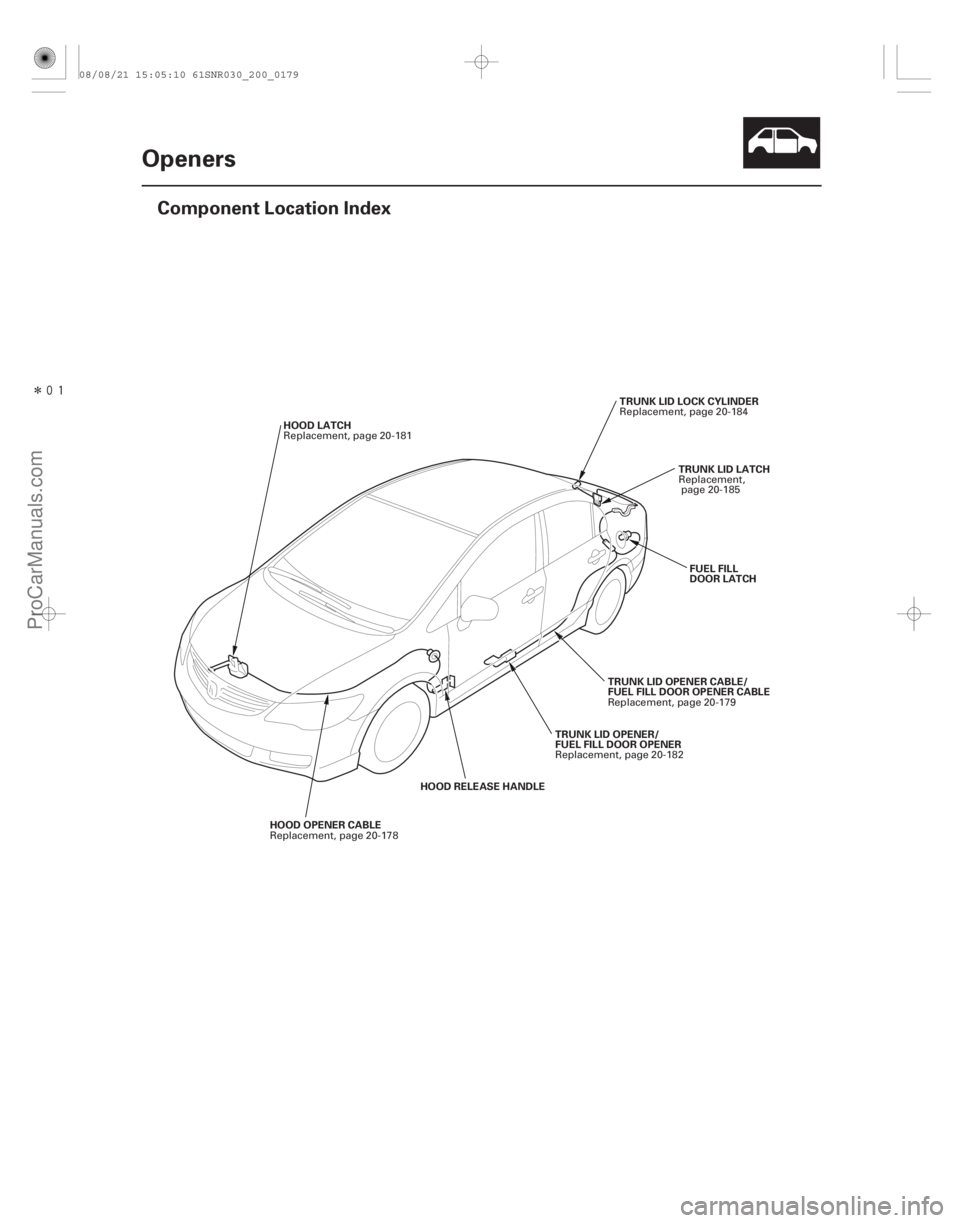
Component Location Index
TRUNK LID LOCK CYLINDER
TRUNK LID LATCH
FUEL FILL
DOOR LATCH
TRUNK LID OPENER CABLE/
FUEL FILL DOOR OPENER CABLE
HOOD OPENER CABLE HOOD LATCH
TRUNK LID OPENER/
FUEL FILL DOOR OPENER
HOOD RELEASE HANDLE Replacement, page 20-184
Replacement,page 20-185
Replacement, page 20-179
Replacement, page 20-178 Replacement, page 20-181
Replacement, page 20-182
08/08/21 15:05:10 61SNR030_200_0179
ProCarManuals.com
DYNOMITE -2009-
Page 1869 of 2893
���
����
�(�#�'�����������
�������������������
� �����)����
S
pecial Tools Required
20-182 Openers
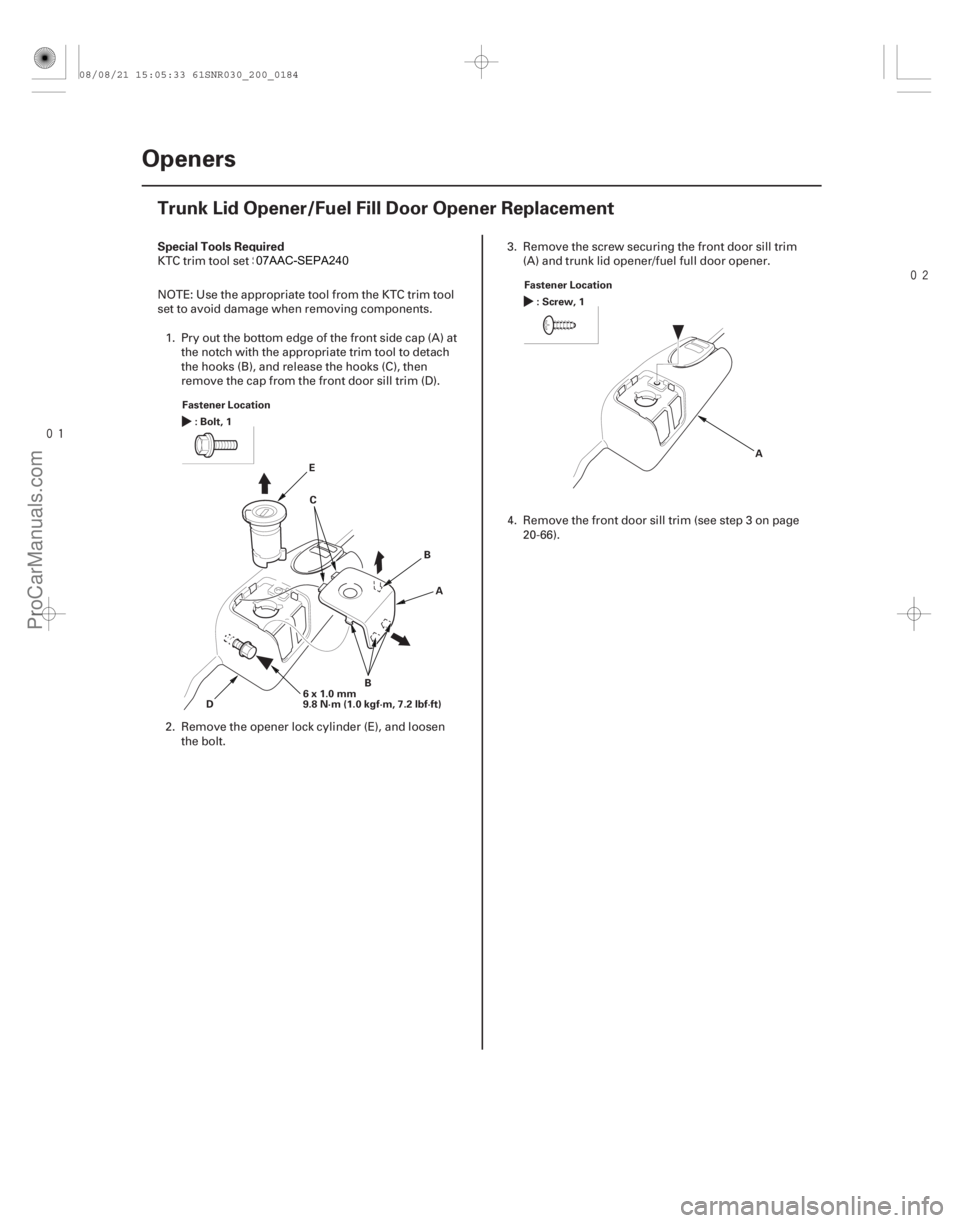
Trunk Lid Opener/Fuel Fill Door Opener Replacement
Fastener Location
:Bolt,1
6x1.0mm
9.8 N·m (1.0 kgf·m, 7.2 lbf·ft) A
D E
B
B
C F
astener Location
:Screw,1
A
KTC trim tool set SOJATP2014
NOTE: Use the appropriate tool from the KTC trim tool
s
et to avoid damage when removing components.
1. Pry out the bottom edge of the front side cap (A) at the notch with the appropriate trim tool to detach
the hooks (B), and release the hooks (C), then
remove the cap from the front door sill trim (D).
2. Remove the opener lock cylinder (E), and loosen the bolt. 3
. Remove the screw securing the front door sill trim
(A) and trunk lid opener/fuel full door opener.
4. Remove the front door sill trim (see step 3 on page 20-66).
08/08/21 15:05:33 61SNR030_200_0184
ProCarManuals.com
DYNOMITE -2009-
Page 1870 of 2893
��������
20-183
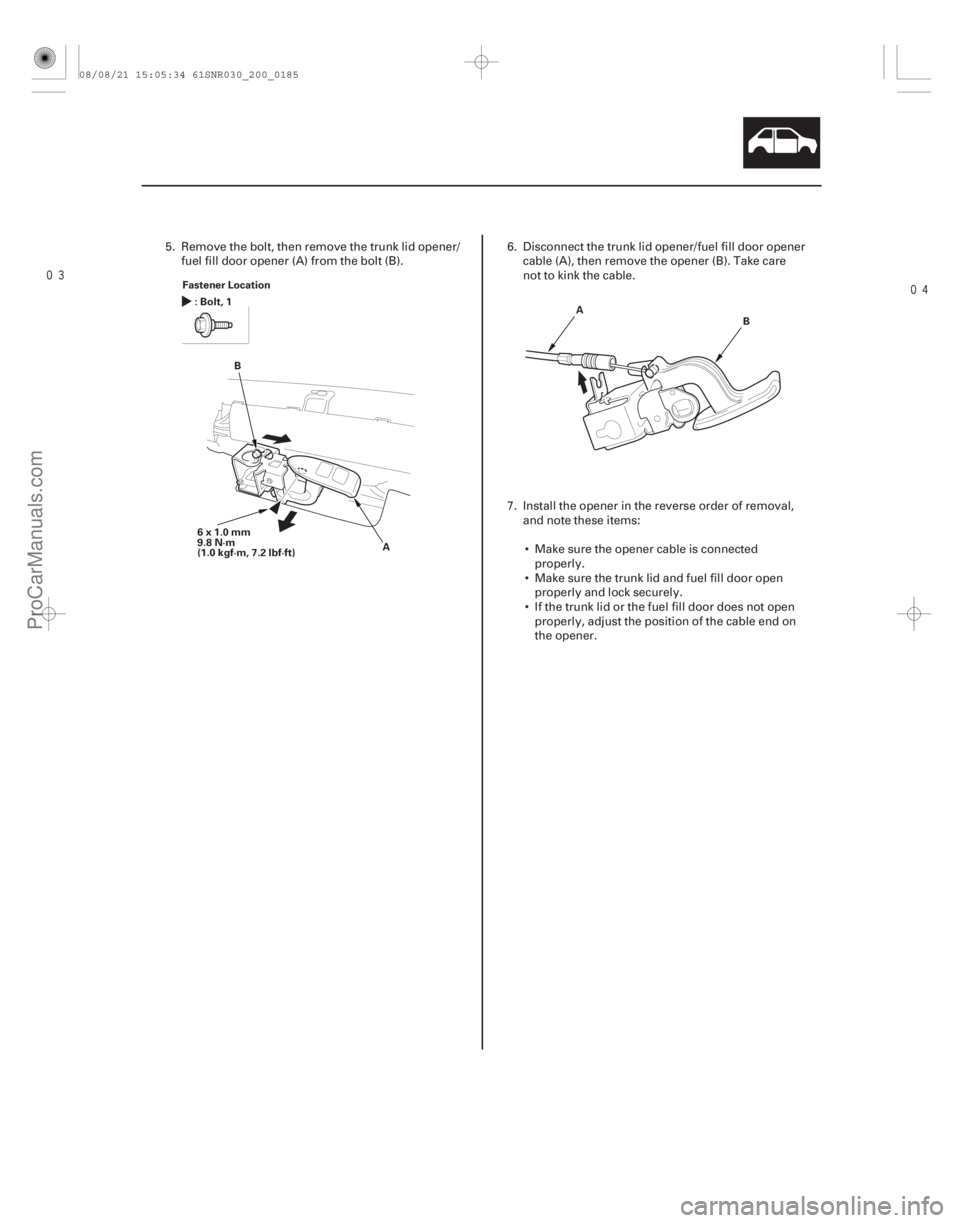
Fastener Location
:Bolt,1
A
B
6x1.0mm
9.8 N·m
(1.0 kgf·m, 7.2 lbf·ft) A
B
5. Remove the bolt, then remove the trunk lid opener/
fuel fill door opener (A) from the bolt (B). 6. Disconnect the trunk lid opener/fuel fill door opener
cable (A), then remove the opener (B). Take care
not to kink the cable.
7. Install the opener in the reverse order of removal, and note these items:
Make sure the opener cable is connected properly.
Make sure the trunk lid and fuel fill door open properly and lock securely.
If the trunk lid or the fuel fill door does not open properly, adjust the position of the cable end on
the opener.
08/08/21 15:05:34 61SNR030_200_0185
ProCarManuals.com
DYNOMITE -2009-