Page 2142 of 2893
���� ���
����
�(�#����������������
����������������� �����)���
22-19222-192 Turn Signal/Hazard Warning Lights
Hazard Warning Switch Test/")
���
����
�����(�#�'���������������
���������
�����
�������)���� ���
����
�(�#�'���������������
����������������� �����)���
22-19222-192 Turn Signal/Hazard Warning Lights
Hazard Warning Switch Test/
Replacement
Side Turn Signal Light Replacement
A
A
Terminal
Position 12
4
5
OFF ON A
A
B
1. Remove the center panel. With audio:– ’06-08 models (see page 23-80)
– ’09 model (see page 23-256)
With navigation: – ’06-08 models (see page 23-155)
– ’09 model (see page 23-355)
2. Remove the screws and the hazard warning switch (A).
3. Check for continuity between the terminals in each switch position according to the table.
4. If the continuity is not as specified, replace the bulb (A) or the hazard warning switch.
5. Install the hazard warning switch in the reverse order of removal. 1. Remove the mirror holder (see page 20-34).
2. Remove the four screws and the mirror visor (A).
3. Disconnect the 2P connector (A) from the side turn
signal light (B), then remove the side turn signal
light.
4. Install the side turn signal light in the reverse order of removal.
08/08/21 14:27:45 61SNR030_220_0194
ProCarManuals.com
DYNOMITE -2009-
Page 2143 of 2893
����
22-193
Interior Lights
Component Location Index
TRUNK LIGHT
FRONT INDIVIDUAL MAP LIGHTS
AMBIENT LIGHT
INTERIOR LIGHT SWITCH*
TRUNK LID LATCH S")
����
�(�#�'���������������������������������������)����
22-193
Interior Lights
Component Location Index
TRUNK LIGHT
FRONT INDIVIDUAL MAP LIGHTS
AMBIENT LIGHT
INTERIOR LIGHT SWITCH*
TRUNK LID LATCH SWITCH
GLOVE BOX LIGHT
MICU
(Built into the under-
dash fuse/relay box) CEILING LIGHT
DRIVER’S DOOR
COURTESY LIGHT FRONT PASSENGER’S
DOOR COURTESY LIGHT
*1: With moonroof
*2: ’08-09 models
*3: TYPE S model FRONT PASSENGER’S FOOTWELL LIGHT*
DRIVER’S FOOTWELL
LIGHT* DRIVER’S VANITY MIRROR LIGHT* PASSENGER’S VANITY MIRROR LIGHT*
1
3
3 22
Test/Replacement,
page 22-197
Test/Replacement, page 22-196
Test/Replacement, page 22-198
Test/Replacement, page 22-200
Test, page 22-200
Test/Replacement, page 22-199
Input Test,
page 22-204 Test/Replacement, page 22-197
Replacement, page 22-198 Replacement, page 22-198
Test/Replacement, page 22-201
Test/Replacement, page 22-201
Test/Replacement, page 22-199 Test/Replacement, page 22-199
08/08/21 14:27:48 61SNR030_220_0195
ProCarManuals.com
DYNOMITE -2009-
Page 2144 of 2893
�
�
22-194Interior Lights
Circuit Diagram
D A
B
A C
GRNMICU
UNDER-DASH FUSE/RELAY BOX
GRNE37 E3
LT GRN BRNE17 E2
GRYK4
(8 W) (8 W)
1
(Without moon")
������(�#�'���������������������������������������)�
�
22-194Interior Lights
Circuit Diagram
D A
B
A C
GRNMICU
UNDER-DASH FUSE/RELAY BOX
GRNE37 E3
LT GRN BRNE17 E2
GRYK4
(8 W) (8 W)
1
(Without moonroof)
LT BLU
PNKDOOR
OFF
PNK
BLU
3
LT BLU LT BLU
LT BLU
(With moonroof)
1
2
(8 W) (8 W)
PNK 1
ON OFF
(8 W) RED
UNDER-HOOD FUSE/RELAY BOX
No. 22 (7.5 A)
No. 1 (BAT) (100 A)
BATTERY
CEILING
LIGHT
INTERIOR
LIGHT SWITCH
(In the moonroof
switch)
RIGHT REAR
DOOR
SWITCH
(Closed:
Door open)
LEFT REAR
DOOR
SWITCH
(Closed:
Door open)
FRONT
PASSENGER’S
DOOR SWITCH
(Closed:
Door open)
DRIVER’S
DOOR
SWITCH
(Closed:
Door open) D2
1 1
1
9*2 8*1
1*1
7*2 LT BLU
LT BLU
FRONT
PASSENGER’S
DOOR
COURTESY
LIGHT LT BLU
VANITY
MIRROR
LIGHTS *2
No. 22 (7.5 A)FUSE
(UNDER-HOOD
FUSE/RELAY BOX) LT BLU
GRN (3.4 W)
DRIVER’S
DOOR
COURTESY
LIGHT
GRN1 No. 22 (7.5 A)FUSE
(UNDER-HOOD
FUSE/RELAY BOX)
LT GRN
GRN (3.4 W)
FRONT
PASSENGER’S
DOOR
COURTESY
LIGHT BLU
BLK 3
2
G701 E36
BLU TRUNK LID
LATCH
SWITCH
(Closed:
Trunk lid open)BLU
TRUNK
LIGHT
FRONT
INDIVIDUAL
MAP LIGHTS
FRONT
INDIVIDUAL
MAP LIGHTS
08/08/21 14:27:49 61SNR030_220_0196
ProCarManuals.com
DYNOMITE -2009-
Page 2145 of 2893

LT BLU
BLK GRY
GRY GRY
RED
(5 W)
1
WHT
2
(LED)
GRN
G502 AMBIENT
LIGHT
DASH LIGHTS
BRIGHTNESS
CONTROLLER TRUNK
LIGHT
UNDER-DASH")
�����
�µ
�µ
�µ
�µ
22-195
R10LT BLU
K5
G3
E38
CLOSE OPEN
1
2 (3.4 W)
LT BLU
BLK GRY
GRY GRY
RED
(5 W)
1
WHT
2
(LED)
GRN
G502 AMBIENT
LIGHT
DASH LIGHTS
BRIGHTNESS
CONTROLLER TRUNK
LIGHT
UNDER-DASH
FUSE/RELAY BOX
No. 14 (7.5 A) FUSE
(UNDER-DASH
FUSE/RELAY BOX) GLOVE
BOX
LIGHTGLOVE
BOX
LID
GRY
(LED)
RED 2 1
DRIVER’S
FOOTWELL
LIGHT
DASH LIGHTS
BRIGHTNESS
CONTROLLER
GRY
(TYPE S model)
BLU
DRIVER’S
DOOR
COURTESY
LIGHT
TRUNK LID
LATCH
SWITCH
GRY(LED)
RED 2 1
FRONT
PASSENGER’S
FOOTWELL
LIGHT
DASH LIGHTS
BRIGHTNESS
CONTROLLER
LT BLU
DRIVER’S
VANITY
MIRROR
LIGHT
SWITCH
DRIVER’S
VANITY
MIRROR
LIGHT (2 W)DRIVER’S
SUNVISOR
1
2 LT BLU
PASSENGER’S
VANITY
MIRROR
LIGHT
SWITCH
PASSENGER’S
VANITY
MIRROR
LIGHT (2 W)PASSENGER’S
SUNVISOR
1
2
G502 BLK *2
BLK BLK
No. 22 (7.5 A) FUSE
(UNDER-HOOD
FUSE/RELAY BOX)
C
D B
5*3
4*4
3*2
2*2
5*4
3*3 *1: ’06 07 models
*2: ’08 09 models
*3: ’06 07 models with moonroof
*4: ’06 07 models without moonroof
08/08/21 14:27:49 61SNR030_220_0197
ProCarManuals.com
DYNOMITE -2009-
Page 2146 of 2893
�
�� ����
����
�(�#��������������������������������
�������)�
�
With moonroof Without moonroof
Front Individual Map Light: 8 W x 2 Front")
����
����
�(�#�'�������������������������������
�������)�
�� ����
����
�(�#�'�������������������������������
�������)�
�
With moonroof Without moonroof
Front Individual Map Light: 8 W x 2 Front Individual Map Light: 8 W x 2
22-19622-196Interior Lights
Front Individual Map Light Test/Replacement
A
B
C
Position 13
Terminal
RIGHT LEFT ON
OFF ON
OFF Body
ground A
B
C
Position 1
Terminal
RIGHT LEFT ON
OFF ON
OFF Body
ground
1. Turn the map light switch OFF.
2. Carefully pry the lens (A) off with a small
screwdriver.
3. Remove the screws, then remove the map lights (B) and moonroof switch or navigation microphone (C).
4. Disconnect the 3P connector from the map lights and the 10P connector from the moonroof switch or
navigation microphone.
5. Check for continuity between the terminals in each switch position according to the table.
6. If the continuity is not as specified, check the bulb(s). If the bulb(s) are OK, replace the light
assembly.
7. Install the map light in the reverse order of removal. 1. Turn the map light switch OFF.
2. Carefully pry the lens (A) off with a small
screwdriver.
3. Remove the screws, then remove the map lights (B).
4. Disconnect the 3P connector (C) from the map lights.
5. Check for continuity between the terminals in each switch position according to the table.
6. If the continuity is not as specified, check the bulb(s). If the bulb(s) are OK, replace the light
assembly.
7. Install the map light in the reverse order of removal.
08/08/21 14:27:50 61SNR030_220_0198
ProCarManuals.com
DYNOMITE -2009-
Page 2148 of 2893
���� ���
�(�#����������������������������
���
� �����)���� Courtesy light: 3.4 W
22-19822-198
Interior Lights
Ambient Light Test/Replacement Cour")
����
�(�#�'�����������������������
���������������)���� ���
�(�#�'���������������������������
���
� �����)���� Courtesy light: 3.4 W
22-19822-198
Interior Lights
Ambient Light Test/Replacement Courtesy Light Replacement
A
B
C ’06-07 models
’08-09 models
A
B C
D
1. Remove the front individual map light.
With moonroof (see page 22-196)
Without moonroof (see page 22- 196)
2. Disconnect the 10P (or 12P ) connector (A) from the ambient light (B), then remove the ambient
light from the front individual map light housing (C).
1: ’06-07 models
2: ’08-09 models
3. Connect battery power to the terminal No. 5 and ground to the No. 3 terminal. The ambient light
should turn on. If the light does not turn on, replace
the ambient light.
4. Install the ambient light in the reverse order of removal. 1. Carefully pry off the lens (A) with a small
screwdriver.
2. Pry out the housing (B) from the door panel, then disconnect the 2P connector (C).
3. Separate the housing, then remove the bulb (D) from the socket.
4. Install the courtesy light in the reverse order of removal.
12
08/08/21 14:27:50 61SNR030_220_0200
ProCarManuals.com
DYNOMITE -2009-
Page 2150 of 2893
���� ���
�(�#��������������������������������
�������)����
With moonroof
22-20022-200 Interior Lights
Interior Light Switch Test/
Replacement
Tru")
����
�(�#�'�������������������������������
�������)���� ���
�(�#�'�������������������������������
�������)����
With moonroof
22-20022-200 Interior Lights
Interior Light Switch Test/
Replacement
Trunk Lid Latch Switch Test
B
C A
’06-07 models
’08-09 models
A
B
NOTE: The interior light switch is built into the
moonroof switch, and it switches the front individual
map light OFF and DOOR positions. 1. Remove the front individual map lights (see page 22-196).
2. Disconnect the moonroof switch 10P (12P ) connector (A) and map light 3P connector (B).1: ’06-07 models
2: ’08-09 models
3. Remove the moonroof switch (C).
4. Check for continuity between moonroof switch 10P (12P ) connector check for continuity
between terminals No. 1 (No. 7 ) and No. 8
(No. 9 ).1: ’06-07 models
2: ’08-09 models
There should be continuity when the interior light switch is in the DOOR position.
There should be no continuity when the interior light switch is in the OFF position.
5. If the continuity check is not as specified, replace the switch.
6. Install the interior light switch in the reverse order of removal. 1. Open the trunk lid.
2. Disconnect the 3P connector (A) from the trunk lid
latch assembly (B).
3. Check for continuity between terminals No. 2 and No. 3.
There should be continuity with the trunk lid open.
There should be no continuity with the trunk lid closed.
4. If the continuity is not as specified, replace the trunk lid latch assembly.
12
12 12 1
2
08/08/21 14:27:51 61SNR030_220_0202
ProCarManuals.com
DYNOMITE -2009-
Page 2152 of 2893
����
�(�#�'���������������������������������������)����
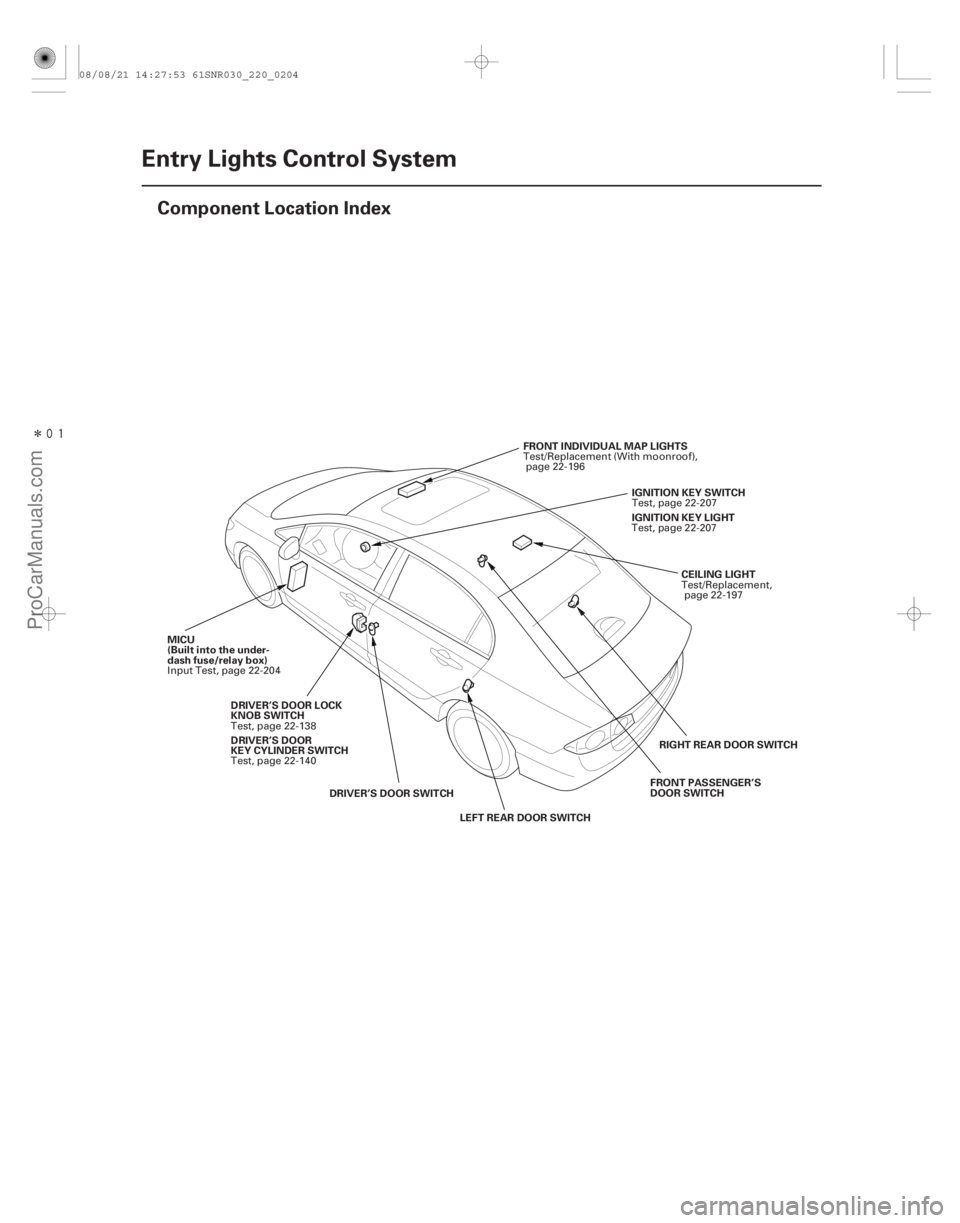
22-202Entry Lights Control System
Component Location Index
CEILING LIGHT
FRONT INDIVIDUAL MAP LIGHTS
MICU
(Built into the under-
dash fuse/relay box) IGNITION KEY SWITCH
DRIVER’S DOOR SWITCH LEFT REAR DOOR SWITCH RIGHT REAR DOOR SWITCH
FRONT PASSENGER’S
DOOR SWITCH
DRIVER’S DOOR LOCK
KNOB SWITCH IGNITION KEY LIGHT
DRIVER’S DOOR
KEY CYLINDER SWITCH Test/Replacement,
page 22-197
Test/Replacement (With moonroof),
page 22-196
Input Test, page 22-204 Test, page 22-207
Test, page 22-138 Test, page 22-207
Test, page 22-140
08/08/21 14:27:53 61SNR030_220_0204
ProCarManuals.com
DYNOMITE -2009-