Page 1730 of 2893

�´�µ
�´�µ
�´�µ �´ �µ
���
����
�(�#�'�������������������������������
�"�����)���� ����
����
�(�#�'�������������������������������
� �����)����
�´�µ �´�µ
�´�µ �´
�µ
20-5520-55
Glass Position Adjustment Glass Replacement
13.5 1/ 1 mm
(0.55 0.04/ 0.04 in.)
AB
01/1mm
(0 0.04/ 0.04 in.)
Fastener Locations 5x0.8mm
4N·m
(0.4 kgf·m, 3 lbf·ft)
:TORXScrew,6
Front A
Fastener Locations
:Screw,2
Front
5x0.8mm
4N·m
(0.4 kgf·m, 3 lbf·ft)
F
:TORXScrew,6
BE
B
D
C
D C
A
E E
E
A
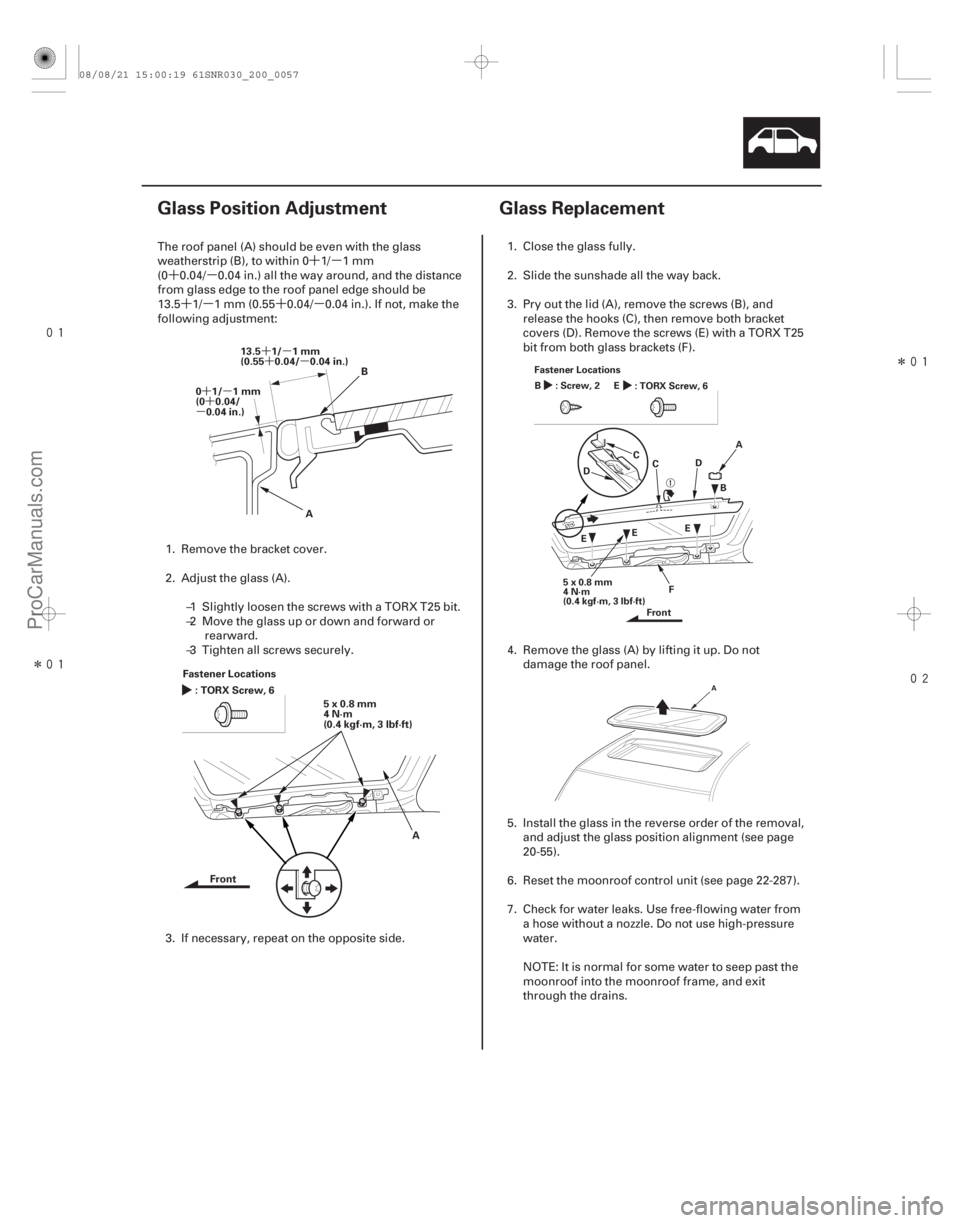
The roof panel (A) should be
even with the glass
weatherstrip (B), to within 0 1/ 1 mm
(0 0.04/ 0.04 in.) all the way around, and the distance
from glass edge to the roof panel edge should be
13.5 1/ 1 mm (0.55 0.04/ 0.04 in.). If not, make the
following adjustment:
1. Remove the bracket cover.
2. Adjust the glass (A). –1 Slightly loosen the screws with a TORX T25 bit.
–2 Move the glass up or down and forward orrearward.
–3 Tighten all screws securely.
3. If necessary, repeat on the opposite side. 1. Close the glass fully.
2. Slide the sunshade all the way back.
3. Pry out the lid (A), remove the screws (B), and
release the hooks (C), then remove both bracket
covers (D). Remove the screws (E) with a TORX T25
bit from both glass brackets (F).
4. Remove the glass (A) by lifting it up. Do not damage the roof panel.
5. Install the glass in the reverse order of the removal, and adjust the glass position alignment (see page
20-55).
6. Reset the moonroof control unit (see page 22-287).
7. Check for water leaks. Use free-flowing water from a hose without a nozzle. Do not use high-pressure
water.
NOTE: It is normal for some water to seep past the
moonroof into the moonroof frame, and exit
through the drains.
08/08/21 15:00:19 61SNR030_200_0057
ProCarManuals.com
DYNOMITE -2009-
Page 1734 of 2893
����
�������
�(�#�'�������������������������
�����
� �����)����
20-5920-59
Motor Replacement
A B
A Fastener Locations
6x1.0mm
9.8 N·m
(1.0 kgf·m, 7.2 lbf·ft)A
B
:Bolt,2
6. Remove the sunshade (A).
7. Remove both front sunshade base sliders (A) and
both rear sunshade base sliders (B).
8. Install the sunshade in the reverse order of removal, and check the glass position adjustment (see page
20-55).
9. Check for water leaks. Let the water run freely from a hose without a nozzle. Do not use a high-pressure
spray. 1. Remove the headliner (see page 20-84).
2. Put on gloves to protect your hands. Disconnect the
connector (A), and remove the bolts, then remove
the motor (B).
3. Install the motor in the reverse order of removal, and note these items:
Make sure the connector is plugged in properly.
Reset the moonroof control unit (see page 22-287).
Check the motor operation.
08/08/21 15:01:20 61SNR030_200_0061
ProCarManuals.com
DYNOMITE -2009-
Page 1735 of 2893
����
�������
�(�#�'�������������������������
�����
� �����)����
20-5920-59
Motor Replacement
A B
A Fastener Locations
6x1.0mm
9.8 N·m
(1.0 kgf·m, 7.2 lbf·ft)A
B
:Bolt,2
6. Remove the sunshade (A).
7. Remove both front sunshade base sliders (A) and
both rear sunshade base sliders (B).
8. Install the sunshade in the reverse order of removal, and check the glass position adjustment (see page
20-55).
9. Check for water leaks. Let the water run freely from a hose without a nozzle. Do not use a high-pressure
spray. 1. Remove the headliner (see page 20-84).
2. Put on gloves to protect your hands. Disconnect the
connector (A), and remove the bolts, then remove
the motor (B).
3. Install the motor in the reverse order of removal, and note these items:
Make sure the connector is plugged in properly.
Reset the moonroof control unit (see page 22-287).
Check the motor operation.
08/08/21 15:01:20 61SNR030_200_0061
ProCarManuals.com
DYNOMITE -2009-