Page 2649 of 2893

Introduction
Checking Cell Phone CompatibilityVoice Control Tips and Improving Voice
Recognition
23-361
The HFL system works only with Honda approved
Bluetooth
-enabled cell phones with a hands-free
profile. If you are not sure if a particular cell phone is
compatible with the HFL system, Acura has a dedicated
call center at 888-528-7876 and website www.acura.
com/handsfreelink to answer your questions.
The HFL system allows you to make and receive hands-
free calls. It cannot control the phone’s performance
(call quality and signal strength). For more information
about performance and performance problems, refer to
Dropped Calls.
The most important step in troubleshooting HFL issues
is to identify the model, software version, and wireless
carrier of the phone in question. Not all phones with the
Bluetooth feature and a hands-free profile are
compatible with the HFL system.
Go to handsfreelink.com, and check if the client phone
is approved to work with Honda HFL system.
NOTE: The lists of approved, archived, and currently testing phones are constantly changing, so make sure you
view them frequently.
Phones are added as they are approved.
Phones can be removed from the approved list if a software bug is discovered that makes the phone
incompatible. These phones can be added back to the
approved list if the phone manufacturer corrects the
bug.
If the software bug is corrected, a new software version is created and may be listed in the Supported
Features section of the phone.
The software versions that are approved are now being listed in the Software Version field.
If you cannot access the Acura website, call the HFL call center at 888-528-7876 for further assistance. The
call center is open Monday thru Friday from 6:00 a.m.
to 6:00 p.m. CT; Saturday from 7:00 a.m. to 6:00 p.m.
CT; and Sunday from 8:00 a.m. to 6:00 p.m. CT. To give a voice command to the HFL system, press and
release the HFL TALK button. Always wait for the beep,
then give your command in a clear, natural voice. The
HFL microphone is on the ce
iling by the map lights.
If the HFL system doesn’t recognize your voice
command, you’ll hear ‘‘Pardon.’’ If your command isn’t
recognized a second time, you’ll hear ‘‘Please repeat.’’
If your command isn’t recognized a third time, the HFL
system sends you to its Help menu.
To hear a list of available options at any time, press the
HFL TALK button and say ‘‘Hands-free help.’’
The HFL system may have problems recognizing some
voices. To improve voice recognition:
Close the windows and the moonroof.
Set the fan speed to low (1 or 2) or off.
Adjust the airflow from the center vents down, so that it’s not blowing against the microphone on the ce iling.
Speak in a clear and natural voice. If the system cannot recognize your command, try speaking louder,
in a deeper tone.
If the background noise is too loud, you may need to speak louder.
If you speak with something in your mouth, or your voice is too high, the system may not interpret your
command correctly.
Find out if the problem is with one person or with everyone who uses the system. If the system has a
problem with only one person’s voice, this is a
system limitation.
(cont’d)
08/08/21 14:18:36 61SNR030_230_0364
ProCarManuals.com
DYNOMITE -2009-
Page 2662 of 2893
������(�#�'�����#�����
���������������������������)����
�´
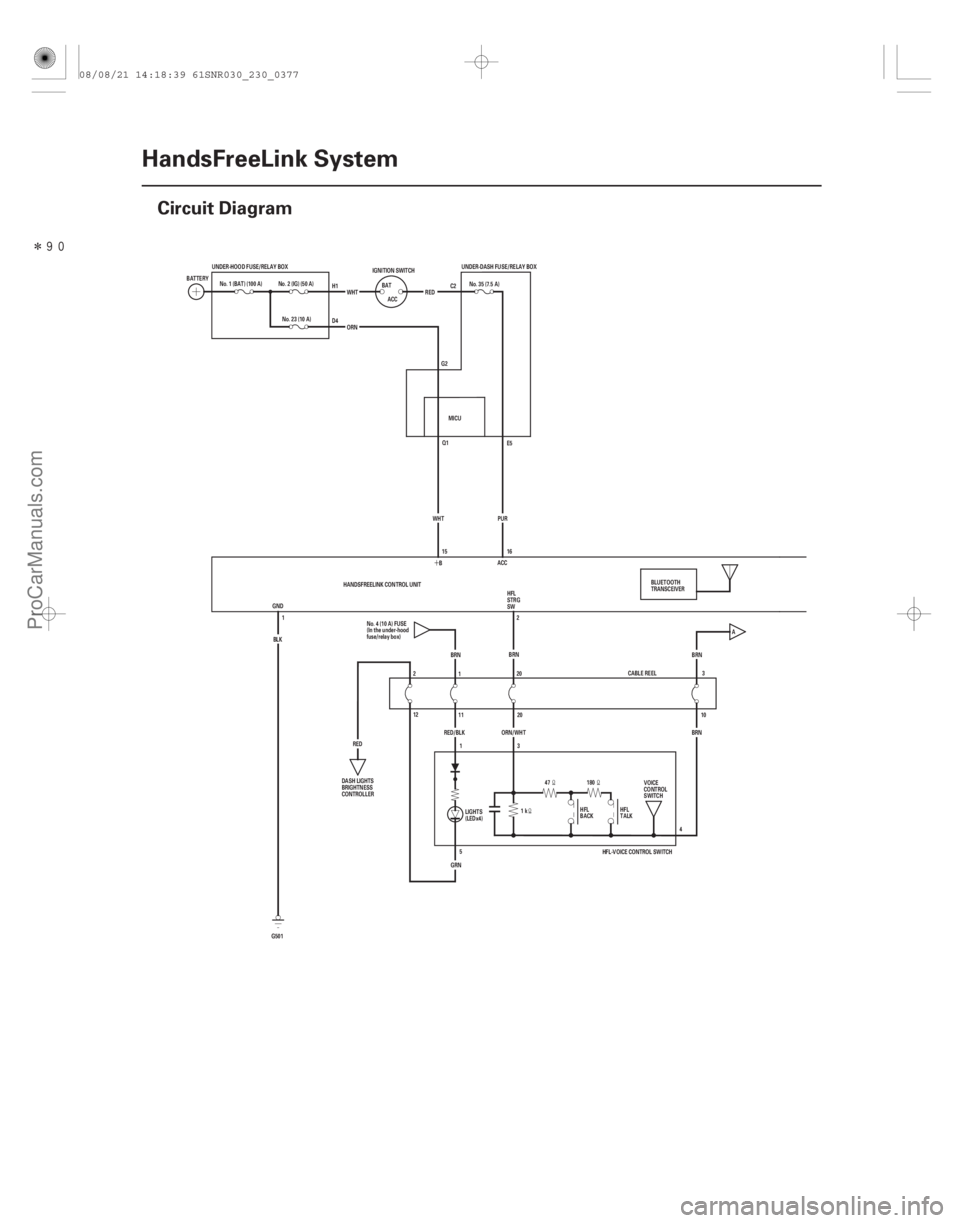
23-374HandsFreeLink System
Circuit Diagram
UNDER-HOOD FUSE/RELAY BOX
Q1E5
WHT 15 16
ORN
RED
WHT
ACC
BAT
IGNITION SWITCH
No. 23 (10 A)
No. 2 (IG) (50 A)
BATTERY
No. 1 (BAT) (100 A)
BRN
BRN
2
GRN 3
BLK
G501 1
CABLE REEL
H1
D4
G2
B ACC
MICU
13 HFL-VOICE CONTROL SWITCH4
LIGHTS
(LEDx4)
5 PUR
UNDER-DASH FUSE/RELAY BOX
No. 35 (7.5 A)
GND 20BLUETOOTH
TRANSCEIVER
1k
HANDSFREELINK CONTROL UNIT
VOICE
CONTROL
SWITCH
HFL
BACK HFL
TALK
47 180 A
C2
No. 4 (10 A) FUSE
(In the under-hood
fuse/relay box) ORN/WHT 10
20
HFL
STRG
SW
DASH LIGHTS
BRIGHTNESS
CONTROLLER RED BRN
BRN
1
2
11
12
RED/BLK
08/08/21 14:18:39 61SNR030_230_0377
ProCarManuals.com
DYNOMITE -2009-
Page 2699 of 2893
���������
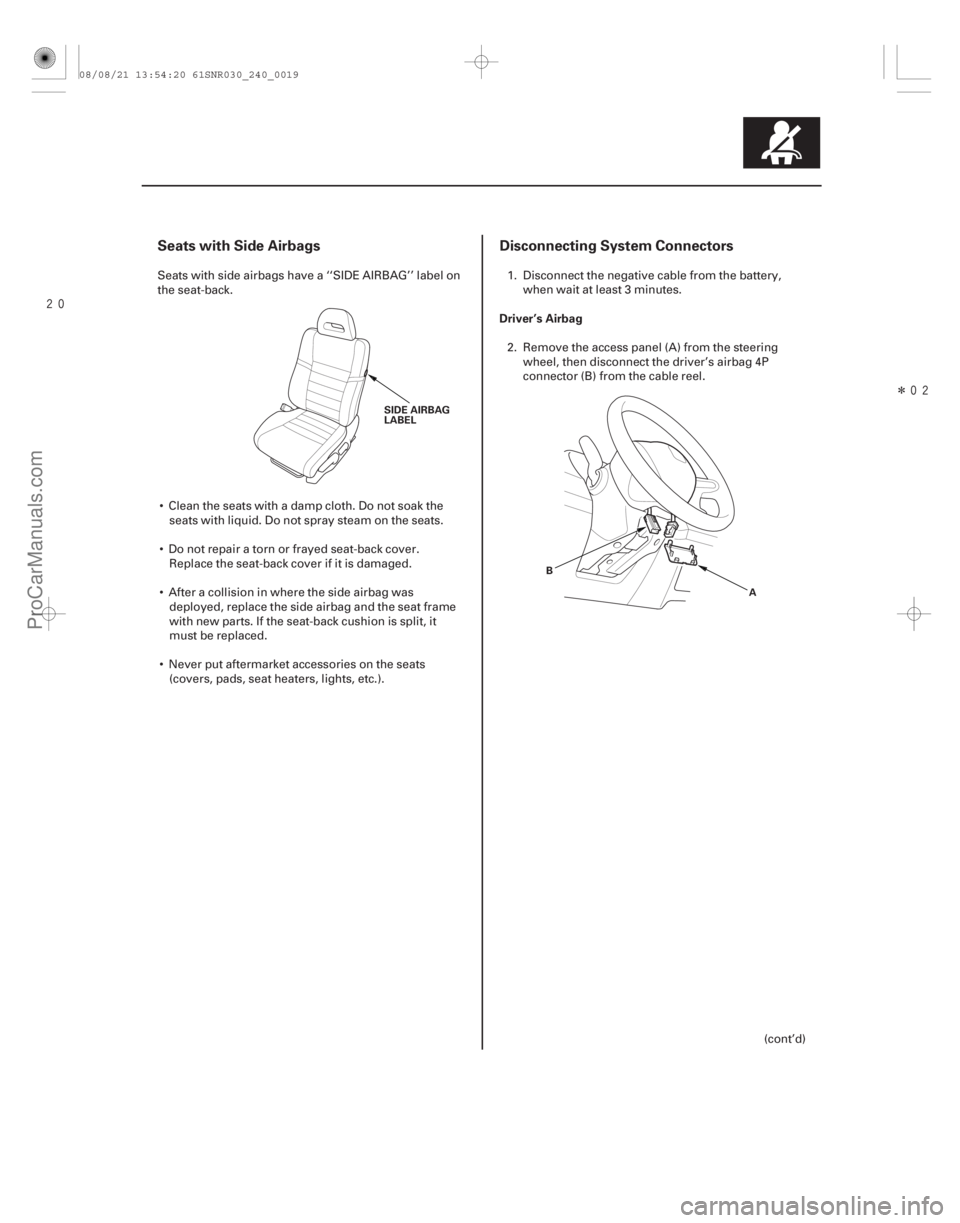
Seats with Side AirbagsDisconnecting System Connectors
Driver’s Airbag
24-19
SIDE AIRBAG
LABEL
A
B
Seats with side airbags have a ‘‘SIDE AIRBAG’’ label on
the seat-back.
Clean the seats with a damp cloth. Do not soak the seats with liquid. Do not spray steam on the seats.
Do not repair a torn or frayed seat-back cover. Replace the seat-back cover if it is damaged.
After a collision in where the side airbag was deployed, replace the side airbag and the seat frame
with new parts. If the seat-back cushion is split, it
must be replaced.
Never put aftermarket accessories on the seats (covers, pads, seat heaters, lights, etc.). 1. Disconnect the negative cable from the battery,
when wait at least 3 minutes.
2. Remove the access panel (A) from the steering wheel, then disconnect the driver’s airbag 4P
connector (B) from the cable reel.
(cont’d)
08/08/21 13:54:20 61SNR030_240_0019
ProCarManuals.com
DYNOMITE -2009-
Page 2708 of 2893
����
Pre-operation Check Set-up After Replacing Front Passenger’s Seat
Component(s)
24-28SRS
ODS Unit Operation Check
A
Check the ODS operation aft")
���
�(�#�'�������������������������������
�"�����)����
Pre-operation Check Set-up After Replacing Front Passenger’s Seat
Component(s)
24-28SRS
ODS Unit Operation Check
A
Check the ODS operation after any of these actions.
Replacement of front passenger’s seat component(s) (except ODS unit and/or weight sensors)
After a vehicle collision
SRS unit replacement
Make sure all the components of the front passenger’s seat are correctly installed.
Position the front passenger’s seat to the rearmost position.
Adjust the seat-back to the forwardmost position.
Do not move the seat from this position.
Make sure nothing is on or under the front passenger’s seat.
Make sure there is nothing in the front passenger’s seat-back pocket.
Keep the windows and moonroof closed.
Do all calibration procedures, except test-driving, in the service bay.
Make sure the vehicle is on level gr ound.
Turn the heater and the A/C off.
Do not touch the front passenger’s seat during the calibration, unless you are prompted to or until you
have completed the operation check.
Do not expose the front passenger’s seat to sudden temperature changes.
Make sure all aftermarket devices such as amplifiers, fluorescent lights, air purifies, CB or HAM radios, etc.
are turned off. 1. Make sure the ignition switch is in LOCK (0).
2. Connect the HDS to the data link connector (DLC)
(A).
3. Turn the ignition switch to ON (II).
4. Make sure the HDS communicates with the vehicle and the SRS unit. If it does not communicate,
troubleshoot the DLC circuit (see page 11-204).
5. Drive the vehicle, accelerate to 20 mph (36 km/h), then stop on level ground.
6. From the HDS Main Menu, select SRS, then Inspection. In the HDS Inspection Menu, select
SEAT OUTPUT CHK and follow the prompts until
the ODS unit operation check is complete.
08/08/21 13:54:23 61SNR030_240_0028
ProCarManuals.com
DYNOMITE -2009-
Page 2848 of 2893
����
�µ
�µ
�µ
�µ
YES
NO
YES
NO
DTC 86-1x (‘‘x’’ can be 0 thru 9 or A thru F):
DTC 86-2x (‘‘x’’ can be 0 thru 9 or A thru F):
24-16824-")
�(�#�'��������� �����
�������'�����
�-�������)����
�µ
�µ
�µ
�µ
YES
NO
YES
NO
DTC 86-1x (‘‘x’’ can be 0 thru 9 or A thru F):
DTC 86-2x (‘‘x’’ can be 0 thru 9 or A thru F):
24-16824-168SRS
DTC Troubleshooting (cont’d)
7. Initialize the ODS unit (see page 24-26).
8. Turn the ignition switch to ON (II), and check that
the SRS indicator comes on for about 6 seconds
and then goes off.
Replace the ODS unit (see page 24-209), then
clear the DTC. If the problem is still present, replace
the OPDS sensor/seat-back (see page 20-123).
Intermittent failure, the system is OK at this
time. Go to Troubleshooting Intermittent Failures
(see page 24-24). NOTE: Before doing this troubleshooting procedure,
review SRS Precautions and Procedures (see page
24-13) and General Troubleshooting Information
(see page 24-22).
1. Clear the DTC memory (see page 24-23).
2. Turn the ignition switch to ON (II), and check that the SRS indicator comes on for about 6 seconds
and then goes off.
Go to step 3.
Intermittent failure, system is OK at this time.
Go to Troubleshooting Intermittent Failures
(see page 24-24). If another DTC is indicated,
troubleshoot the DTC.
NOTE: Aftermarket devices (fluorescent lights,
laptop computers, etc.) used near the front
passenger’s seat-back can interfere with the seat-
back sensors and cause a false DTC 86-1x or 86-2x.
If one of these devices was used, clear the DTC,
operate the device near the seat-back, and recheck
for DTCs. If DTC 86-1x or 86-2x is set, clear it, and
do not use the device near the seat-back.
Faulty OPDS Seat-Back Sensor
Faulty OPDS Seat Support Sensor
Does the SRS indicator go of f ?
Does the SRS indicator stay on, and is DT C 86-1xor 86-2x indicated?
08/08/21 14:00:55 61SNR030_240_0168
ProCarManuals.com
DYNOMITE -2009-