Page 130 of 2893
�
�����
�(�#�'�����������
��������������������� �����)���
5-295-29
Transmission Mount Replacement
12x1.25mm
64 N·m
(6.5 kgf·m, 47 lbf·ft) A
22. Raise the vehicle on the lift.
23. M/T model: Tighten the front mount mounting bolt.
24. Install the splash shield (see step 40 on page 5-20).1. Loosen the upper torque rod mounting bolt (A).
2. Remove the air cleaner assembly (see page 11-345).
3. Remove the engine control module (ECM)/
powertrain control module (PCM) cover, then
remove the three bolts securing the ECM/PCM (see
step 10 on page 5-4).
4. Remove the under hood fuse/relay box from the ECM/PCM bracket, then remove the ECM/PCM
bracket(seestep13onpage5-4).
(cont’d)
08/08/21 14:21:04 61SNR030_050_0029
ProCarManuals.com
DYNOMITE -2009-
Page 131 of 2893

A
A
D
12x1.25mm
74N·m(7.5kgf·m,54lbf·ft) D
12x1.25mm
74 N·m
(7.5 kgf·m,
54 lbf·ft)
C E")
����
��������
�����
M/T model
A/T model
5-30 Engine Assembly
Transmission Mount Replacement (cont’d)
A
A
D
12x1.25mm
74N·m(7.5kgf·m,54lbf·ft) D
12x1.25mm
74 N·m
(7.5 kgf·m,
54 lbf·ft)
C E
12x1.25mm
74 N·m
(7.5 kgf·m, 54 lbf·ft)
6x1.0mm
10 N·m
(1.0 kgf·m,
7.2 lbf·ft)
B
D
12 x 1.25 mm
64 N·m
(6.5 kgf·m,
47 lbf·ft) D
12x1.25mm
64 N·m
(6.5 kgf·m,
47 lbf·ft)
C A
10 x 1.25 mm
38 N·m
(3.9 kgf·m, 28 lbf·ft)
E
12 x 1.25 mm
74 N·m
(7.5 kgf·m, 54 lbf·ft)
5. Raise the vehicle on the lift.
6. Remove the splash shield (see step 25 on page 5-5).
7. Loosen the lower torque rod mounting bolt (A).
8. M/T model: Loosen the front mount mounting bolt (A).
9. Lower the vehicle on the lift. 10. A/T model: Remove the transmission mount
stiffener (A).
11. M/T model: Remove the ground cable (B).
12. Remove the transmission mount (C).
13. Install the transmission mount, and tighten the transmission mount mounting bolts (D).
14. A/T model: Install the transmission mount stiffener.
15. Loosely tighten the new transmission mounting bolt and nuts (E).
16. M/T model: Install the ground cables.
Replace.
Replace.
Replace.
Replace. Replace.
Replace.
08/08/21 14:21:05 61SNR030_050_0030
ProCarManuals.com
DYNOMITE -2009-
Page 133 of 2893
�
�����
����
�(�#�'�����������
��������������������� �����)����
5-325-32 Engine Assembly
Transmission Mount Replacement
(cont’d)
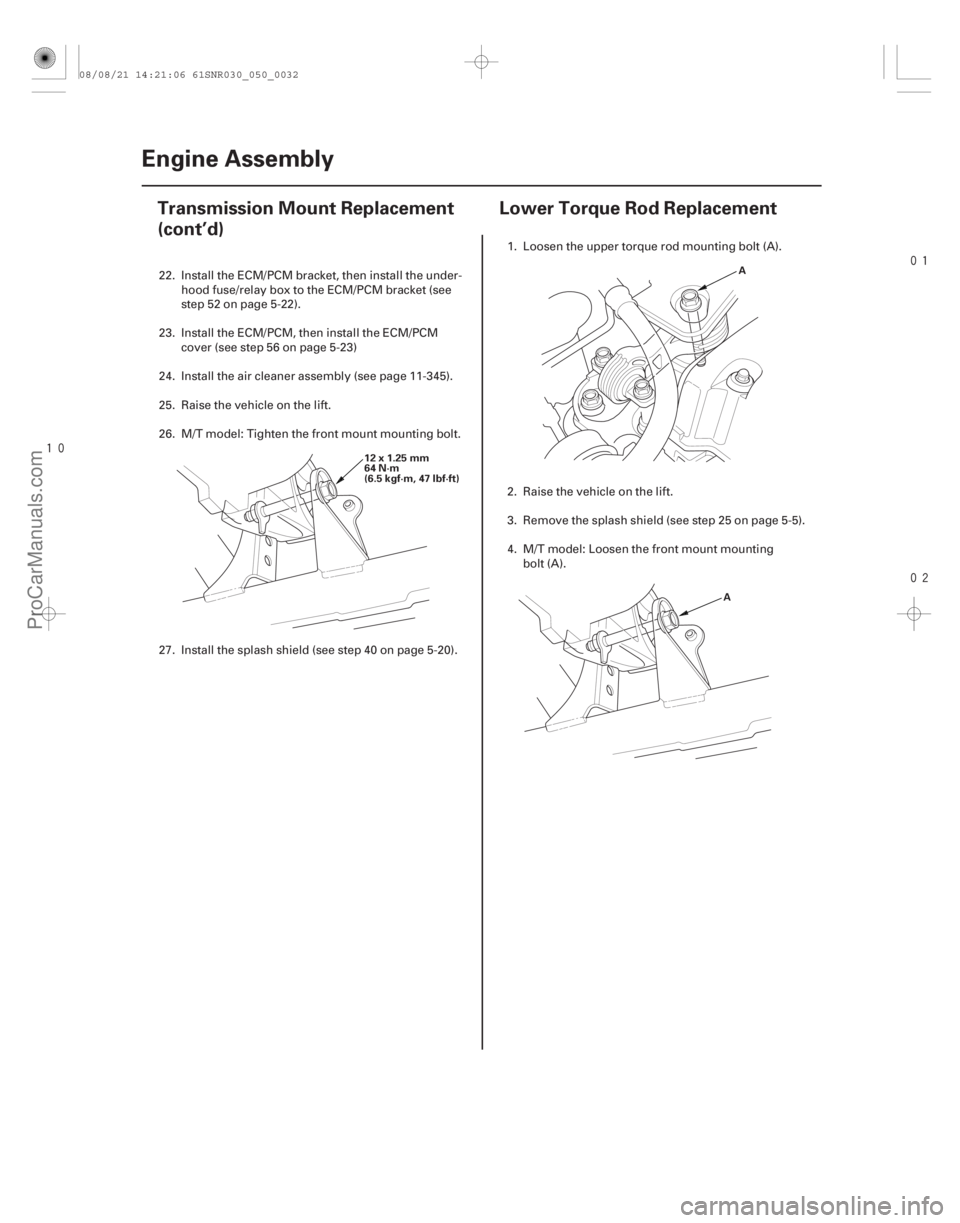
Lower Torque Rod Replacement
12x1.25mm
64 N·m
(6.5 kgf·m, 47 lbf·ft) A
A
22. Install the ECM/PCM bracket, then install the under- hood fuse/relay box to the ECM/PCM bracket (see
step 52 on page 5-22).
23. Install the ECM/PCM, then install the ECM/PCM cover (see step 56 on page 5-23)
24. Install the air cleaner assembly (see page 11-345).
25. Raise the vehicle on the lift.
26. M/T model: Tighten the front mount mounting bolt.
27. Install the splash shield (see step 40 on page 5-20). 1. Loosen the upper torque rod mounting bolt (A).
2. Raise the vehicle on the lift.
3. Remove the splash shield (see step 25 on page 5-5).
4. M/T model: Loosen the front mount mounting
bolt (A).
08/08/21 14:21:06 61SNR030_050_0032
ProCarManuals.com
DYNOMITE -2009-
Page 134 of 2893
�
�����
����
�(�#�'�����������
��������������������� �����)����
5-325-32 Engine Assembly
Transmission Mount Replacement
(cont’d)
Lower Torque Rod Replacement
12x1.25mm
64 N·m
(6.5 kgf·m, 47 lbf·ft) A
A
22. Install the ECM/PCM bracket, then install the under- hood fuse/relay box to the ECM/PCM bracket (see
step 52 on page 5-22).
23. Install the ECM/PCM, then install the ECM/PCM cover (see step 56 on page 5-23)
24. Install the air cleaner assembly (see page 11-345).
25. Raise the vehicle on the lift.
26. M/T model: Tighten the front mount mounting bolt.
27. Install the splash shield (see step 40 on page 5-20). 1. Loosen the upper torque rod mounting bolt (A).
2. Raise the vehicle on the lift.
3. Remove the splash shield (see step 25 on page 5-5).
4. M/T model: Loosen the front mount mounting
bolt (A).
08/08/21 14:21:06 61SNR030_050_0032
ProCarManuals.com
DYNOMITE -2009-
Page 136 of 2893
���
����
����
�(�#�'�����������
��������������������� �����)����
M/T model
A/T model
5-34 Engine Assembly
Upper Torque Rod Replacement
A
12x1.25mm
64 N·m
(6.5 kgf·m, 47 lbf·ft)
12x1.25mm
64 N·m
(6.5 kgf·m, 47 lbf·ft)
A
12x1.25mm
64 N·m
(6.5 kgf·m, 47 lbf·ft)
12x1.25mm
64 N·m
(6.5 kgf·m, 47 lbf·ft)
A
1. Raise the vehicle on the lift.
2. Remove the splash shield (see step 25 on page 5-5).
3. M/T model: Loosen the front mount mountingbolt (A).
4. Lower the vehicle on the lift. 5. Remove the upper torque rod (A).
6. Install the upper torque rod, then tighten the new
bolts in the numbered sequence shown.
Replace.
Replace.
Replace.
Replace.
08/08/21 14:21:08 61SNR030_050_0034
ProCarManuals.com
DYNOMITE -2009-
Page 137 of 2893
�������
����
�(�#�'�����������
��������������������� �����)���� M/T model
A/T model
5-355-35
Side Engine Mount Bracket
Replacement
12x1.25mm
64 N·m
(6.5 kgf·m, 47 lbf·ft)
7. Raise the vehicle on the lift.
8. M/T model: Tighten the front mount mounting bolt.
9. Install the splash shield (see step 40 on page 5-20).
1. Support the engine with a jack and wood block
under the oil pan.
2. Remove the upper torque rod.
(cont’d)
Replace.
Replace.
Replace.
Replace.
08/08/21 14:21:08 61SNR030_050_0035
ProCarManuals.com
DYNOMITE -2009-
Page 138 of 2893
�������
����
�(�#�'�����������
��������������������� �����)���� M/T model
A/T model
5-355-35
Side Engine Mount Bracket
Replacement
12x1.25mm
64 N·m
(6.5 kgf·m, 47 lbf·ft)
7. Raise the vehicle on the lift.
8. M/T model: Tighten the front mount mounting bolt.
9. Install the splash shield (see step 40 on page 5-20).
1. Support the engine with a jack and wood block
under the oil pan.
2. Remove the upper torque rod.
(cont’d)
Replace.
Replace.
Replace.
Replace.
08/08/21 14:21:08 61SNR030_050_0035
ProCarManuals.com
DYNOMITE -2009-
Page 139 of 2893
����
����
����
M/T model
A/T model
5-36 Engine Assembly
Side Engine Mount Bracket Replacement (cont’d)
A
B D
C
6x1.0mm
10 N·m
(1.0 kgf·m, 7.2 lbf·ft)
A
A
3. Remove the ground cable (A), then remove the sideengine mount bracket (B).
4. Install the side engine mount bracket, then loosely tighten the new bolt and nut (C), then loosely
tighten the bolt (D).
5. Install the ground cable.
6. Remove the air cleaner assembly (see page 11-345). 7. Loosen the transmission mounting bolt and nuts
(A).
Replace.
08/08/21 14:21:09 61SNR030_050_0036
ProCarManuals.com
DYNOMITE -2009-