Page 1728 of 2893
����
�(�#�'���������������������������������������)���
20-53
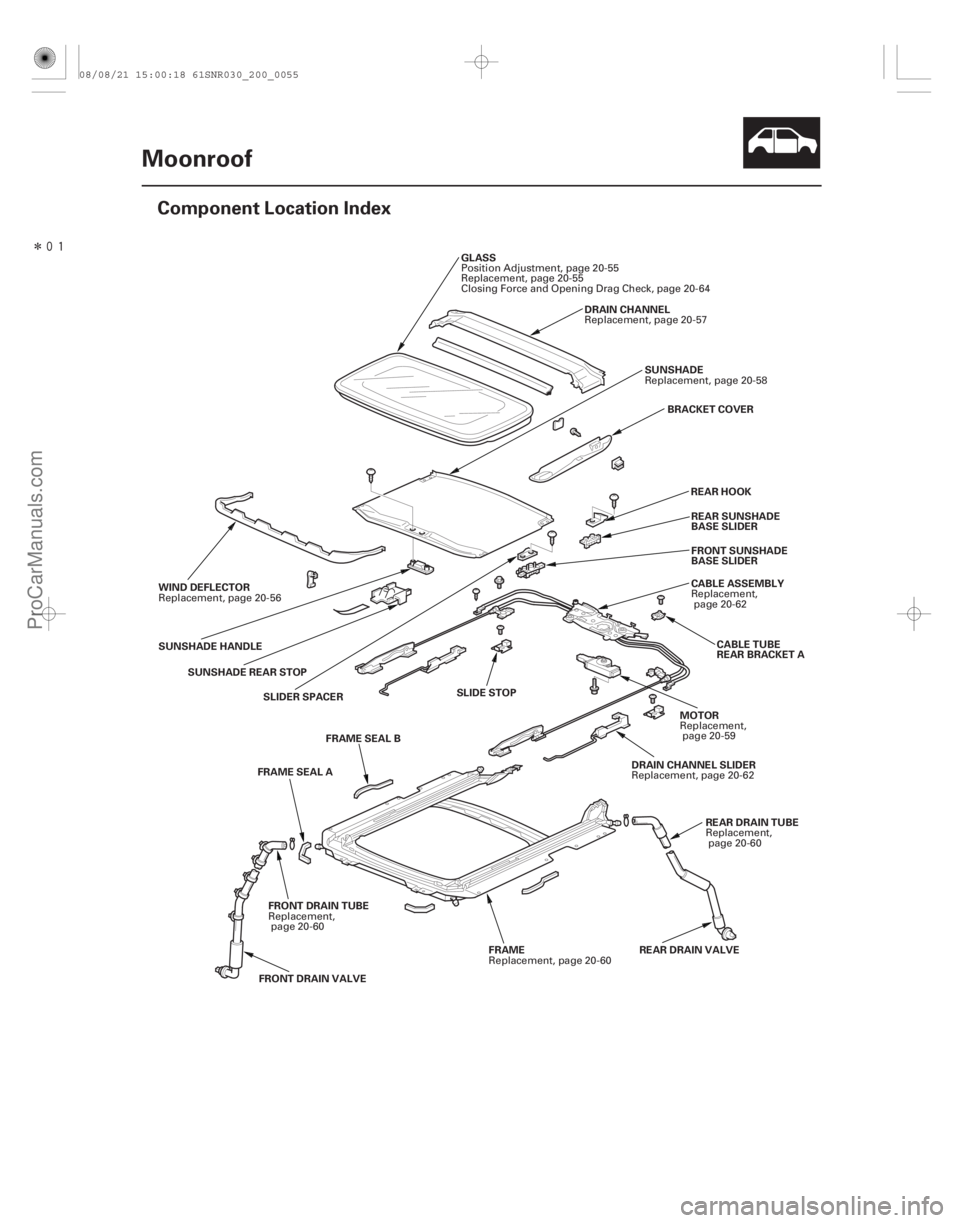
Moonroof
Component Location Index
BRACKET COVER
FRAME SEAL A SLIDE STOP
FRONT DRAIN VALVE REAR DRAIN VALVECABLE TUBE
REAR BRACKET A
GLASS
DRAIN CHANNEL
WIND DEFLECTOR SUNSHADE
CABLE ASSEMBLY
DRAIN CHANNEL SLIDER REAR DRAIN TUBE
MOTOR
FRAME
FRONT DRAIN TUBE FRAME SEAL B
SLIDER SPACER
SUNSHADE REAR STOP
SUNSHADE HANDLE FRONT SUNSHADE
BASE SLIDER REAR SUNSHADE
BASE SLIDER
REAR HOOK
Position Adjustment, page 20-55
Replacement, page 20-55
Closing Force and Opening Drag Check, page 20-64
Replacement, page 20-57
Replacement, page 20-56 Replacement, page 20-58
Replacement,page 20-62
Replacement, page 20-62 Replacement,page 20-60
Replacement,
page 20-59
Replacement, page 20-60
Replacement,
page 20-60
08/08/21 15:00:18 61SNR030_200_0055
ProCarManuals.com
DYNOMITE -2009-
Page 1729 of 2893
���
Symptom Diagnostic procedure
20-54
Moonroof
Symptom Troubleshooting Index
Water leaks from moonroof 1.
2.
3.
4.
5.Check for a clogged drain tube.
Chec")
�(�#�'���������������������������������������)���
Symptom Diagnostic procedure
20-54
Moonroof
Symptom Troubleshooting Index
Water leaks from moonroof 1.
2.
3.
4.
5.Check for a clogged drain tube.
Check for a gap between the glass weatherstrip and the roof panel
(see page 20-55).
Check for a defective or an improperly installed glass weatherstrip or drain
channel.
Check for a gap between the drain seal and the roof panel.
Adjust the moonroof position.
Wind noise from moonroof 1.
2.Check for excessive clearance between the glass weatherstrip and the roof
panel.
Adjust the moonroof position.
Motor noise from moonroof 1. 2.
3.Check for a loose motor.
Check for a worn gear or bearing.
Check for a deformed cable assembly.
Moonroof glass does not move,
but motor turns 1.
2.
3.
4.Check for a defective gear or inner cable.
Check for foreign matter stuck between the guide rail and the slider.
Check for a loose inner cable.
Make sure the cable assembly is attached properly.
Moonroof glass does not move
and motor does not turn (glass
can be moved with 5 mm
hexagonal wrench) 1.
2.
3.
4.Check for a blown fuse.
Check for a faulty moonroof switch.
Check for a run down battery.
Check for a defective motor control unit.
Moonroof glass does not stop at
proper flush closed position 1.
2.Reset the moonroof control unit (see page 22-287).
Check glass position adjustment.
During auto close operation,
moonroof glass r everses when
no object is trapped Check for dirt and debris in the track. Reset the moonroof control unit (see page
22-287).
Moonroof glass moves, but
there is no AUTO function Reset the moonroof control unit (see page 22-287).
08/08/21 15:00:18 61SNR030_200_0056
ProCarManuals.com
DYNOMITE -2009-
Page 1730 of 2893
���� ����
����
�(�#��������������������������������
� �����)����
�´�µ �´�µ
�´�µ �´
�µ
20-5520-55
Gla")
�´�µ
�´�µ
�´�µ �´ �µ
���
����
�(�#�'�������������������������������
�"�����)���� ����
����
�(�#�'�������������������������������
� �����)����
�´�µ �´�µ
�´�µ �´
�µ
20-5520-55
Glass Position Adjustment Glass Replacement
13.5 1/ 1 mm
(0.55 0.04/ 0.04 in.)
AB
01/1mm
(0 0.04/ 0.04 in.)
Fastener Locations 5x0.8mm
4N·m
(0.4 kgf·m, 3 lbf·ft)
:TORXScrew,6
Front A
Fastener Locations
:Screw,2
Front
5x0.8mm
4N·m
(0.4 kgf·m, 3 lbf·ft)
F
:TORXScrew,6
BE
B
D
C
D C
A
E E
E
A
The roof panel (A) should be
even with the glass
weatherstrip (B), to within 0 1/ 1 mm
(0 0.04/ 0.04 in.) all the way around, and the distance
from glass edge to the roof panel edge should be
13.5 1/ 1 mm (0.55 0.04/ 0.04 in.). If not, make the
following adjustment:
1. Remove the bracket cover.
2. Adjust the glass (A). –1 Slightly loosen the screws with a TORX T25 bit.
–2 Move the glass up or down and forward orrearward.
–3 Tighten all screws securely.
3. If necessary, repeat on the opposite side. 1. Close the glass fully.
2. Slide the sunshade all the way back.
3. Pry out the lid (A), remove the screws (B), and
release the hooks (C), then remove both bracket
covers (D). Remove the screws (E) with a TORX T25
bit from both glass brackets (F).
4. Remove the glass (A) by lifting it up. Do not damage the roof panel.
5. Install the glass in the reverse order of the removal, and adjust the glass position alignment (see page
20-55).
6. Reset the moonroof control unit (see page 22-287).
7. Check for water leaks. Use free-flowing water from a hose without a nozzle. Do not use high-pressure
water.
NOTE: It is normal for some water to seep past the
moonroof into the moonroof frame, and exit
through the drains.
08/08/21 15:00:19 61SNR030_200_0057
ProCarManuals.com
DYNOMITE -2009-
Page 1732 of 2893
���
��������
�(�#�'�������������������������������
� �����)����
20-57
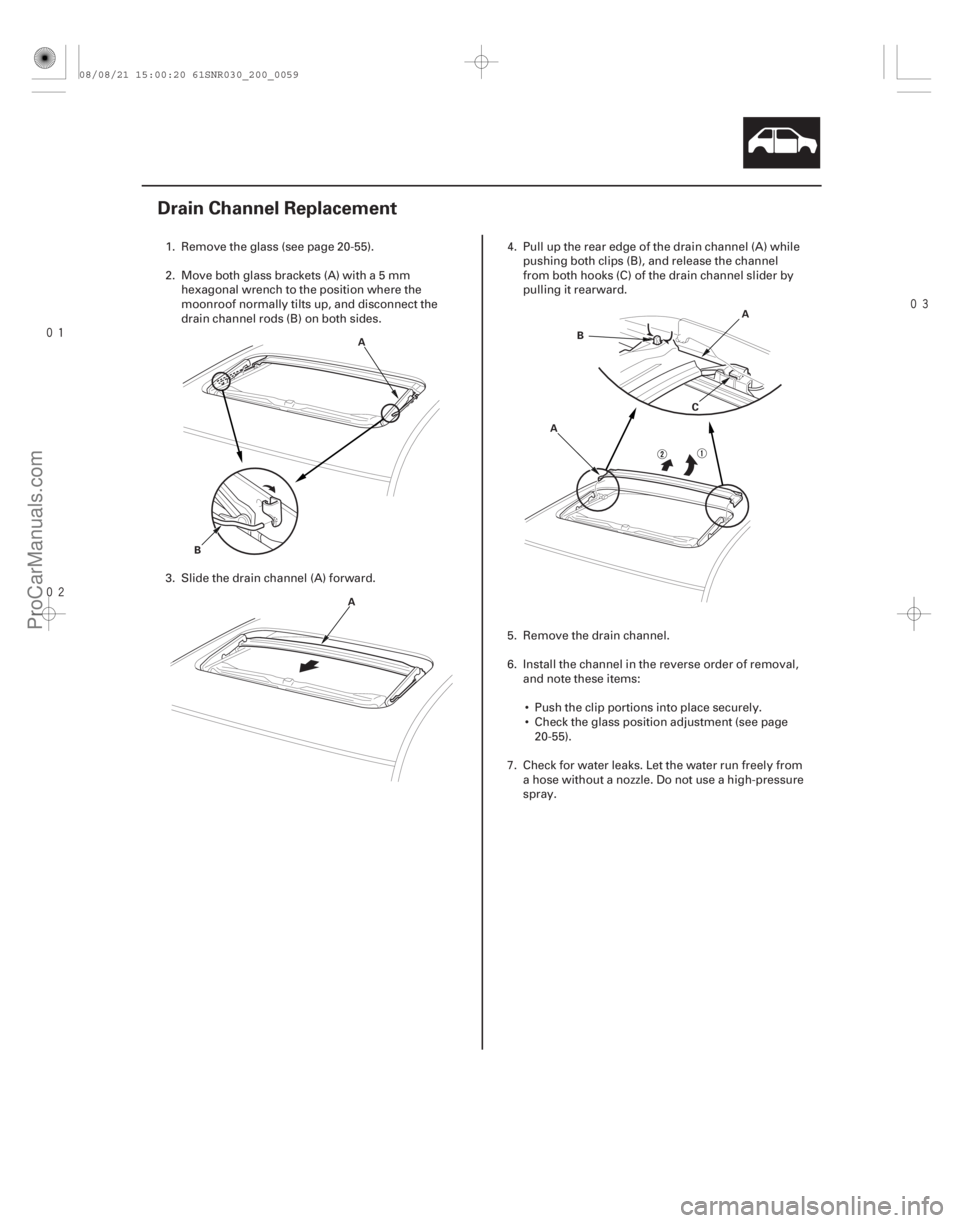
Drain Channel Replacement
A
B A A
C
B
A
1. Remove the glass (see page 20-55).
2. Move both glass brackets (A) with a 5 mm hexagonal wrench to the position where the
moonroof normally tilts up, and disconnect the
drain channel rods (B) on both sides.
3. Slide the drain channel (A) forward. 4. Pull up the rear edge of the drain channel (A) while
pushing both clips (B), and release the channel
from both hooks (C) of the drain channel slider by
pulling it rearward.
5. Remove the drain channel.
6. Install the channel in the reverse order of removal, and note these items:
Push the clip portions into place securely.
Check the glass position adjustment (see page 20-55).
7. Check for water leaks. Let the water run freely from a hose without a nozzle. Do not use a high-pressure
spray.
08/08/21 15:00:20 61SNR030_200_0059
ProCarManuals.com
DYNOMITE -2009-
Page 1738 of 2893
�
��
20-62 Moonroof
Drain Channel Slider and Cable Assembly Replacement
A
B
C D
E 6x1.0mm
9.8 N·m
(1.0 kgf·m, 7.2 lbf·ft)
F G
Fastener Locatio")
���
����
�(�#�'��������������������������������� �����)�
��
20-62 Moonroof
Drain Channel Slider and Cable Assembly Replacement
A
B
C D
E 6x1.0mm
9.8 N·m
(1.0 kgf·m, 7.2 lbf·ft)
F G
Fastener Locations Fastener Locations
:Screw,2
A:Screw,2 B:Bolt,2E
:Screw,2
F
A
B
C
D
E
C
C
Front
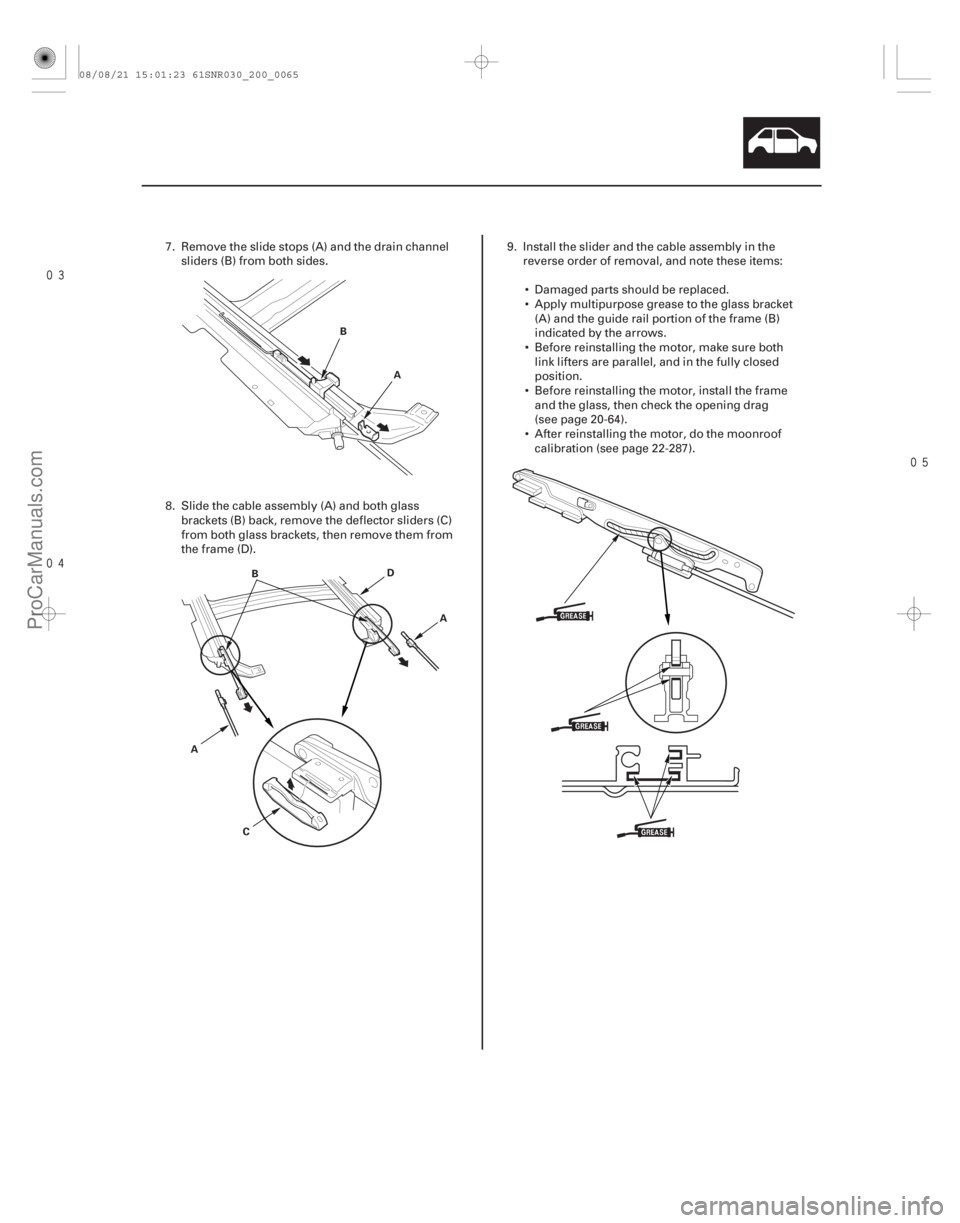
1. Remove the frame (see page 20-60).
2. Remove these parts from the frame:
Sunshade (see page 20-58)
Moonroof motor (see page 20-59)
3. Put on gloves to protect your hands. Remove the screws (A, B) securing the slide stops (C), and the
cable tube rear brackets A (D), the cable tube side
bracket mounting bolts (E) and the cable tube
mounting screws (F) from both sides of the frame
(G). 4. Turn both cable tube side brackets (A) up to release
the hooks (B) from the holes in both sides of the
frame.
5. Pivot the glass brackets (C) down by sliding the link lifters (D) back, then slide both glass brackets back
with the link lifters.
6. Slide the cable assembly (E) half-way back.
08/08/21 15:01:23 61SNR030_200_0064
ProCarManuals.com
DYNOMITE -2009-
Page 1739 of 2893
����
��������
20-63
A
B
A
B
C D
A
7. Remove the slide stops (A) and the drain channel sliders (B) from both sides.
8. Slide the cable assembly (A) and both glass brackets (B) back, remove the deflector sliders (C)
from both glass brackets, then remove them from
the frame (D). 9. Install the slider and the cable assembly in the
reverse order of removal, and note these items:
Damaged parts should be replaced.
Apply multipurpose grease to the glass bracket (A) and the guide rail portion of the frame (B)
indicated by the arrows.
Before reinstalling the motor, make sure both link lifters are parallel, and in the fully closed
position.
Before reinstalling the motor, install the frame and the glass, then check the opening drag
(see page 20-64).
After reinstalling the motor, do the m oonroof
calibration (see page 22-287).
08/08/21 15:01:23 61SNR030_200_0065
ProCarManuals.com
DYNOMITE -2009-
Page 1852 of 2893
����
Special Tools Required
Molding Replacement
20-165
Roof Molding Replacement
A
A
Fastener Location
: Clip
A Fastener Locations
: Clip (Light G")
���
����
�(�#�'�����������
�������������
�����
� �����)����
Special Tools Required
Molding Replacement
20-165
Roof Molding Replacement
A
A
Fastener Location
: Clip
A Fastener Locations
: Clip (Light Green)
C, F
: Clip (Light Yellow)
G
7mm
(0.28 in.)
1mm
(0.039 in.)
DE C
F
G
F
A
B
C, F, G
E C, F, G
D
A
B B
D C, F, G
KTC trim tool set SOJATP2014
NOTE:
Put on gloves to protect your hands.
Take care not to damage the windshield.
Do not use any metallic tools to remove the roof molding, or you may chip or crack the windshield.
Use the appropriate tool from the KTC trim tool set to avoid damage when removing components.
Take care not to bend the roof molding.
1. Remove the cowl cover (see page 20-163).
2. Detach the bottom clip (A) at the lower corner of the windshield. 3. Remove the windshield portion of the roof molding
(A).
–1 Carefully insert a trim tool (B) in under the molding next to the lower clip (C).
–2 While pulling the clip portion of the molding up by hand, push the hooks (D) to release the clip
from the retainer (E). Do not pry on the
windshield trim with any tools.
–3 Gradually work your way up to release each of the clips (F, G).
(cont’d)
08/08/21 15:05:03 61SNR030_200_0167
ProCarManuals.com
DYNOMITE -2009-
Page 2237 of 2893
����
22-287
Resetting the Moonroof Control Unit
Resetting the moonroof is required when any of the following have occurred: The moonroof was moved manual")
�(�#�'�������������������������������
�!�����)����
22-287
Resetting the Moonroof Control Unit
Resetting the moonroof is required when any of the following have occurred: The moonroof was moved manually while the battery was dead or disconnected.
The moonroof motor was replaced with a new one.
Any of components related to the moonroof were replaced. – Wind deflector
– Moonroof glass
– Moonroof seal
– Moonroof glass bracket
– Moonroof cables, etc.
To reset the moonroof control unit, do these steps: 1. Close the driver’s door, and keep it closed until the procedure is complete.
2. Turn the ignition switch to LOCK (0).
3. Press and hold the tilt switch, and turn the ignition switch to ON (II).
4. Release the tilt switch, and turn the ignition switch to LOCK (0).
5. Repeat steps 3 and 4 four times.
6. Press and hold the moonroof open switch for 3 additional seconds after the moonroof is fully opened.
7. Press and hold the moonroof close switch for 3 additional seconds after the moonroof is fully closed (tilted).
8. Confirm that the moonroof control unit is reset by using the moonroof AUTO OPEN and AUTO CLOSE function.
08/08/21 14:36:04 61SNR030_220_0289
ProCarManuals.com
DYNOMITE -2009-