Page 301 of 5135
05±144
±
DIAGNOSTICS SFI SYSTEM(1AZ±FE)
AVENSIS REPAIR MANUAL (RM1018E)
9SYMPTOM SIMULATION
10DTC CHECK (See page 05±149)
AMalfunction code
BNo code
BGO TO STEP 12
A
11DTC CHART (See page 05±161)
GO TO STEP 14
12BASIC INSPECTION (See page 05±149)
AWrong parts not confirmed
BWrong parts confirmed
BGO TO STEP 17
A
13PROBLEM SYMPTOMS TABLE (See page 05±168)
AWrong circuit confirmed
BWrong parts confirmed
B GO TO STEP 17
A
14CHECK ECM POWER SOURCE CIRCUIT (See page 05±257)
15 CIRCUIT INSPECTION
AMalfunction not confirmed
BMalfunction confirmed
B GO TO STEP 18
A
Page 304 of 5135
±
DIAGNOSTICS SFI SYSTEM(1AZ±FE)
05±147
AVENSIS REPAIR MANUAL (RM1018E)
8PROBLEM SYMPTOMS TABLE (See page 05±168)
AWrong circuit confirmed
BWrong parts confirmed
BGO TO STEP 12
A
9CHECK ECM POWER SOURCE CIRCUIT (See page 05±257)
10CIRCUIT INSPECTION
AMalfunction not confirmed
BMalfunction confirmed
BGO TO STEP 13
A
11CHECK FOR INTERMITTENT PROBLEMS (See page 05±149)
GO TO STEP 13
12 PARTS INSPECTION
13 IDENTIFICATION OF PROBLEM
14 ADJUSTMENT, REPAIR
15 CONFIRMATION TEST
END
Page 305 of 5135

A81014
4 D5
DLC3
CGTC13
W±BCBW±L20
E9TCECM
W±L
W±B J8
J/C
BB
J16
J/C
A
IP
IOCenter J/B
CA 36
A(RHD) W±B
(RHD)
(LHD)W±B
(LHD) (LHD)W±L
(LHD)
W±L W±L
(RHD)
(RHD) J21D
J20BDB DC173 Driver Side J/B
3 2 1 45678
9 1 0 111 21 31 41 51 6
DLC3
A04550
CG (±)TC (+)
DLC3
± DIAGNOSTICSSFI SYSTEM (1ZZ±FE/3ZZ±FE)
05±141
AVENSIS REPAIR MANUAL (RM1018E)
TC TERMINAL CIRCUIT
CIRCUIT DESCRIPTION
Terminals TC and CG are located in the DLC3. When connecting these terminals, DTCs in normal mode or
check mode can be read through the CHK ENG flashing in the combination meter.
WIRING DIAGRAM
INSPECTION PROCEDURE
HINT:
�Even though terminal TC is not connected to terminal CG, the CHK ENG blinks.
�For the above phenomenon, an open or short in the wire harness, or malfunction inside the ECM is
the likely cause.
1 CHECK DLC3(TC VOLTAGE)
(a) Turn the ignition switch ON.
(b) Measure the voltage between the terminals of the DLC3.
Standard:
Symbols (Terminal No.)Specified condition
TC (13) ± CG (4)9 to 14 V
OK Go to step 3
NG
05C6K±01
Page 307 of 5135
A81015
Engine
Room
R/B No. 1
Engine
Room
J/B No. 1W
9ECM
W
E9 11
1 2
B±W22 1
4A
Battery4
2I13
Ignition
Switch
DH 6
B±R B±R
C11
Combination
Meter Assy
Check
Engine
Warning
Light AM2
IG2
AM2
Driver
Side
J/B
FL MAINEngine
Room
J/B
No. 4
4BB±G 1A 1B±R
IE41
(LHD)IP11
(RHD)
18 DA
J8C
(LHD)J26A
(RHD)J8C
(LHD)J26A
(RHD) J/CB±W IGN
1
1
B±G
± DIAGNOSTICSSFI SYSTEM (1ZZ±FE/3ZZ±FE)
05±139
AVENSIS REPAIR MANUAL (RM1018E)
CHECK ENGINE WARNING LIGHT CIRCUIT
CIRCUIT DESCRIPTION
If the ECM detects a trouble, the CHK ENG is illuminated. At this time, the ECM records a DTC in the memory.
WIRING DIAGRAM
INSPECTION PROCEDURE
HINT:
Troubleshoot each trouble symptom in accordance with the chart below .
CHK ENG remains onStart inspection from step 1
CHK ENG is not illuminatedStart inspection from step 3
05C6J±01
Page 308 of 5135

A65748
E9
ECM Connector
05±140
±
DIAGNOSTICS SFI SYSTEM(1ZZ±FE/3ZZ±FE)
AVENSIS REPAIR MANUAL (RM1018E)
1CLEAR DTC
(a)Connect the hand±held tester to the DLC 3.
(b)Turn the ignition switch ON and push the hand±held tester main switch \
ON.
(c)Read the DTC (See page 05±5).
(d)Clear the DTC (See page 05±5).
(e)Check that the CHK ENG is OFF. Standard: CHK ENG is OFF
OKREPAIR CIRCUIT INDICATED BY OUTPUTCODE (See page 05±16)
NG
2CHECK HARNESS AND CONNECTOR(CHECK FOR SHORT IN WIRE HARNESS)
(a)Disconnect the E9 ECM connector.
(b)Turn the ignition switch ON.
(c)Check that the CHK ENG is OFF. Standard: CHK ENG is OFF
OKCHECK AND REPLACE ECM (See page 01±32)
NG
CHECK AND REPAIR HARNESS AND CONNECTOR
3CHECK CHK ENG CONDITION
(a)Check that the CHK ENG is illuminated when turning the ignition switch O\
N. Standard: CHK ENG is illuminated
OKSYSTEM OK
NG
4INSPECT COMBINATION METER ASSY(CHK ENG CIRCUIT)
(a)See the combination meter troubleshooting on page 05±1509. NG REPAIR OR REPLACE BULB OR COMBINATIONMETER ASSEMBLY
OK
CHECK AND REPAIR HARNESS AND CONNECTOR (COMBINATION METER ± ECM)
Page 309 of 5135
± DIAGNOSTICSSFI SYSTEM (1ZZ±FE/3ZZ±FE)
05±135
AVENSIS REPAIR MANUAL (RM1018E)
STARTER SIGNAL CIRCUIT
CIRCUIT DESCRIPTION
When the engine is cranked, the intake air flow becomes slow, so fuel vaporization is poor. A rich mixture
is therefore necessary in order to achieve good startability. While the engine is being cranked, the battery
voltage is applied to terminal STA of the ECM. The starter signal is mainly used to increase the fuel injection
volume for the starting injection control and after±start injection control.
05C6I±01
Page 311 of 5135

A65745
STA
E12
ECM Connector
A79097
Driver Side R/B
LHDStarter Relay
A79098
Driver Side R/B
RHD
Starter Relay
±
DIAGNOSTICS SFI SYSTEM(1ZZ±FE/3ZZ±FE)
05±137
AVENSIS REPAIR MANUAL (RM1018E)
NSPECTION PROCEDURE
HINT:
This diagnostic chart is on the premise that the engine is cranked normally. If the engine is not cranked,
pro-
ceed to the problem symptoms table on page 05±22.
1 READ VALUE OF HAND±HELD TESTER(STARTER SIGNAL)
(a) Connect the hand±held tester to the DLC3.
(b) Turn the ignition switch ON and push the hand±held tester main switch \
ON.
(c) Select the item ºDIAGNOSIS / OBD/MOBD / DATA LIST / ALL / STARTER SIGº and read its value dis-
played on the hand±held tester.
Result:
Ignition Switch PositionONSTART
STA SignalOFFON
OK PROCEED TO NEXT CIRCUIT INSPECTION SHOWN ON PROBLEM SYMPTOMS TABLE
NG
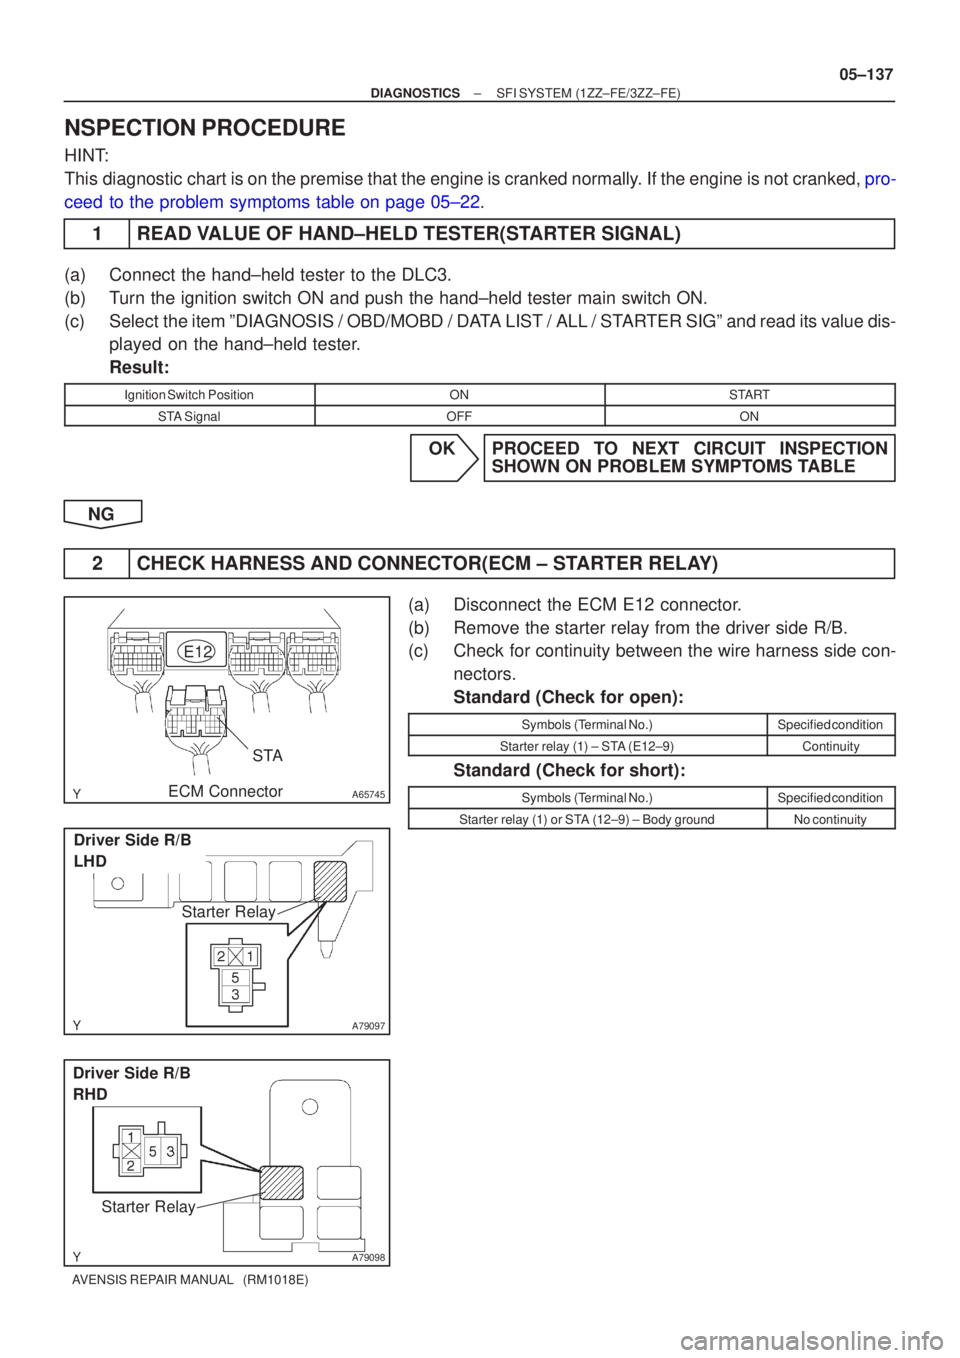
2 CHECK HARNESS AND CONNECTOR(ECM ± STARTER RELAY)
(a) Disconnect the ECM E12 connector.
(b) Remove the starter relay from the driver side R/B.
(c) Check for continuity between the wire harness side con- nectors.
Standard (Check for open):
Symbols (Terminal No.)Specified condition
Starter relay (1) ± STA (E12±9)Continuity
Standard (Check for short):
Symbols (Terminal No.)Specified condition
Starter relay (1) or STA (12±9) ± Body groundNo continuity
Page 313 of 5135

A79082
53G±Y
L±B E9 10
4
5 W±B
BR F25
Fuel Pump ECM
B±W 12
FC
C8
Circuit
Opening Relay
From
Terminal 3 of
EFI Relay
(See Page 05±124)
G±Y
B±W
B±W
IB1 10 IC3
6
±
DIAGNOSTICS SFI SYSTEM(1ZZ±FE/3ZZ±FE)
05±131
AVENSIS REPAIR MANUAL (RM1018E)
FUEL PUMP CONTROL CIRCUIT
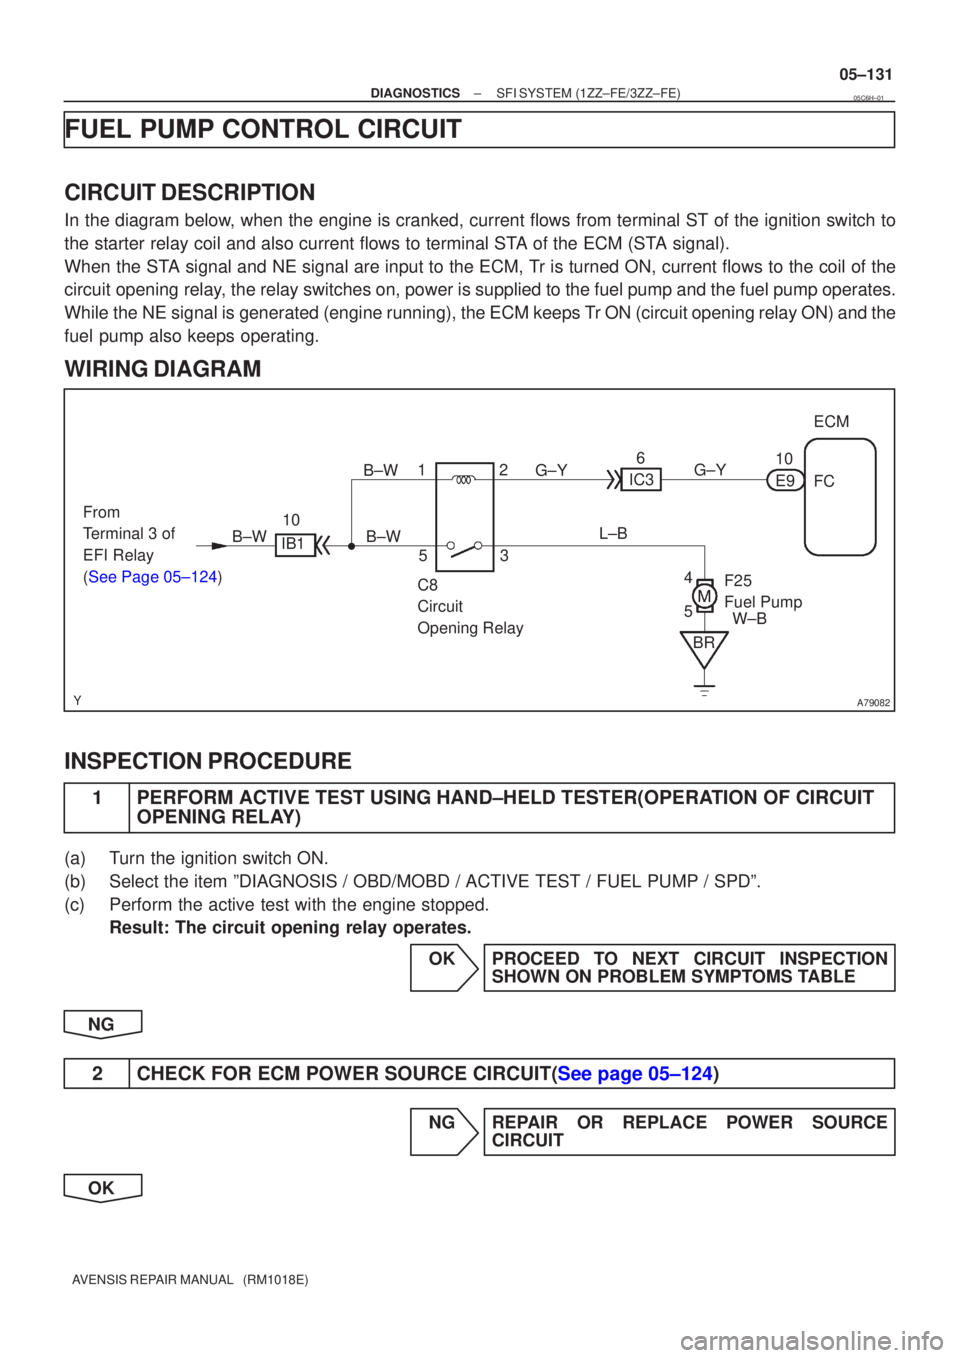
CIRCUIT DESCRIPTION
In the diagram below, when the engine is cranked, current flows from terminal ST of the igni\
tion switch to
the starter relay coil and also current flows to terminal STA of the ECM (STA signal).
When the STA signal and NE signal are input to the ECM, Tr is turned ON, current flows to the coil of the
circuit opening relay, the relay switches on, power is supplied to the fuel pump and the fuel p\
ump operates.
While the NE signal is generated (engine running), the ECM keeps Tr ON (circuit opening relay ON) and the
fuel pump also keeps operating.
WIRING DIAGRAM
INSPECTION PROCEDURE
1PERFORM ACTIVE TEST USING HAND±HELD TESTER(OPERATION OF CIRCUIT
OPENING RELAY)
(a)Turn the ignition switch ON.
(b)Select the item ºDIAGNOSIS / OBD/MOBD / ACTIVE TEST / FUEL PUMP / SPD\
º.
(c)Perform the active test with the engine stopped.
Result: The circuit opening relay operates.
OKPROCEED TO NEXT CIRCUIT INSPECTIONSHOWN ON PROBLEM SYMPTOMS TABLE
NG
2CHECK FOR ECM POWER SOURCE CIRCUIT(See page 05±124)
NG REPAIR OR REPLACE POWER SOURCE CIRCUIT
OK
05C6H±01