Page 3367 of 5135

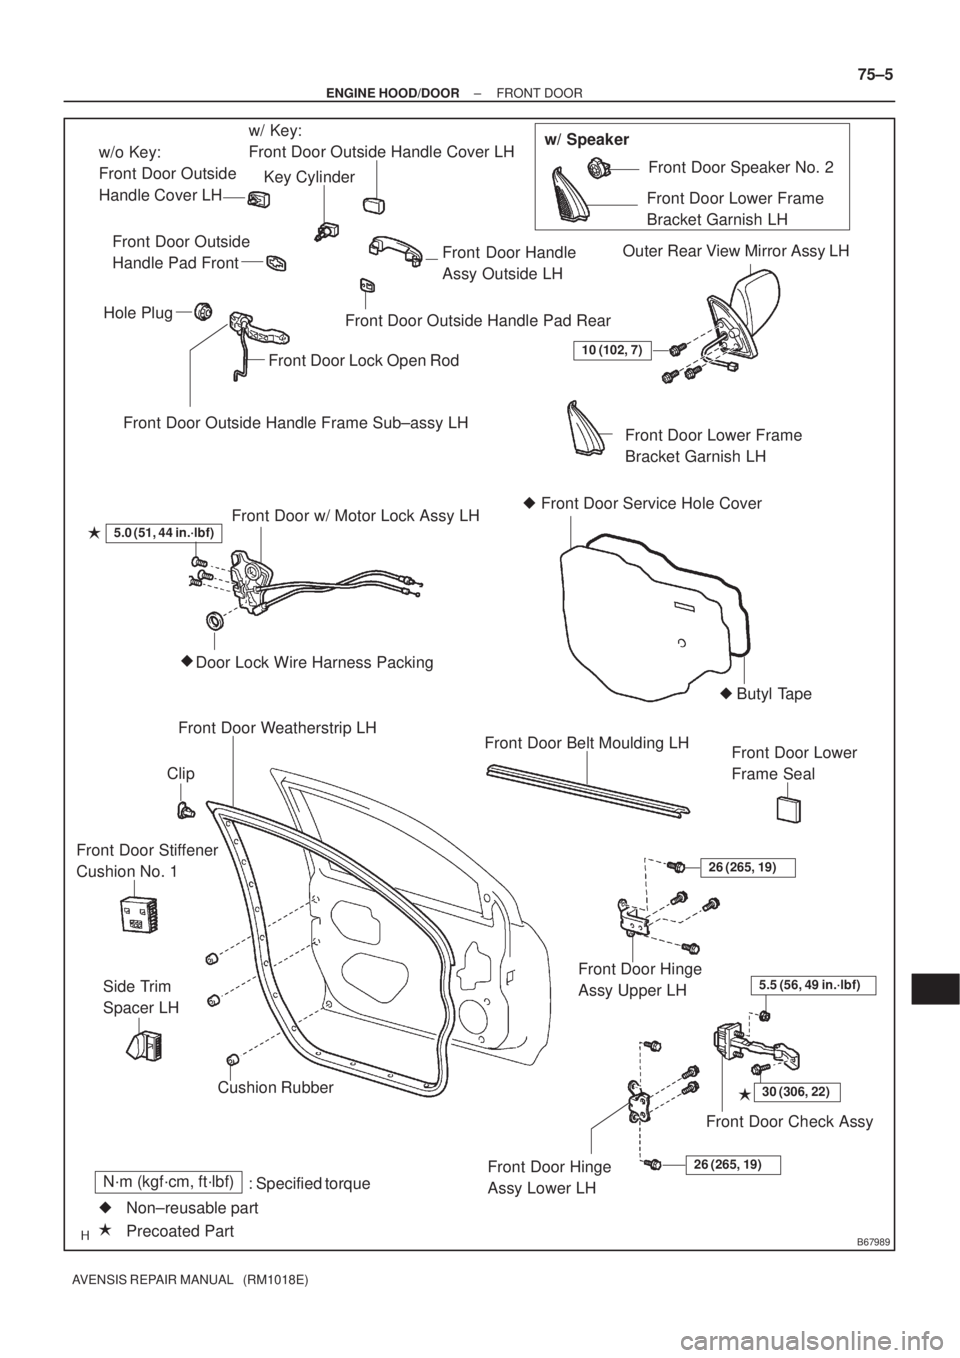
B67989
Front Door Outside Handle Frame Sub±assy LHw/ Key:
Front Door Outside Handle Cover LH
Front Door Handle
Assy Outside LH
Front Door Outside Handle Pad Rear Front Door Outside
Handle Pad Front
Hole Plug
Front Door Lock Open Rod
Front Door w/ Motor Lock Assy LH
Door Lock Wire Harness Packing �5.0 (51, 44 in.´lbf)
Front Door Belt Moulding LH
Front Door Hinge
Assy Upper LH
Front Door Check Assy
30 (306, 22)�
5.5 (56, 49 in.´lbf)
Front Door Hinge
Assy Lower LH26 (265, 19)
Front Door Weatherstrip LH
Cushion RubberFront Door Lower Frame
Bracket Garnish LH Outer Rear View Mirror Assy LH
Front Door Speaker No. 2
Front Door Service Hole Cover �
: Specified torqueN´m (kgf´cm, ft´lbf)
�
Precoated Part Non±reusable part �Clip
26 (265, 19)
Front Door Lower
Frame Seal
�
Butyl Tape
�
10 (102, 7)
Front Door Stiffener
Cushion No. 1
Side Trim
Spacer LH
Key Cylinder
w/o Key:
Front Door Outside
Handle Cover LHw/ Speaker
Front Door Lower Frame
Bracket Garnish LH
± ENGINE HOOD/DOORFRONT DOOR
75±5
AVENSIS REPAIR MANUAL (RM1018E)
Page 3368 of 5135
750MU±01
B57104
Centering BoltStandard Bolt
B66962
AB
B61420
75±2
± ENGINE HOOD/DOORHOOD
AVENSIS REPAIR MANUAL (RM1018E)
ADJUSTMENT
HINT:
Because a centering bolt is used as a hood hinge mounting bolt
and hood lock mounting bolt, the hood and hood lock can not
be adjusted with them on. Substitute a bolt with a washer for the
centering bolt.
1. INSPECT HOOD SUB±ASSY
(a) Check that the clearance is within the standard range.
Standard range:
A3.5 � 1.5 mm (0.138 � 0.059 in.)
B3.5 ± 1.5 or +2.5 mm
(0.138 ± 0.059 or + 0.098 in.)
2. ADJUST HOOD SUB±ASSY
(a) Horizontally and vertically adjust the hood.
(1) Loosen the 4 hood hinge bolts on the hood side.
Page 3369 of 5135

B66963
A
Aligned
B66964
B62401
±
ENGINE HOOD/DOOR HOOD
75±3
AVENSIS REPAIR MANUAL (RM1018E)
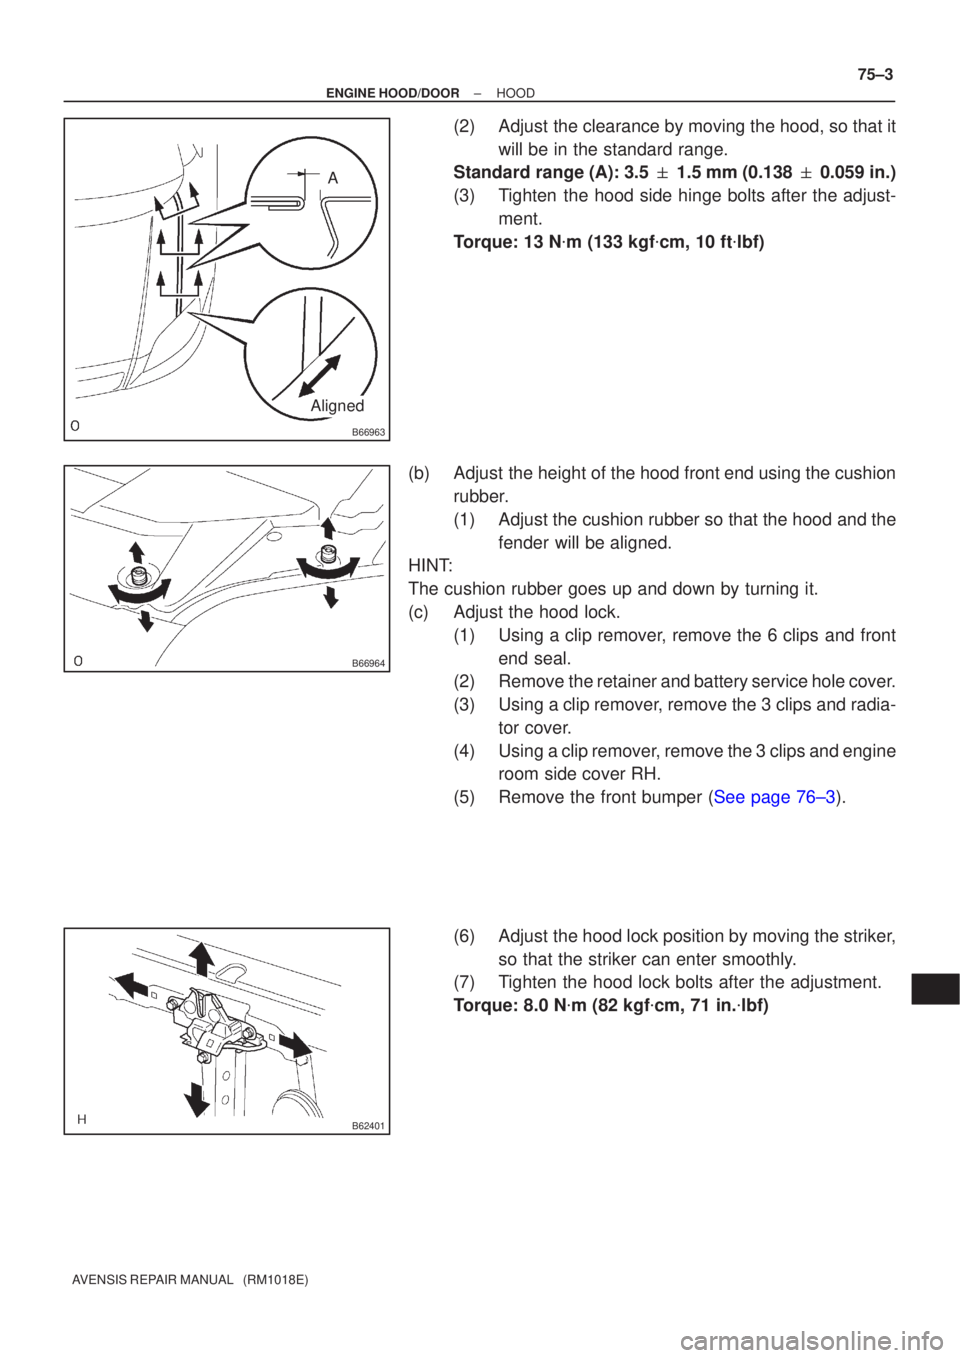
(2)Adjust the clearance by moving the hood, so that it
will be in the standard range.
Standard range (A): 3.5 � 1.5 mm (0.138 � 0.059 in.)
(3)Tighten the hood side hinge bolts after the adjust- ment.
Torque: 13 N �m (133 kgf �cm, 10 ft �lbf)
(b)Adjust the height of the hood front end using the cushion rubber.
(1)Adjust the cushion rubber so that the hood and thefender will be aligned.
HINT:
The cushion rubber goes up and down by turning it.
(c)Adjust the hood lock.
(1)Using a clip remover, remove the 6 clips and frontend seal.
(2)Remove the retainer and battery service hole cover.
(3)Using a clip remover, remove the 3 clips and radia-
tor cover.
(4)Using a clip remover, remove the 3 clips and engine room side cover RH.
(5)Remove the front bumper (See page 76±3).
(6) Adjust the hood lock position by moving the striker, so that the striker can enter smoothly.
(7) Tighten the hood lock bolts after the adjustment.
Torque: 8.0 N �m (82 kgf �cm, 71 in. �lbf)
Page 3370 of 5135
750MT±01
B67533
Hood Sub±assy
Hood Insulator
Engine Room Side Cover RH
Radiator CoverBattery Service Hole Cover
Hood Hinge Assy RH
Hood to Front Fender Seal RH Hood Lock Assy
Front Bumper Assy
Hood to Front Fender Seal LH
Hood Hinge Assy LH x 8
Hood to Front End Panel Seal
8.0 (82, 71 in.´lbf)
13 (133, 10)
13 (133, 10)
: Specified torqueN´m (kgf´cm, ft´lbf)Cushion Rubber
Cushion Rubber
Clip
± ENGINE HOOD/DOORHOOD
75±1
AVENSIS REPAIR MANUAL (RM1018E)
HOOD
COMPONENTS
Page 3381 of 5135

760X6±01
B68949
B69147
76±14
±
EXTERIOR/INTERIOR TRIM FUEL LID LOCK CONTROL ASSY
AVENSIS REPAIR MANUAL (RM1018E)
REPLACEMENT
HINT:
The installation is in the reverse order of the removal. However, when there is a special point concerning
the installation, it is indicated.
1.REMOVE LUGGAGE COMPARTMENT TRIM COVER INNER LH (SEDAN MODELS) (See page 76±36)
(a) Remove the luggage compartment floor carpet.
(b) Remove the 2 rope hooks.
(c) Remove the rear floor finish plate.
(d) Remove the 2 luggage compartment trim hooks.
(e) Remove the luggage compartment trim inner.
2.REMOVE DECK TRIM SIDE BOARD LH (LIFTBACK MODELS) (See page 76±45)
(a) Remove the 2 rope hooks.
(b) Remove the rear floor finish plate.
(c) Remove the rear door opening trim weatherstrip LH.
(d) Remove the rear door scuff plate LH.
(e) Remove the deck trim side board.
3.REMOVE DECK TRIM SIDE PANEL ASSY LH (WAGON MODELS) (See page 76±54)
(a) Remove the rear door opening trim weatherstrip LH
(b) Remove the rear door scuff plate.
(c) Remove the tonneau cover.
(d) Remove the deck board.
(e) Remove the deck floor box rear.
(f) Remove the deck floor box LH.
(g) Remove the deck floor box front.
(h) Remove the rear floor finish plate.
(i) Remove the luggage compartment trim hook No. 2.
(j) Remove the deck trim side board.
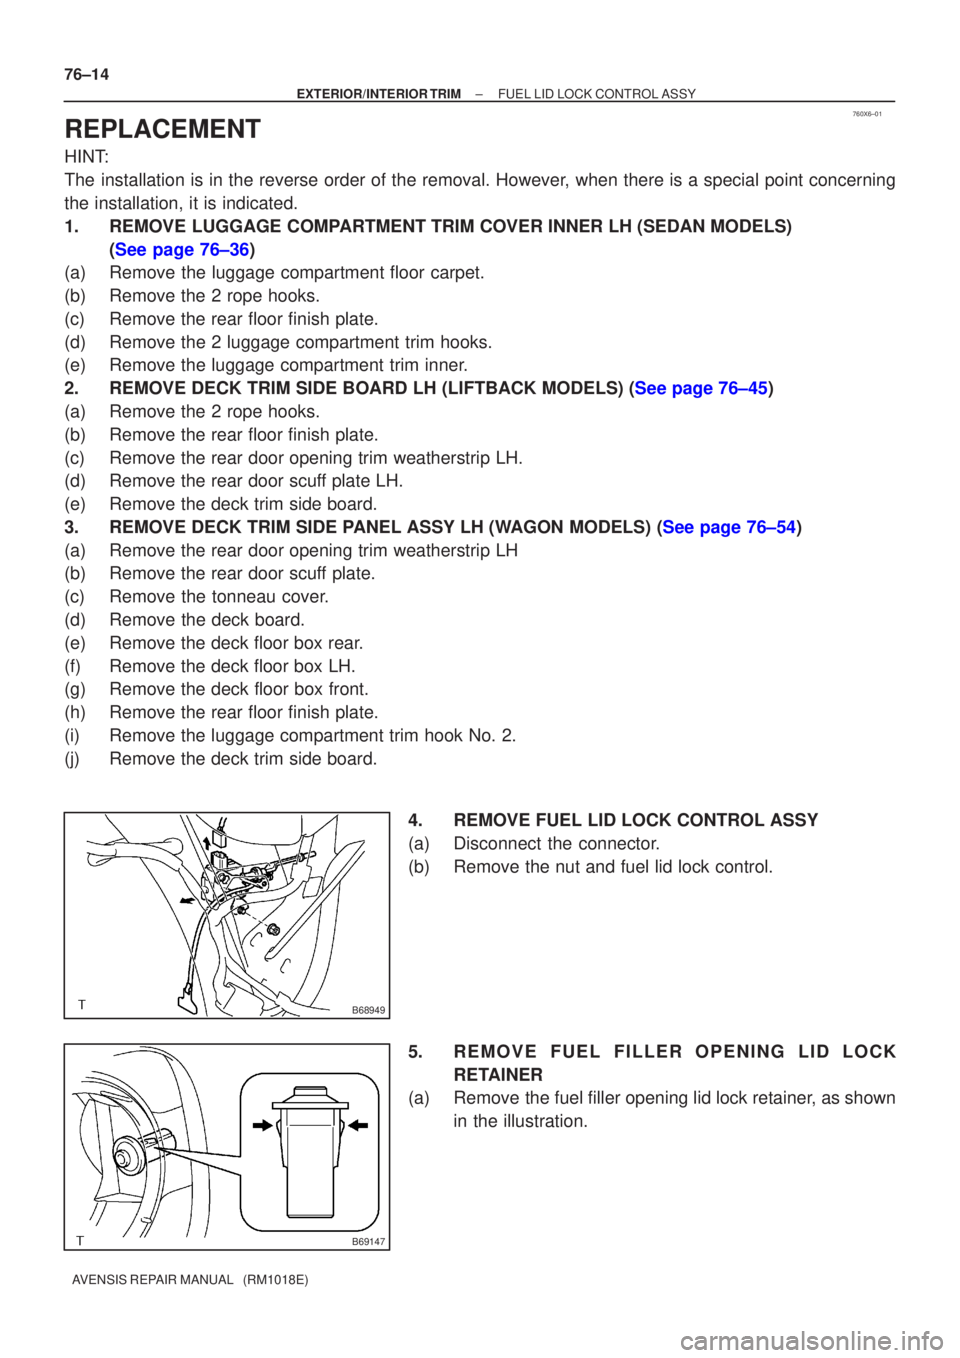
4. REMOVE FUEL LID LOCK CONTROL ASSY
(a) Disconnect the connector.
(b) Remove the nut and fuel lid lock control.
5. REMOVE FUEL FILLER OPENING LID LOCKRETAINER
(a) Remove the fuel filler opening lid lock retainer, as shown
in the illustration.
Page 3385 of 5135
B68947
Liftback Models
Fuel Lid Lock Control Assy
Fuel Filler Opening Lid Lock Retainer
Rear Floor Finish Plate
Rear Door Opening Trim Weatherstrip LH
Rear Door Scuff Plate LHDeck Trim Side Board LH Rope Hook Assy
Rope Hook Assy
: Specified torqueN�m (kgf�cm, ft�lbf)
5.5 (56, 49 in.´lbf)
76±12
± EXTERIOR/INTERIOR TRIMFUEL LID LOCK CONTROL ASSY
AVENSIS REPAIR MANUAL (RM1018E)
Page 3386 of 5135
B68946
Wagon Models
Fuel Lid Lock Control Assy
Fuel Filler Opening Lid Lock Retainer
Deck Trim Side Board LH
Luggage Compartment
Trim Hook No. 2 Tonneau Cover Assy
Deck Board Sub±assy Deck Floor Box Front
Deck Floor Box LHRear Floor Finish Plate
Deck Floor Box Rear
Rear Door Opening Trim Weatherstrip LH
Rear Door Scuff Plate LH
: Specified torqueN�m (kgf�cm, ft�lbf)
5.5 (56, 49 in.´lbf)
± EXTERIOR/INTERIOR TRIMFUEL LID LOCK CONTROL ASSY
76±13
AVENSIS REPAIR MANUAL (RM1018E)
Page 3400 of 5135
B66315
B66315
75±46
±
ENGINE HOOD/DOOR BACK DOOR(WAGON MODELS)
AVENSIS REPAIR MANUAL (RM1018E)
9.REMOVE BACK DOOR LOCK ASSY
(a)Disconnect the door lock connector.
(b)Remove the 3 bolts and door lock.
10.BACK DOOR STAY ASSY LH (See page 65±26)
11.BACK DOOR STAY ASSY RH (See page 65±26) 12. INSTALL BACK DOOR LOCK ASSY
(a) Install the door lock with the 3 bolts.Torque: 8.0 N �m (82 kgf �cm, 71 in. �lbf)
(b) Connect the door lock connector.