Page 5058 of 5135
A62150
Camshaft No. 2
Camshaft
A62825
62 4 8
51 3 7 11
10
9
A10079
A62170
Set KeyUpward
A62171
Yellow
Color Link
Timing Mark
– ENGINE MECHANICALCYLINDER HEAD GASKET (1ZZ–FE/3ZZ–FE)(From
February, 2004)14–39
AVENSIS REPAIR MANUAL SUPPLEMENT
(RM1098E)
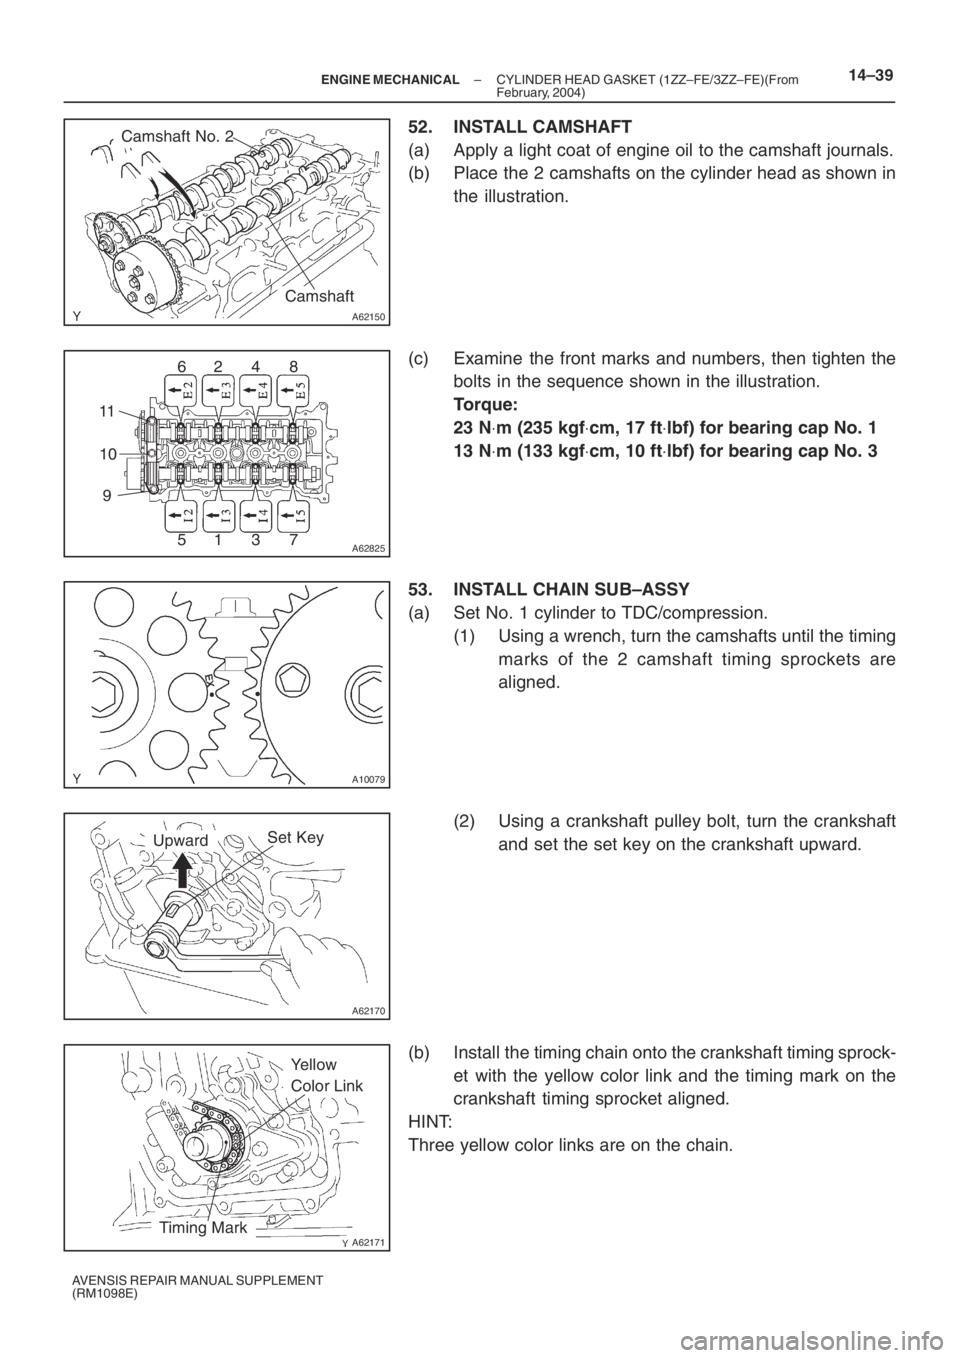
52. INSTALL CAMSHAFT
(a) Apply a light coat of engine oil to the camshaft journals.
(b) Place the 2 camshafts on the cylinder head as shown in
the illustration.
(c) Examine the front marks and numbers, then tighten the
bolts in the sequence shown in the illustration.
Torque:
23 N⋅m (235 kgf⋅cm, 17 ft⋅lbf) for bearing cap No. 1
13 N⋅m (133 kgf⋅cm, 10 ft⋅lbf) for bearing cap No. 3
53. INSTALL CHAIN SUB–ASSY
(a) Set No. 1 cylinder to TDC/compression.
(1) Using a wrench, turn the camshafts until the timing
marks of the 2 camshaft timing sprockets are
aligned.
(2) Using a crankshaft pulley bolt, turn the crankshaft
and set the set key on the crankshaft upward.
(b) Install the timing chain onto the crankshaft timing sprock-
et with the yellow color link and the timing mark on the
crankshaft timing sprocket aligned.
HINT:
Three yellow color links are on the chain.
Page 5059 of 5135
A62172
SST
A62173
Yellow Color Mark
Timing Mark
A30867
A62174
SST
A62175
Seal Width
4 to 5 mm
Seal Packing
14–40– ENGINE MECHANICALCYLINDER HEAD GASKET (1ZZ–FE/3ZZ–FE)(From
February, 2004)
AVENSIS REPAIR MANUAL SUPPLEMENT
(RM1098E)
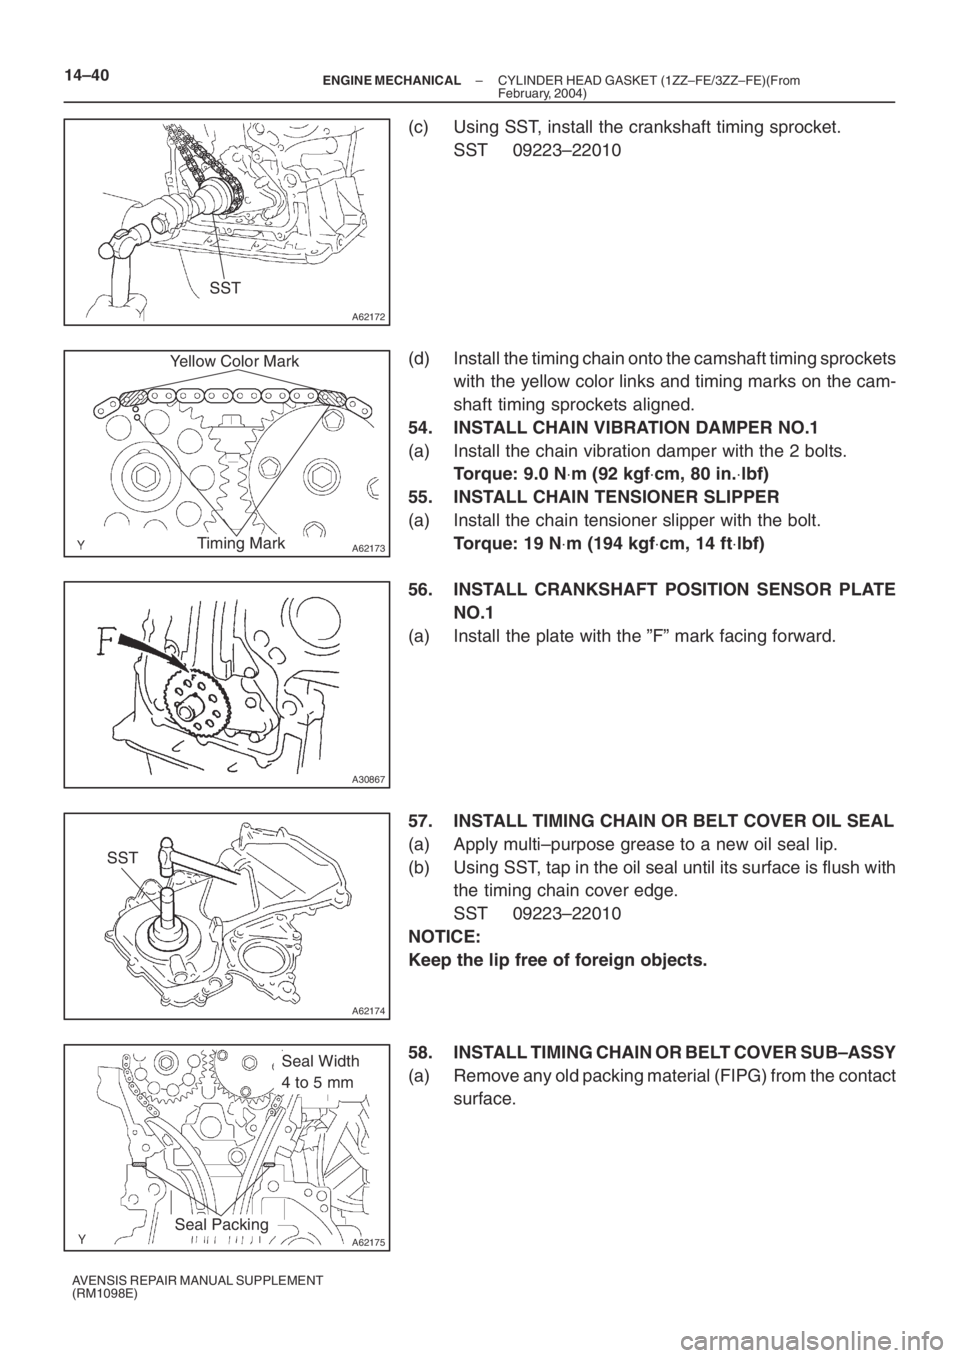
(c) Using SST, install the crankshaft timing sprocket.
SST 09223–22010
(d) Install the timing chain onto the camshaft timing sprockets
with the yellow color links and timing marks on the cam-
shaft timing sprockets aligned.
54. INSTALL CHAIN VIBRATION DAMPER NO.1
(a) Install the chain vibration damper with the 2 bolts.
Torque: 9.0 N⋅m (92 kgf⋅cm, 80 in.⋅lbf)
55. INSTALL CHAIN TENSIONER SLIPPER
(a) Install the chain tensioner slipper with the bolt.
Torque: 19 N⋅m (194 kgf⋅cm, 14 ft⋅lbf)
56. INSTALL CRANKSHAFT POSITION SENSOR PLATE
NO.1
(a) Install the plate with the ”F” mark facing forward.
57. INSTALL TIMING CHAIN OR BELT COVER OIL SEAL
(a) Apply multi–purpose grease to a new oil seal lip.
(b) Using SST, tap in the oil seal until its surface is flush with
the timing chain cover edge.
SST 09223–22010
NOTICE:
Keep the lip free of foreign objects.
58. INSTALL TIMING CHAIN OR BELT COVER SUB–ASSY
(a) Remove any old packing material (FIPG) from the contact
surface.
Page 5060 of 5135
A65676
Timing Chain Cover Side:
3 (0.118)3 (0.118)
A
A’BB’
C
C’
7 (0.276)
4.5 (0.177)
12 (0.472)6 (0.236)
3 (0.118)
Width 4 (0.157)
A – A’B – B’
C – C’
08826–00100 or equivalent
08826–00080 or equivalent
(mm (in.))
A65677
A
A
AA
A
A
AAA B
B
B
– ENGINE MECHANICALCYLINDER HEAD GASKET (1ZZ–FE/3ZZ–FE)(From
February, 2004)14–41
AVENSIS REPAIR MANUAL SUPPLEMENT
(RM1098E)
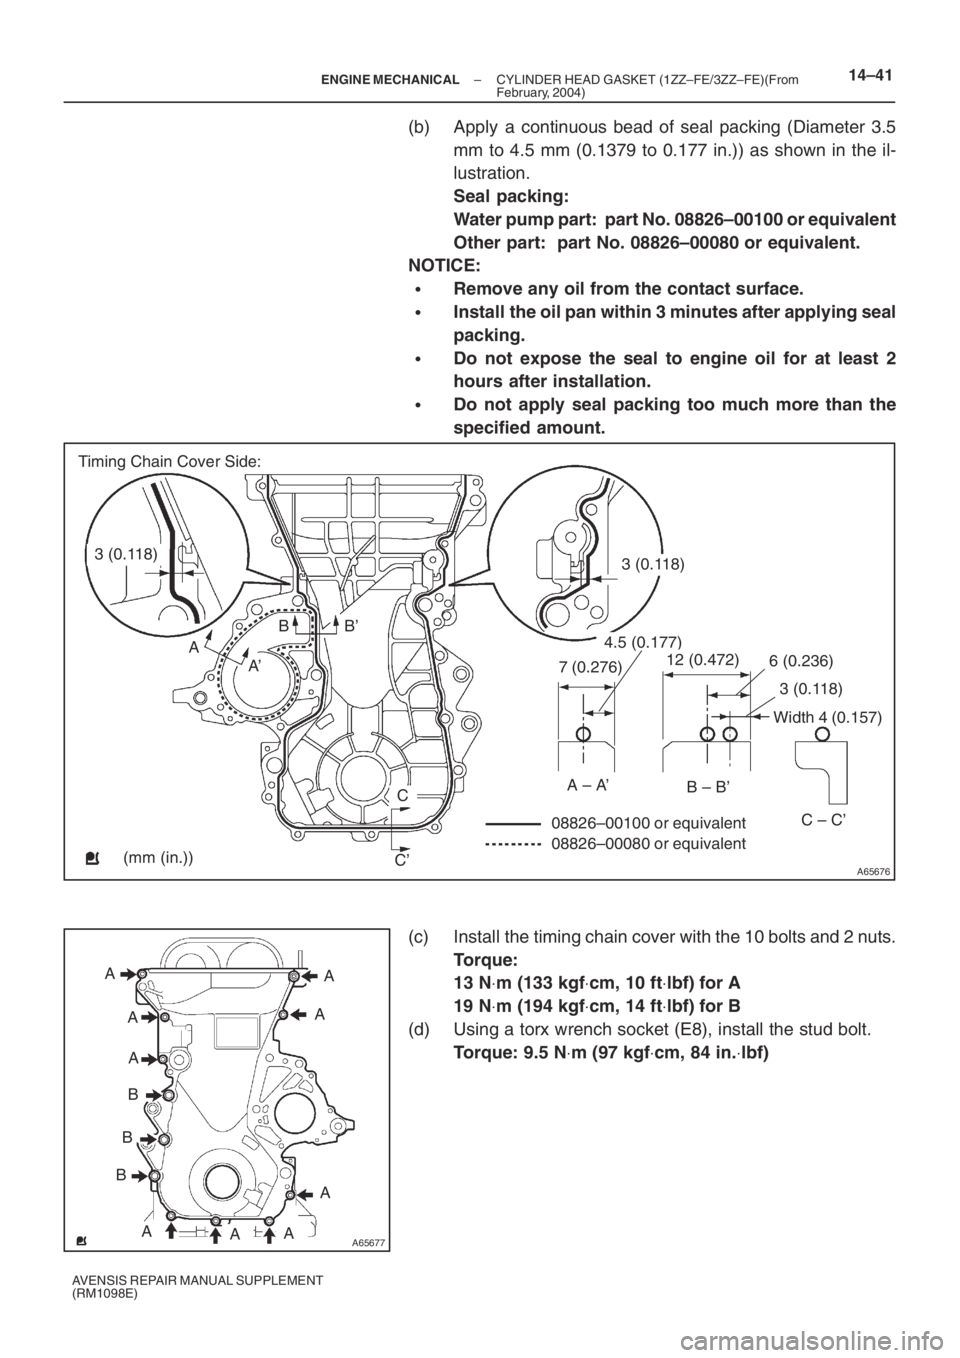
(b) Apply a continuous bead of seal packing (Diameter 3.5
mm to 4.5 mm (0.1379 to 0.177 in.)) as shown in the il-
lustration.
Seal packing:
Water pump part: part No. 08826–00100 or equivalent
Other part: part No. 08826–00080 or equivalent.
NOTICE:
�Remove any oil from the contact surface.
�Install the oil pan within 3 minutes after applying seal
packing.
�Do not expose the seal to engine oil for at least 2
hours after installation.
�Do not apply seal packing too much more than the
specified amount.
(c) Install the timing chain cover with the 10 bolts and 2 nuts.
Torque:
13 N⋅m (133 kgf⋅cm, 10 ft⋅lbf) for A
19 N⋅m (194 kgf⋅cm, 14 ft⋅lbf) for B
(d) Using a torx wrench socket (E8), install the stud bolt.
Torque: 9.5 N⋅m (97 kgf⋅cm, 84 in.⋅lbf)
Page 5061 of 5135
A62177
Raise
Push
Hook
Pin
A62178
Push
A76692
A12816
A11858
14–42– ENGINE MECHANICALCYLINDER HEAD GASKET (1ZZ–FE/3ZZ–FE)(From
February, 2004)
AVENSIS REPAIR MANUAL SUPPLEMENT
(RM1098E)
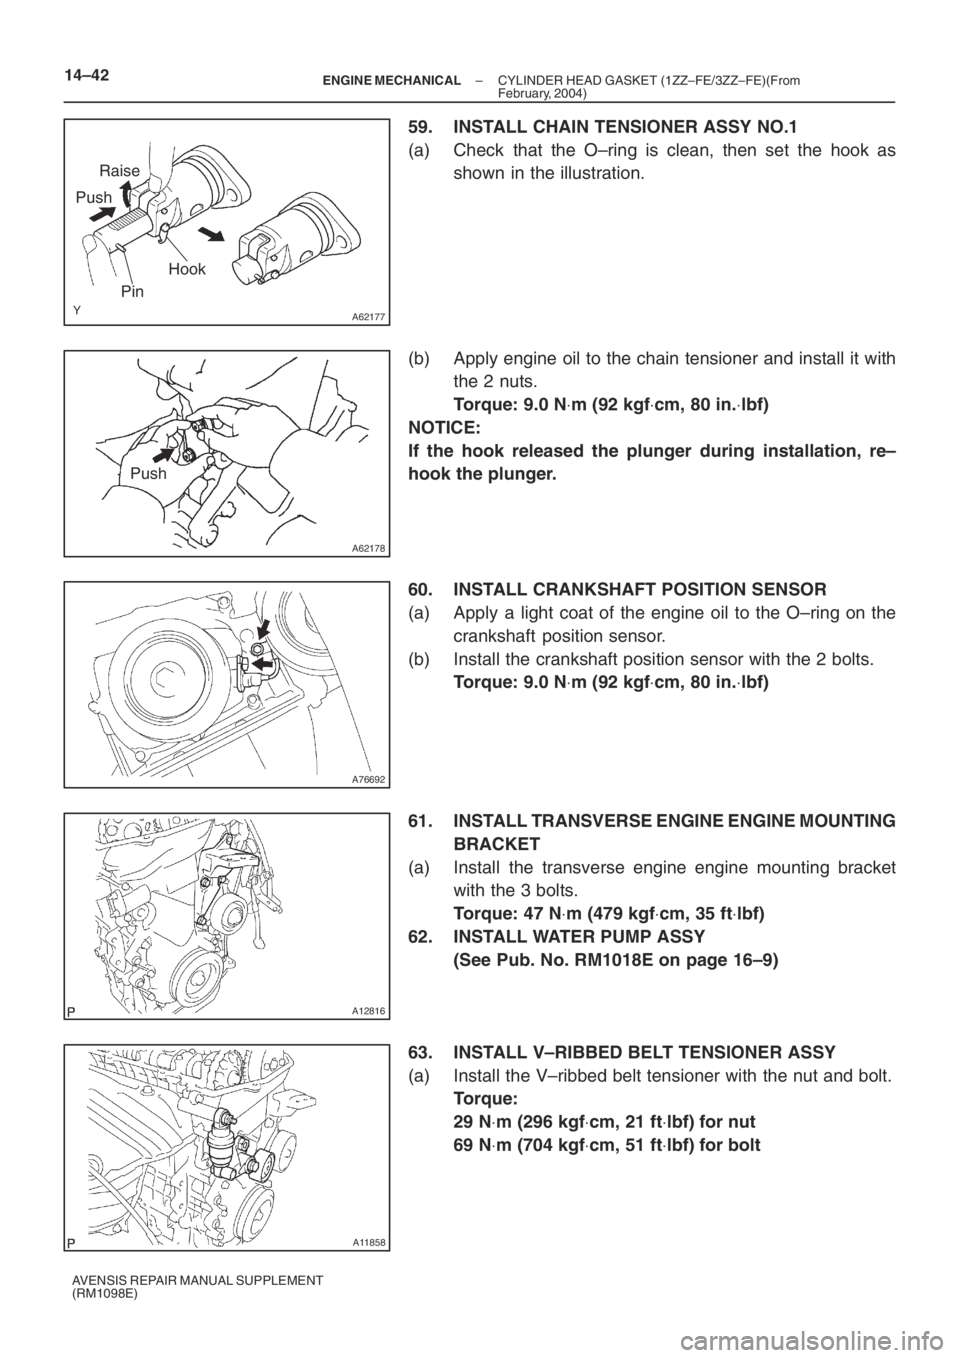
59. INSTALL CHAIN TENSIONER ASSY NO.1
(a) Check that the O–ring is clean, then set the hook as
shown in the illustration.
(b) Apply engine oil to the chain tensioner and install it with
the 2 nuts.
Torque: 9.0 N⋅m (92 kgf⋅cm, 80 in.⋅lbf)
NOTICE:
If the hook released the plunger during installation, re–
hook the plunger.
60. INSTALL CRANKSHAFT POSITION SENSOR
(a) Apply a light coat of the engine oil to the O–ring on the
crankshaft position sensor.
(b) Install the crankshaft position sensor with the 2 bolts.
Torque: 9.0 N⋅m (92 kgf⋅cm, 80 in.⋅lbf)
61. INSTALL TRANSVERSE ENGINE ENGINE MOUNTING
BRACKET
(a) Install the transverse engine engine mounting bracket
with the 3 bolts.
Torque: 47 N⋅m (479 kgf⋅cm, 35 ft⋅lbf)
62. INSTALL WATER PUMP ASSY
(See Pub. No. RM1018E on page 16–9)
63. INSTALL V–RIBBED BELT TENSIONER ASSY
(a) Install the V–ribbed belt tensioner with the nut and bolt.
Torque:
29 N⋅m (296 kgf⋅cm, 21 ft⋅lbf) for nut
69 N⋅m (704 kgf⋅cm, 51 ft⋅lbf) for bolt
Page 5062 of 5135
A62837SST
A62180
Disconnect
Hook
Pin Turn
A62181
Plunger
Turn
Push
A62182
Seal Packing
– ENGINE MECHANICALCYLINDER HEAD GASKET (1ZZ–FE/3ZZ–FE)(From
February, 2004)14–43
AVENSIS REPAIR MANUAL SUPPLEMENT
(RM1098E)
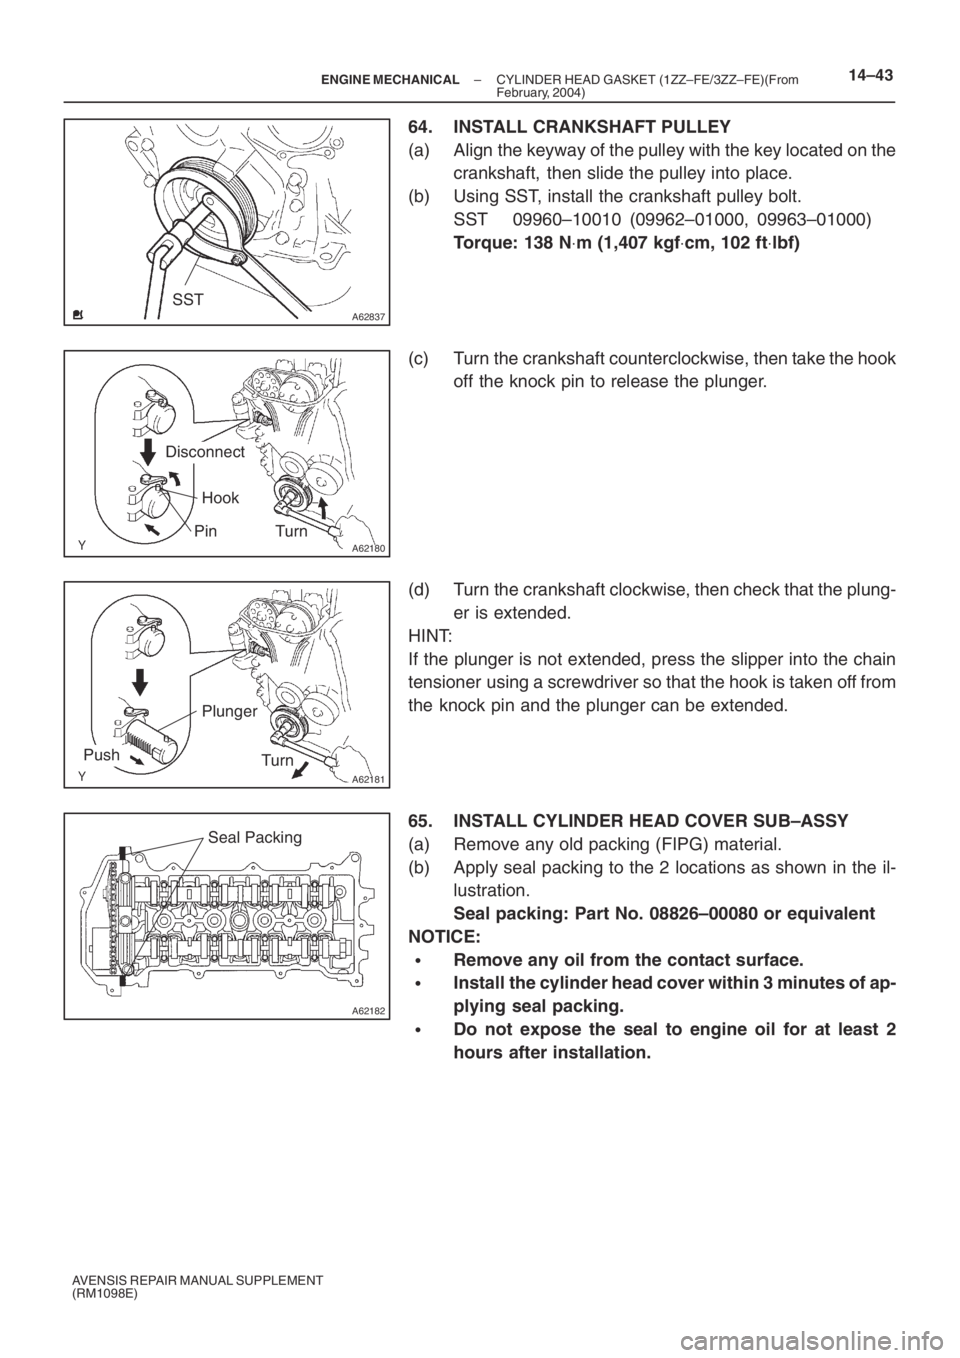
64. INSTALL CRANKSHAFT PULLEY
(a) Align the keyway of the pulley with the key located on the
crankshaft, then slide the pulley into place.
(b) Using SST, install the crankshaft pulley bolt.
SST 09960–10010 (09962–01000, 09963–01000)
Torque: 138 N⋅m (1,407 kgf⋅cm, 102 ft⋅lbf)
(c) Turn the crankshaft counterclockwise, then take the hook
off the knock pin to release the plunger.
(d) Turn the crankshaft clockwise, then check that the plung-
er is extended.
HINT:
If the plunger is not extended, press the slipper into the chain
tensioner using a screwdriver so that the hook is taken off from
the knock pin and the plunger can be extended.
65. INSTALL CYLINDER HEAD COVER SUB–ASSY
(a) Remove any old packing (FIPG) material.
(b) Apply seal packing to the 2 locations as shown in the il-
lustration.
Seal packing: Part No. 08826–00080 or equivalent
NOTICE:
�Remove any oil from the contact surface.
�Install the cylinder head cover within 3 minutes of ap-
plying seal packing.
�Do not expose the seal to engine oil for at least 2
hours after installation.
Page 5064 of 5135
B06777
A64026
A93668
A64023
A76713
– ENGINE MECHANICALCYLINDER HEAD GASKET (1ZZ–FE/3ZZ–FE)(From
February, 2004)14–45
AVENSIS REPAIR MANUAL SUPPLEMENT
(RM1098E)
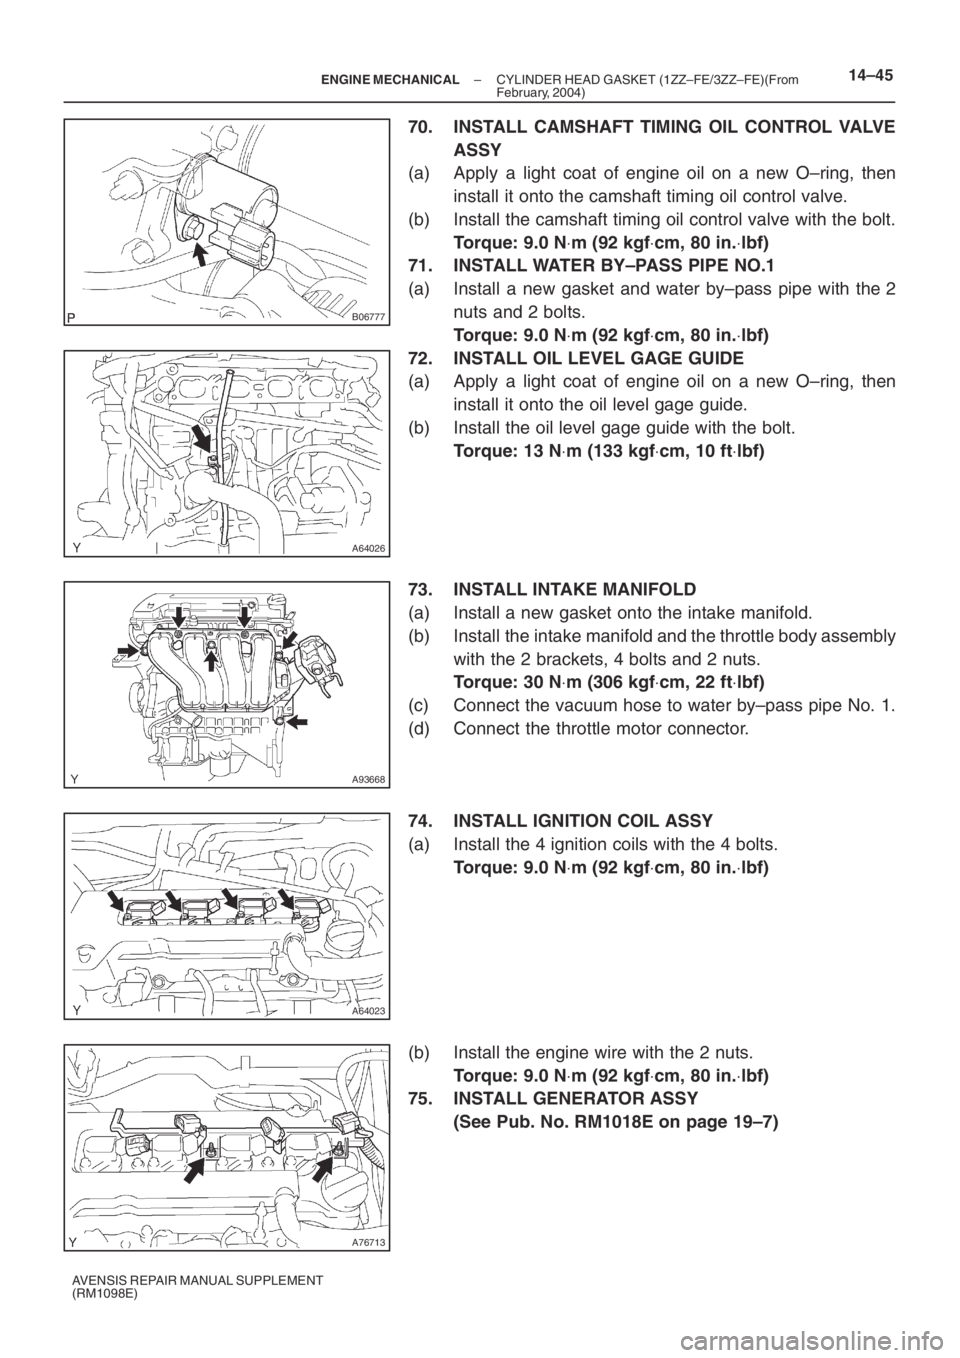
70. INSTALL CAMSHAFT TIMING OIL CONTROL VALVE
ASSY
(a) Apply a light coat of engine oil on a new O–ring, then
install it onto the camshaft timing oil control valve.
(b) Install the camshaft timing oil control valve with the bolt.
Torque: 9.0 N⋅m (92 kgf⋅cm, 80 in.⋅lbf)
71. INSTALL WATER BY–PASS PIPE NO.1
(a) Install a new gasket and water by–pass pipe with the 2
nuts and 2 bolts.
Torque: 9.0 N⋅m (92 kgf⋅cm, 80 in.⋅lbf)
72. INSTALL OIL LEVEL GAGE GUIDE
(a) Apply a light coat of engine oil on a new O–ring, then
install it onto the oil level gage guide.
(b) Install the oil level gage guide with the bolt.
Torque: 13 N⋅m (133 kgf⋅cm, 10 ft⋅lbf)
73. INSTALL INTAKE MANIFOLD
(a) Install a new gasket onto the intake manifold.
(b) Install the intake manifold and the throttle body assembly
with the 2 brackets, 4 bolts and 2 nuts.
Torque: 30 N⋅m (306 kgf⋅cm, 22 ft⋅lbf)
(c) Connect the vacuum hose to water by–pass pipe No. 1.
(d) Connect the throttle motor connector.
74. INSTALL IGNITION COIL ASSY
(a) Install the 4 ignition coils with the 4 bolts.
Torque: 9.0 N⋅m (92 kgf⋅cm, 80 in.⋅lbf)
(b) Install the engine wire with the 2 nuts.
Torque: 9.0 N⋅m (92 kgf⋅cm, 80 in.⋅lbf)
75. INSTALL GENERATOR ASSY
(See Pub. No. RM1018E on page 19–7)
Page 5065 of 5135
A96566
A93669
14–46–
ENGINE MECHANICAL CYLINDER HEAD GASKET (1ZZ–FE/3ZZ–FE)(From
February, 2004)
AVENSIS REPAIR MANUAL SUPPLEMENT
(RM1098E)
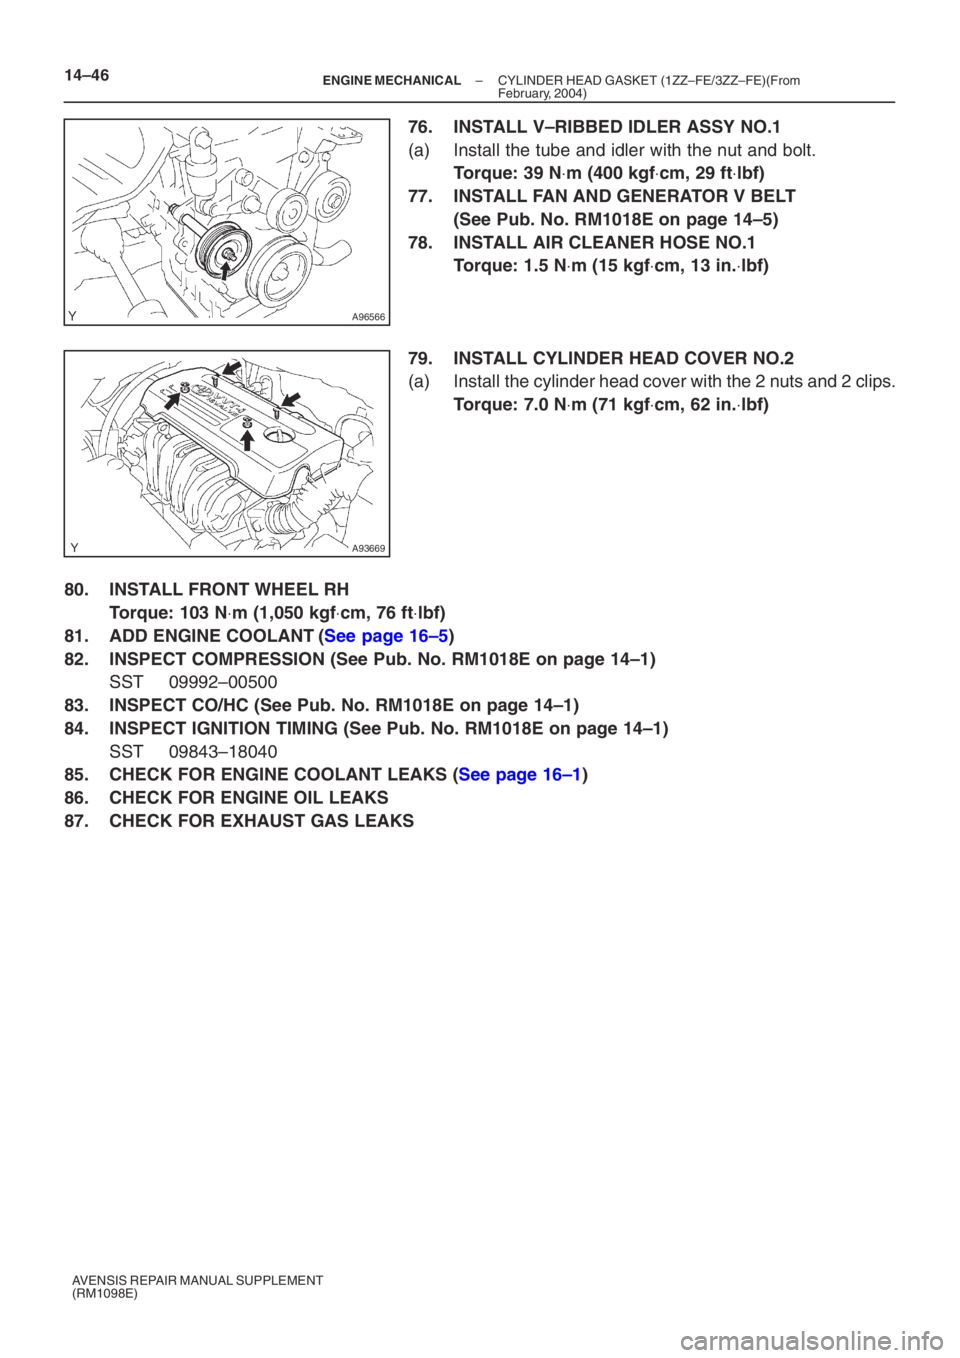
76. INSTALL V–RIBBED IDLER ASSY NO.1
(a) Install the tube and idler with the nut and bolt.
Torque: 39 N ⋅m (400 kgf ⋅cm, 29 ft ⋅lbf)
77. INSTALL FAN AND GENERATOR V BELT
(See Pub. No. RM1018E on page 14–5)
78. INSTALL AIR CLEANER HOSE NO.1
Torque: 1.5 N ⋅m (15 kgf ⋅cm, 13 in. ⋅lbf)
79. INSTALL CYLINDER HEAD COVER NO.2
(a) Install the cylinder head cover with the 2 nuts and 2 clips.
Torque: 7.0 N ⋅m (71 kgf ⋅cm, 62 in. ⋅lbf)
80. INSTALL FRONT WHEEL RH
Torque: 103 N ⋅m (1,050 kgf ⋅cm, 76 ft ⋅lbf)
81. ADD ENGINE COOLANT (See page 16–5)
82. INSPECT COMPRESSION (See Pub. No. RM1018E on page 14–1)
SST 09992–00500
83. INSPECT CO/HC (See Pub. No. RM1018E on page 14–1)
84. INSPECT IGNITION TIMING (See Pub. No. RM1018E on page 14–1)
SST 09843–18040
85. CHECK FOR ENGINE COOLANT LEAKS (See page 16–1)
86. CHECK FOR ENGINE OIL LEAKS
87. CHECK FOR EXHAUST GAS LEAKS
Page 5067 of 5135
A78516
A93669
14–10–
ENGINE MECHANICAL PARTIAL ENGINE ASSY (1ZZ–FE/3ZZ–FE)(From
February, 2004)
AVENSIS REPAIR MANUAL SUPPLEMENT
(RM1098E)
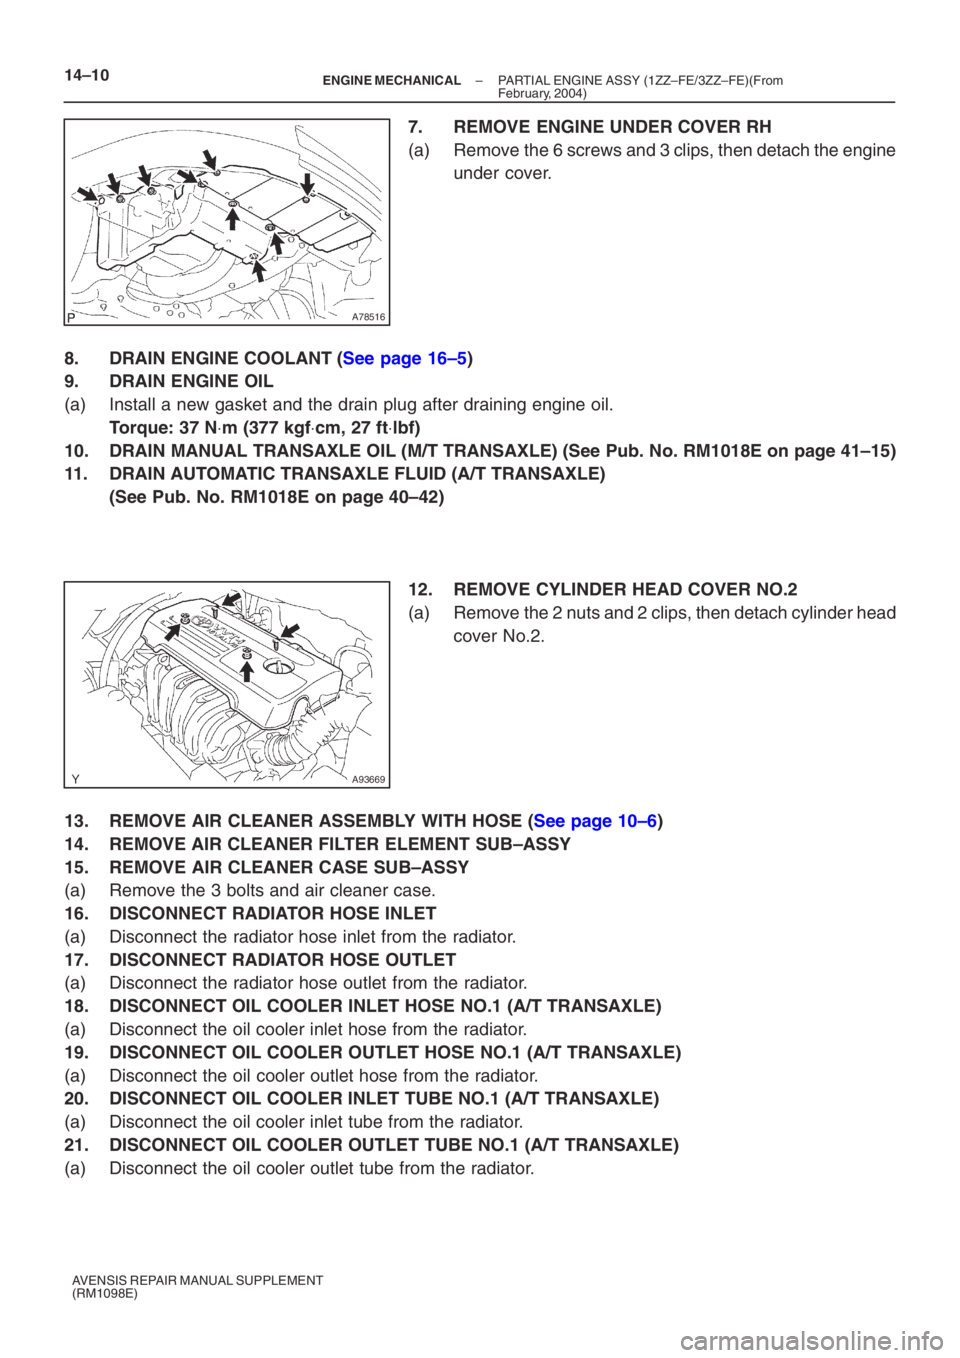
7. REMOVE ENGINE UNDER COVER RH
(a) Remove the 6 screws and 3 clips, then detach the engine under cover.
8. DRAIN ENGINE COOLANT (See page 16–5)
9. DRAIN ENGINE OIL
(a) Install a new gasket and the drain plug after draining engine oil.
Torque: 37 N ⋅m (377 kgf ⋅cm, 27 ft ⋅lbf)
10. DRAIN MANUAL TRANSAXLE OIL (M/T TRANSAXLE) (See Pub. No. RM1018E on p\
age 41–15)
11. DRAIN AUTOMATIC TRANSAXLE FLUID (A/T TRANSAXLE)
(See Pub. No. RM1018E on page 40–42)
12. REMOVE CYLINDER HEAD COVER NO.2
(a) Remove the 2 nuts and 2 clips, then detach cylinder head
cover No.2.
13. REMOVE AIR CLEANER ASSEMBLY WITH HOSE (See page 10–6)
14. REMOVE AIR CLEANER FILTER ELEMENT SUB–ASSY
15. REMOVE AIR CLEANER CASE SUB–ASSY
(a) Remove the 3 bolts and air cleaner case.
16. DISCONNECT RADIATOR HOSE INLET
(a) Disconnect the radiator hose inlet from the radiator.
17. DISCONNECT RADIATOR HOSE OUTLET
(a) Disconnect the radiator hose outlet from the radiator.
18. DISCONNECT OIL COOLER INLET HOSE NO.1 (A/T TRANSAXLE)
(a) Disconnect the oil cooler inlet hose from the radiator.
19. DISCONNECT OIL COOLER OUTLET HOSE NO.1 (A/T TRANSAXLE)
(a) Disconnect the oil cooler outlet hose from the radiator.
20. DISCONNECT OIL COOLER INLET TUBE NO.1 (A/T TRANSAXLE)
(a) Disconnect the oil cooler inlet tube from the radiator.
21. DISCONNECT OIL COOLER OUTLET TUBE NO.1 (A/T TRANSAXLE)
(a) Disconnect the oil cooler outlet tube from the radiator.