Page 286 of 5135

A73303
Crankshaft Position Sensor C6
��
A66132
Wire Harness Side
NE+
NE±
Crankshaft Position Sensor Connector
C6
A65743NE± NE+
E13
ECM Connector
05±86
± DIAGNOSTICSSFI SYSTEM (1ZZ±FE/3ZZ±FE)
AVENSIS REPAIR MANUAL (RM1018E)
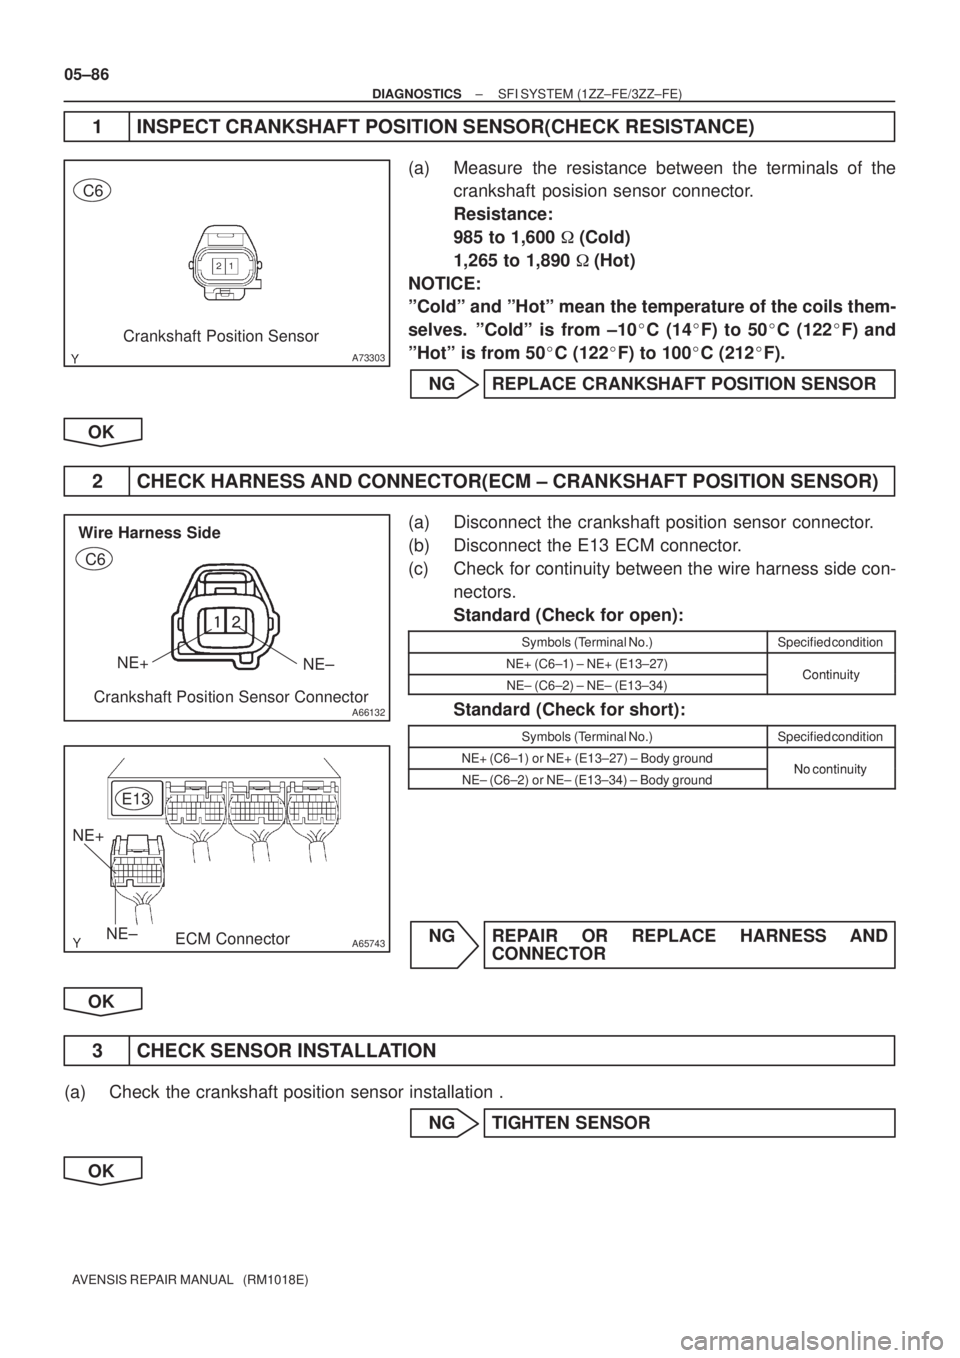
1 INSPECT CRANKSHAFT POSITION SENSOR(CHECK RESISTANCE)
(a) Measure the resistance between the terminals of the
crankshaft posision sensor connector.
Resistance:
985 to 1,600 � (Cold)
1,265 to 1,890 �(Hot)
NOTICE:
ºColdº and ºHotº mean the temperature of the coils them-
selves. ºColdº is from ±10�C (14�F) to 50�C (122�F) and
ºHotº is from 50�C (122�F) to 100�C (212�F).
NG REPLACE CRANKSHAFT POSITION SENSOR
OK
2 CHECK HARNESS AND CONNECTOR(ECM ± CRANKSHAFT POSITION SENSOR)
(a) Disconnect the crankshaft position sensor connector.
(b) Disconnect the E13 ECM connector.
(c) Check for continuity between the wire harness side con-
nectors.
Standard (Check for open):
Symbols (Terminal No.)Specified condition
NE+ (C6±1) ± NE+ (E13±27)ContinuityNE± (C6±2) ± NE± (E13±34)Continuity
Standard (Check for short):
Symbols (Terminal No.)Specified condition
NE+ (C6±1) or NE+ (E13±27) ± Body groundNo continuityNE± (C6±2) or NE± (E13±34) ± Body groundNo continuity
NG REPAIR OR REPLACE HARNESS AND
CONNECTOR
OK
3 CHECK SENSOR INSTALLATION
(a) Check the crankshaft position sensor installation .
NG TIGHTEN SENSOR
OK
Page 287 of 5135
±
DIAGNOSTICS SFI SYSTEM(1ZZ±FE/3ZZ±FE)
05±87
AVENSIS REPAIR MANUAL (RM1018E)
4INSPECT CRANKSHAFT(TEETH OF SIGNAL PLATE)
(a)Remove the oil pump assembly. (See page 17±3)
(b) Check the teeth of the signal plate.
NG REPAIR OR REPLACE CRANKSHAFT
OK
CHECK AND REPLACE ECM (See page 01±32)
Page 294 of 5135
05C6O±01
A76850
Combination Meter
Fuel Pump
DLC3
Circuit Opening Relay
Engine Room J/B No.1
Engine Room R/B No.1 Variable Resister (*1)
ECM
VSV (EVAP)
Mass Air Flow Meter
Engine Room J/B No.4
Engine Room R/B No.4
Idle Speed Control Valve
Canshaft Position Sensor
Engine Coolamt
Temperature SensorThrottle Body
Knock Sensor
Neutral Start Switch Injector Camshaft Oil Control Valve
Ignition Coli and Igniter
Crank Position Sensor
A/F Sensor
(Bank 1 Sensor 1)
Heated Oxygen Sensor
(Bank 1 Sensor 2) A/F Sensor
(Bank 2 Sensor 1)
Heated Oxygen Sensor
(Bank 2 Sensor 2)
*1: Leaded Only
± DIAGNOSTICSSFI SYSTEM (1AZ±FE)
05±165
AVENSIS REPAIR MANUAL (RM1018E)
LOCATION
Page 295 of 5135

05C6N±01
±
DIAGNOSTICS SFI SYSTEM(1AZ±FE)
05±161
AVENSIS REPAIR MANUAL (RM1018E)
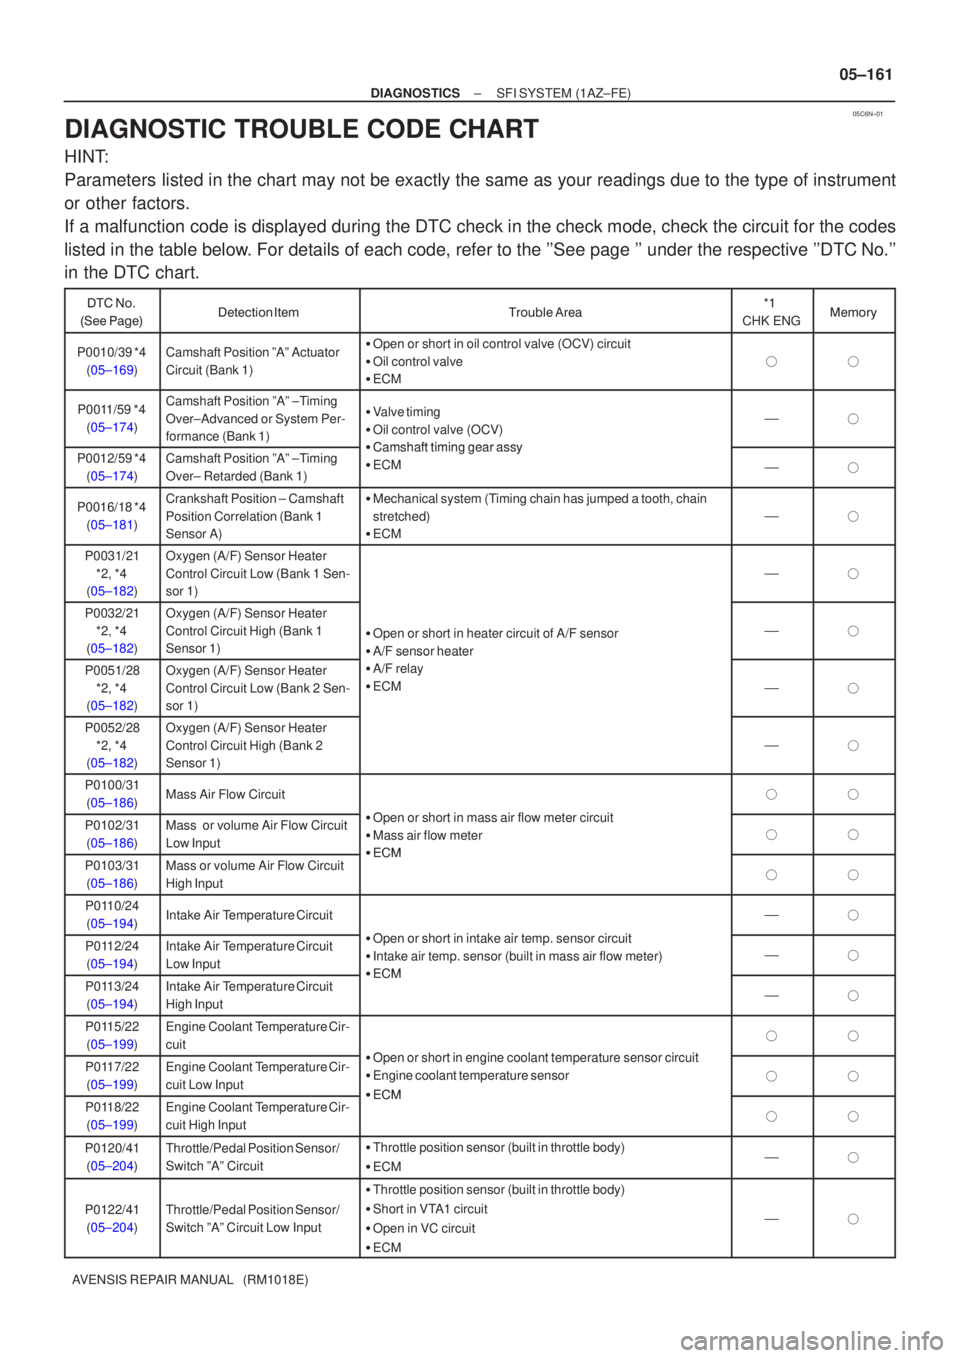
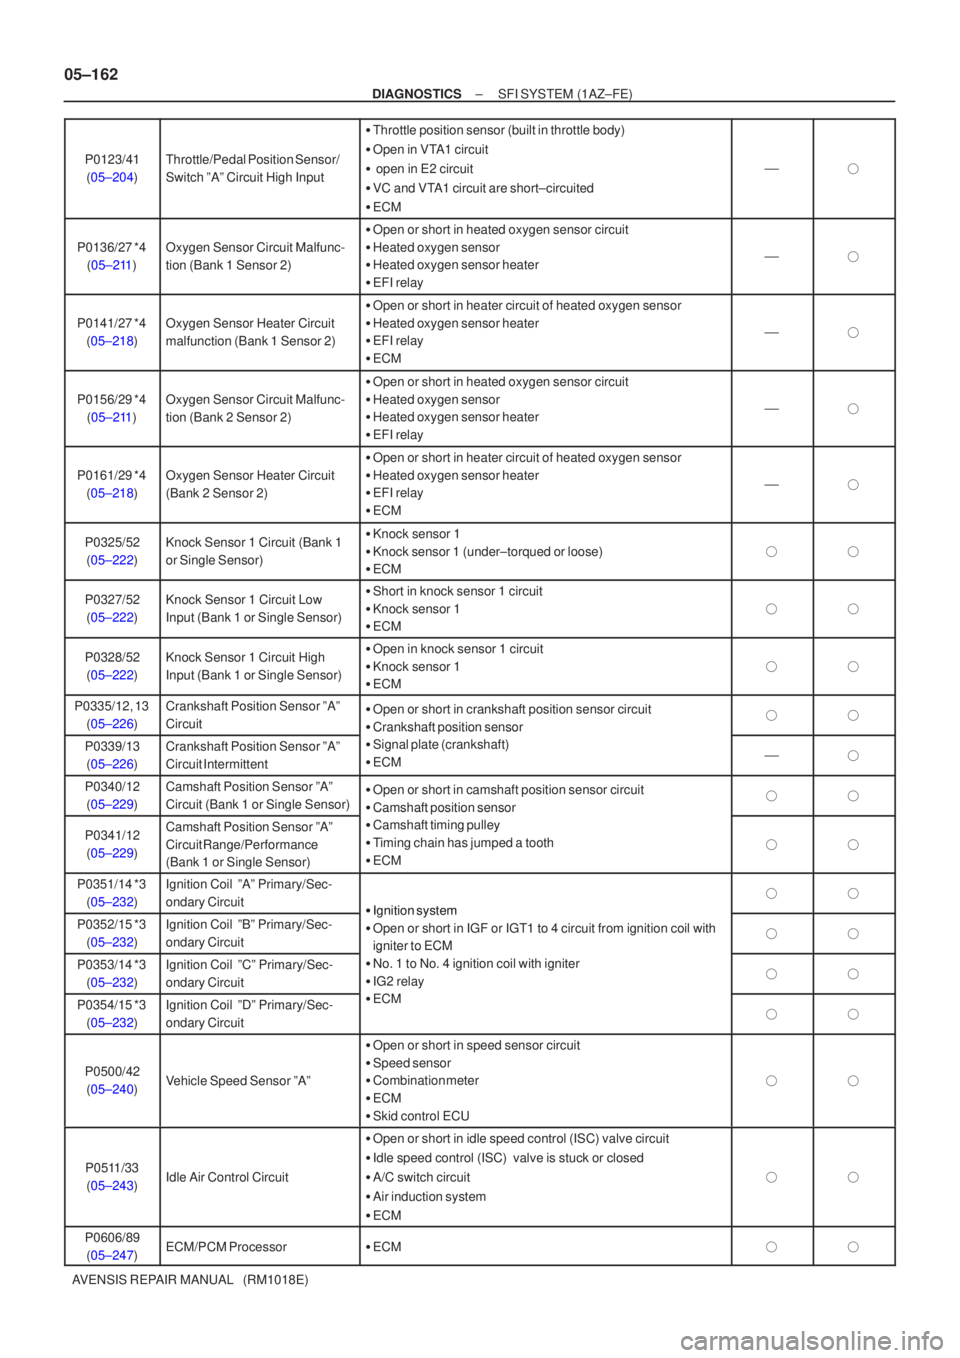
DIAGNOSTIC TROUBLE CODE CHART
HINT:
Parameters listed in the chart may not be exactly the same as your readings due to\
the type of instrument
or other factors.�
If a malfunction code is displayed during the DTC check in the check mode, check the circuit f\
or the codes
listed in the table below. For details of each code, refer to the ''See page '' under the respective ''DTC No.''
in the DTC chart.
�
�
��
�\f���������������� \b���
������ ����*1
CHK ENG �����
P0010/39 *4 (05±169)Camshaft Position ºAº Actuator
Circuit (Bank 1)�Open or short in oil control valve (OCV) circuit
� Oil control valve
� ECM
��
P0011/59 *4
(05±174)Camshaft Position ºAº ±Timing
Over±Advanced or System Per-
formance (Bank 1)�Valve timing
� Oil control valve (OCV)
�Camshaft timing gear assy
��
P0012/59 *4
(05±174)Camshaft Position ºAº ±Timing
Over± Retarded (Bank 1)�Camshaft timing gear assy
� ECM
��
P0016/18 *4
(05±181)Crankshaft Position ± Camshaft
Position Correlation (Bank 1
Sensor A)�Mechanical system (Timing chain has jumped a tooth, chain
stretched)
� ECM
��
P0031/21
*2, *4
(05±182)Oxygen (A/F) Sensor Heater
Control Circuit Low (Bank 1 Sen-
sor 1)
��
P0032/21
*2, *4
(05±182)Oxygen (A/F) Sensor Heater
Control Circuit High (Bank 1
Sensor 1)
� Open or short in heater circuit of A/F sensor
� A/F sensor heater��
P0051/28
*2, *4
(05±182)Oxygen (A/F) Sensor Heater
Control Circuit Low (Bank 2 Sen-
sor 1)
A/F sensor heater
� A/F relay
� ECM
��
P0052/28
*2, *4
(05±182)Oxygen (A/F) Sensor Heater
Control Circuit High (Bank 2
Sensor 1)
��
P0100/31
(05±186)Mass Air Flow Circuit
Ohti ifltiit
��
P0102/31(05±186)Mass or volume Air Flow Circuit
Low Input� Open or short in mass air flow meter circuit
� Mass air flow meter
�ECM
��
P0103/31
(05±186)Mass or volume Air Flow Circuit
High Input�ECM
��
P0110/24(05±194)Intake Air Temperature Circuit
O h ti itk it i it
��
P0112/24(05±194)Intake Air Temperature Circuit
Low Input� Open or short in intake air temp. sensor circuit
� Intake air temp. sensor (built in mass air flow meter)
�ECM
��
P0113/24
(05±194)Intake Air Temperature Circuit
High Input�ECM
��
P0115/22(05±199)Engine Coolant Temperature Cir-
cuit
Open or short in engine coolant temperature sensor circuit
��
P0117/22(05±199)Engine Coolant Temperature Cir-
cuit Low Input� Open or short in engine coolant temperature sensor circuit
� Engine coolant temperature sensor
�ECM
��
P0118/22
(05±199)Engine Coolant Temperature Cir-
cuit High Input�ECM
��
P0120/41 (05±204)Throttle/Pedal Position Sensor/
Switch ºAº Circuit� Throttle position sensor (built in throttle body)
� ECM��
P0122/41
(05±204)Throttle/Pedal Position Sensor/
Switch ºAº Circuit Low Input
� Throttle position sensor (built in throttle body)
� Short in VTA1 circuit
� Open in VC circuit
� ECM
��
Page 296 of 5135

05±162
±
DIAGNOSTICS SFI SYSTEM (1AZ±FE)
AVENSIS REPAIR MANUAL (RM1018E) P0123/41
(05±204)
Throttle/Pedal Position Sensor/
Switch ºAº Circuit High Input
� Throttle position sensor (built in throttle body)
� Open in VTA1 circuit
� open in E2 circuit
� VC and VTA1 circuit are short±circuited
� ECM
��
P0136/27 *4
(05±211)Oxygen Sensor Circuit Malfunc-
tion (Bank 1 Sensor 2)
�Open or short in heated oxygen sensor circuit
� Heated oxygen sensor
� Heated oxygen sensor heater
� EFI relay
��
P0141/27 *4
(05±218)Oxygen Sensor Heater Circuit
malfunction (Bank 1 Sensor 2)
�Open or short in heater circuit of heated oxygen sensor
� Heated oxygen sensor heater
� EFI relay
� ECM
��
P0156/29 *4
(05±211)Oxygen Sensor Circuit Malfunc-
tion (Bank 2 Sensor 2)
�Open or short in heated oxygen sensor circuit
� Heated oxygen sensor
� Heated oxygen sensor heater
� EFI relay
��
P0161/29 *4
(05±218)Oxygen Sensor Heater Circuit
(Bank 2 Sensor 2)
�Open or short in heater circuit of heated oxygen sensor
� Heated oxygen sensor heater
� EFI relay
� ECM
��
P0325/52
(05±222)Knock Sensor 1 Circuit (Bank 1
or Single Sensor)� Knock sensor 1
� Knock sensor 1 (under±torqued or loose)
� ECM
��
P0327/52
(05±222)Knock Sensor 1 Circuit Low
Input (Bank 1 or Single Sensor)� Short in knock sensor 1 circuit
� Knock sensor 1
� ECM
��
P0328/52
(05±222)Knock Sensor 1 Circuit High
Input (Bank 1 or Single Sensor)� Open in knock sensor 1 circuit
� Knock sensor 1
� ECM
��
P0335/12, 13
(05±226)Crankshaft Position Sensor ºAº
Circuit�Open or short in crankshaft position sensor circuit
� Crankshaft position sensor��
P0339/13
(05±226)Crankshaft Position Sensor ºAº
Circuit Intermittent
Crankshaft osition sensor
� Signal plate (crankshaft)
� ECM��
P0340/12
(05±229)Camshaft Position Sensor ºAº
Circuit (Bank 1 or Single Sensor)� Open or short in camshaft position sensor circuit
� Camshaft position sensor��
P0341/12
(05±229)Camshaft Position Sensor ºAº
Circuit Range/Performance
(Bank 1 or Single Sensor)
Camshaft osition sensor
� Camshaft timing pulley
� Timing chain has jumped a tooth
� ECM
��
P0351/14 *3
(05±232)Ignition Coil ºAº Primary/Sec-
ondary Circuit
�Ignition system
��
P0352/15 *3(05±232)Ignition Coil ºBº Primary/Sec-
ondary Circuit�Ignition system
�Open or short in IGF or IGT1 to 4 circuit from ignition coil with
igniter to ECM��
P0353/14 *3
(05±232)Ignition Coil ºCº Primary/Sec-
ondary Circuit
igniter to ECM
�No. 1 to No. 4 ignition coil with igniter
� IG2 relay��
P0354/15 *3
(05±232)Ignition Coil ºDº Primary/Sec-
ondary Circuit�ECM��
P0500/42
(05±240)Vehicle Speed Sensor ºAº
� Open or short in speed sensor circuit
� Speed sensor
� Combination meter
� ECM
� Skid control ECU
��
P0511/33
(05±243)Idle Air Control Circuit
� Open or short in idle speed control (ISC) valve circuit
� Idle speed control (ISC) valve is stuck or closed
� A/C switch circuit
� Air induction system
� ECM
��
P0606/89
(05±247)ECM/PCM Processor� ECM��
Page 313 of 5135

A79082
53G±Y
L±B E9 10
4
5 W±B
BR F25
Fuel Pump ECM
B±W 12
FC
C8
Circuit
Opening Relay
From
Terminal 3 of
EFI Relay
(See Page 05±124)
G±Y
B±W
B±W
IB1 10 IC3
6
±
DIAGNOSTICS SFI SYSTEM(1ZZ±FE/3ZZ±FE)
05±131
AVENSIS REPAIR MANUAL (RM1018E)
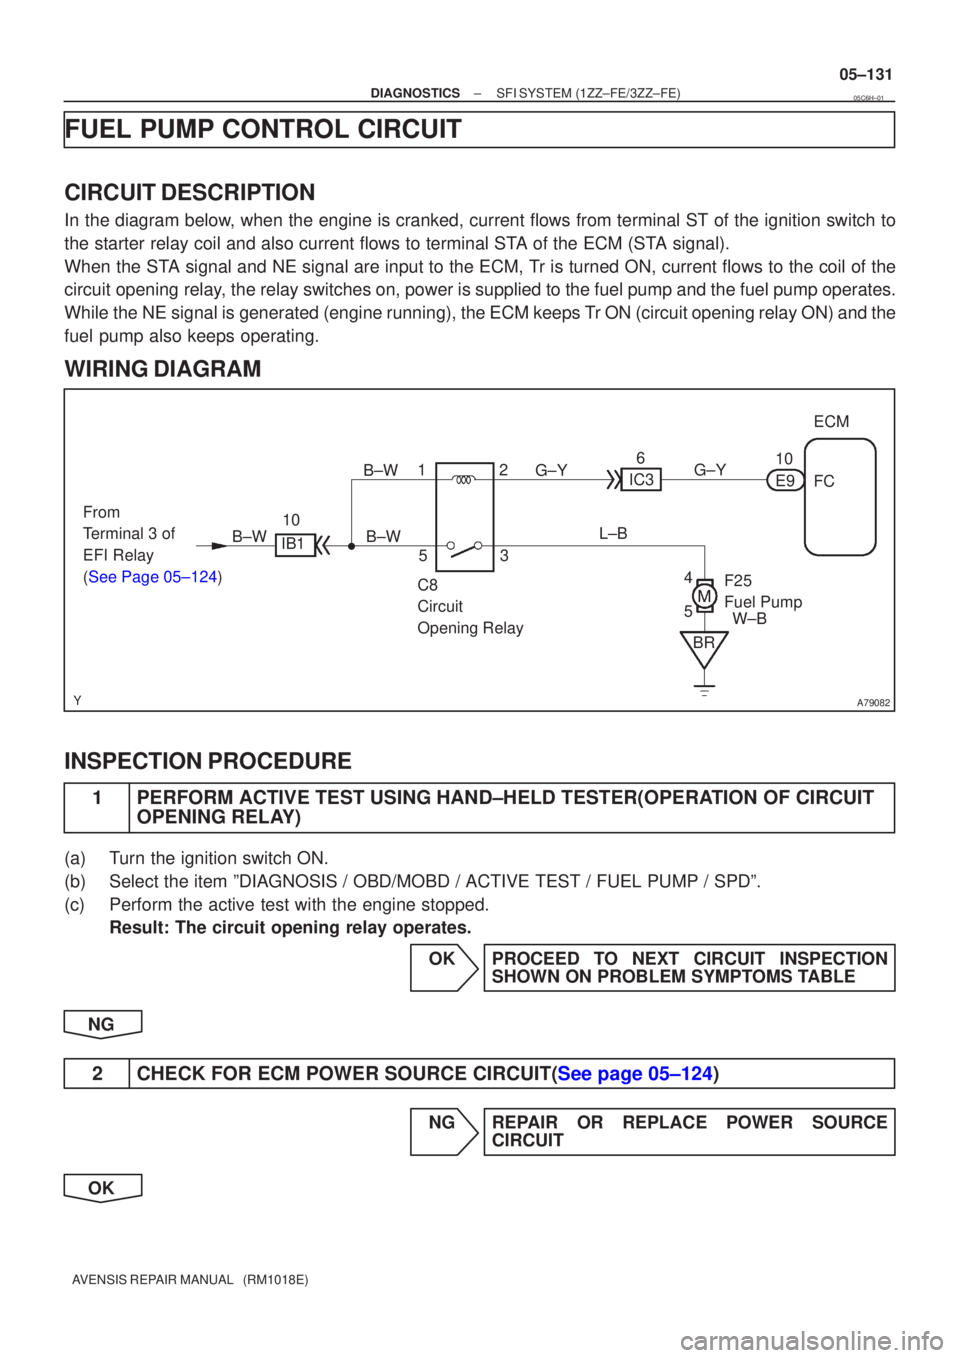
FUEL PUMP CONTROL CIRCUIT
CIRCUIT DESCRIPTION
In the diagram below, when the engine is cranked, current flows from terminal ST of the igni\
tion switch to
the starter relay coil and also current flows to terminal STA of the ECM (STA signal).
When the STA signal and NE signal are input to the ECM, Tr is turned ON, current flows to the coil of the
circuit opening relay, the relay switches on, power is supplied to the fuel pump and the fuel p\
ump operates.
While the NE signal is generated (engine running), the ECM keeps Tr ON (circuit opening relay ON) and the
fuel pump also keeps operating.
WIRING DIAGRAM
INSPECTION PROCEDURE
1PERFORM ACTIVE TEST USING HAND±HELD TESTER(OPERATION OF CIRCUIT
OPENING RELAY)
(a)Turn the ignition switch ON.
(b)Select the item ºDIAGNOSIS / OBD/MOBD / ACTIVE TEST / FUEL PUMP / SPD\
º.
(c)Perform the active test with the engine stopped.
Result: The circuit opening relay operates.
OKPROCEED TO NEXT CIRCUIT INSPECTIONSHOWN ON PROBLEM SYMPTOMS TABLE
NG
2CHECK FOR ECM POWER SOURCE CIRCUIT(See page 05±124)
NG REPAIR OR REPLACE POWER SOURCE CIRCUIT
OK
05C6H±01
Page 317 of 5135
05±124
± DIAGNOSTICSSFI SYSTEM (1ZZ±FE/3ZZ±FE)
AVENSIS REPAIR MANUAL (RM1018E)
ECM POWER SOURCE CIRCUIT
CIRCUIT DESCRIPTION
When the ignition switch is turned ON, battery positive voltage is applied to terminal IGSW of the ECM and
the EFI relay (Marking: EFI) control circuit in the ECM sends a signal to terminal MREL of the ECM switching
on the EFI relay.
This signal causes current to flow to the coil, closing the contacts of the EFI relay and supplying power to
terminal +B of the ECM.
If the ignition switch is turned off, the ECM continues to switch on the EFI relay for a maximum of 2 seconds
for the initial setting of the throttle valve.
05C6G±01
Page 318 of 5135
A79085
IE4
IP1
1 1 B±R
4
6
I13
Ignition Switch
B±RDH IGN
16 DL
2
Driver Side J/B
B±W
B
B±R 4
4
1
IG2
Relay
2
3 Engine Room
R/B No.4 ECM
4 4
5
111 B±Y
2
1 112
2
EFI
IG2
AM2
1A B±G Engine Room
R/B No.1 and
Engine Room
J/B No.1 R±B
EA1
8 8
MREL
E9
GR
IE1
2
GR
4
4
51
32 EFI
Relay
4 4
Engine Room
R/B No.4
W±B
W±B
1
1+B
E9
B±R
EC
To Injector
(See page 05±73)
To Ignition Coil
and Igniter
(See page 05±103)
B±R
B±R
EA1
IK1
8
12
Battery
FL MAIN
B±G Engine Room
J/B No.4
4A
4B
1
1
R±B
W±B EFI
No.1
Engine Room
R/B No.4
1 B±W
4
2 4
18
DA B±W
A
J26
Junction Connector
E
J27 B±W
E9IGSW
9
(*2) J8
Junction Connector
(*1) B±W
EH E1
7
E12
BR
(*2)
(*1)
C C
*1: RHD *2: LHD
(*1)
(*2)
±
DIAGNOSTICS SFI SYSTEM (1ZZ±FE/3ZZ±FE)
05±125
AVENSIS REPAIR MANUAL (RM1018E)
WIRING DIAGRAM