2005 SUZUKI JIMNY engine warning light
[x] Cancel search: engine warning lightPage 330 of 687

Downloaded from www.Manualslib.com manuals search engine ANTILOCK BRAKE SYSTEM (ABS) 5E-13
TERMINAL CIRCUIT
A1 Idle up signal
A2 Stop lamp switch
A3 Right front wheel speed sensor (+)
A4 Right front wheel speed sensor (–)
A5–
A6 Right rear wheel speed sensor (–)
A7 Right rear wheel speed sensor (+)
A8–
A9–
A10–
A11 G sensor signal
A12 Diagnosis switch terminal
A13 G sensor ground
A14“ABS” warning lamp
A15 Left front wheel speed sensor (+)
A16 Left front wheel speed sensor (–)
A17 4WD switch (for 4WD model only)
A18 Ignition switch
A19 Left rear wheel speed sensor (+)
A20 Left rear wheel speed sensor (–)
A21 Data link connector
A22 Ground (for ABS pump motor)
A23 ABS pump motor power supply
A24 Ground (for ABS control module)
A25 Solenoid valve power supply
Wire color
B : Black G/W : Green / White R/W : Red / White
B/BI : Black / Blue Lg/B : Light green / Black W/Bl : White / Blue
B/W : Black / White Lg/R : Light green / Red W/G : White / Green
B/Or : Black / Orange Or : Orange W/R : White / Red
Bl : Blue Or/B : Orange / Black Y : Yellow
Bl/W : Blue / White P/B : Pink / Black Y/B : Yellow / Black
G : Green P/G : Pink / Green
G/B : Green / Black R/Bl : Red / Blue
Page 331 of 687

Downloaded from www.Manualslib.com manuals search engine 5E-14 ANTILOCK BRAKE SYSTEM (ABS)
Table – A “ABS” Warning Lamp Circuit Check – Lamp Does Not Come “ON” at
Ignition Switch ON
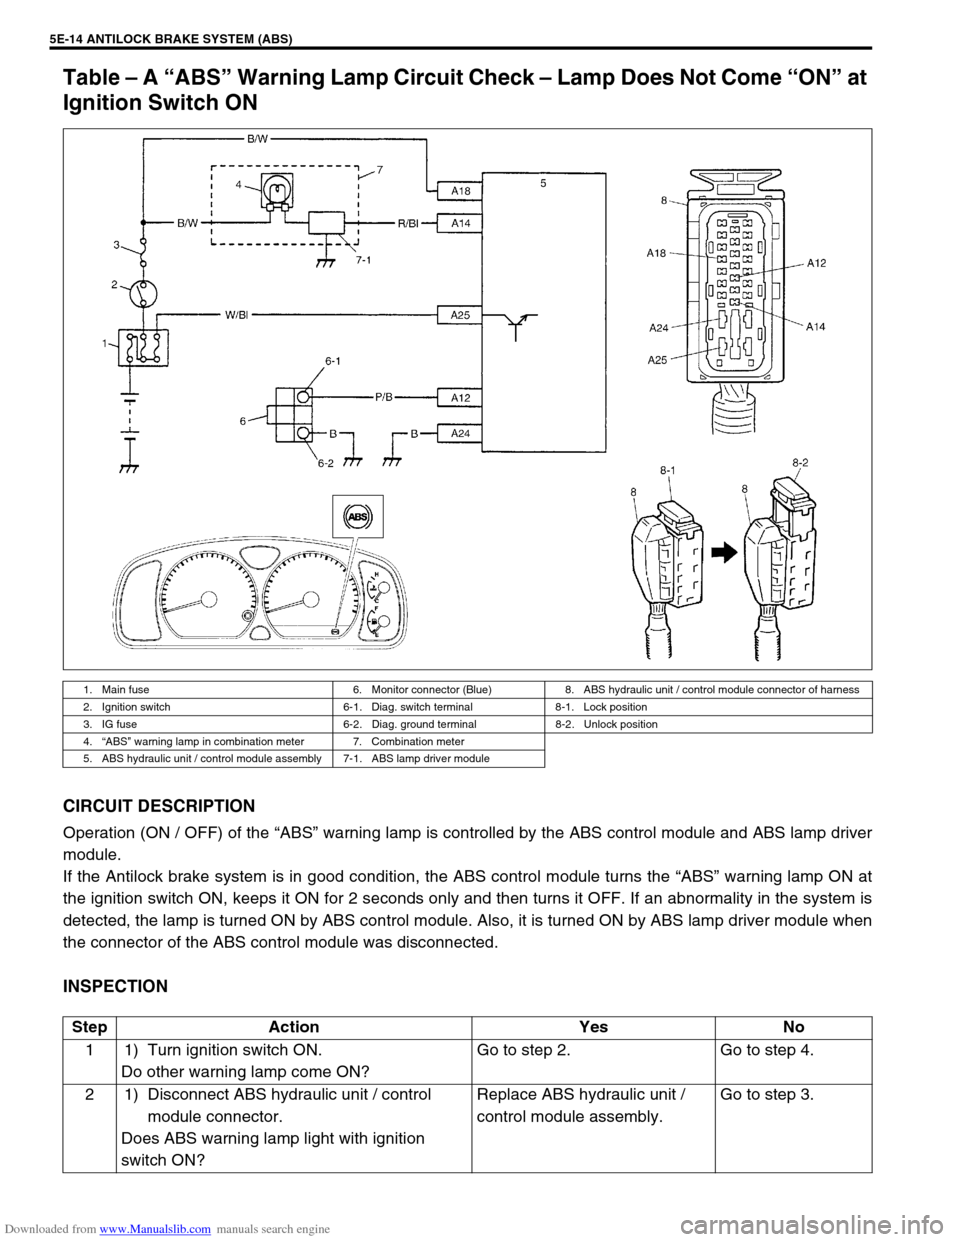
CIRCUIT DESCRIPTION
Operation (ON / OFF) of the “ABS” warning lamp is controlled by the ABS control module and ABS lamp driver
module.
If the Antilock brake system is in good condition, the ABS control module turns the “ABS” warning lamp ON at
the ignition switch ON, keeps it ON for 2 seconds only and then turns it OFF. If an abnormality in the system is
detected, the lamp is turned ON by ABS control module. Also, it is turned ON by ABS lamp driver module when
the connector of the ABS control module was disconnected.
INSPECTION
1. Main fuse 6. Monitor connector (Blue) 8. ABS hydraulic unit / control module connector of harness
2. Ignition switch 6-1. Diag. switch terminal 8-1. Lock position
3. IG fuse 6-2. Diag. ground terminal 8-2. Unlock position
4.“ABS” warning lamp in combination meter 7. Combination meter
5. ABS hydraulic unit / control module assembly 7-1. ABS lamp driver module
Step Action Yes No
1 1) Turn ignition switch ON.
Do other warning lamp come ON?Go to step 2. Go to step 4.
2 1) Disconnect ABS hydraulic unit / control
module connector.
Does ABS warning lamp light with ignition
switch ON?Replace ABS hydraulic unit /
control module assembly.Go to step 3.
Page 332 of 687

Downloaded from www.Manualslib.com manuals search engine ANTILOCK BRAKE SYSTEM (ABS) 5E-15
Table – B “ABS” Warning Lamp Circuit Check – Lamp Comes “ON” Steady
Refer to TABLE – A for System Circuit Diagram and Circuit Description.
INSPECTION
3 1) Remove combination meter.
Is bulb of ABS warning lamp in good condition?“R/Bl” circuit shorted to ground.
If OK, replace ABS warning cir-
cuit (lamp driver module).Replace bulb.
4 Is IG fuse in good condition? Open in “B/W” wire to combina-
tion meter or poor connection.Repair and replace. Step Action Yes No
Step Action Yes No
1 Perform diagnostic trouble code check. Is there
any DTC (including code No.12, NO CODES on
SUZUKI scan tool) exists?Go to step 2. Go to step 3.
2 Is malfunction DTC (other than code No.12)
exists at step 1?Go to step 7 of ABS diag-
nostic flow table in this
section.Go to step 3.
3 1) Disconnect ABS hydraulic unit / control
module connector.
2) Check for proper connection to ABS hydrau-
lic unit / control module connector at termi-
nals “A14” and “A18”.
3) If OK, turn ignition switch “ON” and mea-
sure voltage at terminal “A18” of connector.
Is it 10 – 14 V?Go to step 4.“B/W” circuit open.
4 1) With ABS control module connector discon-
nected, turn ignition switch ON and light
ABS warning lamp.
2) Connect terminal “A14” of disconnected
connector to ground using service wire.
Does “ABS warning lamp” turn off?Go to step 5.“R/Bl” circuit open.
If wire and connection are
OK, replace ABS lamp
driver module.
5 1) Measure resistance from connector termi-
nal “A24” to body ground.
Is continuity indicated?Substitute a known-good
ABS hydraulic unit / con-
trol module assembly and
recheck.“B” circuit open.
Page 400 of 687

Downloaded from www.Manualslib.com manuals search engine ENGINE GENERAL INFORMATION AND DIAGNOSIS 6-43
Table A-1 Malfunction Indicator Lamp Circuit Check - Lamp Does Not Come
“ON” at Ignition Switch ON (But Engine at Stop)
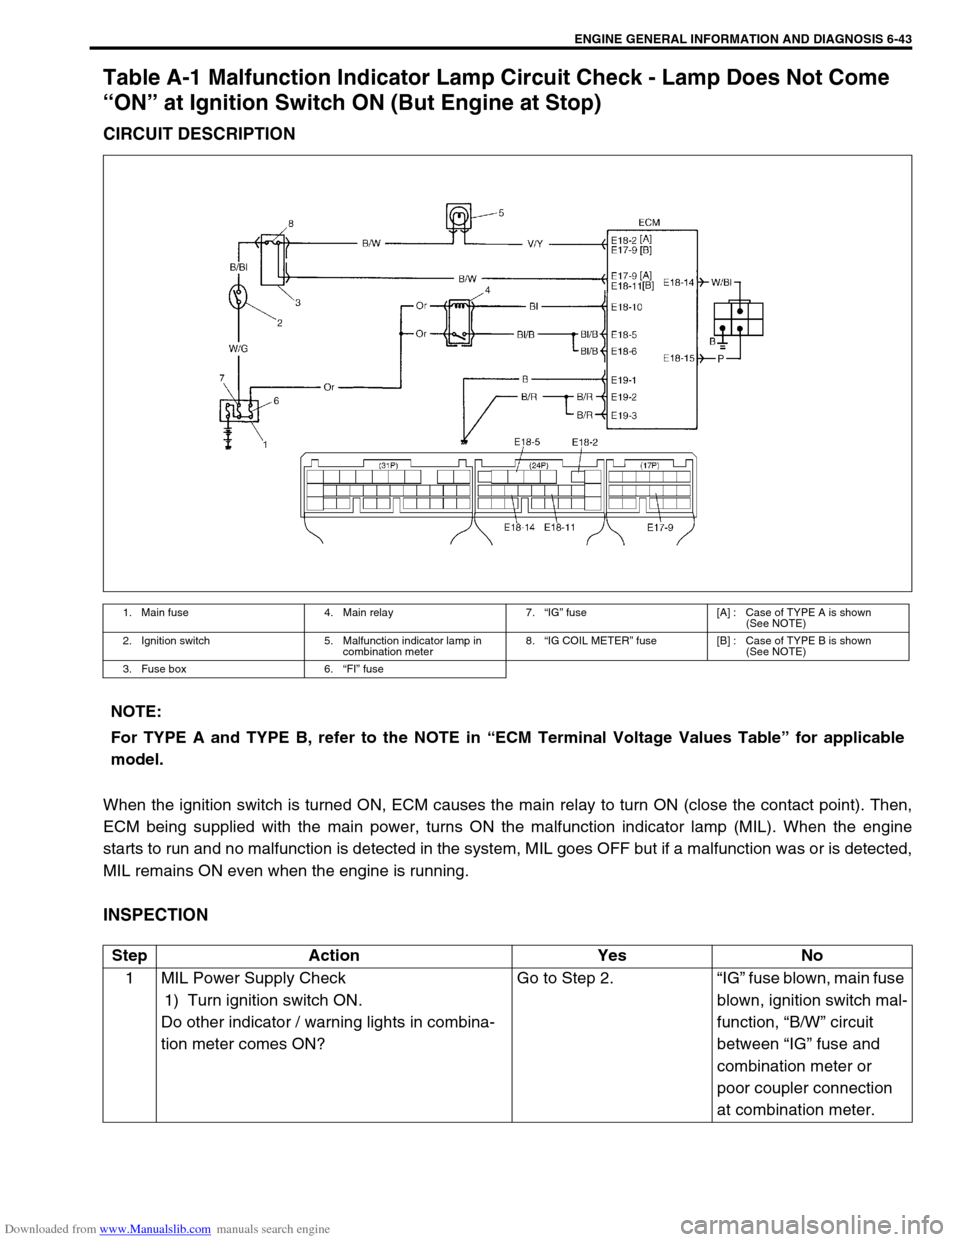
CIRCUIT DESCRIPTION
When the ignition switch is turned ON, ECM causes the main relay to turn ON (close the contact point). Then,
ECM being supplied with the main power, turns ON the malfunction indicator lamp (MIL). When the engine
starts to run and no malfunction is detected in the system, MIL goes OFF but if a malfunction was or is detected,
MIL remains ON even when the engine is running.
INSPECTION
1. Main fuse 4. Main relay 7.“IG” fuse [A] : Case of TYPE A is shown
(See NOTE)
2. Ignition switch 5. Malfunction indicator lamp in
combination meter8.“IG COIL METER” fuse [B] : Case of TYPE B is shown
(See NOTE)
3. Fuse box 6.“FI” fuse
NOTE:
For TYPE A and TYPE B, refer to the NOTE in “ECM Terminal Voltage Values Table” for applicable
model.
Step Action Yes No
1 MIL Power Supply Check
1) Turn ignition switch ON.
Do other indicator / warning lights in combina-
tion meter comes ON?Go to Step 2.“IG” fuse blown, main fuse
blown, ignition switch mal-
function, “B/W” circuit
between “IG” fuse and
combination meter or
poor coupler connection
at combination meter.
Page 670 of 687

Downloaded from www.Manualslib.com manuals search engine CHARGING SYSTEM 6H-3
BUILT-IN INDICATOR (IF EQUIPPED)
The battery has a built-in temperature compensated indicator in
the top of the battery. This indicator is to be used with the follow-
ing diagnostic procedure. When checking the indicator, make
sure that the battery has a clean top. A light may be needed in
some poorly-lit areas.
Three types of indication which is available under normal opera-
tion are as follows.
Green Dot
Battery is sufficiently charged for testing.
Dark
Battery must be charged before testing.
If there is a cranking complaint, battery should be tested as
described in Diagnosis section. Charging and electrical sys-
tems should also be checked at this time.
Clear or Light Yellow
This means that fluid level is below the bottom of hydrome-
ter. Its possible cause is excessive or prolonged charging, a
broken case, excessive tipping or normal battery deteriora-
tion.
When the battery is found in such condition, it is possible
that high charging voltage is caused by the faulty charging
system and therefore, charging and electrical systems need
to be checked. If there is a trouble in cranking and its cause
lies in the battery, it should be replaced.
CARE OF BATTERY
1) The battery is a very reliable component, but needs periodi-
cal attentions.
Keep the battery carrier clean.
Prevent rust formation on the terminal posts.
Keep the electrolyte up to the upper level uniformly in all
cells. WARNING:
Never expose battery to open flame or electric spark
because of battery generate gas which is flammable
and explosive.
Do not allow battery fluid to contact eyes, skin, fabrics,
or painted surfaces as fluid is a corrosive acid. Flush
any contacted area with water immediately and thor-
oughly.
Batteries should always be kept out of reach of chil-
dren.
Page 677 of 687

Downloaded from www.Manualslib.com manuals search engine 6H-10 CHARGING SYSTEM
1) Set parking brake and place automatic transmission in
PARK (NEUTRAL on manual transmission). Turn off ignition,
turn off lights and all other electrical loads.
2) Check electrolyte level. If it is below low level line, add dis-
tilled water.
3) Attach end of one jumper cable to positive terminal of
booster battery and the other end of the same cable to posi-
tive terminal of discharged battery. (Use 12-volt battery only
to jump start engine).
4) Attach one end of the remaining negative cable to negative
terminal of booster battery, and the other end to a solid
engine ground (such as exhaust manifold) at least 45 cm (18
in.) away from battery of vehicle being started.
5) Start engine of vehicle with booster battery and turn off elec-
trical accessories. Then start engine of the vehicle with dis-
charged battery.
6) Disconnect jumper cables in the exact reverse order.
WITH CHARGING EQUIPMENT
WARNING:
Departure from these conditions or procedure
described below could result in:
–Serious personal injury (particularly to eyes) or
property damage from such causes as battery explo-
sion, battery acid, or electrical burns.
–Damage to electronic components of either vehicle.
Remove rings, watches, and other jewelry. Wear
approved eye protection.
Be careful so that metal tools or jumper cables do not
contact positive battery terminal (or metal in contact
with it) and any other metal on vehicle, because a short
circuit could occur.
WARNING:
Do not connect negative cable directly to negative termi-
nal of dead battery.
CAUTION:
When jump starting engine with charging equipment, be
sure equipment used is 12-volt and negative ground. Do
not use 24-volt charging equipment. Using such equip-
ment can cause serious damage to electrical system or
electronic parts.