Page 2225 of 4555
INPUT SHAFT AND GEARS
MT-69
D
E
F
G
H
I
J
K
L
MA
B
MT
2. Measure the clearance “B” at 2 points or more diagonally oppo-
site using a feeler gauge. And then calculate mean value.
Bearing
Check items below. If necessary, replace them with new ones.
�Damage and rough rotation of bearing
ASSEMBLY
1. Install 3rd needle bearing to input shaft.
2. Install 3rd input gear and 3rd baulk ring to input shaft.
3. Install 3rd-4th spread spring,3rd-4th shifting insert and 3rd-4th synchronizer hub onto 3rd-4th coupling
sleeve.
CAUTION:
�Be careful with orientation of 3rd-4th synchronizer hub.
�Do not reuse 3rd-4th synchronizer hub.
�Be careful with orientation of 3rd-4th coupling sleeve.
�Do not reuse 3rd-4th coupling sleeve.Clearance “B”
Standard value : 0.6 - 1.1 mm (0.024 - 0.043 in)
Limit value : 0.2 mm (0.008 in)
SCIA1084E
MTF0041D
SCIA0921E
PCIB0799E
Page 2226 of 4555
MT-70
INPUT SHAFT AND GEARS
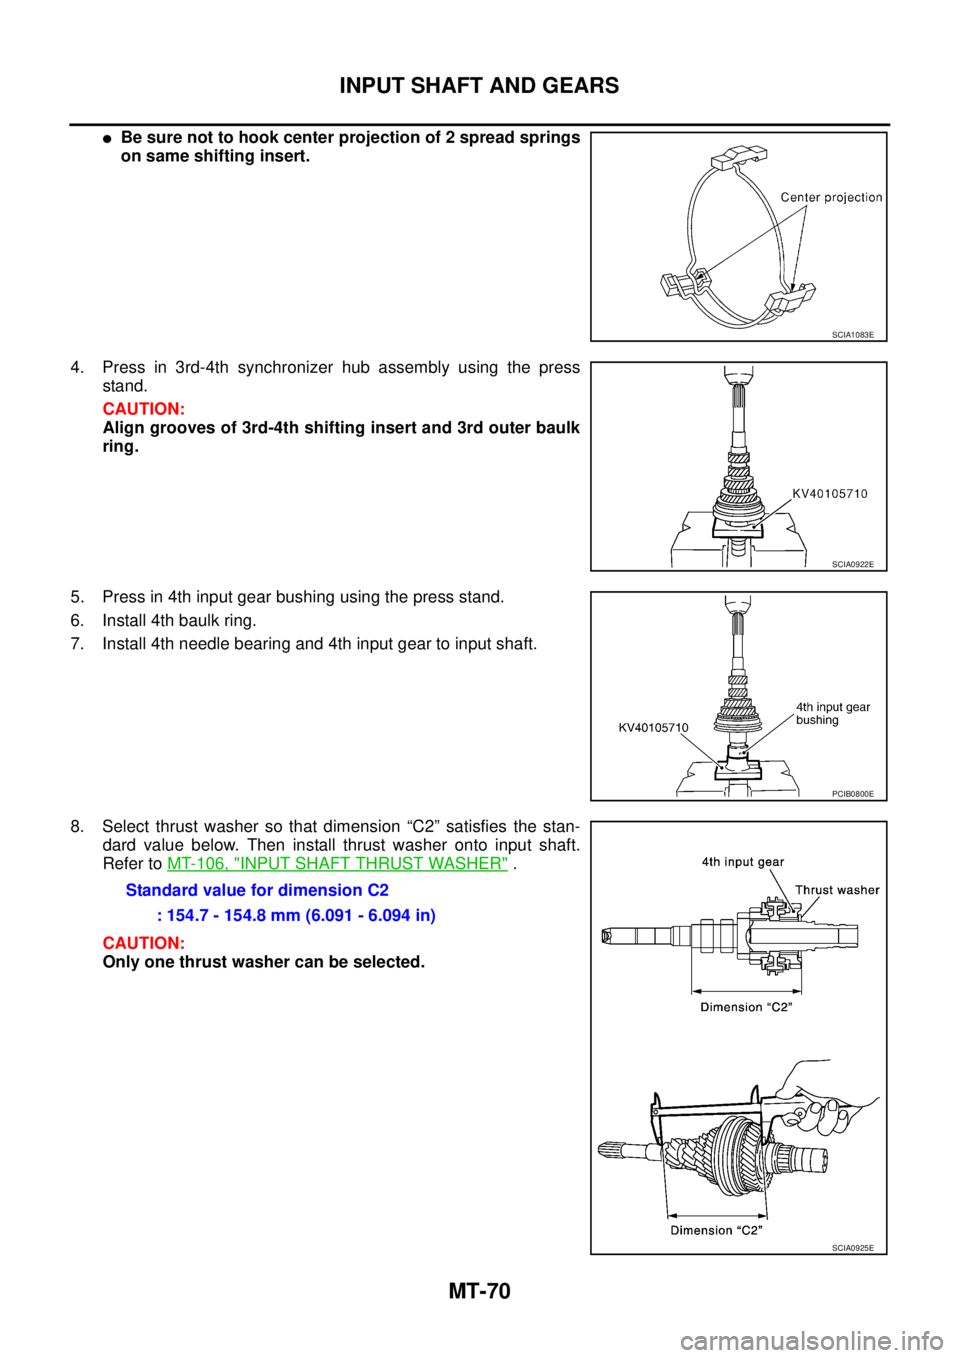
�Be sure not to hook center projection of 2 spread springs
on same shifting insert.
4. Press in 3rd-4th synchronizer hub assembly using the press
stand.
CAUTION:
Align grooves of 3rd-4th shifting insert and 3rd outer baulk
ring.
5. Press in 4th input gear bushing using the press stand.
6. Install 4th baulk ring.
7. Install 4th needle bearing and 4th input gear to input shaft.
8. Select thrust washer so that dimension “C2” satisfies the stan-
dard value below. Then install thrust washer onto input shaft.
Refer to MT-106, "
INPUT SHAFT THRUST WASHER" .
CAUTION:
Only one thrust washer can be selected.
SCIA1083E
SCIA0922E
PCIB0800E
Standard value for dimension C2
: 154.7 - 154.8 mm (6.091 - 6.094 in)
SCIA0925E
Page 2227 of 4555
INPUT SHAFT AND GEARS
MT-71
D
E
F
G
H
I
J
K
L
MA
B
MT
9. Press in 5th input gear bushing using the press stand.
CAUTION:
Do not reuse 5th input gear bushing.
10. Install 5th needle bearing and 5th input gear to input shaft.
11. Install 5th baulk ring.
12. Install 5th-6th synchronizer hub, 5th-6th spread spring and 5th-
6th shifting insert onto 5th-6th coupling sleeve.
CAUTION:
�Be careful with orientation of 5th-6th synchronizer hub.
�Do not reuse 5th-6th synchronizer hub.
�Be careful with orientation of 5th-6th coupling sleeve.
�Do not reuse 5th-6th coupling sleeve.
�Be sure not to hook center projection of 2 spread springs
on same shifting insert.
13. Press in 5th-6th synchronizer hub assembly using the press
stand.
CAUTION:
Align grooves of 5th-6th shifting insert and 5th baulk ring
and 6th baulk ring.
SCIA0926E
SCIA0921E
PCIB0801E
SCIA1083E
SCIA0928E
Page 2230 of 4555
MT-74
MAINSHAFT AND GEARS
6. Press out 4th main gear and 5th main gear using the drift and a
puller.
7. Remove 4th main gear adjusting shim.
8. Remove 3rd-4th mainshaft spacer.
9. Press out 3rd main gear, 2nd main gear, 2nd needle bearing,
2nd main gear bushing, 1st-2nd synchronizer hub assembly, 1st
main gear, 1st needle bearing, and 1st main gear bushing
reverse main gear using the drift.
INSPECTION AFTER DISASSEMBLY
Mainshaft and Gears
Check items below. If necessary, replace them with new ones.
�Damage, peeling, dent, uneven wear, bending, and other non-
standard conditions of the shaft.
�Excessive wear, damage, peeling, and other non-standard con-
ditions of the gears.
Synchronizer
Check items below. If necessary, replace them with new ones.
�Damage and unusual wear on contact surfaces of coupling
sleeve, synchronizer hub and shifting insert.
�Coupling sleeve and synchronizer hub must move smoothly.
SCIA0937E
SCIA0938E
SCIA1075J
SMT387A
Page 2233 of 4555
MAINSHAFT AND GEARS
MT-77
D
E
F
G
H
I
J
K
L
MA
B
MT
2. Press in 1st main gear bushing using the drifts and the press
stand.
3. Install 1st needle bearing, and then 1st main gear.
4. Install 1st-2nd spread spring, 1st-2nd shifting insert and 1st-2nd synchronizer hub onto 1st-2nd coupling
sleeve.
CAUTION:
�Be careful with orientation of 1st-2nd synchronizer hub.
�Do not reuse 1st-2nd synchronizer hub.
�Be careful with orientation of 1st-2nd coupling sleeve.
�Do not reuse 1st-2nd coupling sleeve.
�Be sure not to hook center projection of 2 spread springs
on same 1st-2nd shifting insert.
SCIA0940E
SCIA0921E
PCIB0803E
SCIA1083E
Page 2238 of 4555

MT-82
MAINSHAFT AND GEARS
Synchronizer
Check items below. If necessary, replace them with new ones.
�Damage and unusual wear on contact surfaces of coupling
sleeve, synchronizer hub and shifting insert.
�Coupling sleeve and synchronizer hub must move smoothly.
�If any crack, damage, or excessive wear is found on cam face of
baulk ring or working face of insert, replace it.
BAULK RING CLEARANCE
Triple-cone synchronizer (1st and 2nd)
�Check the clearance between outer baulk ring, synchronizer
cone and inner baulk ring as follows.
CAUTION:
The clearances “A”, “B” and “C” are controlled with outer
baulk ring, synchronizer cone and inner baulk ring as a set.
Replace them as a set if the clearances are outside the limit
value.
1. Measure the clearance “A” at 2 points or more diagonally oppo-
site using a feeler gauge when pressing baulk ring toward clutch
gear taper cone. And then calculate mean value.
SMT387A
SMT867D
PCIB1358E
Clearance “A”
Standard value : 0.6 - 1.2 mm (0.024 - 0.047 in)
Limit value : 0.3 mm (0.012 in)
PCIB1359E
Page 2240 of 4555
MT-84
MAINSHAFT AND GEARS
CAUTION:
�Be careful with orientation of reverse main gear.
�Do not reuse reverse main gear.
2. Press in 1st main gear bushing using the drifts and the press
stand.
3. Install 1st needle bearing, and then 1st main gear.
4. Install 1st-2nd spread spring, 1st-2nd shifting insert and 1st-2nd synchronizer hub onto 1st-2nd coupling
sleeve.
CAUTION:
�Be careful with orientation of 1st-2nd synchronizer hub.
�Do not reuse 1st-2nd synchronizer hub.
�Be careful with orientation of 1st-2nd coupling sleeve.
�Do not reuse 1st-2nd coupling sleeve.
SCIA0992E
SCIA0940E
SCIA0921E
PCIB0803E
Page 2241 of 4555
MAINSHAFT AND GEARS
MT-85
D
E
F
G
H
I
J
K
L
MA
B
MT
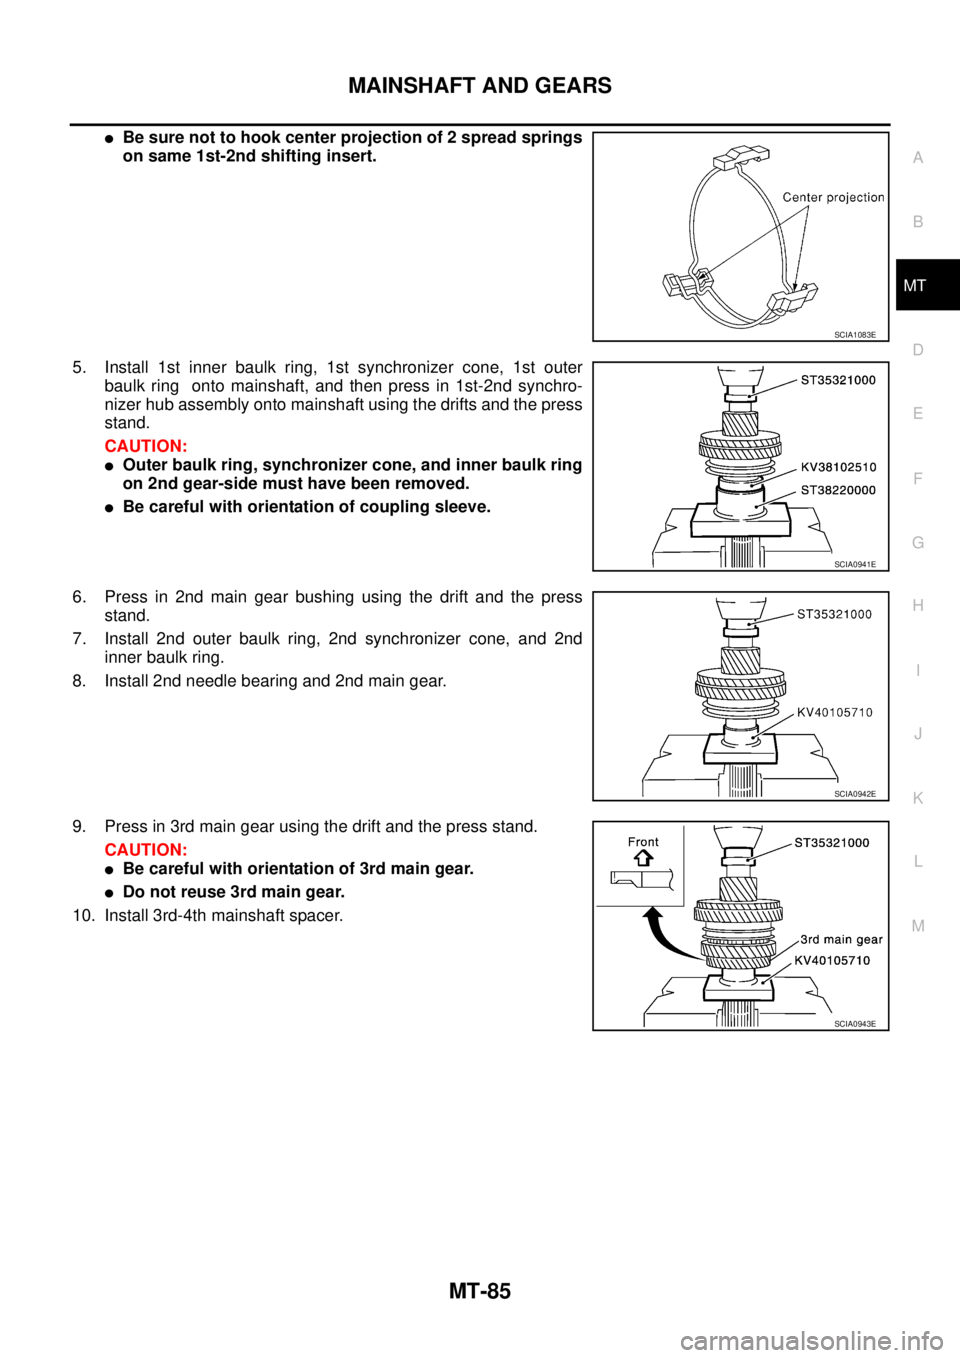
�Be sure not to hook center projection of 2 spread springs
on same 1st-2nd shifting insert.
5. Install 1st inner baulk ring, 1st synchronizer cone, 1st outer
baulk ring onto mainshaft, and then press in 1st-2nd synchro-
nizer hub assembly onto mainshaft using the drifts and the press
stand.
CAUTION:
�Outer baulk ring, synchronizer cone, and inner baulk ring
on 2nd gear-side must have been removed.
�Be careful with orientation of coupling sleeve.
6. Press in 2nd main gear bushing using the drift and the press
stand.
7. Install 2nd outer baulk ring, 2nd synchronizer cone, and 2nd
inner baulk ring.
8. Install 2nd needle bearing and 2nd main gear.
9. Press in 3rd main gear using the drift and the press stand.
CAUTION:
�Be careful with orientation of 3rd main gear.
�Do not reuse 3rd main gear.
10. Install 3rd-4th mainshaft spacer.
SCIA1083E
SCIA0941E
SCIA0942E
SCIA0943E