Page 333 of 4555
![NISSAN X-TRAIL 2005 Service Repair Manual OIL COOLER
LU-11
[QR]
C
D
E
F
G
H
I
J
K
L
MA
LU
OIL COOLERPFP:21305
Removal and InstallationEBS00KO8
WARNING:
Be careful not to get burned when engine and engine oil may be hot.
CAUTION:
�When remov](/manual-img/5/57403/w960_57403-332.png "NISSAN X-TRAIL 2005 Service Repair Manual OIL COOLER
LU-11
[QR]
C
D
E
F
G
H
I
J
K
L
MA
LU
OIL COOLERPFP:21305
Removal and InstallationEBS00KO8
WARNING:
Be careful not to get burned when engine and engine oil may be hot.
CAUTION:
�When remov")
OIL COOLER
LU-11
[QR]
C
D
E
F
G
H
I
J
K
L
MA
LU
OIL COOLERPFP:21305
Removal and InstallationEBS00KO8
WARNING:
Be careful not to get burned when engine and engine oil may be hot.
CAUTION:
�When removing oil cooler and oil cooler bracket, prepare a shop cloth to absorb any engine oil
leakage or spillage.
�Completely wipe off any engine oil that adhere to engine and vehicle.
REMOVAL
1. Remove RH front road wheel and tyre and RH undercover.
2. Drain engine coolant by removing water drain plug on cylinder block and radiator drain plug. Refer to EM-
89, "CYLINDER BLOCK" and CO-9, "Changing Engine Coolant" .
3. Disconnect water hoses from oil cooler.
4. Remove oil cooler and oil cooler bracket.
NOTE:
For reference when installing, put a mating mark on oil cooler and oil cooler bracket.
INSPECTION AFTER REMOVAL
Oil Cooler
Check oil cooler for cracks. Check oil cooler for clogging by blowing through engine coolant inlet. If necessary,
replace oil cooler assembly.
Relief Valve
Inspect relief valve for movement, cracks and breaks by pushing the ball. If replacement is necessary, remove
valve by prying it out with a suitable tool. Install a new valve in place by tapping it.
INSTALLATION
Installation is the reverse order of removal.
INSPECTION AFTER INSTALLATION
1. Check the engine oil level and the engine coolant level, and adjust engine oil and engine coolant. Refer to
LU-7, "
ENGINE OIL" and CO-9, "ENGINE COOLANT" .
PBIC2273E
1. Oil pressure switch 2. Relief valve 3. Oil cooler bracket
4. O-ring 5. Oil cooler 6. O-ring
7. Gasket 8. Clamp 9. Water hose
10. Water hose
Page 334 of 4555
LU-12
[QR]
OIL COOLER
2. Start engine, and make sure there is no leaks of engine oil or engine coolant.
3. Stop engine and wait for 10 minutes.
4. Check the engine oil level and the engine coolant level again. Refer to LU-7, "
ENGINE OIL" and CO-9,
"ENGINE COOLANT" .
Page 335 of 4555
OIL PUMP
LU-13
[QR]
C
D
E
F
G
H
I
J
K
L
MA
LU
OIL PUMPPFP:15010
Removal and InstallationEBS00KO6
REMOVAL
Remove front cover. Refer to EM-46, "TIMING CHAIN" .
NOTE:
Oil pump is built into front cover.
INSTALLATION
Note the following, and install in the reverse order of removal.
�When installing, align crankshaft flat faces with inner rotor flat faces.
INSPECTION AFTER INSTALLATION
1. After warming up engine, make sure there is no leaks of engine oil.
2. Stop engine and wait for 10 minutes.
3. Check the engine oil level and adjust engine oil. Refer to LU-7, "
ENGINE OIL" .
Disassembly and AssemblyEBS00KO7
DISASSEMBLY
1. Remove oil pump cover.
2. Remove inner rotor and outer rotor from front cover.
3. After removing regulator valve plug, remove regulator spring and regulator valve.
PBIC2430E
1. Front cover (Oil pump body is united) 2. Outer rotor 3. Inner rotor
4. Oil pump cover 5. Regulator valve 6. Regulator valve spring
7. Regulator valve plug
Page 342 of 4555
![NISSAN X-TRAIL 2005 Service Repair Manual LU-20
[YD22DDTi]
ENGINE OIL
ENGINE OILPFP:KLA92
InspectionEBS00B03
ENGINE OIL LEVEL
NOTE:
Before starting engine, put vehicle horizontally and check the engine oil level. If engine is already starte](/manual-img/5/57403/w960_57403-341.png "NISSAN X-TRAIL 2005 Service Repair Manual LU-20
[YD22DDTi]
ENGINE OIL
ENGINE OILPFP:KLA92
InspectionEBS00B03
ENGINE OIL LEVEL
NOTE:
Before starting engine, put vehicle horizontally and check the engine oil level. If engine is already starte")
LU-20
[YD22DDTi]
ENGINE OIL
ENGINE OILPFP:KLA92
InspectionEBS00B03
ENGINE OIL LEVEL
NOTE:
Before starting engine, put vehicle horizontally and check the engine oil level. If engine is already started, stop
it and allow 10 minutes before checking.
1. Pull out oil level gauge and wipe it clean.
2. Insert oil level gauge and make sure the engine oil level is within
the range shown in the figure.
3. If it is out of range, adjust it.
ENGINE OIL APPEARANCE
�Check engine oil for white turbidity or heavy contamination.
�If engine oil becomes turbid and white, it is highly probable that it is contaminated with engine coolant.
Repair or replace damaged parts.
ENGINE OIL LEAKAGE
Check for engine oil leakage around the following area.
�Oil pan (upper and lower)
�Oil pan drain plug
�Oil pressure switch
�Oil filter bracket
�Oil cooler
�Oil pump housing
�Va c u u m p u m p
�Cylinder head rear cover assembly
�Front and rear chain cases
�Mating surface between cylinder block and cylinder head
�Mating surface between cylinder head and rocker cover
�Front and rear oil seals
�Turbocharger
�Oil tube connecting parts from turbocharger
ENGINE OIL PRESSURE CHECK
WARNING:
�Be careful not to burn yourself, as the engine oil is hot.
�Be sure to check oil pressure in “ Neutral position” and parking brake should be applied securely.
1. Check the engine oil level. Refer to LU-20, "
ENGINE OIL LEVEL" .
2. Remove RH engine undercover.
3. Remove exhaust front tube. Refer to EX-2, "
EXHAUST SYSTEM" .
SBIA0122E
Page 343 of 4555
![NISSAN X-TRAIL 2005 Service Repair Manual ENGINE OIL
LU-21
[YD22DDTi]
C
D
E
F
G
H
I
J
K
L
MA
LU
4. Disconnect harness connector at oil pressure switch, and using
deep socket (commercial service tool), remove oil pressure
switch.
5. Install](/manual-img/5/57403/w960_57403-342.png "NISSAN X-TRAIL 2005 Service Repair Manual ENGINE OIL
LU-21
[YD22DDTi]
C
D
E
F
G
H
I
J
K
L
MA
LU
4. Disconnect harness connector at oil pressure switch, and using
deep socket (commercial service tool), remove oil pressure
switch.
5. Install")
ENGINE OIL
LU-21
[YD22DDTi]
C
D
E
F
G
H
I
J
K
L
MA
LU
4. Disconnect harness connector at oil pressure switch, and using
deep socket (commercial service tool), remove oil pressure
switch.
5. Install the oil pressure gauge and hose (special service tool).
6. Install exhaust front tube. Refer to EX-2, "
EXHAUST SYSTEM"
7. After warming up engine, make sure that oil pressure corresponding to the engine speed is produced.
NOTE:
When engine oil temperature is low, engine oil pressure becomes high.
Engine oil pressure [Engine oil temperature at 80 °C (176 °F)]
8. After checking, install oil pressure switch as follows.
CAUTION:
Be careful not to get burned when engine is hot.
a. Remove old liquid gasket adhering to oil pressure switch and engine.
b. Apply liquid gasket and tighten oil pressure switch to specification.
Use Genuine Thread Sealant or equivalent.
c. After warming up engine, check for oil leakage with running engine.
Changing Engine OilEBS00B04
WARNING:
�Be careful not to burn yourself, as the engine oil is hot.
�Prolonged and repeated contact with used engine oil may cause skin cancer; try to avoid direct
skin contact with used engine oil. If skin contact is made, wash thoroughly with soap or hand
cleaner as soon as possible.
1. Warm up engine, put vehicle horizontally and check for engine oil leakage from engine components. Refer
to LU-20, "
ENGINE OIL LEAKAGE" .
2. Stop engine and wait for 10 minutes.
SBIA0123E
SLC926-A
Engine speed (rpm) Idle speed 2,000
Engine pressure
kPa (bar, kg/cm
2 , psi)140 (1.40, 1.43, 20.3) or more 270 (2.70, 2.75, 39.2) or more
Oil pressure switch:
: 15 N·m (1.5 kg-m, 11 ft-lb)
Page 344 of 4555
![NISSAN X-TRAIL 2005 Service Repair Manual LU-22
[YD22DDTi]
ENGINE OIL
3. Loosen oil filler cap and then remove drain plug.
4. Drain engine oil.
5. Install drain plug with new washer. Refer to EM-157, "
OIL PAN AND OIL STRAINER" .
CAUTION:
B](/manual-img/5/57403/w960_57403-343.png "NISSAN X-TRAIL 2005 Service Repair Manual LU-22
[YD22DDTi]
ENGINE OIL
3. Loosen oil filler cap and then remove drain plug.
4. Drain engine oil.
5. Install drain plug with new washer. Refer to EM-157, \"
OIL PAN AND OIL STRAINER\" .
CAUTION:
B")
LU-22
[YD22DDTi]
ENGINE OIL
3. Loosen oil filler cap and then remove drain plug.
4. Drain engine oil.
5. Install drain plug with new washer. Refer to EM-157, "
OIL PAN AND OIL STRAINER" .
CAUTION:
Be sure to clean drain plug and install with new washer.
6. Refill with new engine oil.
Engine oil specification and viscosity:
Refer to MA-17, "
RECOMMENDED FLUIDS AND LUBRICANTS" .
Engine oil capacity (Approximate):
Unit: (lmp qt)
CAUTION:
�The refill capacity depends on the engine oil temperature and drain time. Use these specifica-
tions for reference only.
�Always use the oil level gauge to determine the proper amount of engine oil in the engine.
7. Warm up engine and check area around drain plug and oil filter for oil leakage.
8. Stop engine and wait for 10 minutes.
9. Check the engine oil level. Refer to LU-20, "
ENGINE OIL LEVEL" .
PBIC0527E
Oil pan drain plug:
: 34 N·m (3.5 kg-m, 25 ft-lb)
Drain and refill With oil filter change 5.2 (4-5/8)
Without oil filter change 4.9 (4-3/8)
Dry engine (Overhaul)6.3 (5-1/2)
Page 345 of 4555
![NISSAN X-TRAIL 2005 Service Repair Manual OIL FILTER
LU-23
[YD22DDTi]
C
D
E
F
G
H
I
J
K
L
MA
LU
OIL FILTER PFP:15208
Removal and Installation (TYPE A)EBS00B05
REMOVAL
1. Open oil filter installation/removal cover on RH engine undercover.
2.](/manual-img/5/57403/w960_57403-344.png "NISSAN X-TRAIL 2005 Service Repair Manual OIL FILTER
LU-23
[YD22DDTi]
C
D
E
F
G
H
I
J
K
L
MA
LU
OIL FILTER PFP:15208
Removal and Installation (TYPE A)EBS00B05
REMOVAL
1. Open oil filter installation/removal cover on RH engine undercover.
2.")
OIL FILTER
LU-23
[YD22DDTi]
C
D
E
F
G
H
I
J
K
L
MA
LU
OIL FILTER PFP:15208
Removal and Installation (TYPE A)EBS00B05
REMOVAL
1. Open oil filter installation/removal cover on RH engine undercover.
2. Using the oil filter wrench, remove oil filter.
CAUTION:
�Be careful not to get burned when engine and engine oil are hot.
�When removing, prepare a shop cloth to absorb any engine oil leakage or spillage.
�Do not allow engine oil to adhere to drive belts.
�Completely wipe off any engine oil that adhere to engine and vehicle.
�Oil filter is provided with a relief valve.
INSTALLATION
1. Remove foreign materials adhering to the oil filter installation surface.
2. Apply new engine oil to the oil seal circumference of new oil fil-
ter.
3. Screw oil filter manually until it touches the installation surface, then tighten it by 1/2 turn. Or tighten to
specification.
INSPECTION AFTER INSTALLATION
1. Start engine, and check there is no leakage of engine oil.
2. Stop engine and wait for 10 minutes.
3. Check the engine oil level and adjust engine oil. Refer to LU-20, "
ENGINE OIL" .
SMA010
Oil filter:
: 18 N·m (1.8 Kg-m, 13 ft-lb)
Page 347 of 4555
OIL FILTER
LU-25
[YD22DDTi]
C
D
E
F
G
H
I
J
K
L
MA
LU
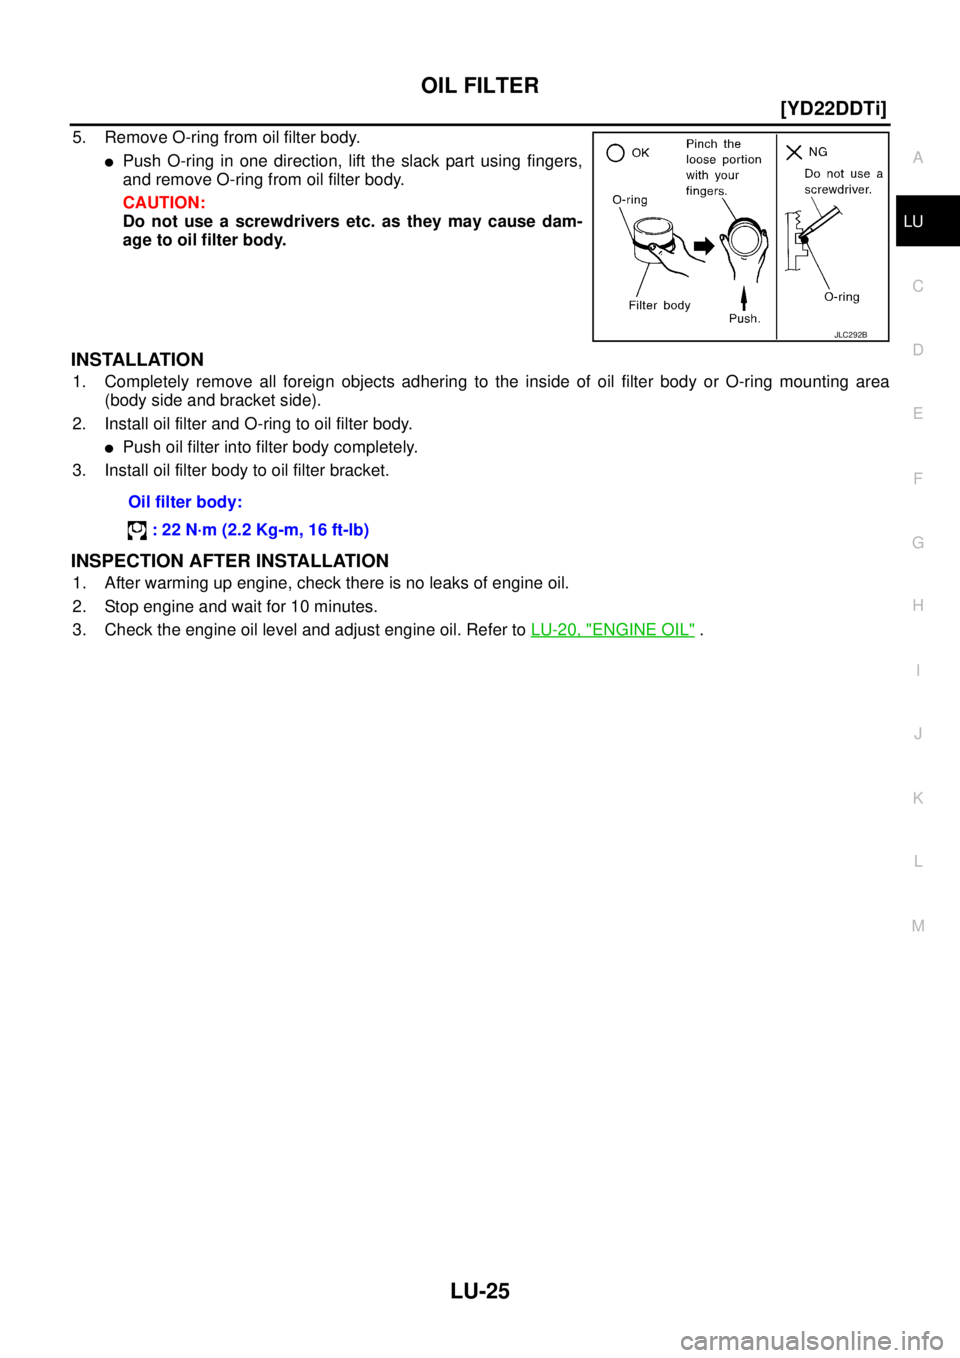
5. Remove O-ring from oil filter body.
�Push O-ring in one direction, lift the slack part using fingers,
and remove O-ring from oil filter body.
CAUTION:
Do not use a screwdrivers etc. as they may cause dam-
age to oil filter body.
INSTALLATION
1. Completely remove all foreign objects adhering to the inside of oil filter body or O-ring mounting area
(body side and bracket side).
2. Install oil filter and O-ring to oil filter body.
�Push oil filter into filter body completely.
3. Install oil filter body to oil filter bracket.
INSPECTION AFTER INSTALLATION
1. After warming up engine, check there is no leaks of engine oil.
2. Stop engine and wait for 10 minutes.
3. Check the engine oil level and adjust engine oil. Refer to LU-20, "
ENGINE OIL" .
JLC292B
Oil filter body:
: 22 N·m (2.2 Kg-m, 16 ft-lb)
![NISSAN X-TRAIL 2005 Service Repair Manual LU-12
[QR]
OIL COOLER
2. Start engine, and make sure there is no leaks of engine oil or engine coolant.
3. Stop engine and wait for 10 minutes.
4. Check the engine oil level and the engine coolant l](/manual-img/5/57403/w960_57403-333.png "NISSAN X-TRAIL 2005 Service Repair Manual LU-12
[QR]
OIL COOLER
2. Start engine, and make sure there is no leaks of engine oil or engine coolant.
3. Stop engine and wait for 10 minutes.
4. Check the engine oil level and the engine coolant l")
![NISSAN X-TRAIL 2005 Service Repair Manual OIL PUMP
LU-13
[QR]
C
D
E
F
G
H
I
J
K
L
MA
LU
OIL PUMPPFP:15010
Removal and InstallationEBS00KO6
REMOVAL
Remove front cover. Refer to EM-46, "TIMING CHAIN" .
NOTE:
Oil pump is built into front cover](/manual-img/5/57403/w960_57403-334.png "NISSAN X-TRAIL 2005 Service Repair Manual OIL PUMP
LU-13
[QR]
C
D
E
F
G
H
I
J
K
L
MA
LU
OIL PUMPPFP:15010
Removal and InstallationEBS00KO6
REMOVAL
Remove front cover. Refer to EM-46, \"TIMING CHAIN\" .
NOTE:
Oil pump is built into front cover")