2005 NISSAN NAVARA engine
[x] Cancel search: enginePage 1469 of 3171
PRIMARY TIMING CHAIN
EM-87
C
D
E
F
G
H
I
J
K
L
MA
EM
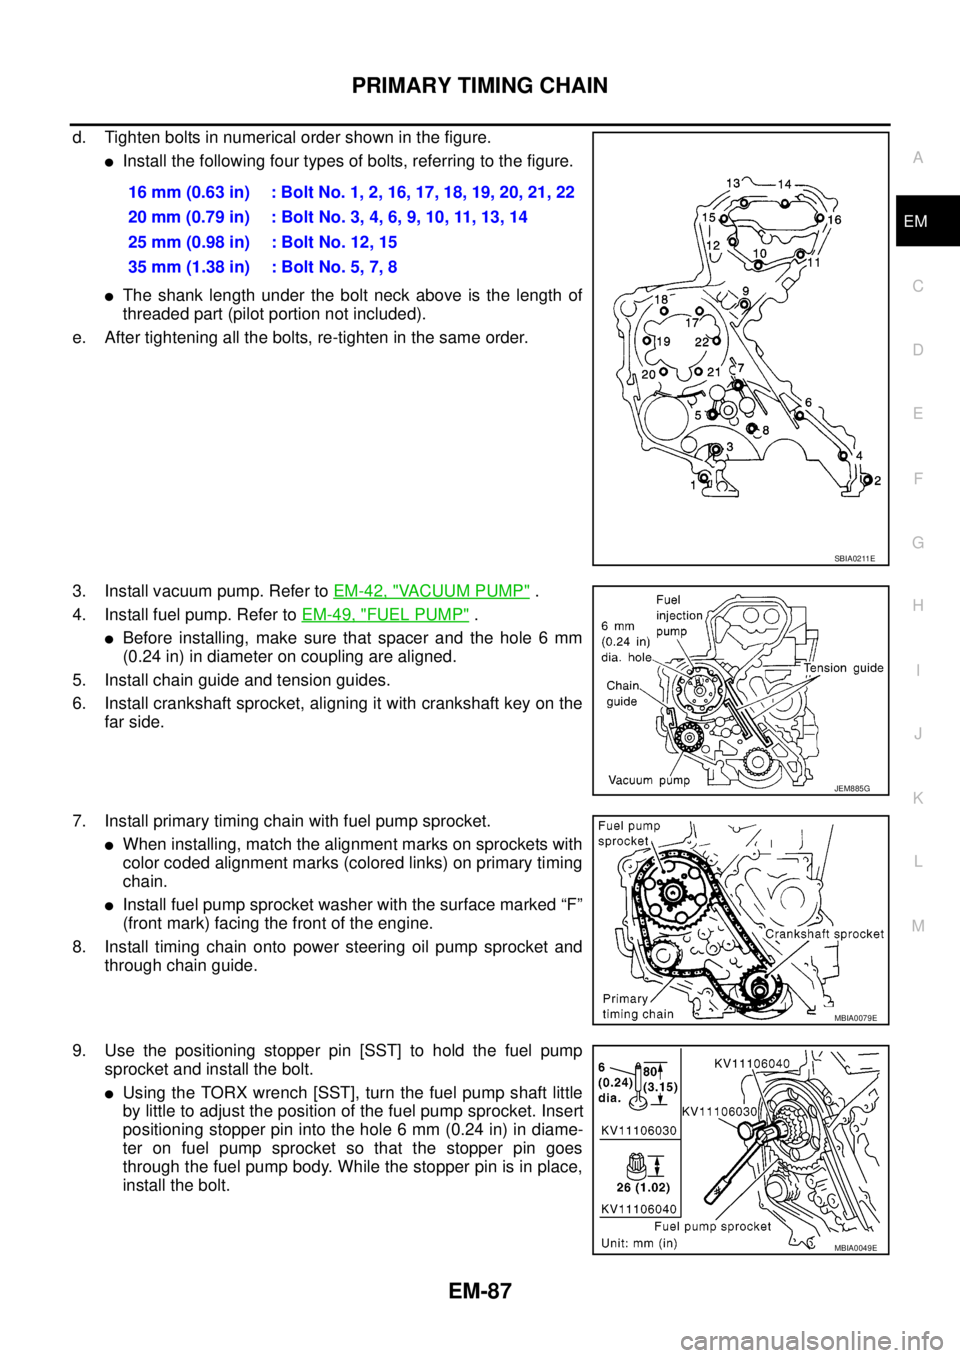
d. Tighten bolts in numerical order shown in the figure.
lInstall the following four types of bolts, referring to the figure.
lThe shank length under the bolt neck above is the length of
threaded part (pilot portion not included).
e. After tightening all the bolts, re-tighten in the same order.
3. Install vacuum pump. Refer toEM-42, "
VACUUM PUMP".
4. Install fuel pump. Refer toEM-49, "
FUEL PUMP".
lBefore installing, make sure that spacer and the hole 6 mm
(0.24 in) in diameter on coupling are aligned.
5. Install chain guide and tension guides.
6. Install crankshaft sprocket, aligning it with crankshaft key on the
far side.
7. Install primary timing chain with fuel pump sprocket.
lWhen installing, match the alignment marks on sprockets with
color coded alignment marks (colored links) on primary timing
chain.
lInstall fuel pump sprocket washer with the surface marked “F”
(front mark) facing the front of the engine.
8. Install timing chain onto power steering oil pump sprocket and
through chain guide.
9. Use the positioning stopper pin [SST] to hold the fuel pump
sprocket and install the bolt.
lUsing the TORX wrench [SST], turn the fuel pump shaft little
by little to adjust the position of the fuel pump sprocket. Insert
positioning stopper pin into the hole 6 mm (0.24 in) in diame-
ter on fuel pump sprocket so that the stopper pin goes
through the fuel pump body. While the stopper pin is in place,
install the bolt.16 mm (0.63 in) : Bolt No. 1, 2, 16, 17, 18, 19, 20, 21, 22
20mm(0.79in) :BoltNo.3,4,6,9,10,11,13,14
25 mm (0.98 in) : Bolt No. 12, 15
35 mm (1.38 in) : Bolt No. 5, 7, 8
SBIA0211E
JEM885G
MBIA0079E
MBIA0049E
Page 1472 of 3171
EM-90
PRIMARY TIMING CHAIN
b. Install O-ring into the groove of rear chain case.
c. Install oil pump housing.
lWhen installing, align the inner rotor in the direction of the two facing flats of oil pump drive spacer.
lWhen installing, align the dowel pin with the pin hole.
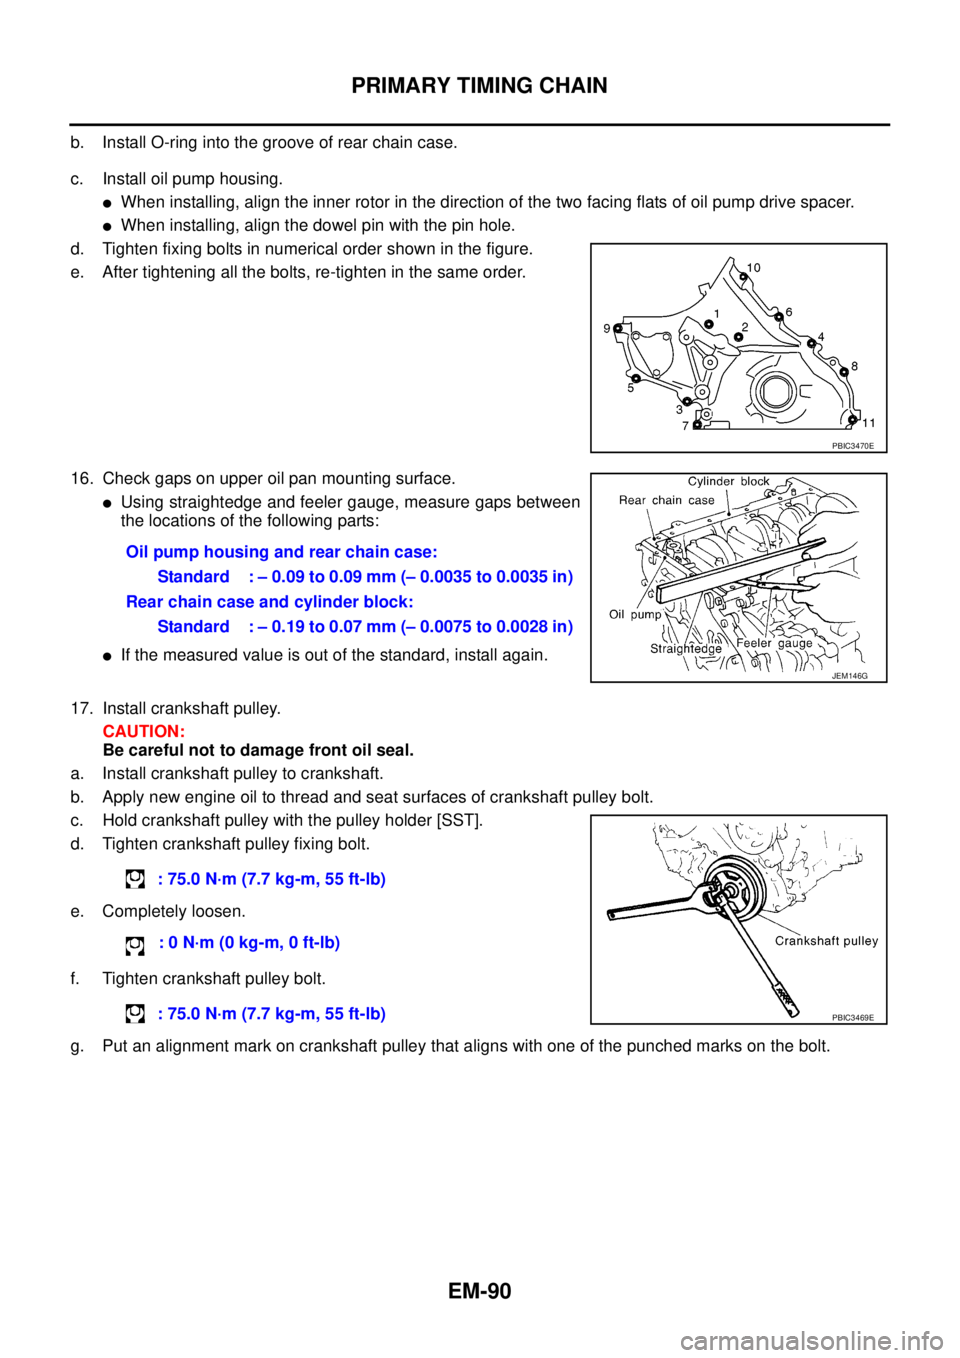
d. Tighten fixing bolts in numerical order shown in the figure.
e. After tightening all the bolts, re-tighten in the same order.
16. Check gaps on upper oil pan mounting surface.
lUsing straightedge and feeler gauge, measure gaps between
the locations of the following parts:
lIf the measured value is out of the standard, install again.
17. Install crankshaft pulley.
CAUTION:
Be careful not to damage front oil seal.
a. Install crankshaft pulley to crankshaft.
b. Apply new engine oil to thread and seat surfaces of crankshaft pulley bolt.
c. Hold crankshaft pulley with the pulley holder [SST].
d. Tighten crankshaft pulley fixing bolt.
e. Completely loosen.
f. Tighten crankshaft pulley bolt.
g. Put an alignment mark on crankshaft pulley that aligns with one of the punched marks on the bolt.
PBIC3470E
Oil pump housing and rear chain case:
Standard : – 0.09 to 0.09 mm (– 0.0035 to 0.0035 in)
Rear chain case and cylinder block:
Standard : – 0.19 to 0.07 mm (– 0.0075 to 0.0028 in)
JEM146G
: 75.0 N·m (7.7 kg-m, 55 ft-lb)
:0N·m(0kg-m,0ft-lb)
: 75.0 N·m (7.7 kg-m, 55 ft-lb)
PBIC3469E
Page 1473 of 3171
PRIMARY TIMING CHAIN
EM-91
C
D
E
F
G
H
I
J
K
L
MA
EM
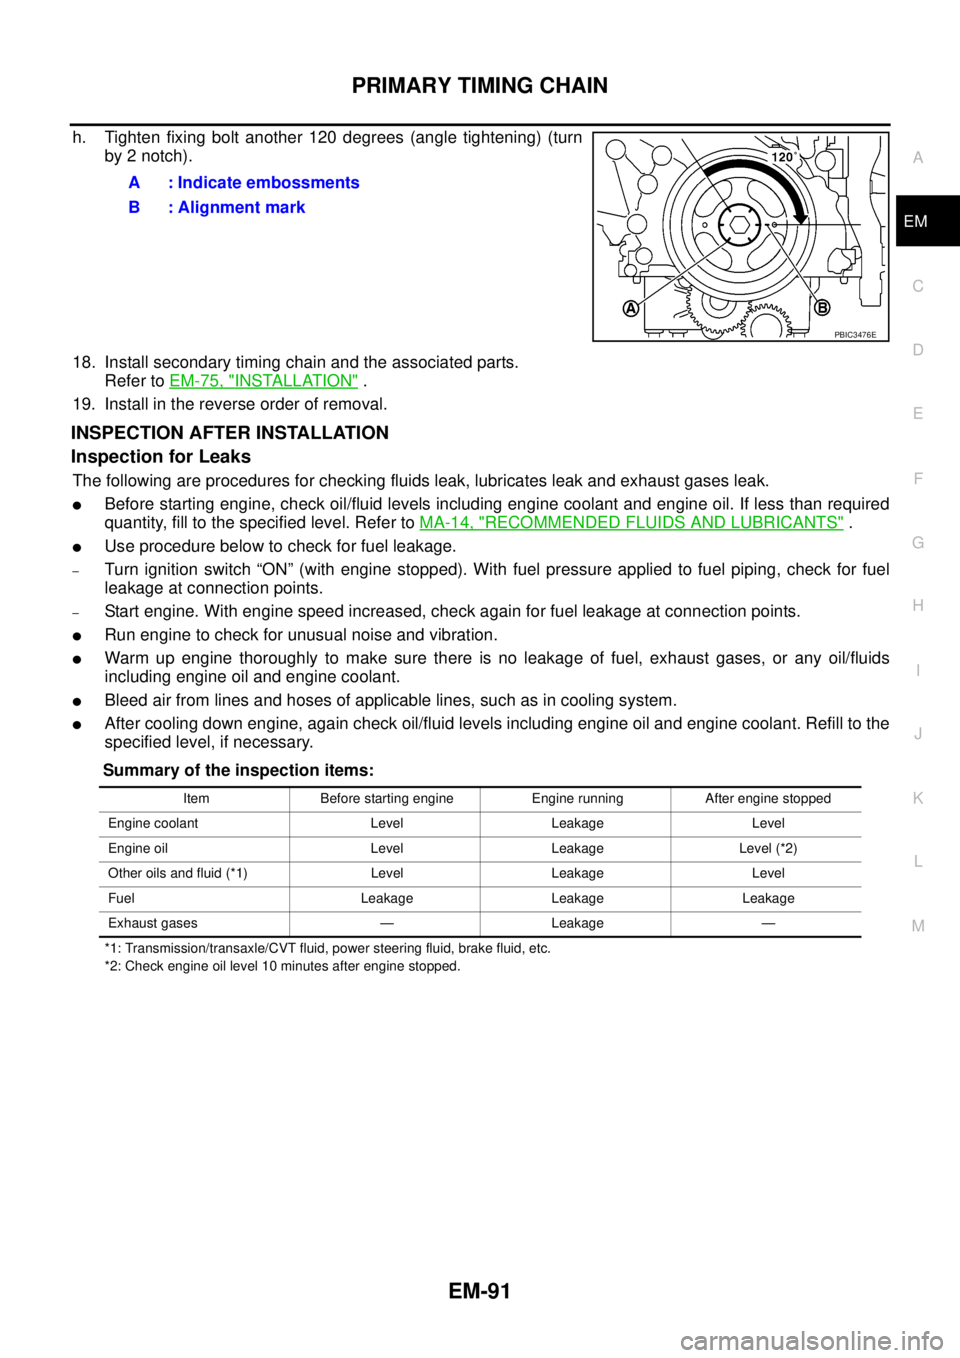
h. Tighten fixing bolt another 120 degrees (angle tightening) (turn
by 2 notch).
18. Install secondary timing chain and the associated parts.
Refer toEM-75, "
INSTALLATION".
19. Install in the reverse order of removal.
INSPECTION AFTER INSTALLATION
Inspection for Leaks
The following are procedures for checking fluids leak, lubricates leak and exhaust gases leak.
lBefore starting engine, check oil/fluid levels including engine coolant and engine oil. If less than required
quantity, fill to the specified level. Refer toMA-14, "
RECOMMENDED FLUIDS AND LUBRICANTS".
lUse procedure below to check for fuel leakage.
–Turn ignition switch “ON” (with engine stopped). With fuel pressure applied to fuel piping, check for fuel
leakage at connection points.
–Start engine. With engine speed increased, check again for fuel leakage at connection points.
lRun engine to check for unusual noise and vibration.
lWarm up engine thoroughly to make sure there is no leakage of fuel, exhaust gases, or any oil/fluids
including engine oil and engine coolant.
lBleed air from lines and hoses of applicable lines, such as in cooling system.
lAfter cooling down engine, again check oil/fluid levels including engine oil and engine coolant. Refill to the
specified level, if necessary.
Summary of the inspection items:
*1: Transmission/transaxle/CVT fluid, power steering fluid, brake fluid, etc.
*2: Check engine oil level 10 minutes after engine stopped.
A : Indicate embossments
B : Alignment mark
PBIC3476E
Item Before starting engine Engine running After engine stopped
Engine coolant Level Leakage Level
Engine oil Level Leakage Level (*2)
Other oils and fluid (*1) Level Leakage Level
Fuel Leakage Leakage Leakage
Exhaust gases — Leakage —
Page 1474 of 3171
EM-92
CYLINDER HEAD
CYLINDER HEAD
PFP:11041
On-Vehicle ServiceEBS01E6A
CHECKING COMPRESSION PRESSURE
1. Warm up engine thoroughly. Then, stop it.
2. Using CONSULT-II, make sure no error codes are indicated for self-diagnosis items. Refer toEC-38,
"Basic Inspection".
lDo not disconnect CONSULT-II until the end of this operation; it will be used to check engine rpm and
for error detection at the end of this operation.
3. Disconnect the battery cable from the negative terminal.
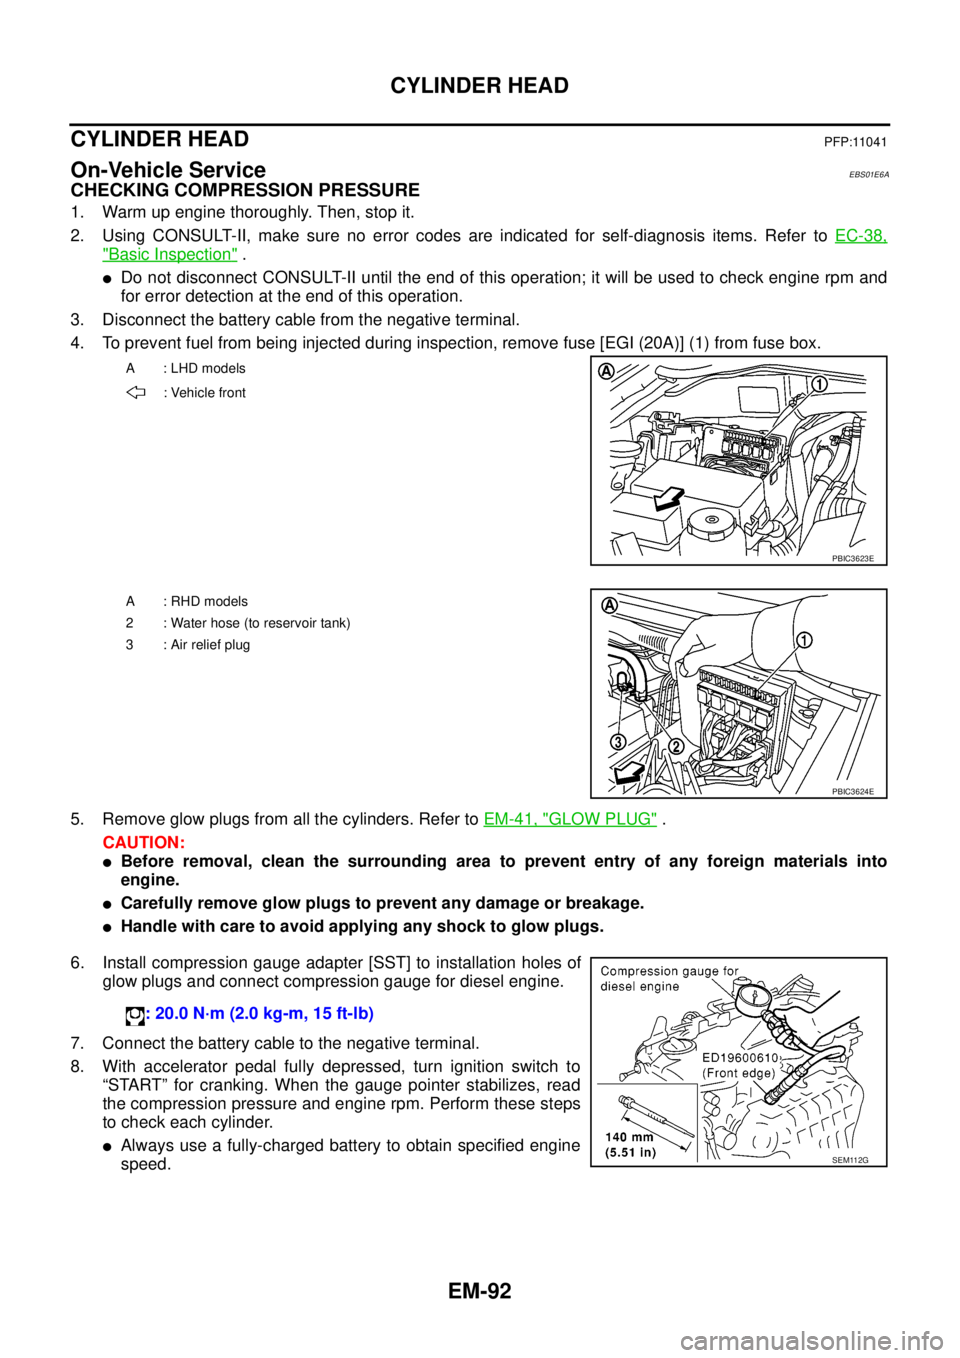
4. To prevent fuel from being injected during inspection, remove fuse [EGI (20A)] (1) from fuse box.
5. Remove glow plugs from all the cylinders. Refer toEM-41, "
GLOW PLUG".
CAUTION:
lBefore removal, clean the surrounding area to prevent entry of any foreign materials into
engine.
lCarefully remove glow plugs to prevent any damage or breakage.
lHandle with care to avoid applying any shock to glow plugs.
6. Install compression gauge adapter [SST] to installation holes of
glow plugs and connect compression gauge for diesel engine.
7. Connect the battery cable to the negative terminal.
8. With accelerator pedal fully depressed, turn ignition switch to
“START” for cranking. When the gauge pointer stabilizes, read
the compression pressure and engine rpm. Perform these steps
to check each cylinder.
lAlways use a fully-charged battery to obtain specified engine
speed.
A : LHD models
: Vehicle front
PBIC3623E
A : RHD models
2 : Water hose (to reservoir tank)
3:Airreliefplug
PBIC3624E
: 20.0 N·m (2.0 kg-m, 15 ft-lb)
SEM112G
Page 1475 of 3171
CYLINDER HEAD
EM-93
C
D
E
F
G
H
I
J
K
L
MA
EM
Compression pressure
Unit: kPa (bar, kg/cm2, psi)/rpm
lWhen engine rpm is out of the specified range, check the specific gravity of battery liquid. Measure
again under corrected conditions.
lIf engine rpm exceeds the limit, check valve clearance and combustion chamber components (valves,
valve seats, cylinder head gaskets, piston rings, pistons, cylinder bores, cylinder block upper and lower
surfaces) and measure again.
lIf compression pressure is low in some cylinders, apply engine oil from glow plug installation hole. Then
check pressure again.
–If compression pressure becomes normal after applying engine oil, piston ring may be worn or dam-
aged. Check piston ring for malfunction. If any, replace piston ring.
–If compression pressure is still low after applying engine oil, valve may be malfunctioning. Check valve
for malfunction. If contact malfunction is found, replace valve or valve seat.
lIf compression pressure in adjacent two cylinders is low after applying engine oil, pressure may be
leaking from gasket. In this case, replace cylinder head gasket.
9. Complete this operation as follows:
a. Turn the ignition switch to “OFF”.
b. Disconnect the battery cable from the negative terminal.
c. Install glow plug and install all the parts removed in step 4.
d. Install fuse [EGI (20A)].
e. Connect the battery cable to the negative terminal.
f. Using CONSULT-II make sure no DTC is indicated for items of self-diagnosis.
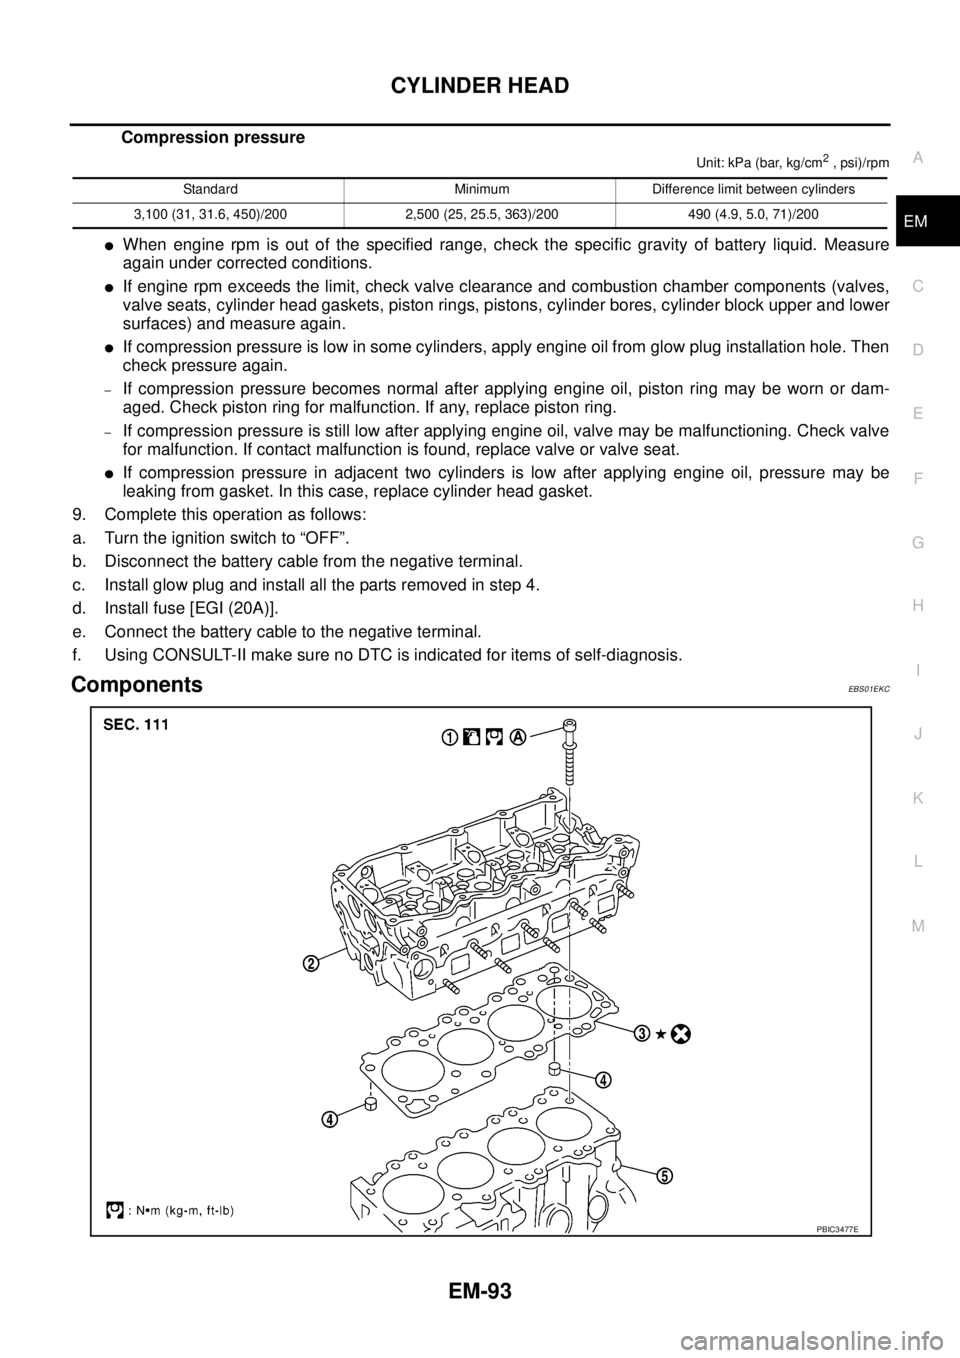
ComponentsEBS01EKC
Standard Minimum Difference limit between cylinders
3,100 (31, 31.6, 450)/200 2,500 (25, 25.5, 363)/200 490 (4.9, 5.0, 71)/200
PBIC3477E
Page 1476 of 3171
EM-94
CYLINDER HEAD
lRefer toGI-10, "Components"for symbol marks in the figure.
Removal and InstallationEBS01E6B
REMOVAL
1. Drain engine coolant. Refer toCO-7, "Changing Engine Coolant".
2. Remove the following:
lRocker cover (Refer toEM-56, "ROCKER COVER".)
lSpill tube and fuel injector (Refer toEM-44, "INJECTION TUBE AND FUEL INJECTOR".)
lIntake manifold (Refer toEM-20, "INTAKE MANIFOLD".)
lTurbocharger (Refer toEM-28, "TURBO CHARGER".)
lExhaust manifold (Refer toEM-34, "EXHAUST MANIFOLD".)
lSecondary timing chain (Refer toEM-73, "SECONDARY TIMING CHAIN".)
lCamshaft (Refer toEM-59, "CAMSHAFT".)
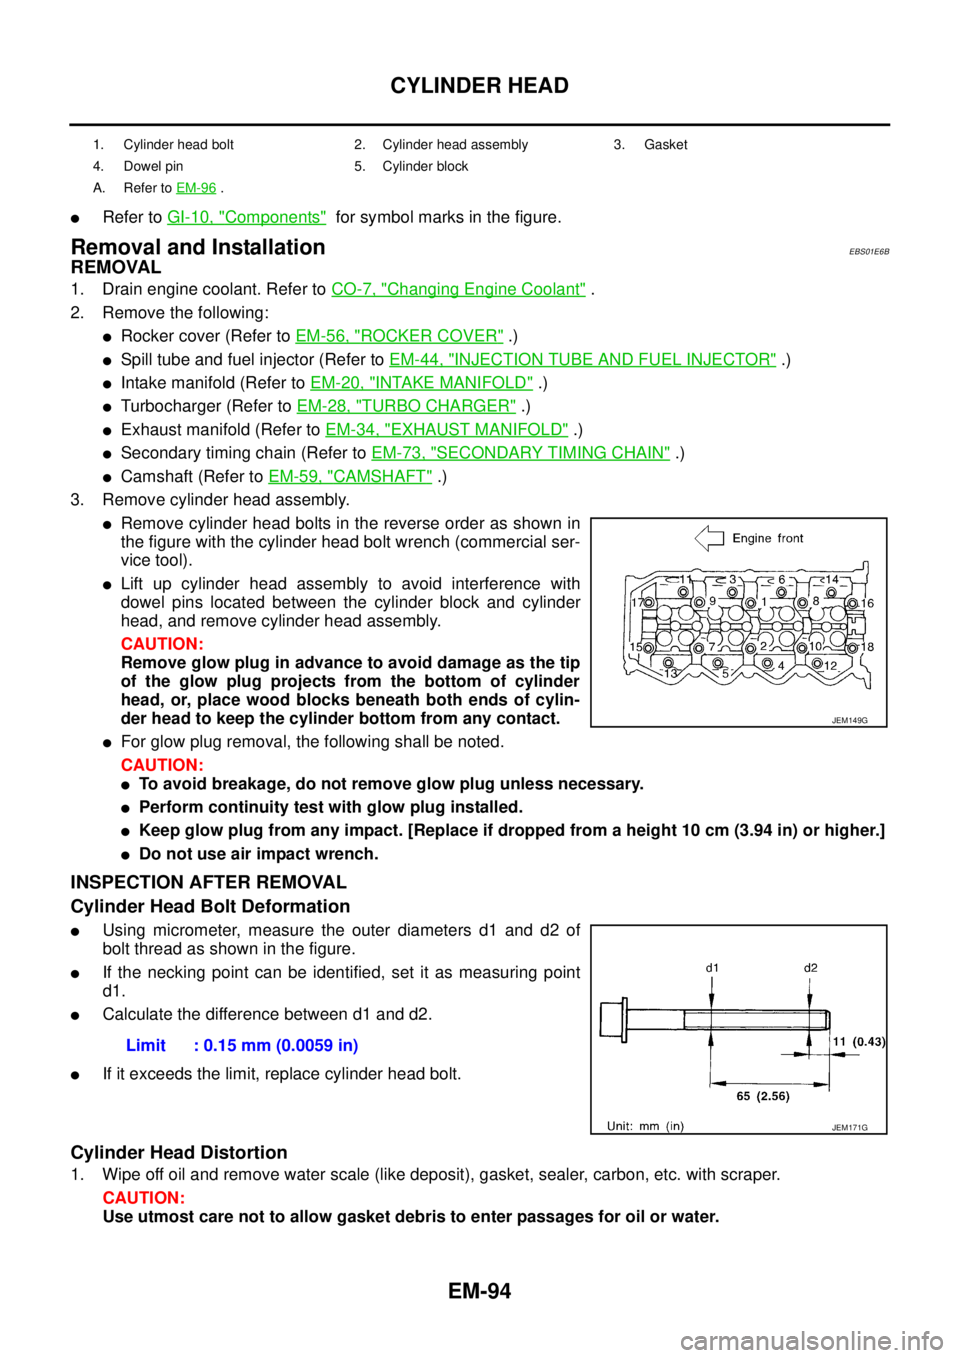
3. Remove cylinder head assembly.
lRemove cylinder head bolts in the reverse order as shown in
the figure with the cylinder head bolt wrench (commercial ser-
vice tool).
lLift up cylinder head assembly to avoid interference with
dowel pins located between the cylinder block and cylinder
head, and remove cylinder head assembly.
CAUTION:
Remove glow plug in advance to avoid damage as the tip
of the glow plug projects from the bottom of cylinder
head, or, place wood blocks beneath both ends of cylin-
der head to keep the cylinder bottom from any contact.
lFor glow plug removal, the following shall be noted.
CAUTION:
lTo avoid breakage, do not remove glow plug unless necessary.
lPerform continuity test with glow plug installed.
lKeep glow plug from any impact. [Replace if dropped from a height 10 cm (3.94 in) or higher.]
lDo not use air impact wrench.
INSPECTION AFTER REMOVAL
Cylinder Head Bolt Deformation
lUsing micrometer, measure the outer diameters d1 and d2 of
bolt thread as shown in the figure.
lIf the necking point can be identified, set it as measuring point
d1.
lCalculate the difference between d1 and d2.
lIf it exceeds the limit, replace cylinder head bolt.
Cylinder Head Distortion
1. Wipe off oil and remove water scale (like deposit), gasket, sealer, carbon, etc. with scraper.
CAUTION:
Use utmost care not to allow gasket debris to enter passages for oil or water.
1. Cylinder head bolt 2. Cylinder head assembly 3. Gasket
4. Dowel pin 5. Cylinder block
A. Refer toEM-96
.
JEM149G
Limit : 0.15 mm (0.0059 in)
JEM171G
Page 1479 of 3171
CYLINDER HEAD
EM-97
C
D
E
F
G
H
I
J
K
L
MA
EM
*: Measured with head bolts tightened
e. If out of above protrusion, check replaced parts.
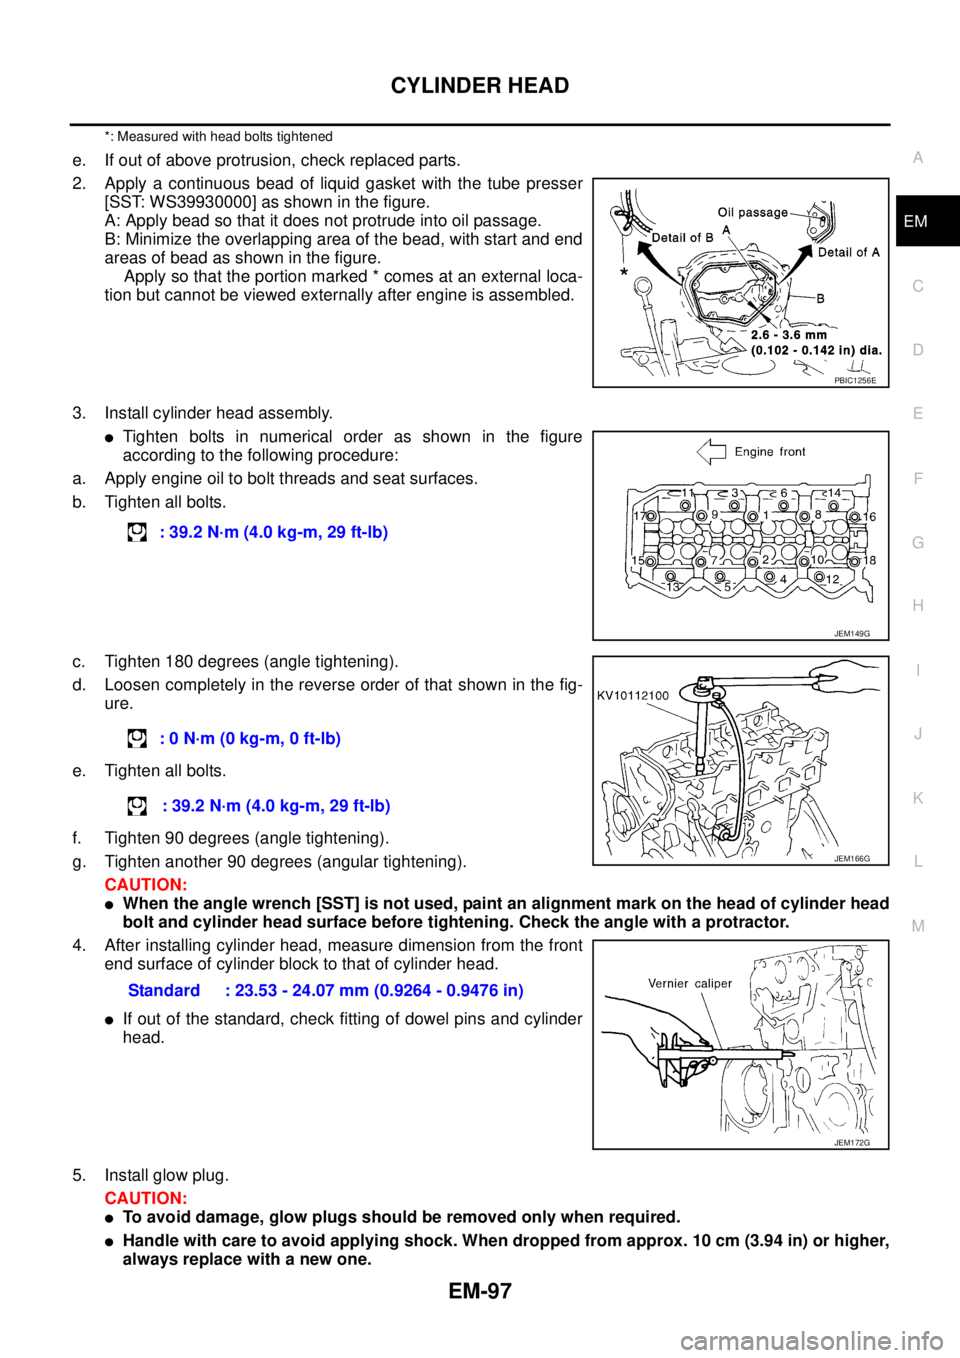
2. Apply a continuous bead of liquid gasket with the tube presser
[SST: WS39930000] as shown in the figure.
A: Apply bead so that it does not protrude into oil passage.
B: Minimize the overlapping area of the bead, with start and end
areas of bead as shown in the figure.
Apply so that the portion marked * comes at an external loca-
tion but cannot be viewed externally after engine is assembled.
3. Install cylinder head assembly.
lTighten bolts in numerical order as shown in the figure
according to the following procedure:
a. Apply engine oil to bolt threads and seat surfaces.
b. Tighten all bolts.
c. Tighten 180 degrees (angle tightening).
d. Loosen completely in the reverse order of that shown in the fig-
ure.
e. Tighten all bolts.
f. Tighten 90 degrees (angle tightening).
g. Tighten another 90 degrees (angular tightening).
CAUTION:
lWhen the angle wrench [SST] is not used, paint an alignment mark on the head of cylinder head
bolt and cylinder head surface before tightening. Check the angle with a protractor.
4. After installing cylinder head, measure dimension from the front
end surface of cylinder block to that of cylinder head.
lIf out of the standard, check fitting of dowel pins and cylinder
head.
5. Install glow plug.
CAUTION:
lTo avoid damage, glow plugs should be removed only when required.
lHandle with care to avoid applying shock. When dropped from approx. 10 cm (3.94 in) or higher,
always replace with a new one.
PBIC1256E
: 39.2 N·m (4.0 kg-m, 29 ft-lb)
JEM149G
:0N·m(0kg-m,0ft-lb)
: 39.2 N·m (4.0 kg-m, 29 ft-lb)
Standard : 23.53 - 24.07 mm (0.9264 - 0.9476 in)
JEM166G
JEM172G
Page 1480 of 3171
EM-98
CYLINDER HEAD
lBefore installing, remove carbon depositing on mounting hole of glow plug with a reamer.
6. Install engine coolant temperature sensor.
7. Install in the reverse order of removal.
INSPECTION AFTER INSTALLATION
Inspection for Leaks
The following are procedures for checking fluids leak, lubricates leak and exhaust gases leak.
lBefore starting engine, check oil/fluid levels including engine coolant and engine oil. If less than required
quantity, fill to the specified level. Refer toMA-14, "
RECOMMENDED FLUIDS AND LUBRICANTS".
lUse procedure below to check for fuel leakage.
–Turn ignition switch “ON” (with engine stopped). With fuel pressure applied to fuel piping, check for fuel
leakage at connection points.
–Start engine. With engine speed increased, check again for fuel leakage at connection points.
lRun engine to check for unusual noise and vibration.
lWarm up engine thoroughly to make sure there is no leakage of fuel, exhaust gases, or any oil/fluids
including engine oil and engine coolant.
lBleed air from lines and hoses of applicable lines, such as in cooling system.
lAfter cooling down engine, again check oil/fluid levels including engine oil and engine coolant. Refill to the
specified level, if necessary.
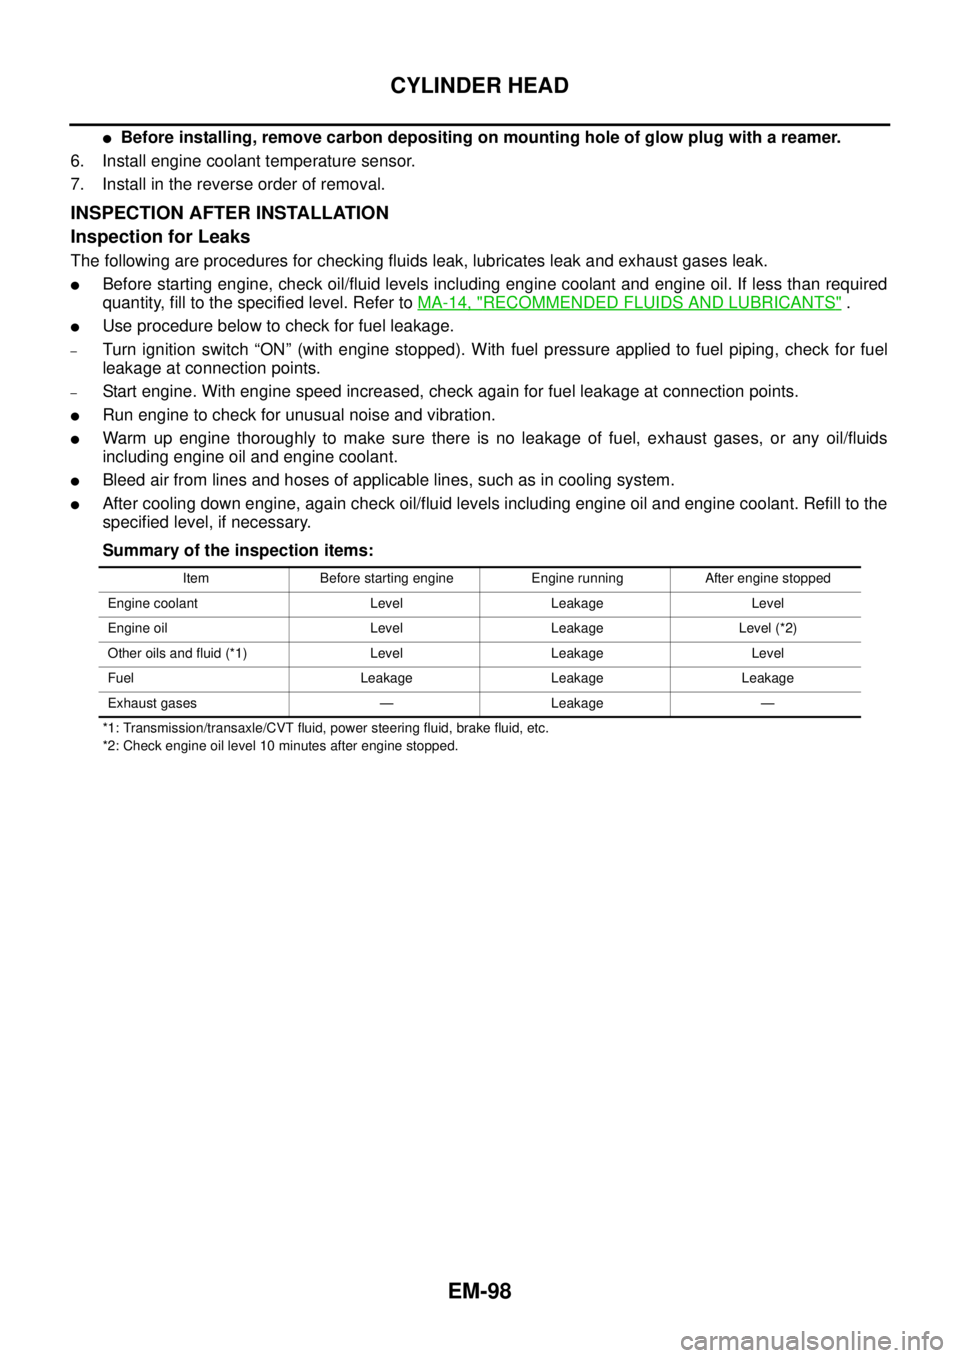
Summary of the inspection items:
*1: Transmission/transaxle/CVT fluid, power steering fluid, brake fluid, etc.
*2: Check engine oil level 10 minutes after engine stopped.Item Before starting engine Engine running After engine stopped
Engine coolant Level Leakage Level
Engine oil Level Leakage Level (*2)
Other oils and fluid (*1) Level Leakage Level
Fuel Leakage Leakage Leakage
Exhaust gases — Leakage —