2005 MITSUBISHI 380 lock
[x] Cancel search: lockPage 1139 of 1500

KEYLESS ENTRY SYSTEM
BODY42-72
NOTE: The adjustment function allows you to change the timer
lock period from 30 seconds (initial setting) to 60, 120 or 180
seconds. Prior to this inspection, confirm which setting is acti-
vated.
ENABLING/DISABLING THE ANSWERBACK
FUNCTION
BGBDGCGD
When the doors are locked or unlocked by using the transmit-
ter, the dome light will flash/illuminate, the turn-signal lights will
flash (hazard answerback), or the horn will sound (horn
answerback) to inform the driver.
The hazard answerback and horn answerback functions can be
enabled or disabled according to the following procedure:
ENABLING/DISABLING THE HAZARD
ANSWERBACK FUNCTION
.
How to adjust hazard answerback when the trans-
mitter is used to lock doors
1. Remove the ignition key.
2. Push the ”unlock” button and then push the ”lock“ button
within 4 seconds to 10 seconds.
3. Release the ”lock” button within 10 seconds after Step 2 and
then release the “unlock” button. The ETACS-ECU tone
alarm will sound, indicating that the hazard answerback
function can be enabled or disabled when the doors are
locked.
Enable the hazard answerback function when the
doors are locked: The ETACS-ECU tone alarm will
sound once.
Disable the hazard answerback function when the
doors are locked: The ETACS-ECU tone alarm will
sound twice.
.
How to adjust hazard answerback when the
transmitter is used to unlock doors
1. Remove the ignition key.
2. Push the ”unlock” button and then push the ”lock“ button
within 4 seconds to 10 seconds.
3. Release the ”lock” button within 10 seconds after Step 2 and
then release the “unlock” button. The ETACS-ECU tone
alarm will sound, indicating that the hazard answerback
function can be enabled or disabled when the door are
unlocked.
Enable the hazard answerback function when the
doors are unlocked: The ETACS-ECU tone alarm
will sound once.
Disable the hazard answerback function when the
doors are unlocked: The ETACS-ECU tone alarm
will sound twice.
Page 1140 of 1500

KEYLESS ENTRY SYSTEM
BODY42-73
ENABLING/DISABLING THE HORN
ANSWERBACK FUNCTION
.
1. Remove the ignition key.
2. Push the ”unlock” button and then push the ”lock“ button
within 4 seconds to 10 seconds.
3. Release the ”lock” button within 10 seconds after Step 2 and
then release the “unlock” button. The ETACS-ECU tone
alarm will sound, indicating that the horn answerback
function can be enabled or disabled.
Enable the horn answerback function*: The
ETACS-ECU tone alarm will sound once.
Disable the horn answerback function: The
ETACS-ECU tone alarm will sound twice.
Enable the horn answerback function**: The
ETACS-ECU tone alarm will sound three times.
NOTE: .
*: The horn will sound if "LOCK" button is pressed with the
doors locked.
**: The horn will sound if the doors are locked with the key-
less entry system.
HOW TO REGISTER SECRET CODEBGBHCCCB
Required Special Tools:
: MUT-III Sub Assembly
MB991824: Vehicle Communication Interface (V.C.I.)
MB991910: MUT-III Main harness A
Each individual secret code is registered inside the transmitter,
and so it is necessary to resister these codes with the
EEPROM inside the receiver in the following cases.
When the transmitter or ETACS-ECU is replaced
If more transmitters are to be used
If it appears that a problem is occurring because of faulty
registration of a code.
A maximum of four different codes can be stored in the
EEPROM memory (four different transmitters can be used).
When the code for the first transmitter is registered, the previ-
ously registered codes for all transmitters are cleared. There-
fore, if you are using four transmitters or are adding more
transmitters, the codes for all transmitters must be registered at
the same time.
WHEN SPECIAL TOOL MB991824 (V.C.I.) IS USED
.
1. Check that the doors lock normally when the key is used.
2. Insert the ignition key.
Page 1141 of 1500

KEYLESS ENTRY SYSTEM
BODY42-74
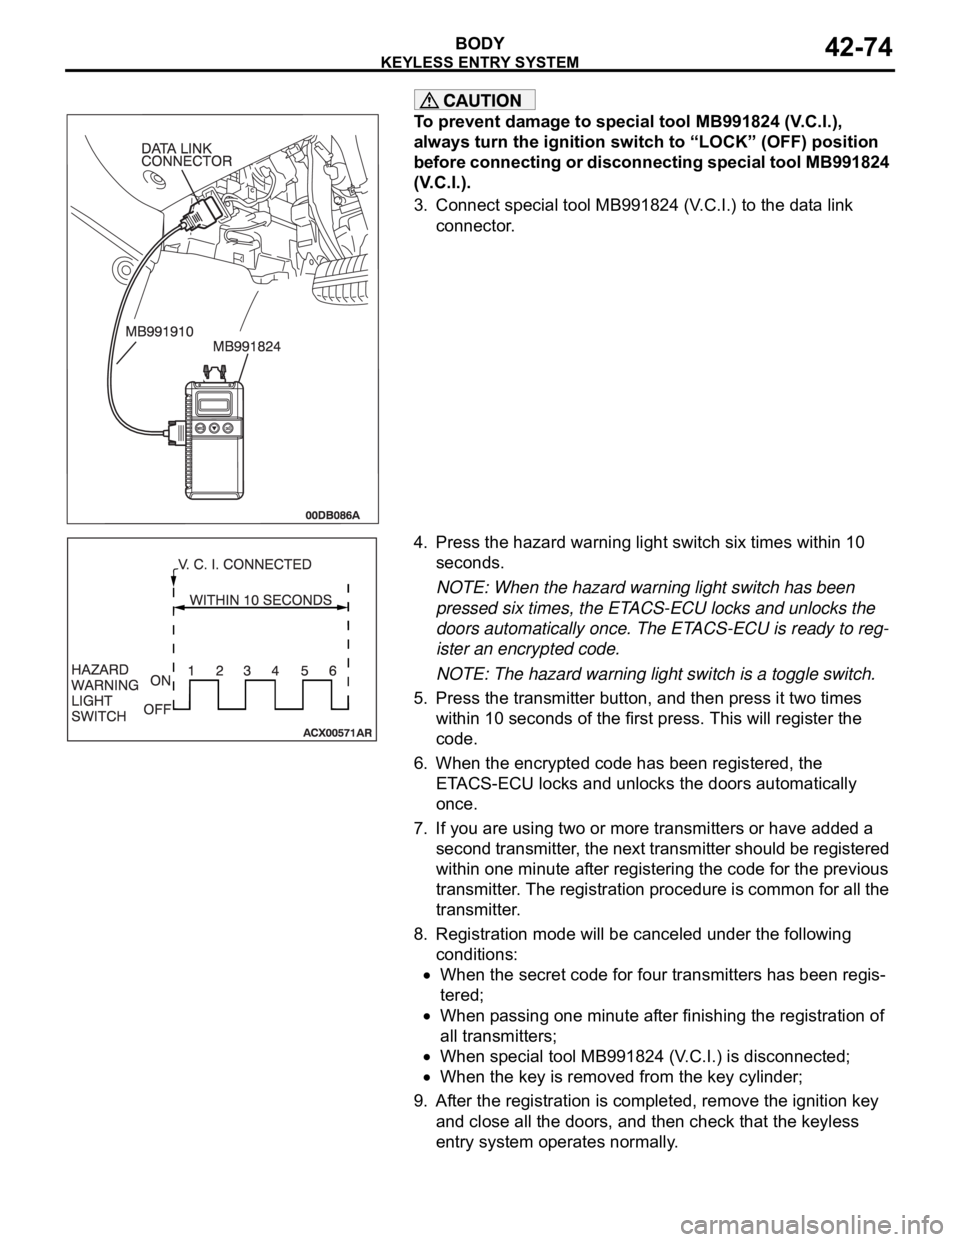
To prevent damage to special tool MB991824 (V.C.I.),
always turn the ignition switch to “LOCK” (OFF) position
before connecting or disconnecting special tool MB991824
(V.C.I.).
3. Connect special tool MB991824 (V.C.I.) to the data link
connector.
4. Press the hazard warning light switch six times within 10
seconds.
NOTE: When the hazard warning light switch has been
pressed six times, the ETACS-ECU locks and unlocks the
doors automatically once. The ETACS-ECU is ready to reg-
ister an encrypted code.
NOTE: The hazard warning light switch is a toggle switch.
5. Press the transmitter button, and then press it two times
within 10 seconds of the first press. This will register the
code.
6. When the encrypted code has been registered, the
ETACS-ECU locks and unlocks the doors automatically
once.
7. If you are using two or more transmitters or have added a
second transmitter, the next transmitter should be registered
within one minute after registering the code for the previous
transmitter. The registration procedure is common for all the
transmitter.
8. Registration mode will be canceled under the following
conditions:
When the secret code for four transmitters has been regis-
tered;
When passing one minute after finishing the registration of
all transmitters;
When special tool MB991824 (V.C.I.) is disconnected;
When the key is removed from the key cylinder;
9. After the registration is completed, remove the ignition key
and close all the doors, and then check that the keyless
entry system operates normally.
Page 1144 of 1500

SUNROOF ASSEMBLY
BODY42-77
SUNROOF INITIALIZATIONM1426004600123
The sunroof should be initialized when any of the following
components are replaced, the sunroof position is miss timed.
Roof lid glass assembly
Sunroof motor assembly.
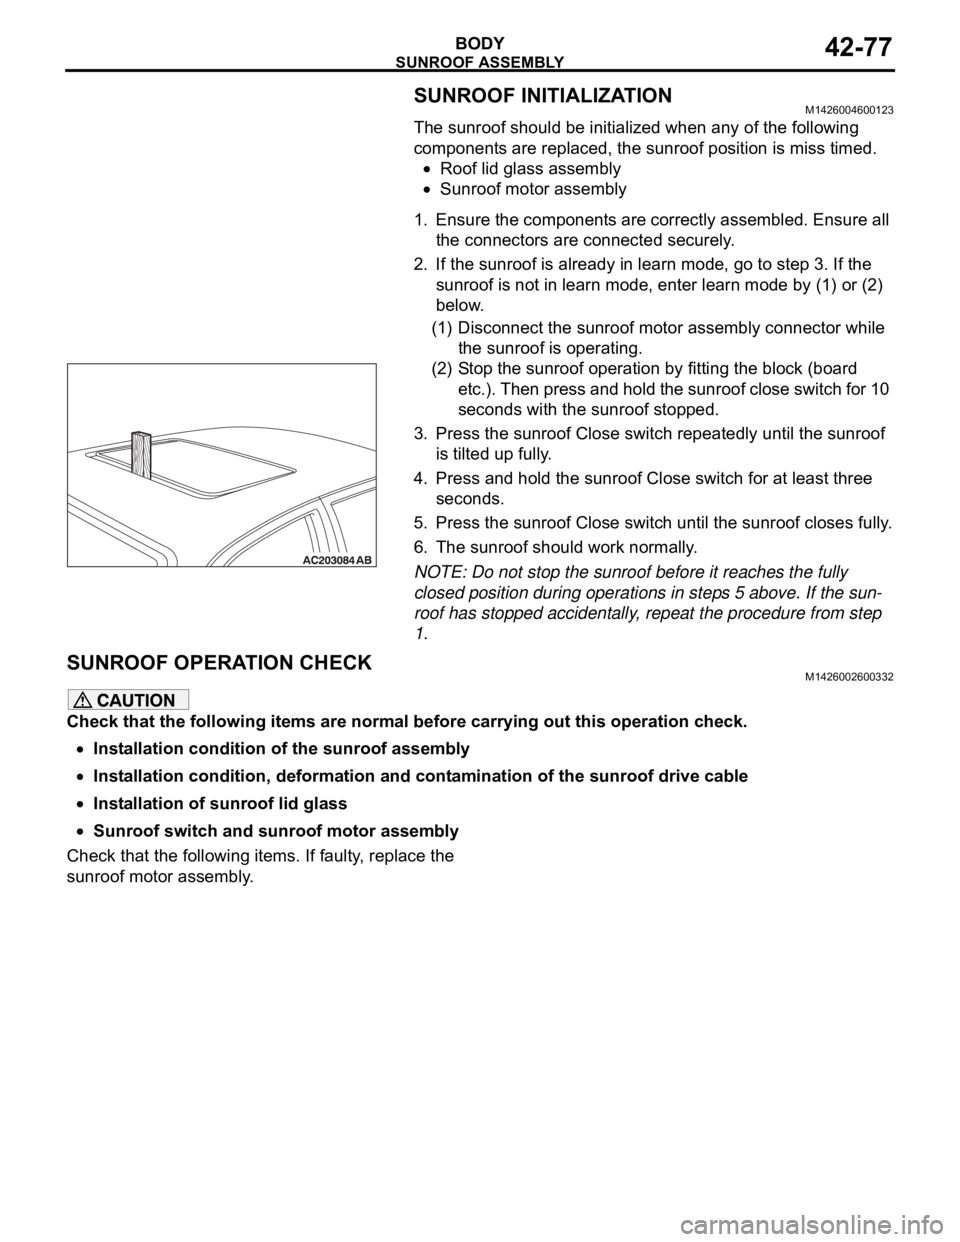
1. Ensure the components are correctly assembled. Ensure all
the connectors are connected securely.
2. If the sunroof is already in learn mode, go to step 3. If the
sunroof is not in learn mode, enter learn mode by (1) or (2)
below.
(1) Disconnect the sunroof motor assembly connector while
the sunroof is operating.
(2) Stop the sunroof operation by fitting the block (board
etc.). Then press and hold the sunroof close switch for 10
seconds with the sunroof stopped.
3. Press the sunroof Close switch repeatedly until the sunroof
is tilted up fully.
4. Press and hold the sunroof Close switch for at least three
seconds.
5. Press the sunroof Close switch until the sunroof closes fully.
6. The sunroof should work normally.
NOTE: Do not stop the sunroof before it reaches the fully
closed position during operations in steps 5 above. If the sun-
roof has stopped accidentally, repeat the procedure from step
1.
SUNROOF OPERATION CHECKM1426002600332
Check that the following items are normal before carrying out this operation check.
Installation condition of the sunroof assembly
Installation condition, deformation and contamination of the sunroof drive cable
Installation of sunroof lid glass
Sunroof switch and sunroof motor assembly
Check that the following items. If faulty, replace the
sunroof motor assembly.
Page 1146 of 1500

SUNROOF ASSEMBLY
BODY42-79
Sunroof timer mechanism
In cases except the following, the basic operation
and jam preventing mechanism will be maintained
for thirty seconds after the ignition switch is turned to
the LOCK (OFF) position. (Sunroof timer function)
If you open a door within that period (i.e. a door
switch is on), the sunroof timer function will be
cancelled immediately.
If you turn the ignition switch to the LOCK (OFF)
position while the timer is working, the sunroof
will continue moving until it closes fully, regard-
less of the time-out period. 05 AUTOMATIC
OPERATION
INTERRUPTION
(OPEN)A
1. Ignition switch: ON
2. Sunroof switch: OPEN or TILT-UPThe sunroof stops the
automatic opening
operation.
B
1. Ignition switch: ON
2. Sunroof switch: CLOSE/TILT DOWN (Push
the sunroof switch to the
CLOSE/TILT-DOWN position while the
sunroof is automatically opening and
release the switch within two seconds)The sunroof stops the
automatic opening
operation.
C
1. Ignition switch: ON
2. Sunroof switch: CLOSE/TILT DOWN (Push
the sunroof switch to the
CLOSE/TILT-DOWN position more than
two seconds while the sunroof is
automatically opening)The sunroof stops the
automatic opening
operation, and the sunroof
closes while the sunroof
switch is pushed to the
CLOSE/TILT-DOWN
position.
06 AUTOMATIC
OPERATION
INTERRUPTION
(TILT-UP)1. Ignition switch: ON
2. Sunroof switch: OPEN or TILT-UP, CLOSE/TILT
DOWNThe sunroof stops the
automatic opening
operation. NO. SUNROOF
FUNCTIONREQUIREMENTS FOR THE SUNROOF TO
FUNCTIONNORMAL OPERATION
Page 1154 of 1500

SPECIFICATIONS
BODY42-87
SERVICE SPECIFICATIONSM1421000300299
SEALANT AND ADHESIVESM1421000500204
Door inside handle knob play mm
(in)Front 26.1 - 58.1 (1.028 - 2.287) [Target
value 41 (1.61)]
Rear 30.3 - 58.1 (1.193 - 2.287) [Target
value 41 (1.61)]
Door inside handle lock knob stroke mm (in) 21.6 (0.850)
Door outside handle play mm (in) Front 10
3.5 (0.39 0.138)
Rear 11.2
4 (0.441 0.16)
Power window operation current A 5
1 [Power supply voltage 14.5
0.5V 25
C (77F)]
ITEM STANDARD VALUE
Roof lid glass operation current A 7 or less [at 20
C(68F)]
ITEM SPECIFIED ADHESIVE
Rear window glass 3 M
AAD part No. 8609 super fast urethane and 3 M AAD part No.
8608 super fast urethane primer or equivalent
Windshield
ITEM SPECIFIED SEALANT REMARK
Waterproof film 3 M
AAD Part No. 8633 or equivalent Ribbon sealer
ITEM SPECIFIED ADHESIVE TAPE
Front door opening outer
weatherstripAdhesive tape: Double-sided tape [7 mm (0.28 in) width, 85 mm (3.35
in) length and 0.8 mm (0.03 in) thickness]
Rear door opening outer
weatherstripAdhesive tape: Double-sided tape [7 mm (0.28 in) width, 50 mm (1.97
in) length and 0.8 mm (0.031 in) thickness]
ITEM SPECIFIED SEALANT REMARK
Trunk lid hinge 3 M
AAD part No. 8531 Heavy drip check sealer,
3 M
AAD part No. 8646 Automotive joint and
seam sealer or equivalentBody sealer
Page 1164 of 1500

35-1
GROUP 35
SERVICE BRAKES
CONTENTS
BASIC BRAKE SYSTEM . . . . . . . . . . . . . . . . . . . . . . . . . . . . . .35A
ANTI-LOCK BRAKING SYSTEM (ABS). . . . . . . . . . . . . . . . . . .35B
Page 1167 of 1500

GENERAL DESCRIPTION
BASIC BRAKE SYSTEM35A-2
GENERAL DESCRIPTIONM1351000100440
The brake system has been designed to give greater
reliability and durability and to provide excellent brak-
ing performance.
FEATURES
.
Improved braking performance
1. An 8+9 inch tandem brake booster provides suffi-
cient braking force in sudden braking range.
2. 296mm front ventilated disc brakes provide sta-
ble braking force and improved braking feel.
3. 303mm rear ventillated disc brakes are used.
.
Improved stability
1. A 4-wheel anti-lock braking system (4ABS) pre-
vents slipping caused by the vehicle wheels lock-
ing up, in order to maintain a stable vehicle
posture and steering performance.
2. An electronic brake-force distribution (EBD)
makes it possible to maintain the maximum
amount of braking force even when the vehicle's
load is unevenly distributed. 3. Front- and rear-wheel X-type brake line layout
are used.
4. Ventilated discs brakes improve anti-fading per-
formance.
.
Improved serviceability
1. A diagnosis function for the ABS system makes
inspection easier.
2. An outer disc separated hub and rotor make
removal and installation easier.
3. The master cylinder reservoir is utilised for both
brake and clutch fluid on manual transmission
vehicles.
4. The master cylinder filter is coloured black for
improved viewing.
5. The ABS-ECU and hydraulic unit are integrated
to make them more compact and light weight.
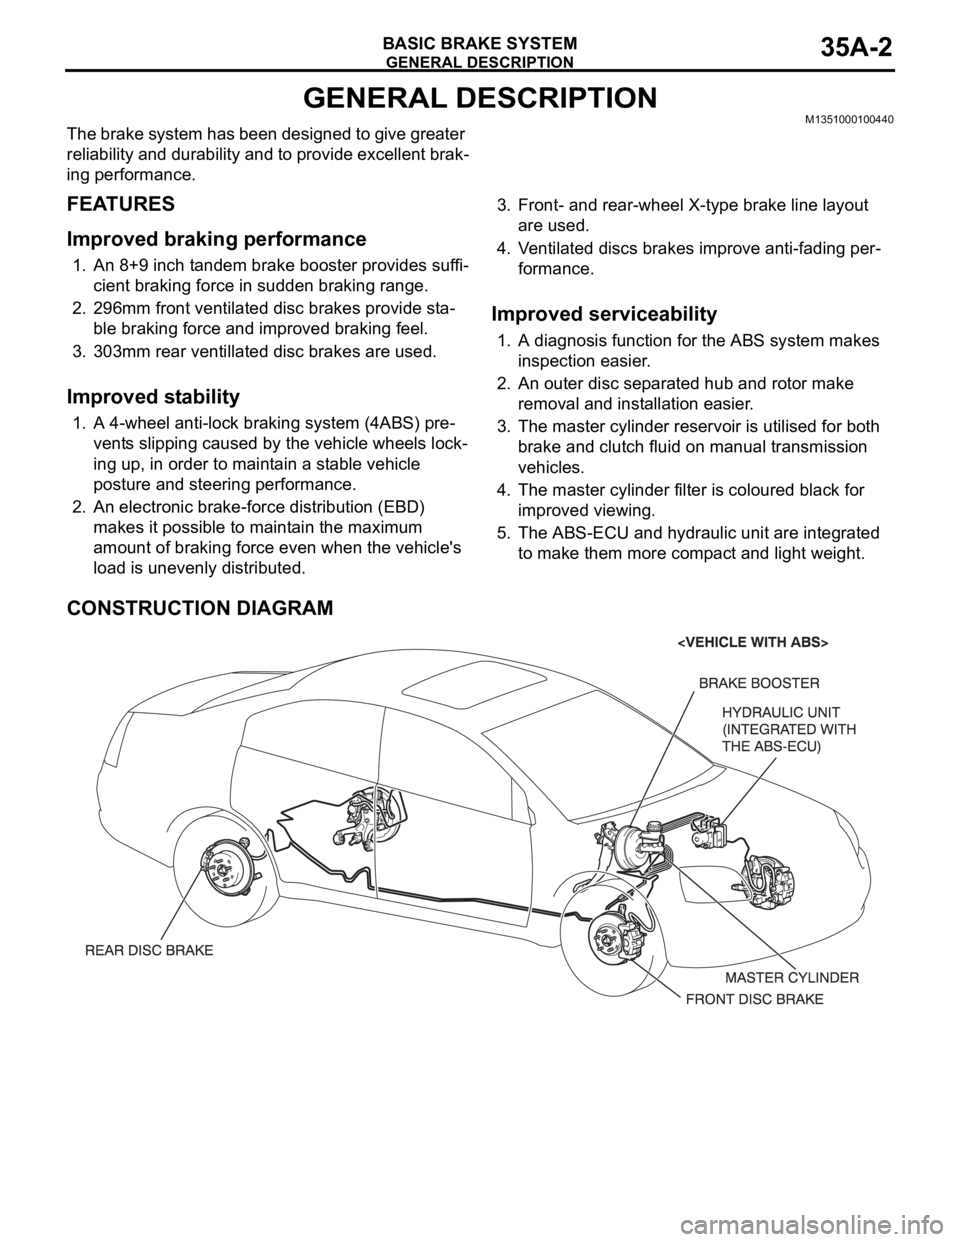
CONSTRUCTION DIAGRAM