Page 1024 of 1500
ENGINE ROLL STOPPER AND CENTREMEMBER
POWER PLANT MOUNT32-7
ENGINE ROLL STOPPER AND CENTREMEMBER
REMOVAL AND INSTALLATIONM1321002300306
*: Indicates parts which should be initially tightened, and then fully tightened after placing the vehicle
horizontally and loading the full weight of the engine on the vehicle body.
Pre-removal and Post-installation Operation
Side Under Cover Removal and Installation (Refer to
GROUP 51, Under Cover P.51-13).
FRONT ROLL STOPPER AND
CENTREMEMBER REMOVAL
STEPS
1. SELF-LOCKING NUT
2. ENGINE FRONT ROLL STOPPER
BRACKET AND
CENTREMEMBER
>>B<<3. ENGINE FRONT ROLL STOPPER
BRACKET
4.
CENTREMEMBERREAR ROLL STOPPER
REMOVAL STEPS
FRONT AXLE NO.1
CROSSMEMBER ASSEMBLY
(REFER TO P.32-9).
5. ENGINE REAR ROLL STOPPER
BRACKET
REAR ROLL STOPPER
BRACKET REMOVAL STEPS
FRONT NO.1 EXHAUST PIPE
(REFER TO GROUP 15,
EXHAUST PIPE AND MAIN
MUFFLER P.15-14).
1. SELF-LOCKING NUT
Page 1025 of 1500
ENGINE ROLL STOPPER AND CENTREMEMBER
POWER PLANT MOUNT32-8
INSTALLATION SERVICE POINTS
.
>>B<< ENGINE FRONT ROLL STOPPER
BRACKET INSTALLATION
Install the engine front roll stopper bracket so that its hole
points towards the front side of the vehicle.
2. ENGINE FRONT ROLL STOPPER
BRACKET AND
CENTREMEMBER
6. SELF-LOCKING NUT
7. TRANSAXLE CASE REAR ROLL
STOPPER BRACKET REAR ROLL STOPPER
BRACKET REMOVAL STEPS
Page 1026 of 1500

CROSSMEMBER
POWER PLANT MOUNT32-9
CROSSMEMBER
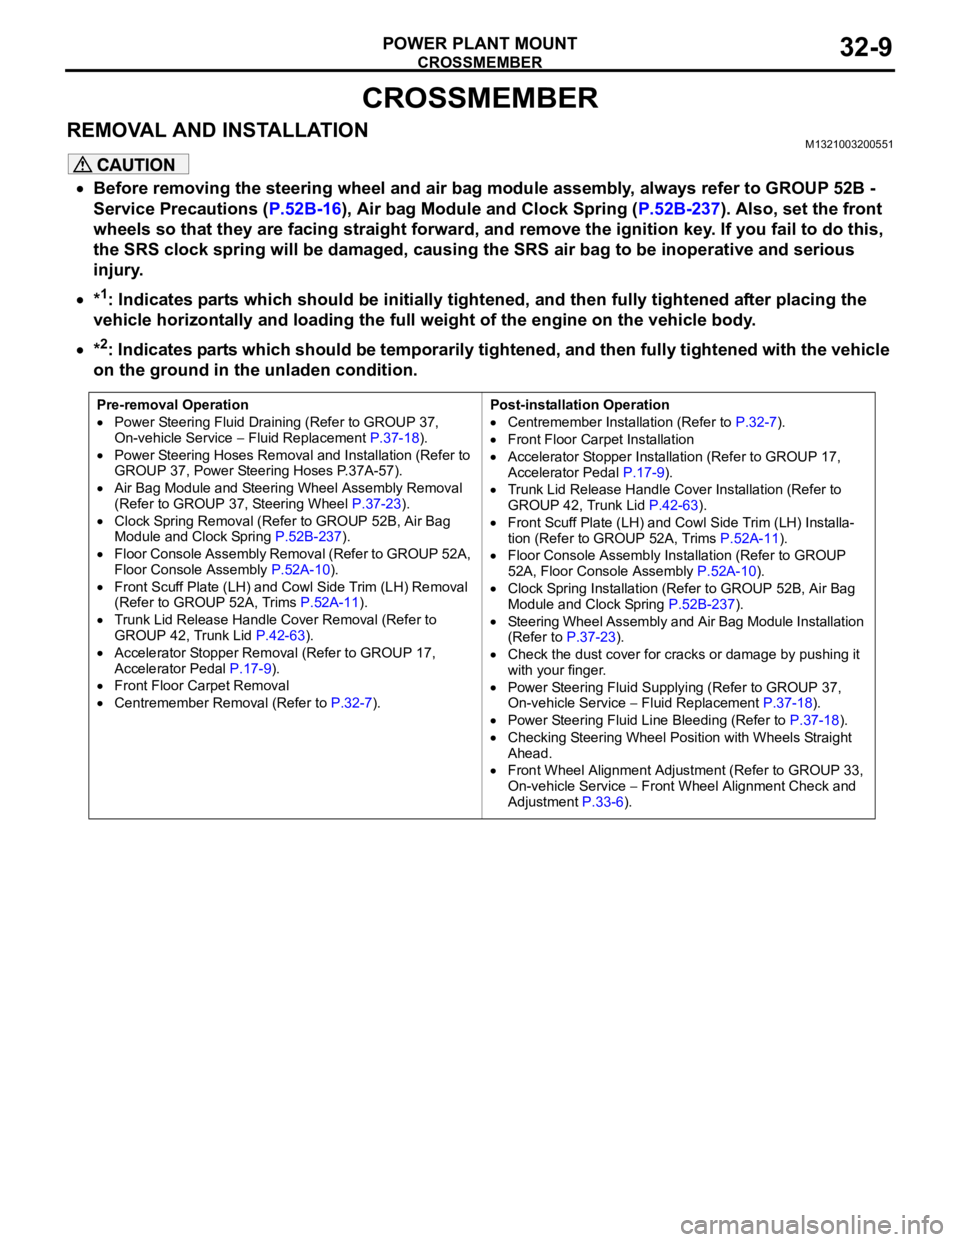
REMOVAL AND INSTALLATIONM1321003200551
Before removing the steering wheel and air bag module assembly, always refer to GROUP 52B -
Service Precautions (P.52B-16), Air bag Module and Clock Spring (P.52B-237). Also, set the front
wheels so that they are facing straight forward, and remove the ignition key. If you fail to do this,
the SRS clock spring will be damaged, causing the SRS air bag to be inoperative and serious
injury.
*1: Indicates parts which should be initially tightened, and then fully tightened after placing the
vehicle horizontally and loading the full weight of the engine on the vehicle body.
*2: Indicates parts which should be temporarily tightened, and then fully tightened with the vehicle
on the ground in the unladen condition.
Pre-removal Operation
Power Steering Fluid Draining (Refer to GROUP 37,
On-vehicle Service Fluid Replacement P.37-18).
Power Steering Hoses Removal and Installation (Refer to
GROUP 37, Power Steering Hoses P.37A-57).
Air Bag Module and Steering Wheel Assembly Removal
(Refer to GROUP 37, Steering Wheel P.37-23).
Clock Spring Removal (Refer to GROUP 52B, Air Bag
Module and Clock Spring P.52B-237).
Floor Console Assembly Removal (Refer to GROUP 52A,
Floor Console Assembly P.52A-10).
Front Scuff Plate (LH) and Cowl Side Trim (LH) Removal
(Refer to GROUP 52A, Trims P.52A-11).
Trunk Lid Release Handle Cover Removal (Refer to
GROUP 42, Trunk Lid P.42-63).
Accelerator Stopper Removal (Refer to GROUP 17,
Accelerator Pedal P.17-9).
Front Floor Carpet Removal
Centremember Removal (Refer to P.32-7).Post-installation Operation
Centremember Installation (Refer to P.32-7).
Front Floor Carpet Installation
Accelerator Stopper Installation (Refer to GROUP 17,
Accelerator Pedal P.17-9).
Trunk Lid Release Handle Cover Installation (Refer to
GROUP 42, Trunk Lid P.42-63).
Front Scuff Plate (LH) and Cowl Side Trim (LH) Installa-
tion (Refer to GROUP 52A, Trims P.52A-11).
Floor Console Assembly Installation (Refer to GROUP
52A, Floor Console Assembly P.52A-10).
Clock Spring Installation (Refer to GROUP 52B, Air Bag
Module and Clock Spring P.52B-237).
Steering Wheel Assembly and Air Bag Module Installation
(Refer to P.37-23).
Check the dust cover for cracks or damage by pushing it
with your finger.
Power Steering Fluid Supplying (Refer to GROUP 37,
On-vehicle Service Fluid Replacement P.37-18).
Power Steering Fluid Line Bleeding (Refer to P.37-18).
Checking Steering Wheel Position with Wheels Straight
Ahead.
Front Wheel Alignment Adjustment (Refer to GROUP 33,
On-vehicle Service
Front Wheel Alignment Check and
Adjustment P.33-6).
Page 1027 of 1500
Page 1029 of 1500

CROSSMEMBER
POWER PLANT MOUNT32-12
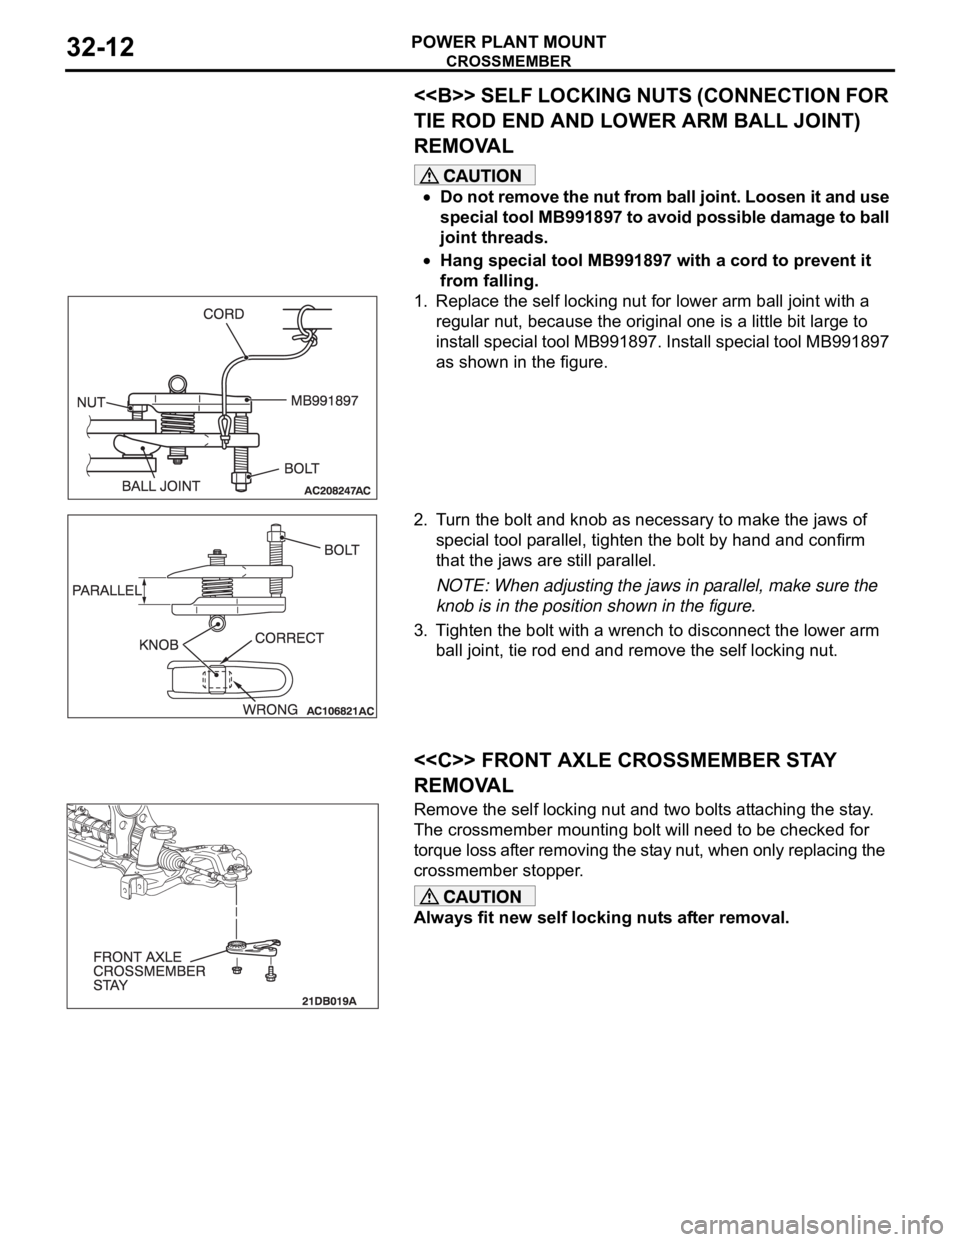
<> SELF LOCKING NUTS (CONNECTION FOR
TIE ROD END AND LOWER ARM BALL JOINT)
REMOVAL
Do not remove the nut from ball joint. Loosen it and use
special tool MB991897 to avoid possible damage to ball
joint threads.
Hang special tool MB991897 with a cord to prevent it
from falling.
1. Replace the self locking nut for lower arm ball joint with a
regular nut, because the original one is a little bit large to
install special tool MB991897. Install special tool MB991897
as shown in the figure.
2. Turn the bolt and knob as necessary to make the jaws of
special tool parallel, tighten the bolt by hand and confirm
that the jaws are still parallel.
NOTE: When adjusting the jaws in parallel, make sure the
knob is in the position shown in the figure.
3. Tighten the bolt with a wrench to disconnect the lower arm
ball joint, tie rod end and remove the self locking nut.
.
<> FRONT AXLE CROSSMEMBER STAY
REMOVAL
Remove the self locking nut and two bolts attaching the stay.
The crossmember mounting bolt will need to be checked for
torque loss after removing the stay nut, when only replacing the
crossmember stopper.
Always fit new self locking nuts after removal.
.
Page 1031 of 1500
CROSSMEMBER
POWER PLANT MOUNT32-14
>>D<< FRONT AXLE CROSSMEMBER BOLT/
STAY/SELF-LOCKING NUTS INSTALLATION
1. Ensure that the crossmember mounting bolts have been
tightened to specification. .
2. Install the front crossmember stay/stopper and tighten self
locking nuts and bolts to specification.
Always fit new self locking nuts after removal.
INSPECTIONM1321003300194
Check the crossmembers for cracks or damage.
Page 1032 of 1500

SPECIFICATIONS
POWER PLANT MOUNT32-15
SPECIFICATIONS
FASTENER TIGHTENING SPECIFICATIONSM1321004100308
ITEM SPECIFICATION
Crossmember
Engine rear roll stopper bracket bolt 58
7 Nm
Front axle crossmember stay bolt and nut 83
12 Nm (61 9 ft-lb)
Front axle No.1 crossmember bolt and nut 180
20 Nm (133 15 ft-lb)
Lower arm assembly bolt 165
15 Nm (122 11 ft-lb)
Lower arm assembly nut (flange nut, self-locking) M14 165
15 Nm (122 11 ft-lb)
Lower arm ball joint clamp assembly nut 110
10 Nm
Power steering gear and linkage bolt 83
12 Nm (61 9 ft-lb)
Power steering gear bracket bolt M12 83
12 Nm (61 9 ft-lb)
Pressure hose clamp bolt and nut 12
2 Nm (102 22 in-lb)
Pressure hose nut 15
3 Nm (11 2 ft-lb)
Return tube clamp bolt and nut 12
2 Nm (102 22 in-lb)
Return tube nut 15
3 Nm (11 2 ft-lb)
Stabilizer bracket bolt 58
7 Nm (43 5 ft-lb)
Stabilizer link nut 48
7 Nm (36 5 ft-lb)
Steering column assembly bolt 18
2 Nm (13 2 ft-lb)
Steering gear and linkage protector bolt 12
2 Nm (102 22 in-lb)
Tie rod end nut 29
4 Nm (21 3 ft-lb)
Engine mounting
Engine mounting thru bolt M12 108
10 Nm (80 9 ft-lb)
Engine front mounting bracket bolt and nut M12 108
10 Nm (80 9 ft-lb)
Engine mounting stay bolt 36
6 Nm (27 4 ft-lb)
Engine roll stopper and centremember
Centremember bolt83
12 Nm (61 9 ft-lb)
Engine front roll stopper thru bolt and nut 69
10 Nm (61 9 ft-lb
Engine rear roll stopper thru bolt and nut 69
10 Nm (61 9 ft-lb
Transaxle case rear roll stopper bracket bolt 90
10 Nm (67 7 ft-lb)
Transaxle mounting
Transaxle mounting body side bracket nut (nut, flange) M12 83
12 Nm (61 9 ft-lb)
Transaxle mounting body side bracket nut (nut, self-locking) M1283
12 Nm (61 9 ft-lb)
Page 1049 of 1500

WINDSHIELD WIPER AND WASHER
EXTERIOR51-16
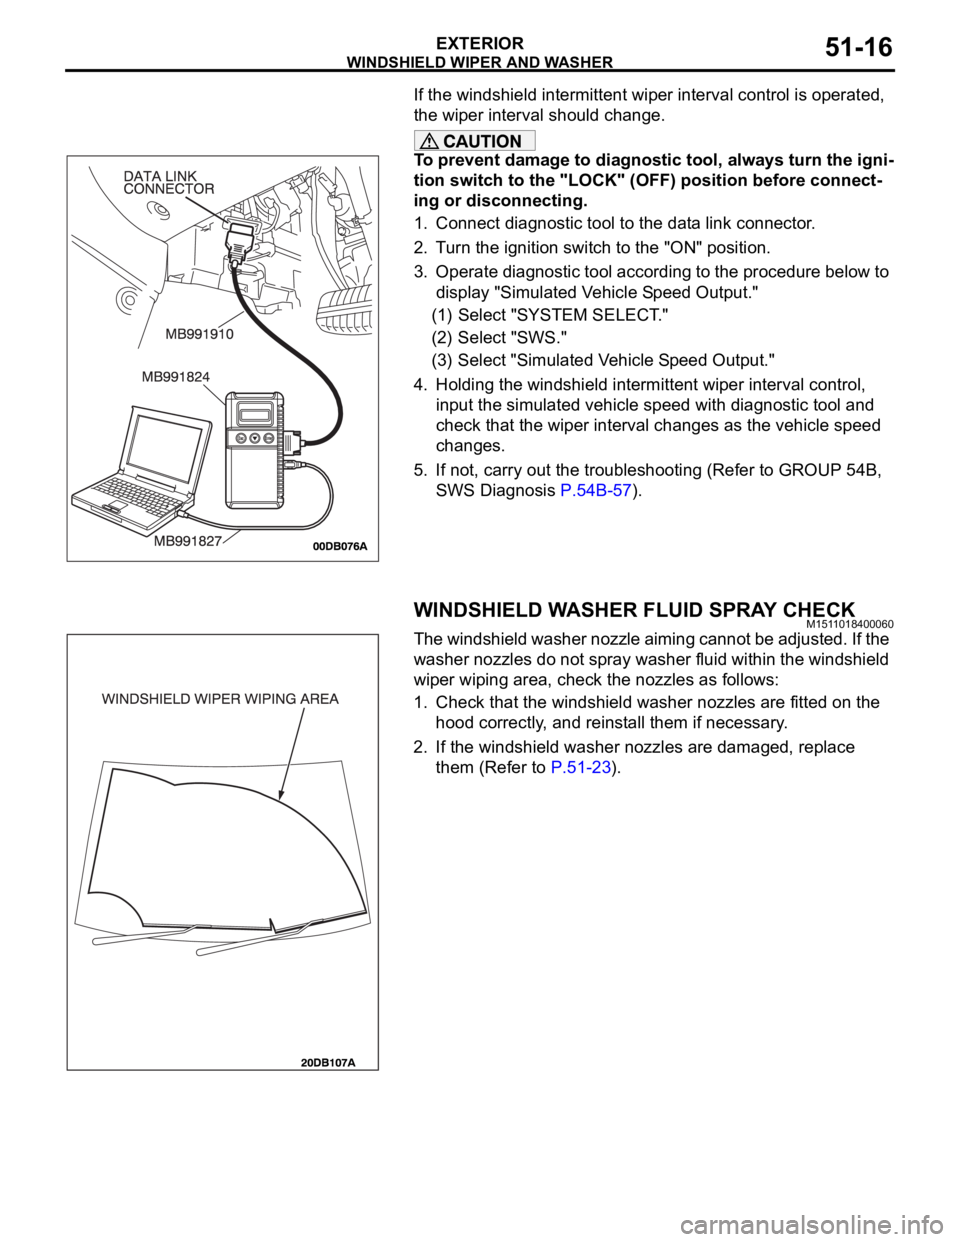
If the windshield intermittent wiper interval control is operated,
the wiper interval should change.
To prevent damage to diagnostic tool, always turn the igni-
tion switch to the "LOCK" (OFF) position before connect-
ing or disconnecting.
1. Connect diagnostic tool to the data link connector.
2. Turn the ignition switch to the "ON" position.
3. Operate diagnostic tool according to the procedure below to
display "Simulated Vehicle Speed Output."
(1) Select "SYSTEM SELECT."
(2) Select "SWS."
(3) Select "Simulated Vehicle Speed Output."
4. Holding the windshield intermittent wiper interval control,
input the simulated vehicle speed with diagnostic tool and
check that the wiper interval changes as the vehicle speed
changes.
5. If not, carry out the troubleshooting (Refer to GROUP 54B,
SWS Diagnosis P.54B-57).
WINDSHIELD WASHER FLUID SPRAY CHECKM1511018400060
The windshield washer nozzle aiming cannot be adjusted. If the
washer nozzles do not spray washer fluid within the windshield
wiper wiping area, check the nozzles as follows:
1. Check that the windshield washer nozzles are fitted on the
hood correctly, and reinstall them if necessary.
2. If the windshield washer nozzles are damaged, replace
them (Refer to P.51-23).