2005 MITSUBISHI 380 height adjustment
[x] Cancel search: height adjustmentPage 989 of 1500

CHARGING SYSTEM
ENGINE ELECTRICAL16-12
NOTE: The voltage waveform of the alternator "B" terminal can
undulate as shown at left. This waveform is produced when the
regulator operates according to fluctuations in the alternator
load (current), and is normal for the alternator.
If the ripple height is abnormally high (approximately 2 V or
more during idling), the wires between the alternator "B" termi-
nal and the battery have broken due to fuse blowing, etc. The
alternator is usually operating properly.
.
ABNORMAL WAVEFORMS EXAMPLES
NOTE: The size of the waveform patterns can differ greatly,
depending on the adjustment of the variable knob on the oscil-
loscope.
NOTE: Identification of abnormal waveforms is easier when
there is a large output current (regulator is not operating).
(Waveforms can be observed when the headlights are illumi-
nated.)
NOTE: Check the conditions of the alternator malfunction light
(illuminated/not illuminated) also, and carry out a total check.
ABNORMAL WAVEFORMS
Example 1
PROBABLE CAUSE: Open circuit in diode
Page 1068 of 1500
42-1
GROUP 42
BODY
CONTENTS
HOOD . . . . . . . . . . . . . . . . . . . . .
42-4
BODY DIAGNOSIS . . . . . . . . . . . .
42-4
INTRODUCTION TO HOOD DIAGNOSIS42-4
HOOD DIAGNOSTIC TROUBLESHOOTING
STRATEGY . . . . . . . . . . . . . . . . . . . . . . 42-4
SYMPTOM CHART . . . . . . . . . . . . . . . . 42-4
SYMPTOM PROCEDURES . . . . . . . . . 42-4
ON-VEHICLE SERVICE. . . . . . . . .42-6
ADJUSTMENT OF CLEARANCE
AROUND HOOD . . . . . . . . . . . . . . . . . . 42-6
ALIGNMENT OF HOOD LATCH AND
STRIKER . . . . . . . . . . . . . . . . . . . . . . . . 42-6
ADJUSTMENT OF HOOD HEIGHT . . . 42-7
HOOD . . . . . . . . . . . . . . . . . . . . . . .42-8
REMOVAL AND INSTALLATION . . . . . 42-8
FENDER . . . . . . . . . . . . . . . . . . .42-10
REMOVAL AND INSTALLATION .
42-10
FUEL FILLER LID . . . . . . . . . . .42-11
REMOVAL AND INSTALLATION .
42-11
STRUT TOWER BAR . . . . . . . . 42-12
REMOVAL AND INSTALLATION .
42-12
WINDOW GLASS . . . . . . . . . . . 42-12
GENERAL . . . . . . . . . . . . . . . . . . . .
42-12
WINDOW GLASS DIAGNOSIS . . .42-14
INTRODUCTION TO WINDOW GLASS
DIAGNOSIS . . . . . . . . . . . . . . . . . . . . . . 42-14
WINDOW GLASS DIAGNOSTIC
TROUBLESHOOTING STRATEGY . . . . 42-14
WINDOW GLASS DIAGNOSTIC TROUBLE
SYMPTOM CHART . . . . . . . . . . . . . . . . 42-14
SYMPTOM PROCEDURES . . . . . . . . . . 42-14
SPECIAL TOOL . . . . . . . . . . . . . . .42-14
WINDSHIELD . . . . . . . . . . . . . . . . .42-15
REMOVAL AND INSTALLATION . . . . . . 42-15
REAR WINDOW GLASS . . . . . . . .42-20
REMOVAL AND INSTALLATION . . . . . . 42-20
Continued on next page
Page 1069 of 1500
BODY42-2
DOOR . . . . . . . . . . . . . . . . . . . . . . . . .42-23
GENERAL DESCRIPTION . . . . . .
42-23
CENTRAL DOOR LOCKING SYSTEM
DIAGNOSIS . . . . . . . . . . . . . . . . . . . . . . 42-23
POWER WINDOW DIAGNOSIS . . . . . . 42-23
DOOR DIAGNOSIS . . . . . . . . . . . . . . . . 42-23
INTRODUCTION TO GLASS AND DOOR
DIAGNOSIS . . . . . . . . . . . . . . . . . . . . . . 42-23
GLASS AND DOOR DIAGNOSTIC
TROUBLESHOOTING STRATEGY . . . 42-23
SYMPTOM CHART . . . . . . . . . . . . . . . . 42-24
SYMPTOM PROCEDURES . . . . . . . . . 42-24
HOW TO LOCATE WIND NOISE . . . . . 42-27
SPECIAL TOOLS. . . . . . . . . . . . . .42-28
ON-VEHICLE SERVICE. . . . . . . . .42-30
DOOR FIT ADJUSTMENT. . . . . . . . . . . 42-30
DOOR WINDOW GLASS ADJUSTMENT42-31
GLASS SLIDING MECHANISM CHECK
AND ADJUSTMENT . . . . . . . . . . . . . . . 42-32
POWER WINDOW TIMER FUNCTION
CHECK . . . . . . . . . . . . . . . . . . . . . . . . . 42-32
POWER WINDOW OPERATING
CURRENT CHECK . . . . . . . . . . . . . . . . 42-33
POWER WINDOW RELAY CHECK . . . 42-33
CIRCUIT BREAKER (INCORPORATED IN
THE POWER WINDOW MOTOR)
INSPECTION . . . . . . . . . . . . . . . . . . . . . 42-34
POWER WINDOW CHECK . . . . . . . . . . 42-34
CENTRAL DOOR LOCKING SYSTEM
INSPECTION . . . . . . . . . . . . . . . . . . . . . 42-34
DOOR OUTSIDE HANDLE PLAY CHECK42-35
DOOR INSIDE HANDLE PLAY CHECK 42-35
DOOR ASSEMBLY . . . . . . . . . . . .42-37
REMOVAL AND INSTALLATION . . . . . 42-37
INSPECTION . . . . . . . . . . . . . . . . . . . . . 42-38
DOOR GLASS AND REGULATOR42-39
REMOVAL AND INSTALLATION . . . . . 42-39
INSPECTION . . . . . . . . . . . . . . . . . . . . . 42-43
DOOR HANDLE AND LATCH . . . .42-46
REMOVAL AND INSTALLATION . . . . . 42-46
INSPECTION . . . . . . . . . . . . . . . . . . . . . 42-49
WINDOW GLASS RUNCHANNEL
AND DOOR OPENING
WEATHERSTRIP . . . . . . . . . . . . . .
42-52
REMOVAL AND INSTALLATION . . . . . . 42-52
TRUNK LID. . . . . . . . . . . . . . . . 42-60
TRUNK LID DIAGNOSIS . . . . . . . .
42-60
INTRODUCTION TO TRUNK LID
DIAGNOSIS . . . . . . . . . . . . . . . . . . . . . . 42-60
TRUNK LID DIAGNOSTIC
TROUBLESHOOTING STRATEGY . . . . 42-60
SYMPTOM CHART . . . . . . . . . . . . . . . . 42-60
SYMPTOM PROCEDURES . . . . . . . . . . 42-60
ON-VEHICLE SERVICE . . . . . . . . .42-61
ADJUSTMENT OF CLEARANCE
AROUND TRUNK LID . . . . . . . . . . . . . . 42-61
TRUNK LID LATCH ADJUSTMENT. . . . 42-61
TRUNK LID HEIGHT ADJUSTMENT . . . 42-62
TRUNK LID . . . . . . . . . . . . . . . . . . .42-63
REMOVAL AND INSTALLATION . . . . . . 42-63
INSPECTION . . . . . . . . . . . . . . . . . . . . . 42-65
KEYLESS ENTRY SYSTEM 42-67
GENERAL DESCRIPTION . . . . . . .
42-67
KEYLESS ENTRY SYSTEM
DIAGNOSIS . . . . . . . . . . . . . . . . . .
42-68
SPECIAL TOOL . . . . . . . . . . . . . . .42-68
ON-VEHICLE SERVICE . . . . . . . . .42-69
TRANSMITTER BATTERY CHECK . . . . 42-69
HOW TO REPLACE THE TRANSMITTER
BATTERY . . . . . . . . . . . . . . . . . . . . . . . . 42-70
KEYLESS ENTRY SYSTEM INSPECTION42-71
KEYLESS ENTRY SYSTEM TIMER LOCK
FUNCTION INSPECTION . . . . . . . . . . . 42-71
ENABLING/DISABLING THE
ANSWERBACK FUNCTION . . . . . . . . . 42-72
HOW TO REGISTER SECRET CODE . 42-73
Continued on next page
Page 1071 of 1500
HOOD
BODY42-4
HOOD
BODY DIAGNOSIS
INTRODUCTION TO HOOD DIAGNOSISM1421005800363
Wind noise at the hood may be caused by improper
hood adjustment.
HOOD DIAGNOSTIC TROUBLESHOOTING STRATEGYM1421005900337
Use these steps to plan your diagnostic strategy. If
you follow them carefully, you will be sure that you
have exhausted most of the possible ways to find a
hood fault.
1. Gather information from the customer.2. Verify that the condition described by the
customer exists.
3. Find the malfunction by following the Symptom
Chart.
4. Verify malfunction is eliminated.
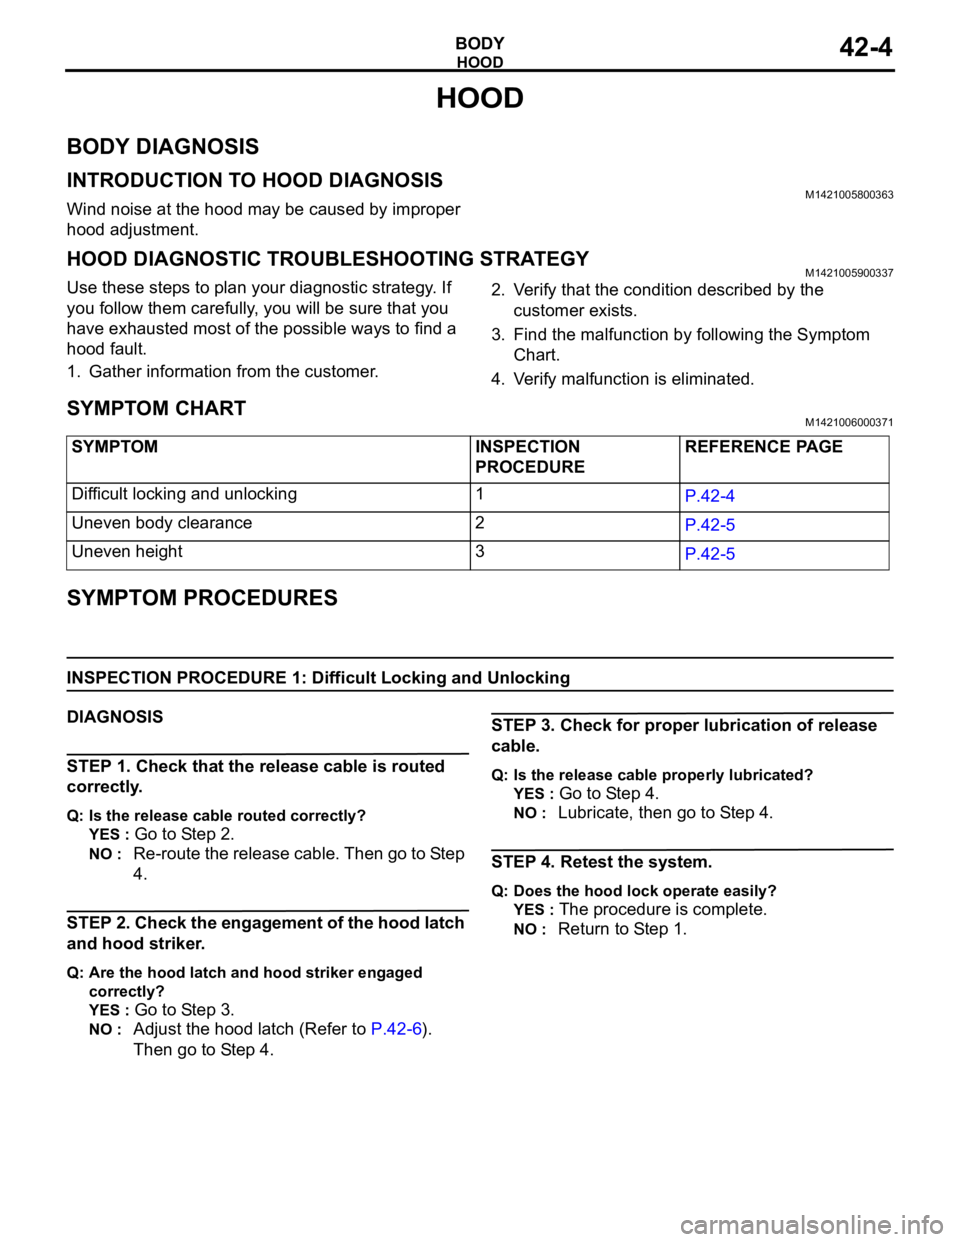
SYMPTOM CHARTM1421006000371
SYMPTOM PROCEDURES
INSPECTION PROCEDURE 1: Difficult Locking and Unlocking
DIAGNOSIS
STEP 1. Check that the release cable is routed
correctly.
Q: Is the release cable routed correctly?
YES :
Go to Step 2.
NO : Re-route the release cable. Then go to Step
4.
STEP 2. Check the engagement of the hood latch
and hood striker.
Q: Are the hood latch and hood striker engaged
correctly?
YES :
Go to Step 3.
NO : Adjust the hood latch (Refer to P.42-6).
Then go to Step 4.
STEP 3. Check for proper lubrication of release
cable.
Q: Is the release cable properly lubricated?
YES :
Go to Step 4.
NO : Lubricate, then go to Step 4.
STEP 4. Retest the system.
Q: Does the hood lock operate easily?
YES :
The procedure is complete.
NO : Return to Step 1. SYMPTOM INSPECTION
PROCEDUREREFERENCE PAGE
Difficult locking and unlocking 1
P.42-4
Uneven body clearance 2
P.42-5
Uneven height 3
P.42-5
Page 1074 of 1500
HOOD
BODY42-7
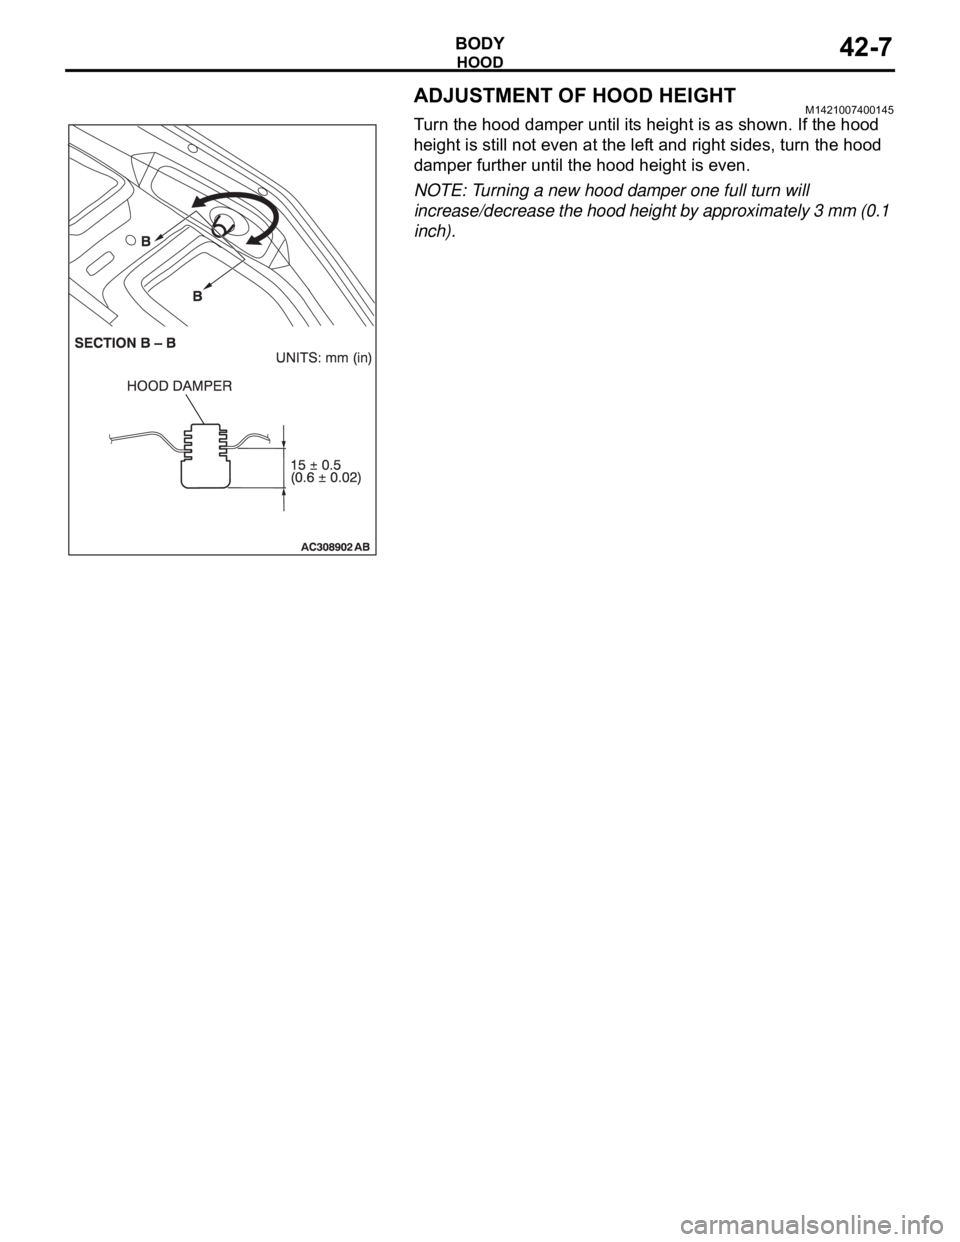
ADJUSTMENT OF HOOD HEIGHTM1421007400145
Turn the hood damper until its height is as shown. If the hood
height is still not even at the left and right sides, turn the hood
damper further until the hood height is even.
NOTE: Turning a new hood damper one full turn will
increase/decrease the hood height by approximately 3 mm (0.1
inch).
Page 1075 of 1500
HOOD
BODY42-8
HOOD
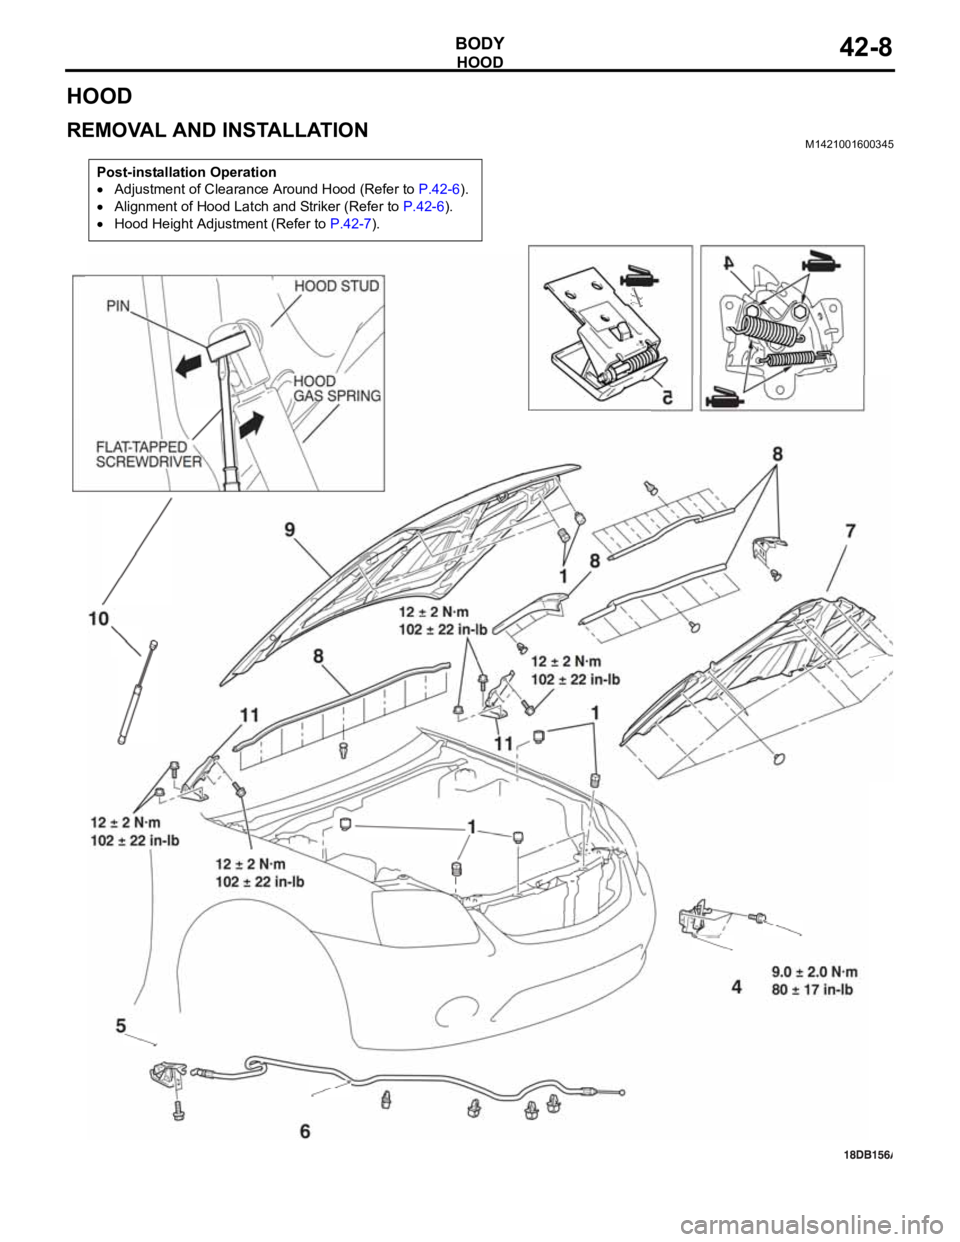
REMOVAL AND INSTALLATIONM1421001600345
Post-installation Operation
Adjustment of Clearance Around Hood (Refer to P.42-6).
Alignment of Hood Latch and Striker (Refer to P.42-6).
Hood Height Adjustment (Refer to P.42-7).
Page 1127 of 1500
TRUNK LID
BODY42-60
TRUNK LID
TRUNK LID DIAGNOSIS
INTRODUCTION TO TRUNK LID DIAGNOSISM1421005800374
Difficult locking and unlocking, uneven clearance and
height, and wind noise from the trunk lid may be
caused by improper adjustment of the trunk lid.
TRUNK LID DIAGNOSTIC TROUBLESHOOTING STRATEGYM1421005900348
Use these steps to plan your diagnostic strategy. If
you follow them carefully, you will be sure that you
have exhausted most of the possible ways to find a
trunk lid fault.
1. Gather information from the customer.2. Verify that the condition described by the
customer exists.
3. Find the malfunction by following the Symptom
Chart.
4. Verify malfunction is eliminated.
SYMPTOM CHARTM1421006000382
SYMPTOM PROCEDURES
INSPECTION PROCEDURE 1: Difficult Locking and Unlocking
DIAGNOSIS
STEP 1. Check the function of trunk lid opening
switch inside glove compartment.
Q: Can the latch unlocking mechanism noise "click"
be heard when operating the switch
YES :
Go to Step 2.
NO : Check switch circuit. Refer to P.42-65.
Then go to Step 2.
STEP 2. Check the engagement of the trunk lid
latch and trunk lid striker.
Q: Are the trunk lid latch and trunk lid striker engaged
correctly?
YES :
Then go to Step 3.
NO : Adjust the trunk lid latch. Refer to P.42-61.
STEP 3. Retest the system.
Q: Does the trunk lid lock operate easily?
YES :
The procedure is complete.
NO : Return to Step 1.
INSPECTION PROCEDURE 2: Uneven Body Clearance
DIAGNOSIS
STEP 1. Check the clearance around the trunk
lid..
Q: Are the apertures between the trunk lid and the adjacent body panels aligned correctly?
YES :
Then go to Step 2.
NO : Adjust the trunk lid panel assembly. Refer to
P.42-61. SYMPTOM INSPECTION
PROCEDUREREFERENCE PAGE
Difficult locking and unlocking 1
P.42-60
Uneven body clearance 2
P.42-60
Uneven height 3
P.42-61
Page 1128 of 1500
TRUNK LID
BODY42-61
STEP 2. Retest the system.
Q: Are the clearances between the body panels even?
YES :
The procedure is complete.
NO : Return to Step 1.
INSPECTION PROCEDURE 3: Uneven Height
DIAGNOSIS
STEP 1. Check the trunk lid bumper height.
Q: Is the trunk lid bumper height proper?
YES :
Then go to Step 2.
NO : Adjust the trunk lid bumper. Refer to
P.42-62.
STEP 2. Retest the system.
Q: Are the trunk lid and body height even?
YES :
The procedure is complete.
NO : Return to Step 1.
ON-VEHICLE SERVICE
ADJUSTMENT OF CLEARANCE AROUND TRUNK
LID
M1421008100040
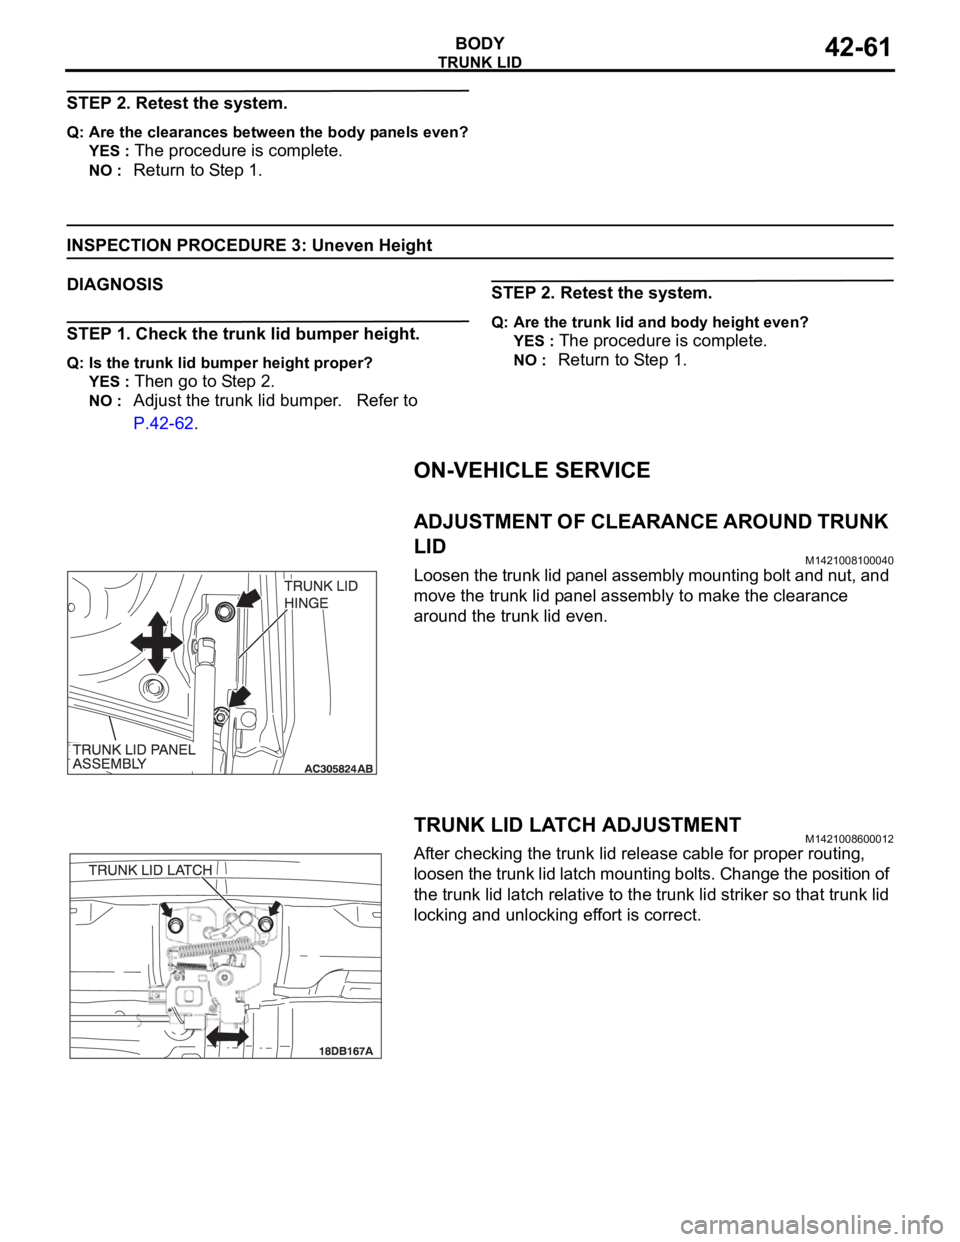
Loosen the trunk lid panel assembly mounting bolt and nut, and
move the trunk lid panel assembly to make the clearance
around the trunk lid even.
TRUNK LID LATCH ADJUSTMENTM1421008600012
After checking the trunk lid release cable for proper routing,
loosen the trunk lid latch mounting bolts. Change the position of
the trunk lid latch relative to the trunk lid striker so that trunk lid
locking and unlocking effort is correct.